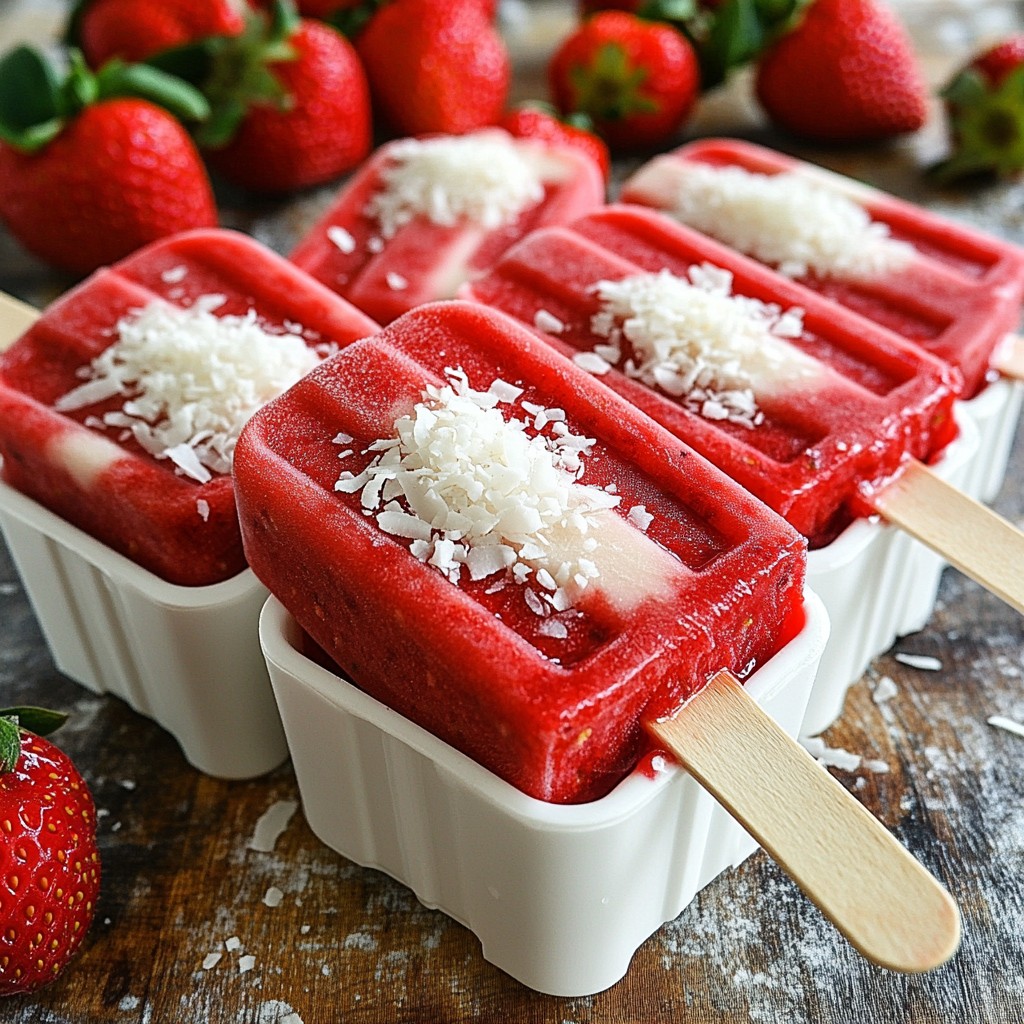
Looking for a cool treat to beat the summer heat? You’ll love these Strawberry Coconut Popsicles! With just a few simple ingredients, you can create a refreshing snack that is both delicious and easy to make. I’ll guide you through each step, from picking ripe strawberries to blending your ingredients. Let’s dive in and cool off with this tasty treat!
Why I Love This Recipe
- Refreshing Flavor: This popsicle combines the sweet juiciness of strawberries with the creamy richness of coconut, making each bite a delightful taste of summer.
- Easy to Make: The recipe comes together in just a few minutes and requires minimal ingredients, making it perfect for a quick treat.
- Healthier Option: With fresh fruit and natural sweeteners, these popsicles are a guilt-free dessert that you can feel good about enjoying.
- Customizable: Feel free to add other fruits or adjust the sweetness to your preference, ensuring that each batch is uniquely yours!
Ingredients
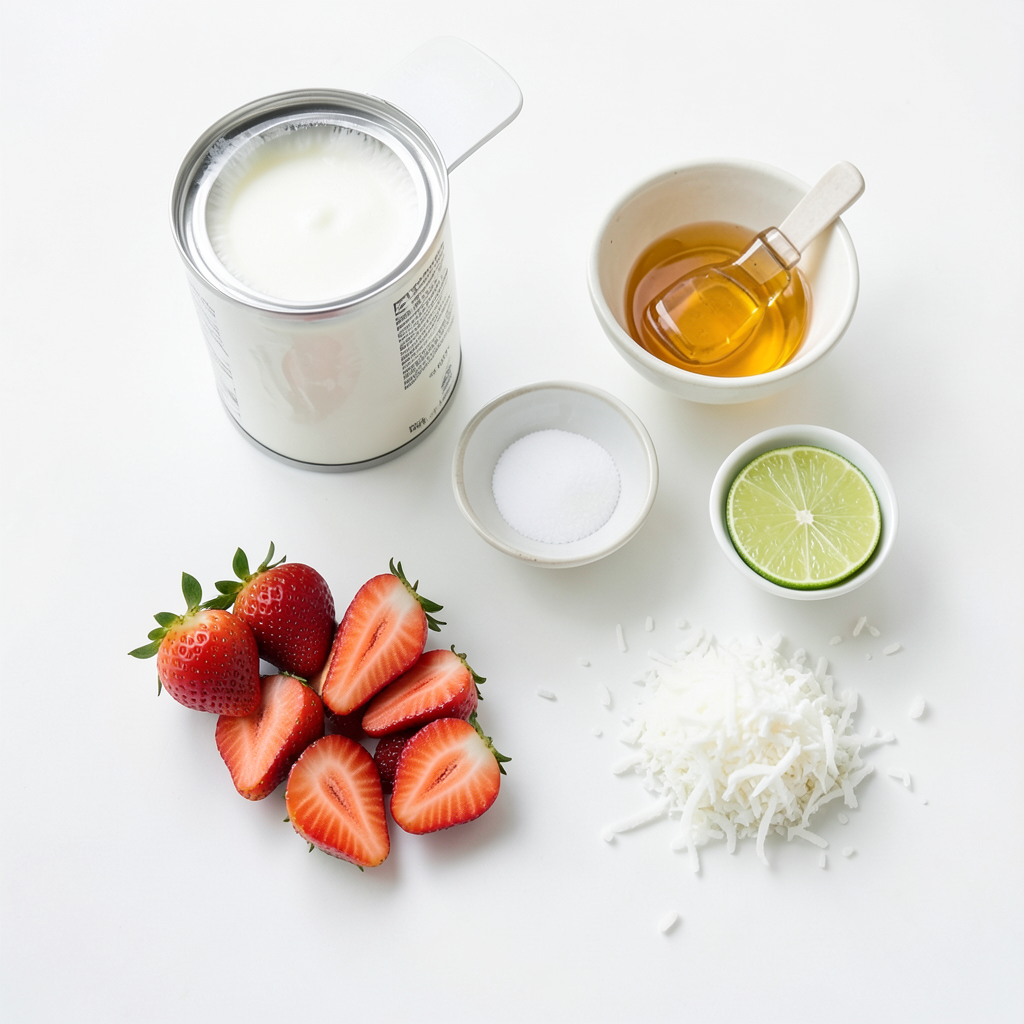
Fresh Strawberries
For these popsicles, you need 2 cups of fresh strawberries. First, wash and hull them. Slicing the strawberries helps them blend easily. Fresh strawberries give the best taste and color. They add natural sweetness and a bright, fruity flavor to your popsicles.
Coconut Milk
You will need 1 cup of coconut milk. You can use canned or carton coconut milk. Choose unsweetened to control the sweetness. Coconut milk brings a creamy texture. It also adds a nice tropical taste, pairing well with strawberries.
Sweetener Options
Add 1/4 cup of honey or agave syrup. This amount is adjustable based on your taste. If you prefer less sweetness, start with less. Honey gives a rich flavor, while agave syrup is lighter. Both options blend well with the other ingredients.
Lime Juice and Salt
You will need 1 tablespoon of fresh lime juice and a pinch of salt. Lime juice brightens the flavors. It adds a refreshing zing to the popsicles. The salt enhances the sweetness, making the fruity taste pop.
Optional Garnishes
For a fun touch, consider shredded coconut as a garnish. Rolling the popsicles in coconut adds texture. It also gives them a tropical look. You can use this garnish if you want to make your popsicles even more special.
Step-by-Step Instructions
Preparing the Strawberries
Start by washing and hulling the strawberries. Remove the green tops and slice them. Use fresh strawberries for the best flavor. You need about 2 cups of sliced strawberries.
Blending the Ingredients
In a blender, add the sliced strawberries. Pour in 1 cup of coconut milk and 1/4 cup of honey or agave syrup. Add 1 tablespoon of fresh lime juice and a pinch of salt. Blend on high until smooth. Make sure the strawberries mix well with the coconut milk. Taste the mixture and adjust the sweetness if needed.
Pouring into Molds
Take the blended mixture and pour it into the popsicle molds. Leave some space at the top so the mixture can expand as it freezes. If you want, save a few strawberry slices to fold into the mixture before pouring. This adds texture.
Freezing Process
Insert popsicle sticks into the molds. Make sure they stand straight up. Place the molds in the freezer. Freeze them for at least 4 to 6 hours. Wait until the popsicles are completely solid.
Removing Popsicles from Molds
To take the popsicles out, run warm water over the outside of the molds for a few seconds. This helps them slide out easily. If you like, roll the popsicles in shredded coconut for an extra touch before serving.
Tips & Tricks
Adjusting Sweetness
Taste your mix before freezing. If it's not sweet enough, add more honey or agave. You can always add a little at a time. Strawberries can vary in sweetness. So, adjust to your liking.
Achieving a Creamy Texture
Use full-fat coconut milk for a rich and creamy popsicle. This gives you a smooth texture. Blend the mixture until it’s fully combined. If you want chunks, add some sliced strawberries after blending. This adds nice texture and flavor.
Perfect Freezing Time
Freeze your popsicles for at least 4 to 6 hours. This ensures they become solid. If you freeze them longer, they will stay fresh. Just keep them in the freezer until you are ready to enjoy.
Serving Suggestions
For a fun twist, roll the popsicles in shredded coconut before serving. This adds crunch and looks great. Serve them with fresh fruit or a squeeze of lime for extra zing. Enjoy them on a hot day for the best refreshment!
Pro Tips
- Use Frozen Strawberries: For a creamier texture, you can use frozen strawberries instead of fresh ones. This will also help keep your popsicles colder for longer.
- Experiment with Sweeteners: Feel free to try different sweeteners like maple syrup or stevia to find the perfect balance for your taste buds.
- Add Other Fruits: You can mix in other fruits like bananas or mangoes for a unique twist on flavor and additional nutrition.
- Garnish Creatively: Don't just stick to shredded coconut; try using crushed nuts, chocolate chips, or fresh mint leaves as fun garnishes before serving.
Variations
Adding Other Fruits
You can make these popsicles even more fun by adding other fruits. Try mango, blueberries, or raspberries. Just blend them with the strawberries. You can mix and match to find your favorite flavor. The sweetness of each fruit brings a unique taste. It’s a great way to use up extra fruit.
Dairy-Free & Vegan Options
This recipe is already dairy-free thanks to coconut milk. If you want to keep it vegan, use agave syrup. This sweetener works well and is plant-based. You can also switch to almond milk or oat milk for a different twist. Both options give a nice flavor while keeping it vegan.
Flavor Infusions
Want to spice things up? You can add herbs or spices to your popsicles. Mint or basil adds a fresh taste. A pinch of cinnamon can give warmth. For a zesty touch, you can add a dash of ginger. Each infusion changes the flavor profile and makes it special. Experimenting is part of the fun!
Storage Info
How to Store Leftover Popsicles
If you have leftover popsicles, store them in the freezer. Wrap each popsicle in plastic wrap or place them in a freezer bag. Seal the bag tightly to prevent ice crystals from forming. This keeps your treats fresh and tasty.
Best Storage Containers
You can use a few types of containers. Rigid plastic containers work great. They keep popsicles safe from breaking. Silicone molds are another good option. They make it easy to pop out the treats. Just remember to cover them well to keep out air.
Freezing Duration
These popsicles can stay in the freezer for up to two months. After that, they still taste good but may lose some flavor. If you want the best taste, eat them within a month. Enjoy those refreshing strawberry coconut popsicles while they are at their best!
FAQs
Can I use frozen strawberries?
Yes, you can use frozen strawberries. They work well in this recipe. Just let them thaw a bit before blending. This gives you a smooth texture.
How long do these popsicles last in the freezer?
These popsicles can last up to two months in the freezer. Make sure to store them in a sealed container. This keeps them fresh and tasty.
What can I substitute for honey or agave?
You can use maple syrup or coconut sugar instead. Both add sweetness without changing the flavor much. Just adjust to your taste.
Can I make these popsicles without dairy?
Yes! Use coconut milk from a can or carton. Both options are dairy-free. They give the popsicles a creamy texture without any dairy.
How can I make these popsicles with a more vibrant color?
Add a few extra fresh strawberries before blending. This boosts the color and flavor. You can also use a little beet juice for a fun twist!
This guide covered everything you need for making tasty popsicles. We explored fresh strawberries, coconut milk, and sweeteners. You learned how to prepare, blend, and freeze your treats. Tips helped you adjust sweetness and ensure a creamy texture. You can even explore fun variations, like adding other fruits or going dairy-free.
Now, you can enjoy delicious, homemade popsicles any time! Remember to keep some in your freezer for a cool treat on warm days.