Are you craving a healthy snack that’s both tasty and easy to make? Let me introduce you to my Peanut Butter Chocolate Chip Granola Bars! With just a handful of simple ingredients, these bars are packed with flavor and nutrition. From the creamy peanut butter to the rich chocolate chips, every bite will satisfy your sweet tooth. Join me as I guide you through this delightful recipe so you can whip up your own batch today!
Why I Love This Recipe
- Healthy Snack Option: These granola bars are packed with wholesome ingredients, making them a nutritious choice for on-the-go snacking.
- Customizable: You can easily customize this recipe by adding your favorite nuts or seeds for an extra crunch.
- Easy to Make: With just a few simple steps, you can whip up a batch in no time, perfect for busy lifestyles.
- Deliciously Indulgent: The combination of peanut butter and dark chocolate creates a rich and satisfying treat that everyone will love.
Ingredients
Main Ingredients
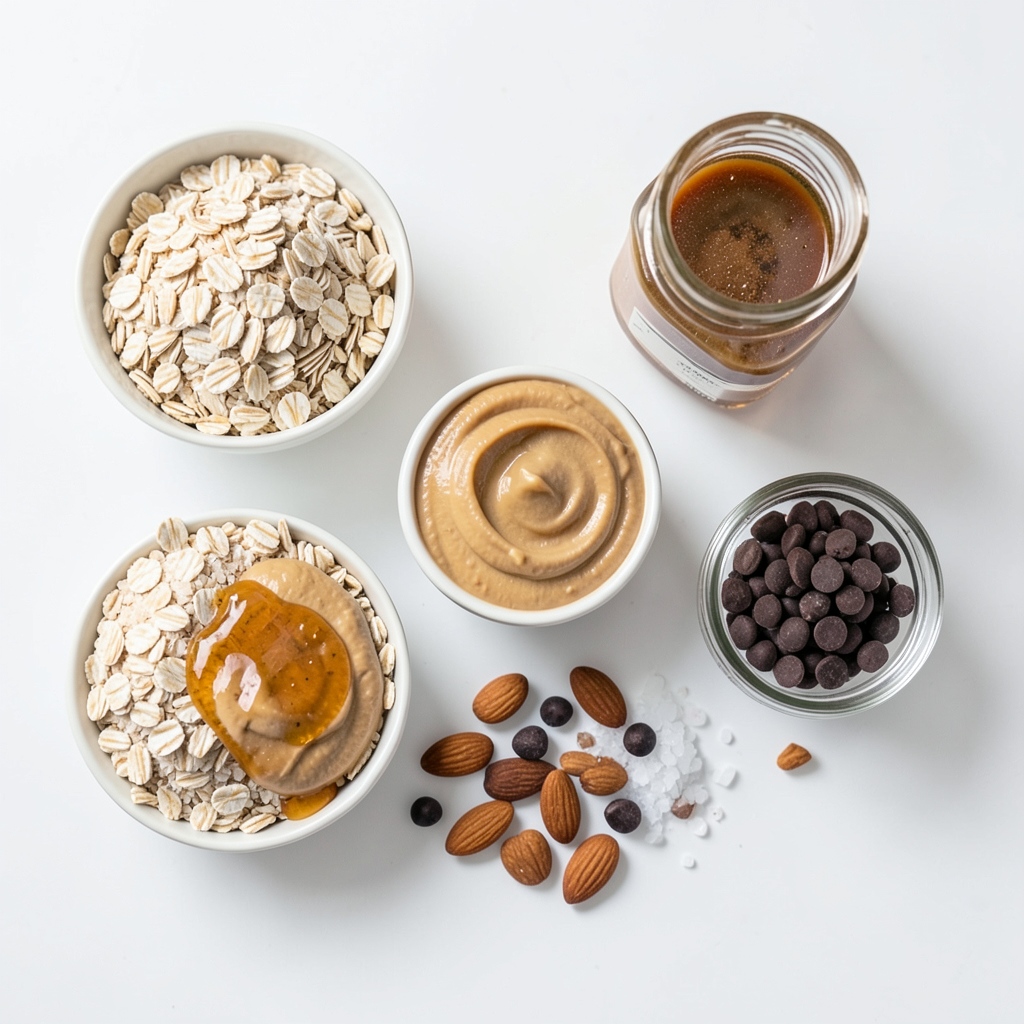
- 2 cups rolled oats
- 1/2 cup honey or maple syrup
- 1/2 cup creamy peanut butter
- 1/4 cup brown sugar
- 1/2 teaspoon vanilla extract
- 1/2 cup dark chocolate chips
- 1/4 cup chopped nuts (e.g., almonds or walnuts)
- 1/4 teaspoon sea salt
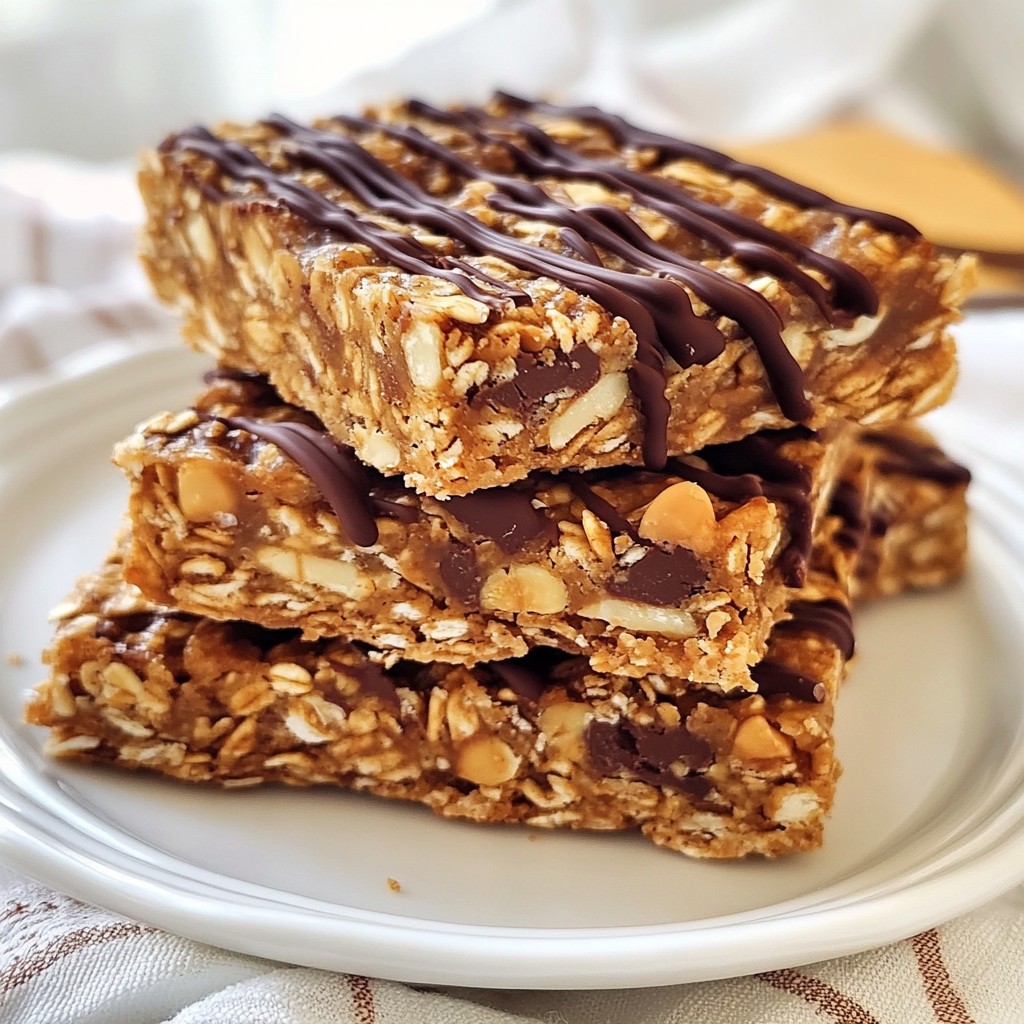
These ingredients make a tasty and chewy granola bar. The rolled oats form the base. They add fiber and texture. Honey or maple syrup gives sweetness. Creamy peanut butter adds a rich flavor and binds the bars. Brown sugar enhances sweetness and adds moisture. Vanilla extract gives a warm, inviting taste. Dark chocolate chips add a nice touch of indulgence. Chopped nuts offer a satisfying crunch. Sea salt balances the sweetness.
Recommended Tools
- 8x8-inch baking dish
- Parchment paper
- Mixing bowls
- Spatula
- Small saucepan
Using the right tools makes cooking easier. An 8x8-inch baking dish helps shape the bars. Parchment paper prevents sticking and makes cleanup easy. Mixing bowls allow for easy ingredient combining. A spatula helps mix and press the mixture down firmly. A small saucepan lets you melt the wet ingredients smoothly. With these tools, you can make perfect peanut butter chocolate chip granola bars every time!
Step-by-Step Instructions
Preparation Steps
1. Preheat the oven and prepare the baking dish: Set your oven to 350°F (175°C). Line an 8x8-inch baking dish with parchment paper. Leave some paper hanging over the edges. This will help you lift the bars out later.
2. Mix rolled oats and nuts in a bowl: In a large bowl, add 2 cups of rolled oats and 1/4 cup of chopped nuts. Stir them together until they are mixed well.
Cooking Steps
1. Combine wet ingredients over low heat: In a small saucepan, add 1/2 cup of honey or maple syrup, 1/2 cup of creamy peanut butter, 1/4 cup of brown sugar, and 1/2 teaspoon of vanilla extract. Heat this mixture on low. Stir until it melts and becomes smooth. Remove it from the heat.
2. Pour mixture and combine with dry ingredients: Pour the melted peanut butter mixture over the oats and nuts. Stir well until every oat and nut is coated.
3. Transfer and press into the baking dish: Add the mixture into the prepared baking dish. Use a spatula or your hands to press it down tightly into an even layer.
Baking and Cooling
1. Bake in the oven: Place the dish in the oven. Bake for about 20-25 minutes. Look for golden brown edges.
2. Cool and cut into bars: After baking, let the bars cool in the dish for 10-15 minutes. Use the parchment paper to lift the bars out. Move them to a cutting board. Once cool, cut them into bars of your choice.
Tips & Tricks
Perfecting the Recipe
To get the right texture in your granola bars, focus on mixing. You want the oats to blend well with the sticky peanut butter mix. Make sure to press the mixture firmly into the baking dish. This helps the bars hold together when you cut them.
Measuring ingredients is key. Use standard measuring cups for accuracy. Too much or too little of any ingredient can change the final outcome. A precise mix of oats, peanut butter, and sweetener ensures a delicious result.
Serving Suggestions
For a nice presentation, stack the bars on a plate. You can drizzle melted chocolate on top for an extra treat. Wrap individual bars in parchment paper. This makes them easy to grab for snacks on the go.
Pair these granola bars with milk or yogurt. They also taste great with a cup of coffee or tea. You can serve them with fresh fruit for a balanced snack.
Healthier Alternatives
If you want a lower-sugar option, try using mashed bananas instead of honey. Applesauce can also work well for sweetness. These alternatives keep your bars moist and tasty.
For nut-free options, try sun butter or soy nut butter. These spreads give a similar flavor without the nuts. You can also skip the nuts entirely and add seeds like pumpkin or sunflower seeds instead.
Pro Tips
- Use Natural Sweeteners: Opt for raw honey or pure maple syrup for a healthier alternative that enhances flavor.
- Customize Your Nuts: Experiment with different nuts like pecans or hazelnuts for varied textures and tastes.
- Chill Before Cutting: Refrigerate the granola bars for an hour after baking for cleaner cuts and firmer bars.
- Store Properly: Keep the bars in an airtight container at room temperature for up to a week or freeze for longer storage.
Variations
Flavor Variations
You can easily change the taste of these bars. Adding dried fruits like cranberries or raisins gives a sweet twist. You can also mix in seeds like chia or pumpkin seeds for crunch and nutrients. These changes make your granola bars unique and fun to eat.
Dietary Adjustments
If you need gluten-free options, pick gluten-free oats. They work just as well in this recipe. For a vegan twist, swap honey with maple syrup. Both options keep your bars tasty and healthy. These adjustments help you enjoy the bars no matter your diet.
Storage Info
Storing Granola Bars
To keep your peanut butter chocolate chip granola bars fresh, follow these tips:
- Cool Completely: Always let the bars cool down before storing.
- Store in Airtight Containers: Use a container with a tight lid to prevent air from entering.
- Layer with Parchment Paper: Place parchment paper between layers to avoid sticking.
For best results, store your granola bars at room temperature for up to one week. If you want to keep them longer, freezing is a great option.
Freezing Tips
To freeze your granola bars for long-term storage, follow these steps:
- Wrap Individually: Wrap each bar in parchment paper or plastic wrap.
- Use Freezer Bags: Place wrapped bars in a freezer-safe bag, removing as much air as possible.
When you want to enjoy a frozen bar, just take one out and let it thaw on the counter for about 30 minutes. You can also heat it in the microwave for a warm snack.
FAQs
Common Questions
Can I substitute almond butter for peanut butter? Yes, you can use almond butter instead of peanut butter. It gives a different flavor but works well. Just make sure it is creamy for the right texture.
How long do these granola bars last? These granola bars last up to one week at room temperature. Store them in an airtight container to keep them fresh. If you want them to last longer, you can freeze them.
Troubleshooting
Why are my granola bars falling apart? If your granola bars fall apart, they might need more binding. Try adding more honey or peanut butter. Press the mixture firmly into the pan before baking. This helps them hold together better.
What can I do if the mixture is too dry or wet? If the mixture is too dry, add a little more honey or peanut butter. If it is too wet, mix in some extra oats. This adjustment will help get the right consistency.
Nutritional Information
Caloric content per bar Each granola bar has about 150 calories. This makes them a great snack that is tasty and energizing.
Key nutritional benefits of ingredients
- Rolled oats provide fiber for digestion.
- Peanut butter adds healthy fats and protein.
- Dark chocolate is rich in antioxidants.
- Nuts offer vitamins and minerals.
These ingredients work together to create a healthy and satisfying snack.
You learned about the key ingredients and tools to make homemade granola bars. We explored step-by-step instructions, tips for perfect texture, and healthier options. Remember, small changes can make big differences. You can try different flavors, adjust for diets, and store your bars well. With these tips, you can create tasty, healthy snacks. Enjoy making your own granola bars, and share them with friends and family!