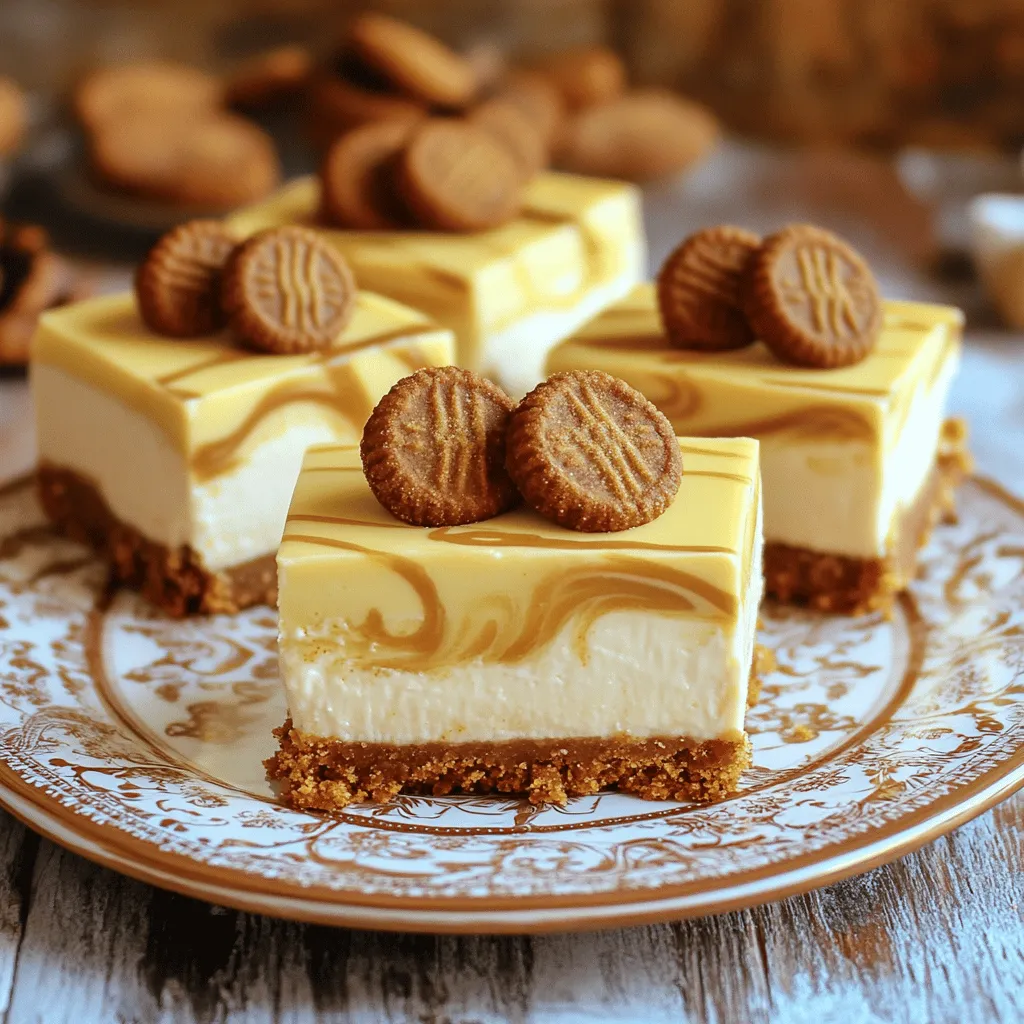
If you crave a creamy and sweet treat, you’re in for a real delight! No-bake Biscoff cheesecake bars combine rich cream cheese with the unique flavors of Biscoff cookies. You’ll enjoy the easy steps and quick prep time, making these dessert bars a fantastic choice for any gathering. Get ready to impress your family and friends with a dessert that’s both simple and scrumptious! Let’s dive into the recipe!
Ingredients
Biscoff Cookie Crust
– 1 ½ cups Biscoff cookie crumbs
– ½ cup unsalted butter, melted
Cheesecake Filling
– 2 (8 oz) packages cream cheese, softened
– 1 cup powdered sugar
– 1 teaspoon vanilla extract
– 1 cup heavy whipping cream
– ½ cup Biscoff spread
Topping
– Extra Biscoff cookies for garnish
To make these No-Bake Biscoff Cheesecake Bars, you need specific ingredients. Each one plays a key role in the flavor and texture of the dessert.
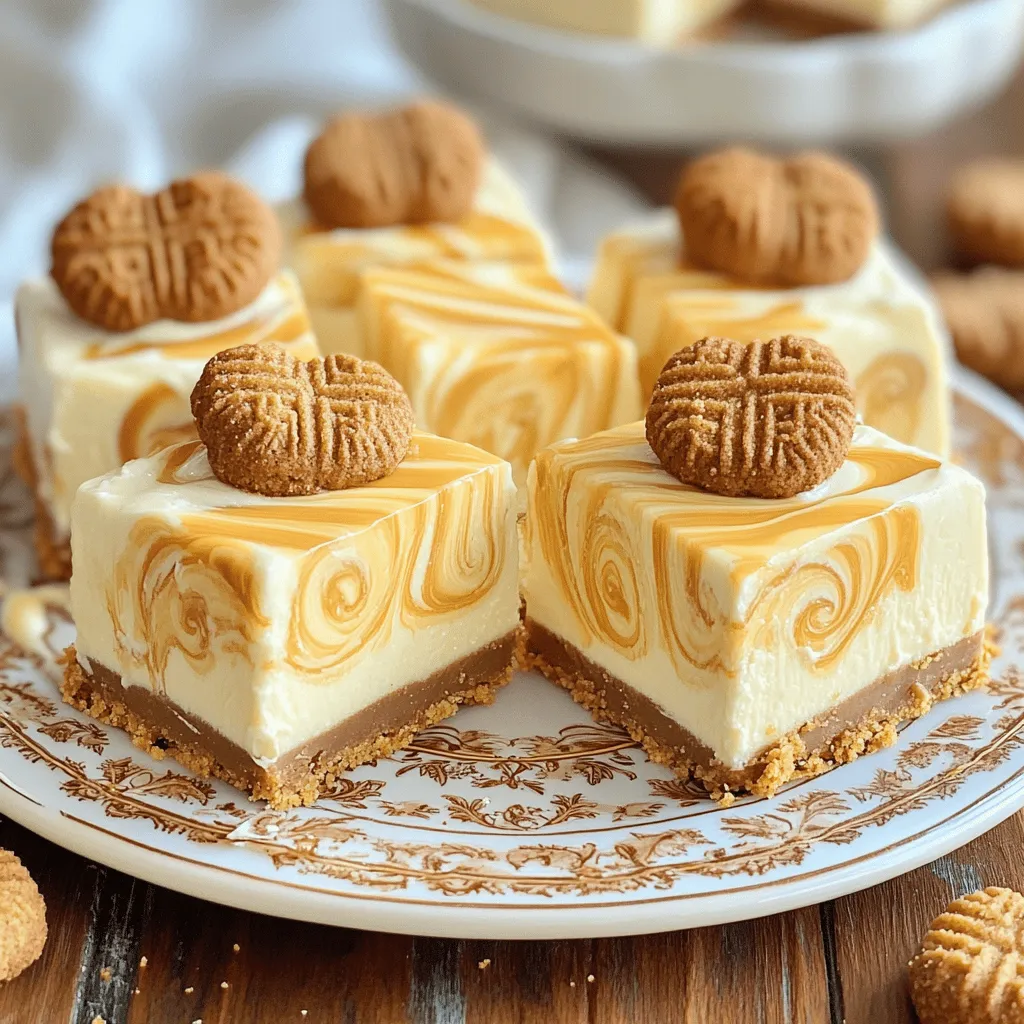
First, for the crust, I use Biscoff cookie crumbs. These crumbs provide a sweet, spicy base that pairs perfectly with the rich filling. Mixing these crumbs with melted butter gives you a firm crust that holds together well.
Next, the cheesecake filling is truly the star. Softened cream cheese creates that creamy texture we love. Adding powdered sugar sweetens the mix, while vanilla extract adds a warm flavor. The heavy cream is crucial because whipping it gives volume and lightness. Finally, the Biscoff spread adds depth, giving a hint of caramel and spice.
For the topping, I like to use extra Biscoff cookies. They not only add a nice crunch but also make the dessert look stunning. This simple touch makes each square even more inviting.
With these ingredients ready, you can create an unforgettable dessert that everyone will love.
Step-by-Step Instructions
Preparing the Crust
1. Combine 1 ½ cups of Biscoff cookie crumbs and ½ cup of melted butter in a bowl.
2. Stir until the mixture looks like wet sand.
3. Press this mixture firmly into the bottom of a lined 9×9-inch baking pan.
4. Refrigerate for 15 minutes to let the crust set.
Making the Cheesecake Filling
1. In a large bowl, beat 2 packages (8 oz each) of softened cream cheese until smooth, about 2 minutes.
2. Gradually add 1 cup of powdered sugar and 1 teaspoon of vanilla extract. Mix until well combined.
3. In a separate bowl, whip 1 cup of heavy cream until stiff peaks form.
4. Gently fold the whipped cream into the cream cheese mixture until fully blended.
Assembly and Setting
1. Swirl in ½ cup of Biscoff spread gently for a marbled look.
2. Pour the cheesecake mixture over the chilled crust and smooth the top with a spatula.
3. Refrigerate for at least 4 hours, or until set.
Tips & Tricks
Ensuring the Perfect Texture
To get smooth cream cheese, make sure it’s softened. Take it out of the fridge ahead of time. This helps it blend well. Beat it for about two minutes. You want it creamy, with no lumps.
Whipped cream needs stiff peaks for the best results. This means it should hold its shape well. To whip it, use a clean bowl and beaters. Start on low speed, then go faster. Stop when it looks fluffy and firm.
Presentation Tips
For an elegant touch, serve the cheesecake bars on a nice plate. You can also drizzle extra Biscoff spread on top. This adds a beautiful look. Plus, it gives more flavor.
Use a squeeze bottle for easy drizzling. You can also add a sprinkle of cookie crumbs on top. This makes it look even nicer and adds some crunch.
Making Ahead
You can prepare this dessert in advance. It stays fresh in the fridge. Make it a day ahead for the best taste. Just follow the recipe and chill it well.
Store it in an airtight container after it sets. This keeps it from drying out. If you want, you can cut it into squares before serving. This makes it easy for guests to grab and enjoy!
Variations
Flavor Additions
You can easily change the taste of your cheesecake bars. Adding chocolate is a great choice. Try folding in mini chocolate chips or using chocolate cookies for the crust. For a fruity twist, top your cheesecake bars with fresh berries. Strawberries, blueberries, or raspberries add a nice burst of flavor. You can also drizzle melted chocolate or caramel sauce on top for extra sweetness.
Gluten-Free Options
If you want a gluten-free version, it’s simple! Just swap out regular Biscoff cookies for gluten-free cookies. There are many tasty options available now. Look for brands that offer gluten-free cookie varieties. This way, everyone can enjoy these delicious bars without worry.
Mini Cheesecake Bars
Making mini cheesecake bars is a fun idea! You can use a muffin tin instead of a baking pan. Just press the cookie crumb mixture into the bottom of each cup. Pour in the cheesecake filling, then chill until set. Once ready, pop them out and serve. These mini bars are perfect for parties or special events.
Storage Info
Recommended Storage Methods
To keep your No-Bake Biscoff Cheesecake Bars fresh, store them in the refrigerator. You should place them in a well-sealed container. This helps keep moisture out and flavors in. I suggest using an airtight container. This way, they stay creamy and delicious for days.
Freezing Instructions
Yes, you can freeze cheesecake bars! To freeze, cut the bars into squares first. Wrap each square tightly in plastic wrap. Then, place them in a freezer-safe bag. This helps prevent freezer burn. They can last up to three months in the freezer. When you want to enjoy them, let them thaw in the fridge overnight. This way, they stay tasty and smooth.
FAQs
What are Biscoff cookies?
Biscoff cookies are crunchy, spiced cookies. They have a rich caramel flavor. These cookies are often served with coffee. They give a sweet, warm taste that pairs well with desserts. Biscoff cookies are made with simple ingredients like flour, sugar, and spices. The unique taste comes from the caramelization of sugar during baking. Their delightful crunch adds a nice texture to many recipes.
Can I use different kinds of cream cheese?
Yes, you can use different cream cheese types. Neufchâtel cheese is a great low-fat option. Mascarpone adds a rich and creamy texture. You can also try flavored cream cheese for a twist. Just make sure it’s softened for easy mixing. Each option will change the taste a bit but will still be yummy.
How long can I keep leftover cheesecake bars?
You can keep leftover cheesecake bars for about 4 to 5 days. Store them in the fridge for the best taste. Use an airtight container to keep them fresh. If you want to keep them longer, you can freeze them. Wrap each bar in plastic wrap and place them in a freezer bag. They can last for up to 3 months in the freezer.
This guide shared a simple way to make a Biscoff cheesecake. We covered the crust, filling, and topping, which make the dessert amazing. You learned about tips for perfect texture and presentation. Plus, we’ve discussed fun variations and storage tips.
Enjoy each creamy bite of your cheesecake creation. Homemade desserts like this not only taste great, but they also impress guests. Keep exploring different flavors to make it your own. The kitchen is your canvas—get creative!