Are you ready to experience a burst of flavor with Mediterranean Quinoa Stuffed Peppers? This dish combines vibrant veggies, protein-rich quinoa, and aromatic spices, making it a perfect meal for any occasion. Not only is it easy to prepare, but it also fits various dietary needs. Join me as we transform simple bell peppers into a savory delight that will impress your family and friends! Let’s dive into the delicious details!
Why I Love This Recipe
- Healthy and Nutritious: This recipe is packed with protein-rich quinoa, fiber-filled chickpeas, and fresh vegetables, making it a wholesome meal option.
- Vibrant and Colorful: The mix of colorful bell peppers and fresh tomatoes creates an eye-catching dish that is sure to impress your guests.
- Easy to Prepare: With simple steps and minimal prep time, this recipe is perfect for busy weeknights or meal prep.
- Customizable: You can easily swap out ingredients based on your preferences or what you have on hand, making it versatile for any taste.
Ingredients
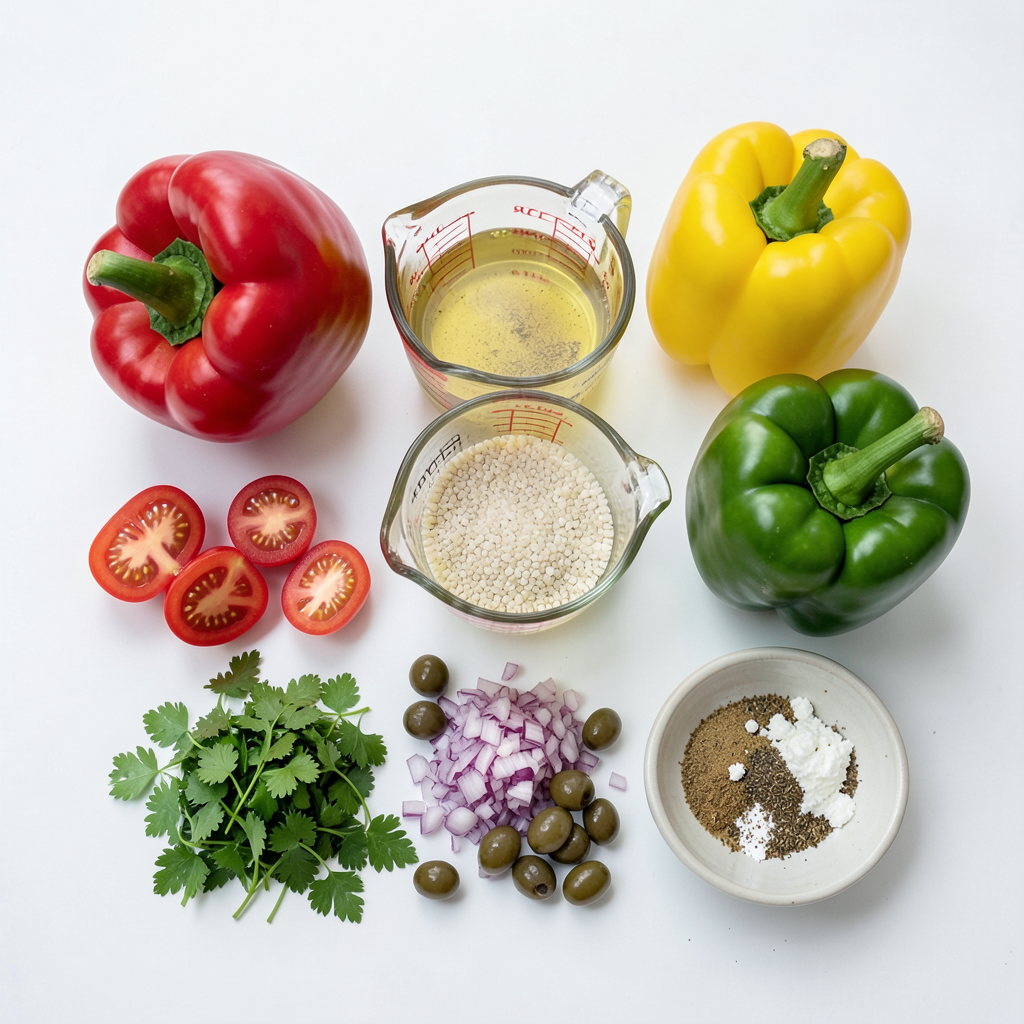
List of Ingredients
- 4 large bell peppers (red, yellow, or green)
- 1 cup quinoa, rinsed
- 2 cups vegetable broth
- 1 cup cherry tomatoes, halved
- 1 cup canned chickpeas, drained and rinsed
- 1/2 cup red onion, finely chopped
- 1/2 cup kalamata olives, pitted and sliced
- 1/4 cup feta cheese, crumbled
- 2 tablespoons olive oil
- 2 tablespoons fresh parsley, chopped
- 1 teaspoon dried oregano
- Salt and pepper to taste
Nutritional Information
Each serving provides a good balance of nutrients. This dish is rich in fiber from quinoa and chickpeas. The peppers add vitamins A and C. Feta cheese brings calcium, while olives offer healthy fats. Overall, this meal is hearty and satisfying.
Possible Dietary Restrictions
This recipe is vegetarian and can be made vegan by omitting feta cheese. It contains gluten-free ingredients, making it suitable for those with gluten sensitivity. Always check labels for chickpeas and broth to ensure they meet specific dietary needs.
Step-by-Step Instructions
Preparation of Bell Peppers
Start by preheating your oven to 375°F (190°C). Take the large bell peppers and cut off the tops. Make sure to remove all seeds and membranes. Drizzle a bit of olive oil on the outside. Sprinkle some salt and pepper for flavor. Next, place the peppers upright in a baking dish. This helps them hold the filling well.
Cooking Quinoa
In a medium pot, bring 2 cups of vegetable broth to a boil. Add 1 cup of rinsed quinoa. Once it boils, reduce the heat to low. Cover the pot and let it simmer for about 15 minutes. The quinoa will absorb all the liquid and become fluffy. This step is key for a tasty filling.
Combining and Stuffing the Filling
In a large mixing bowl, combine the cooked quinoa with the other ingredients. Add 1 cup of halved cherry tomatoes, 1 cup of drained chickpeas, and 1/2 cup of finely chopped red onion. Toss in 1/2 cup of sliced kalamata olives and 1/4 cup of crumbled feta cheese. Drizzle 2 tablespoons of olive oil over the mix. Add 2 tablespoons of chopped fresh parsley and 1 teaspoon of dried oregano. Season with salt and pepper to your liking. Gently mix everything together. Then, carefully spoon the filling into each bell pepper. Press down gently to pack it in.
Baking Instructions
Cover the baking dish with aluminum foil. Bake the stuffed peppers in the oven for 30 minutes. After that, remove the foil. Bake for an additional 10 to 15 minutes. This helps the peppers become tender and the top to brown slightly. Once done, take them out of the oven and let them cool for a few minutes before serving. Enjoy your Mediterranean quinoa stuffed peppers!
Tips & Tricks
How to Choose the Right Bell Peppers
When picking bell peppers, look for bright colors. Red, yellow, or green peppers all work well. They should feel firm and heavy for their size. Avoid any with soft spots or wrinkles. Fresh peppers will give your dish the best taste.
Ways to Enhance Flavor
To boost flavor, use fresh herbs like parsley. You can also add garlic for a nice kick. Lemon juice adds zest and brightness. Try different cheeses like goat cheese for unique flavors. Adding a dash of spice, like red pepper flakes, gives a fun heat.
Serving Suggestions
Serve these stuffed peppers on a large white platter. Drizzle extra virgin olive oil over them for a rich finish. Garnish with more fresh parsley for color. Pair with a crisp salad or some warm pita bread. These sides complement the flavors well and make your meal complete.
Pro Tips
- Choose Colorful Peppers: Using a mix of colored bell peppers not only makes your dish visually appealing but also adds a variety of flavors and nutrients.
- Perfectly Cooked Quinoa: To achieve fluffy quinoa, make sure to rinse it thoroughly before cooking to remove any bitterness from saponins.
- Customize the Filling: Feel free to add other vegetables or proteins like spinach or grilled chicken to the filling for extra flavor and nutrition.
- Serving Suggestion: Serve the stuffed peppers with a side salad or yogurt sauce to balance the flavors and add a refreshing touch.
Variations
Protein Additions
You can add protein to your Mediterranean quinoa stuffed peppers. Chicken or turkey breast works well. Just cook the meat in a pan before mixing it with the quinoa. You can also use ground beef or lamb for a robust flavor. For a plant-based option, tempeh or tofu can be great choices. Just crumble or dice them, and sauté before adding.
Dairy-Free Adaptations
Making these stuffed peppers dairy-free is easy. Simply skip the feta cheese or replace it with a dairy-free version. Nutritional yeast gives a cheesy flavor without dairy. You can also use avocado for creaminess. It adds healthy fats and a unique taste to your dish.
Spicy Options
If you like heat, add some spice! Diced jalapeños or red pepper flakes can give your dish a kick. Mix them into the quinoa filling. For an extra layer of flavor, consider a drizzle of sriracha on top before serving. This adds both heat and a nice color to your presentation.
Storage Info
How to Store Leftovers
After enjoying your Mediterranean quinoa stuffed peppers, store any leftovers in an airtight container. Make sure they cool down first. Place the container in the fridge. They will stay fresh for about three to four days. If you want to keep them longer, freezing is a good option.
Reheating Instructions
When you are ready to eat, reheating is simple. You can use the microwave or oven. For the microwave, place the stuffed pepper on a microwave-safe plate. Heat for about 2-3 minutes. If using the oven, preheat it to 350°F (175°C). Cover the peppers with foil and bake for around 15-20 minutes. This keeps them moist.
Freezing Options
To freeze your stuffed peppers, wrap each one in plastic wrap. Then, place them in a freezer bag. Make sure to remove as much air as possible. They can last up to three months in the freezer. When you want to eat them, thaw them in the fridge overnight before reheating. This keeps the flavors intact and delicious.
FAQs
Can I use different grains instead of quinoa?
Yes, you can use other grains. Brown rice, farro, or couscous work well. These grains can add unique textures and flavors. Just cook them according to package instructions before mixing with the filling.
How can I make this recipe vegan?
To make this dish vegan, skip the feta cheese. Use a vegan cheese alternative or omit cheese entirely. You can add nutritional yeast for a cheesy flavor. Make sure your vegetable broth is vegan, too.
What can I substitute for feta cheese?
If you don't have feta, try goat cheese or ricotta. For a vegan option, use tofu or a nut-based cheese. Each substitute will change the taste, but they will still be tasty.
How long do these stuffed peppers last in the fridge?
These stuffed peppers can last up to five days in the fridge. Store them in an airtight container. Reheat them in the oven or microwave when you're ready to eat.
This blog explored stuffed bell peppers. You learned about key ingredients, their nutrition, and dietary needs. I shared simple steps for preparation and cooking, along with essential tips to boost flavor. You discovered various healthy options and storage methods. Finally, I answered common questions about ingredients and shelf life. Enjoying this dish is easy and fun. Feel free to make it your own with different flavors and tweaks. Happy cooking!