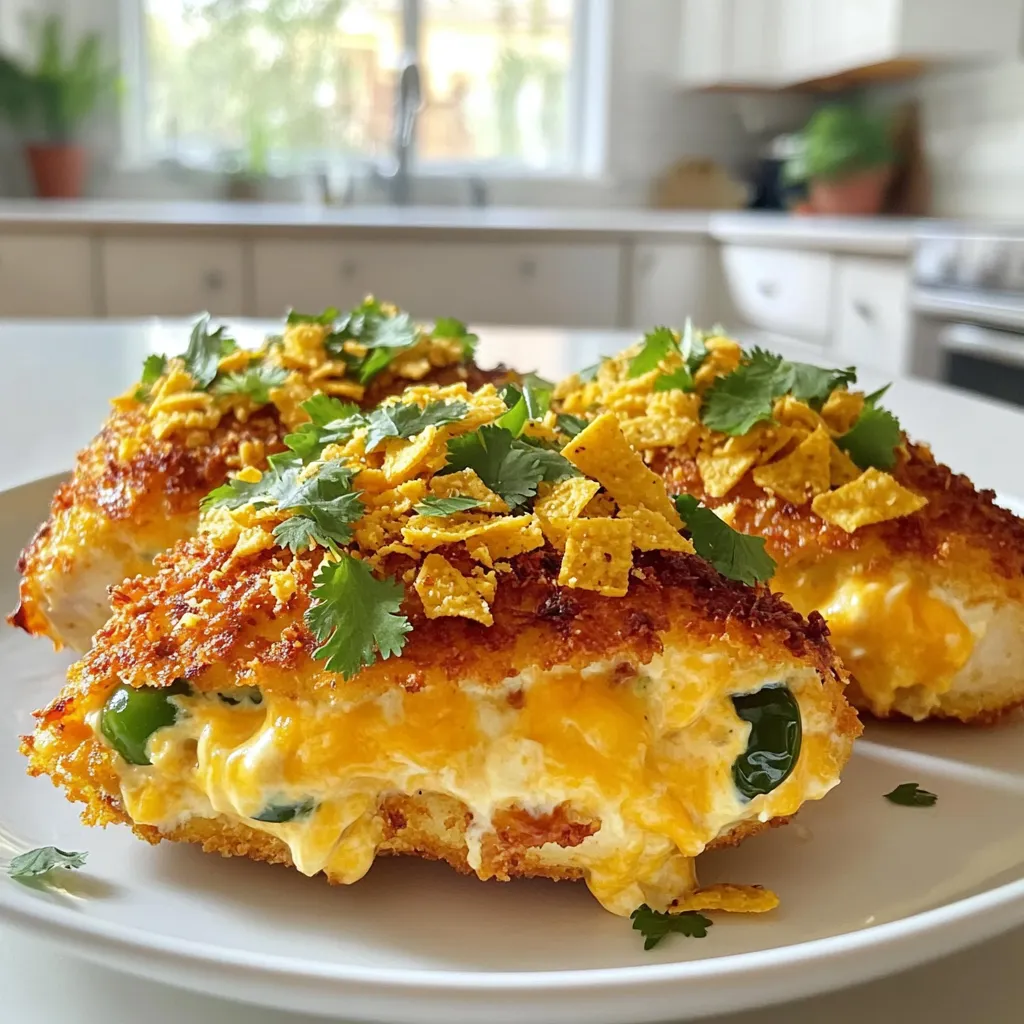
Looking for a tasty dinner that combines bold flavors with easy prep? Jalapeño Popper Stuffed Chicken is your answer! This dish offers a mouthwatering mix of cream cheese, cheese, and spice, all wrapped in juicy chicken. Whether you’re cooking for a family dinner or impressing guests, this recipe is sure to delight. Let’s dive into the ingredients and how to make this delicious meal that everyone will love!
Ingredients
List of Ingredients Required
For this tasty dish, you will need:
– 4 boneless, skinless chicken breasts
– 1 cup cream cheese, softened
– 1 cup shredded cheddar cheese
– 1/2 cup diced jalapeños (fresh or pickled)
– 1/2 cup crushed tortilla chips (plus extra for topping)
– 1 tablespoon garlic powder
– 1 teaspoon onion powder
– Salt and pepper to taste
– 1 tablespoon olive oil
– Fresh cilantro, chopped (for garnish)
Optional Ingredients for Customization
You can change this recipe to suit your taste. Try adding:
– Bacon bits for a smoky flavor
– Different cheese, like pepper jack, for extra heat
– Green onions for a fresh crunch
– Lime juice for a zesty kick
Recommended Brands or Substitutes for Key Ingredients
When picking ingredients, I have some favorites:
– For cream cheese, Philadelphia is a popular choice.
– Use Tillamook or Kraft for sharp cheddar cheese.
– If you can’t find fresh jalapeños, jarred ones can work well too.
– For tortilla chips, look for brands like Tostitos or Mission for good crunch.
These ingredients will help you create a delicious Jalapeño Popper Stuffed Chicken that everyone will love!
Step-by-Step Instructions
Preparation Steps
1. Start by preheating your oven to 375°F (190°C). This step warms up your oven for even cooking.
2. In a mixing bowl, combine the cream cheese, shredded cheddar cheese, and diced jalapeños.
3. Add in the crushed tortilla chips, garlic powder, onion powder, salt, and pepper. Mix until smooth.
4. With a sharp knife, slice each chicken breast to create a pocket. Make sure not to cut all the way through.
5. Generously stuff each chicken breast with the creamy jalapeño mixture. Spread it evenly for the best flavor.
6. Use toothpicks to seal any openings if needed. This keeps the filling inside while cooking.
Cooking Process in Detail
1. Heat olive oil in a large oven-safe skillet over medium-high heat. This helps to brown the chicken nicely.
2. Sear each stuffed chicken breast for about 4-5 minutes on each side. Look for a golden brown color.
3. Once browned, transfer the skillet to the preheated oven. Bake for 20-25 minutes.
4. Check that the chicken reaches an internal temperature of 165°F (75°C) for safety.
5. For a crunchy topping, sprinkle more crushed tortilla chips on in the last 5 minutes of baking.
6. After baking, let the chicken rest for 5 minutes. This helps keep it juicy when you slice it.
Serving Suggestions
1. Serve your stuffed chicken on a rustic wooden board or a white platter for a nice look.
2. Drizzle extra cream cheese or salsa on top for added flavor.
3. Place lime wedges around for a fresh touch. These flavors work well together.
4. Garnish with chopped cilantro for a burst of color and freshness. Enjoy your tasty dinner delight!
Tips & Tricks
Best Practices for Stuffing Chicken
To stuff chicken well, make sure to create a good pocket. Use a sharp knife and slice each chicken breast carefully. Avoid cutting all the way through. This keeps the filling inside. Fill each pocket generously but avoid overstuffing. Too much filling can leak out during cooking. Secure the openings with toothpicks if needed. It helps keep everything in place.
How to Achieve the Perfect Cooked Chicken
To cook chicken perfectly, sear it first. Heat olive oil in your skillet over medium-high heat. Sear each stuffed breast for about 4-5 minutes per side. Look for a golden brown color. After searing, bake the chicken in the oven at 375°F (190°C). Bake for 20-25 minutes. Check the internal temperature; it should reach 165°F (75°C). Let the chicken rest for about 5 minutes before slicing. This step keeps it juicy.
Presentation Tips for Serving
For a stunning presentation, use a rustic wooden board or a white platter. Drizzle some extra cream cheese or salsa on top for flair. Place lime wedges around the chicken for a fresh touch. Garnish with chopped fresh cilantro. This adds color and flavor. Don’t forget to sprinkle extra crushed tortilla chips on top for a crunchy finish.

Variations
Spicy & Mild Versions
You can easily adjust the heat level in Jalapeño Popper Stuffed Chicken. For a spicy version, use fresh jalapeños and add some crushed red pepper flakes. If you prefer it milder, you can use pickled jalapeños instead. Removing the seeds will also make it less hot. You can even swap jalapeños for sweet bell peppers if you want a sweet twist. This way, everyone can enjoy their meal!
Alternative Fillings or Toppings
Get creative with the filling! Try adding cooked bacon bits for extra crunch and flavor. You can also mix in some spinach or chopped herbs for freshness. For toppings, consider using different types of cheese. Mozzarella or pepper jack cheese can add a nice twist. You can even experiment with different chips, like nacho chips or pita chips, for the topping. This makes the dish fun and unique every time you make it.
Dietary Modifications (Gluten-Free, Low-Carb)
If you need a gluten-free option, use gluten-free tortilla chips. This will keep the crunch without the gluten. For a low-carb version, you can skip the chips altogether and use crushed nuts instead. Almonds or pecans work well. You can also serve the stuffed chicken over a bed of leafy greens instead of rice or bread. This keeps your meal light yet satisfying.
Storage Info
How to Store Leftovers Properly
To keep your leftovers fresh, place them in an airtight container. Make sure the chicken is cool before sealing. Store the container in the fridge. It stays good for about 3 to 4 days. When you’re ready to eat, check for any signs of spoilage.
Reheating Instructions for Best Results
For the best taste, reheat your chicken in the oven. Preheat it to 350°F (175°C). Place the chicken in a baking dish. Cover it with foil to prevent drying. Heat for about 15 to 20 minutes. You can also use a microwave, but the oven gives better flavor and texture.
Freezing Tips for Future Meals
If you want to save some for later, freeze the stuffed chicken. Wrap each piece tightly in plastic wrap. Then, place them in a freezer bag or airtight container. They can last up to 3 months in the freezer. When you’re ready to enjoy them, thaw in the fridge overnight before reheating.
FAQs
Can I make Jalapeño Popper Stuffed Chicken ahead of time?
Yes, you can prepare Jalapeño Popper Stuffed Chicken in advance. Stuff the chicken breasts and store them in the fridge for up to a day. This makes dinner easy on busy nights. Just remember to let them sit at room temperature for about 15 minutes before cooking. This helps them cook evenly.
What sides pair well with Jalapeño Popper Stuffed Chicken?
Many sides work well with this dish. Here are some tasty options:
– Mexican rice: It adds a nice texture and flavor.
– Black beans: Packed with protein, they balance the meal.
– Grilled corn: Sweet and crunchy, it complements the spicy chicken.
– Fresh salad: A simple green salad adds freshness.
– Roasted vegetables: They provide a great mix of colors and tastes.
These sides enhance the meal and make it more satisfying.
How can I make this recipe in an air fryer?
To make Jalapeño Popper Stuffed Chicken in an air fryer, follow these steps:
1. Preheat your air fryer to 375°F (190°C).
2. Prepare the chicken as usual, stuffing it with the jalapeño mixture.
3. Lightly coat the chicken with olive oil to help it crisp.
4. Place the stuffed chicken in the air fryer basket.
5. Cook for about 15-20 minutes or until the chicken reaches 165°F (75°C).
6. Check for doneness and adjust the time if needed.
Using an air fryer gives you a crispy outside and juicy inside. It’s a quick and fun way to enjoy this dish!
You learned about making Jalapeño Popper Stuffed Chicken. We covered the ingredients you’ll need and some optional ones for your taste. I also shared detailed steps for preparation and cooking. Plus, tips for perfect results and creative variations.
Finally, we discussed how to store and reheat leftovers. Enjoy this tasty dish any day, and feel free to explore different flavors. You’ll impress your friends and family with your new cooking skills! Happy cooking!