Are you ready to impress your guests with a simple, flavorful treat? This Garlic Herb Feta Dip combines creamy feta, tangy yogurt, and bold garlic for a tasty bite. It’s perfect for dipping fresh veggies or pita chips. In this post, I'll walk you through the easy steps to make this crowd-pleaser. Get your ingredients ready, and let’s make a dip you’ll want at every gathering!
Why I Love This Recipe
- Easy to Make: This dip comes together in just 10 minutes, making it a quick and convenient option for gatherings or snack time.
- Flavorful Combination: The blend of feta, cream cheese, and herbs creates a rich and delicious flavor that is sure to impress your guests.
- Versatile Serving Options: Enjoy this dip with fresh veggies or pita chips, making it a healthy choice for any occasion.
- Make Ahead: Prepare it in advance and let it chill in the fridge, allowing the flavors to meld for a more intense taste.
Ingredients
Main Ingredients
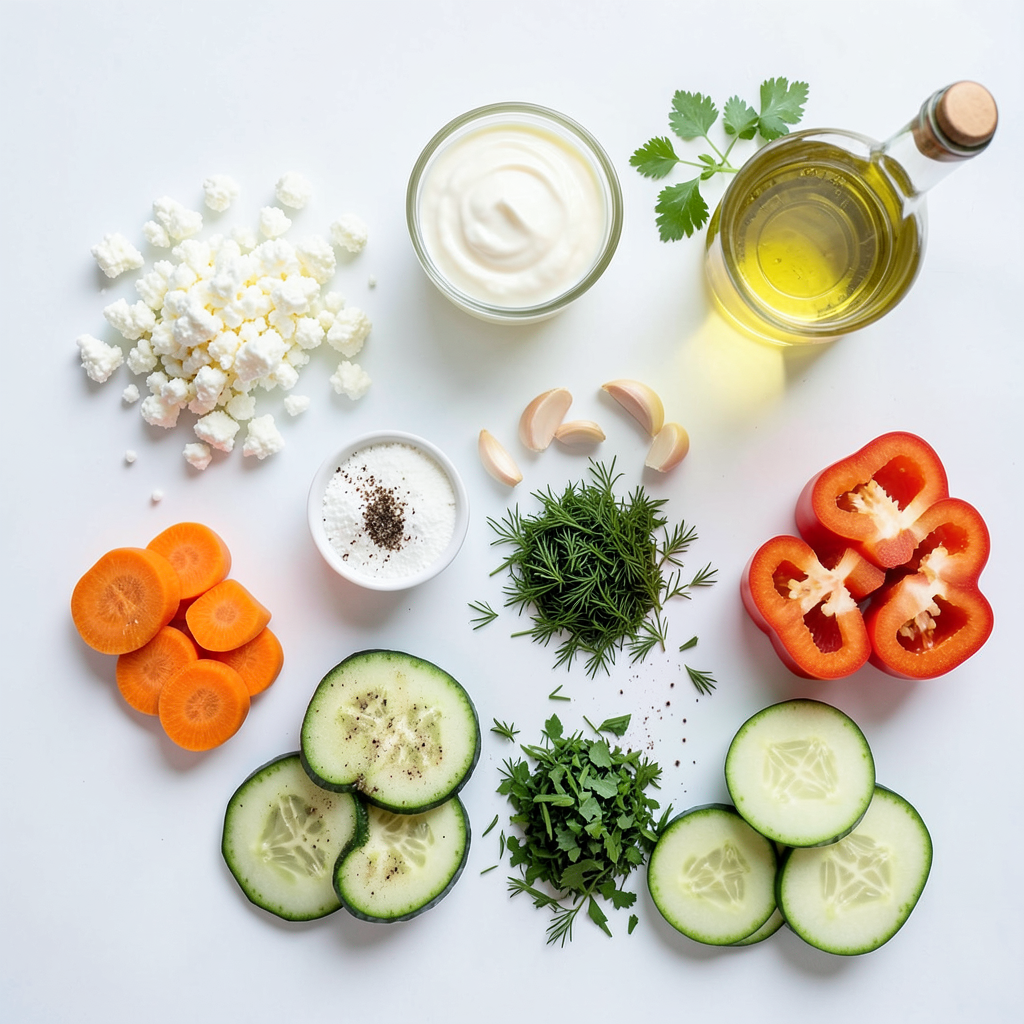
- 1 cup feta cheese, crumbled
- 1/2 cup cream cheese, softened
- 2 tablespoons Greek yogurt
- 2 cloves garlic, minced
The main stars of this dip are the cheeses and garlic. Feta cheese brings a salty, tangy flavor. Cream cheese adds creaminess and smoothness. Greek yogurt gives it a slight tang and makes it lighter. Garlic adds a bold punch that wakes up the taste buds.
Fresh Herbs and Seasonings
- 1 tablespoon fresh dill, chopped
- 1 tablespoon fresh parsley, chopped
- 1 tablespoon fresh lemon juice
- 1 tablespoon olive oil
Fresh herbs are key to elevating this dip. Dill and parsley add bright, green notes. Lemon juice gives it a zesty kick while balancing the rich flavors. Olive oil lends a silky texture and a hint of fruitiness.
Serving Suggestions
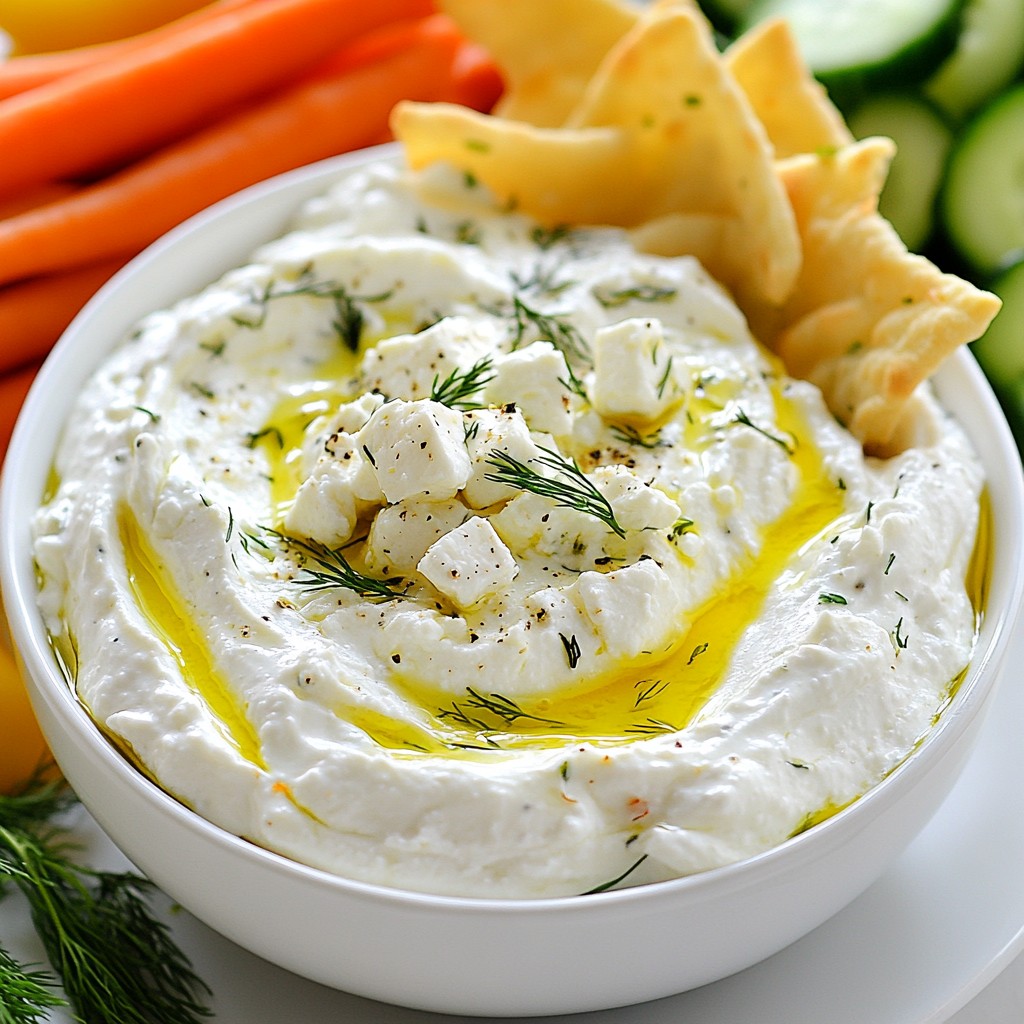
- Fresh veggies (carrots, cucumbers, bell peppers)
- Pita chips
To serve, you can use fresh veggies like carrots, cucumbers, and bell peppers. They add crunch and freshness. Pita chips are a great choice too. They are sturdy and perfect for dipping. This dip is versatile and can fit any gathering.
Step-by-Step Instructions
Preparation Steps
1. Start by mixing the cheeses. In a medium bowl, combine the crumbled feta cheese, softened cream cheese, and Greek yogurt. Use a fork to blend them well. This mix gives the dip a rich and creamy base.
2. Next, add the minced garlic and fresh lemon juice. The garlic adds a nice kick, while the lemon juice brightens the flavors. Drizzle in the olive oil for a smooth texture.
Blending and Finalizing
3. Now, it’s time to blend. Use a fork or a hand mixer to mix everything together. You want a smooth and creamy dip, so make sure the feta is well mixed. This step is key to a great texture.
4. Stir in the chopped dill and parsley. These herbs will add a fresh taste to your dip. Mix well to blend all the flavors. Season with salt and pepper to taste, adjusting as needed.
Chilling and Serving
5. Transfer the dip to a serving bowl. Refrigerate it for at least 30 minutes. This chilling time helps all the flavors meld together.
6. For presentation, serve the dip chilled with fresh veggies like carrots, cucumbers, and bell peppers. You can also use pita chips for dipping. This makes a great snack or appetizer that everyone will enjoy!
Tips & Tricks
Perfecting the Dip
To get the right creaminess, mix well. If your dip feels too thick, add another spoon of Greek yogurt or olive oil. This will help make it smoother and easier to dip. Balancing flavors is key. Start with a pinch of salt and pepper. Taste, then adjust until it feels just right.
Variability
You can customize this dip with different herbs or spices. Try adding basil or oregano for a new twist. If you want a vegan option, use a dairy-free cream cheese and vegan feta. This way, everyone can enjoy your dip.
Enhancing Serving Experience
Pair your dip with fresh veggies like carrots, cucumbers, and bell peppers. Pita chips also work great. For a fun look, serve the dip in a colorful bowl or on a wooden board. This makes your dip stand out and invites people to dig in.
Pro Tips
- Use Room Temperature Ingredients: Allow the cream cheese and Greek yogurt to come to room temperature before mixing. This will help achieve a smoother and creamier dip.
- Fresh Herbs Matter: For the best flavor, use fresh dill and parsley instead of dried herbs. Fresh herbs provide a vibrant taste that elevates the dip.
- Add More Garlic: If you love garlic, feel free to add an extra clove or two for a bolder flavor. Just be mindful of the balance with the other ingredients.
- Chill Before Serving: Refrigerating the dip for at least 30 minutes allows the flavors to meld beautifully. It enhances the overall taste and texture.
Variations
Flavor Enhancements
You can easily spice up this dip! Add red pepper flakes for a kick. This simple change adds heat without losing the dip's creamy taste. Another option is to mix in some chopped olives. This gives the dip a Mediterranean twist. The briny flavor of olives pairs well with the feta.
Ingredient Swaps
If you want a lighter dip, use low-fat cream cheese. It keeps the texture smooth but cuts calories. For dairy-free options, try using vegan feta and plant-based cream cheese. This way, everyone can enjoy the dip without worry.
Themed Dips
Hosting a party? Create a dip bar with various options. You can serve the Garlic Herb Feta Dip alongside a spicy black bean dip or a creamy avocado dip. This variety keeps guests happy. You can also use seasonal ingredients. In summer, add fresh tomatoes or basil. In fall, consider roasted pumpkin or sage. This makes your dips fun and fresh!
Storage Info
Storing the Dip
To keep your Garlic Herb Feta Dip fresh, store it in the fridge. Use an airtight container to seal in the flavor. Glass jars work well, but plastic containers are good too. Make sure to keep it covered to prevent it from drying out.
Shelf Life
When stored properly, this dip lasts about 4 to 5 days in the fridge. If you see any mold or strange smells, it’s time to toss it. Always trust your senses. When in doubt, throw it out.
Reheating vs. Serving Cold
This dip tastes best cold or at room temperature. You don’t need to reheat it. If the dip seems thick after a few days, add a little olive oil or yogurt to refresh it. Mix well to bring back its creamy texture. Enjoy it with fresh veggies or pita chips for a tasty treat.
FAQs
Common Questions
How to make Garlic Herb Feta Dip vegan? To make this dip vegan, replace feta cheese with a vegan feta. Use dairy-free cream cheese and Greek yogurt too. This swap keeps the dip creamy and tasty. Blend the ingredients as you would in the original recipe for a great flavor.
Can I use dried herbs instead of fresh? Yes, you can use dried herbs. Use one-third of the amount listed for fresh herbs. Dried herbs are stronger, so a little goes a long way. However, fresh herbs add a brighter taste and aroma.
Serving Suggestions
What are the best dippers for this dip? Fresh veggies work great! Try carrots, cucumbers, and bell peppers. Pita chips are also a fun choice. You can even use crackers for a crunchy twist. All these dippers pair nicely with the creamy dip.
How to incorporate Garlic Herb Feta Dip in a party spread? Place this dip in the center of a platter. Surround it with colorful veggies and chips. You can also add other dips to create variety. This way, guests can mix and match their favorites. It makes for a lively party spread!
Preparation Tips
Can I prepare this dip ahead of time? Absolutely! You can make it a day in advance. Keep it in the fridge to let the flavors meld. Just give it a quick stir before serving. It will taste even better after a night in the fridge.
What can I pair with this dip for a complete appetizer? Serve the dip with a cheese platter. Add some nuts, olives, and fruits to balance the flavors. This makes a delightful appetizer spread. Guests will love the mix of tastes and textures!
This blog post covered how to make a delicious Garlic Herb Feta Dip. We discussed the key ingredients, including feta cheese and Greek yogurt. You learned step-by-step instructions for mixing, blending, and chilling. We also explored tips for making it perfect and tasty variations. Finally, we shared storage and serving ideas to keep your dip fresh.
Now you’re ready to impress your friends and family. Enjoy creating and sharing this delightful dip!