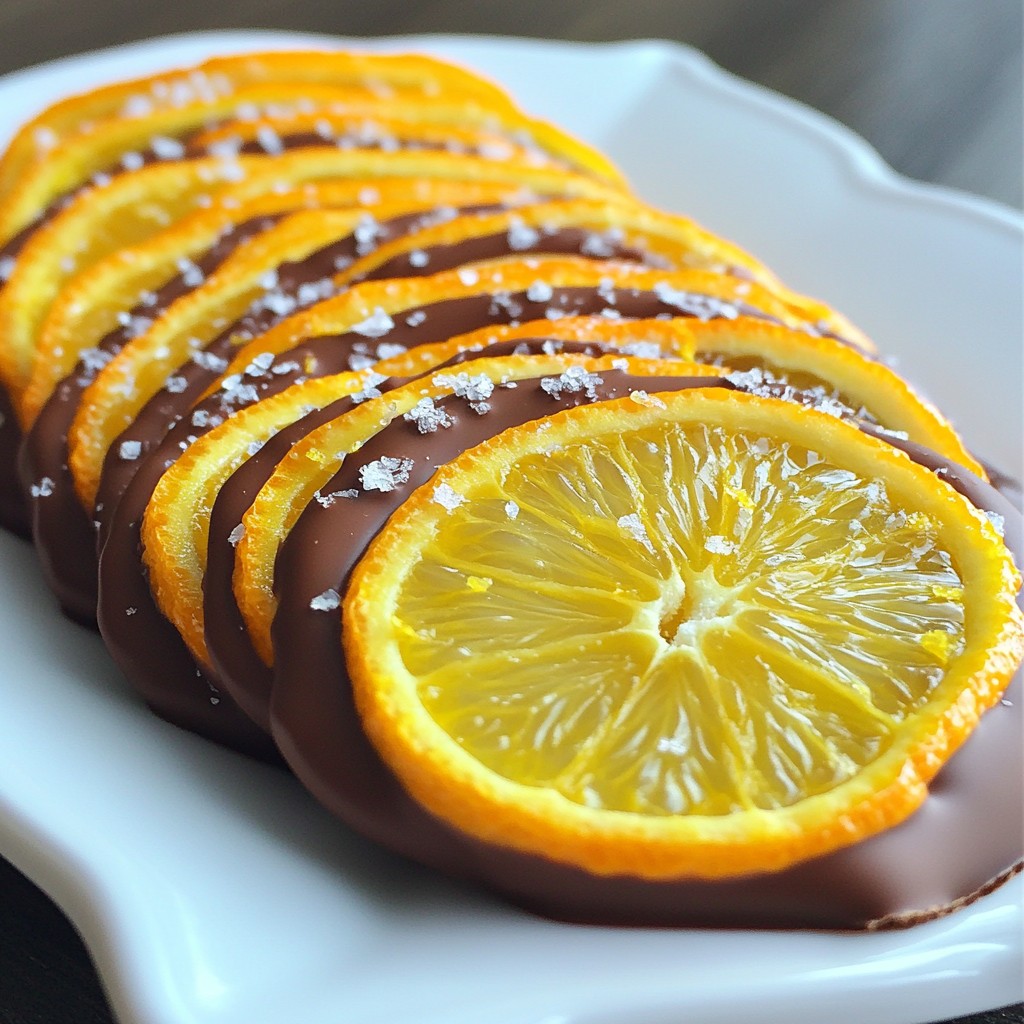
Who doesn't love a sweet treat that combines rich chocolate and zesty oranges? In this guide to making chocolate-covered orange slices, I’ll show you just how easy it is. With a few simple ingredients, you can create a snack that’s both delicious and impressive. Perfect for parties or a midday pick-me-up, these treats are sure to satisfy. Let’s dive into the fun of making this simple dessert!
Why I Love This Recipe
- Fresh and Fruity: The combination of juicy oranges and rich chocolate creates a refreshing yet indulgent treat.
- Easy to Make: This recipe requires minimal ingredients and simple steps, making it perfect for any skill level.
- Customizable: Add your favorite toppings like nuts or different types of chocolate for a personalized touch.
- Perfect for Sharing: These chocolate-covered orange wheels are great for parties or as a sweet snack to share with friends.
Ingredients
List of Required Ingredients
- 2 large oranges
- 1 cup semi-sweet chocolate chips
- 1 teaspoon coconut oil (optional)
- Sea salt for sprinkling
- Zest of 1 orange (for flavor enhancement)
You need a few simple ingredients to make chocolate-covered orange slices. First, grab two large oranges. These will give you sweet and juicy slices. Next, you'll need one cup of semi-sweet chocolate chips. This chocolate will melt nicely and coat the orange slices.
If you want a smooth texture, consider adding one teaspoon of coconut oil. This is optional but can help the chocolate flow better. Sea salt is a must for sprinkling on top. It enhances the flavor. Lastly, the zest of one orange adds a nice touch. It brings out the fresh orange flavor.
With these ingredients, you are ready to create a tasty treat.

Step-by-Step Instructions
Preparing the Oranges
Start by washing the oranges well. Rinse them under cool water to remove dirt. Next, slice each orange into 1/4-inch thick rounds. Discard the ends of the oranges. After slicing, pat the orange slices dry with a paper towel. This step removes extra moisture. Dry slices help the chocolate stick better.
Melting the Chocolate
For melting chocolate, use a microwave-safe bowl. Add 1 cup of semi-sweet chocolate chips. If you want, mix in 1 teaspoon of coconut oil for a smoother texture. Microwave the bowl in 30-second intervals. Stir the chocolate after each interval. Stop when the chocolate is fully melted and smooth.
Dipping and Setting
Take each orange slice and dip it into the melted chocolate. Make sure to coat one side fully. Let any extra chocolate drip off. Place the chocolate-covered slices on a baking sheet lined with parchment paper. This will make cleanup easier.
Adding Finishing Touches
Before the chocolate sets, sprinkle a tiny pinch of sea salt on each slice. This adds a tasty contrast to the sweet chocolate. For extra flavor, you can also add a bit of orange zest on top. It brightens the taste and looks great.
Finalizing the Treats
Put the baking sheet in the fridge for about 30 minutes. This helps the chocolate harden fully. Once hardened, you can serve the slices. They make a fun treat for any occasion. If you have leftovers, store them in an airtight container in the fridge for up to a week.
Tips & Tricks
Selecting the Best Chocolate
Choosing the right chocolate is key. I recommend three types: dark, milk, and white.
- Dark chocolate offers a rich flavor. It pairs well with the tartness of oranges.
- Milk chocolate is sweeter and creamier. It makes the treat more kid-friendly.
- White chocolate adds a smooth and sweet touch. It is a great choice for a unique flavor.
Each type brings something special. Try different kinds to find your favorite!
Improving Flavor and Texture
To ensure smooth chocolate, I suggest adding coconut oil. It makes the chocolate silky and easy to dip. Just a teaspoon works wonders.
Zesting the orange is crucial too. The zest adds a bright and fresh flavor. It enhances each bite, making them more delicious. Use a microplane for fine zest.
Avoiding Common Mistakes
Sometimes, chocolate can clump when dipping. If this happens, melt it for a few more seconds. Stir well to regain its smoothness.
Ensure even coating by dipping each slice fully. Let excess chocolate drip off before placing it on the baking sheet. This helps avoid thick blobs of chocolate. Aim for a thin, even layer for the best look and taste.
Pro Tips
- Use Fresh Oranges: Select ripe, juicy oranges for the best flavor; they should feel heavy for their size and have a vibrant color.
- Melt Chocolate Gently: Be careful not to overheat the chocolate; stirring every 30 seconds helps achieve a smooth consistency without burning.
- Experiment with Toppings: Besides sea salt, try adding crushed nuts or a drizzle of white chocolate for extra texture and flavor.
- Storage Tips: Keep the chocolate-covered oranges in an airtight container in the fridge to maintain their freshness and prevent them from becoming sticky.
Variations
Flavor Variations
You can switch up the taste with dark or white chocolate. Dark chocolate gives a rich flavor. White chocolate adds a sweet, creamy twist. You may also try adding spices like cinnamon or cayenne for a kick. Chopped nuts such as almonds or pistachios can add crunch and flavor.
Creative Presentation Ideas
Drizzling chocolate on top makes each slice look fancy. You can use a spoon or a piping bag for this. It adds a fun touch. You can also use molds to create unique shapes. Just pour the chocolate into molds before adding the orange slices. This makes for fun treats that are great for parties.
Healthier Alternatives
If you want a healthier option, use sugar-free chocolate. It still tastes great and cuts down on sugar. You can also pair your slices with other fruits. Strawberries or apples can make a colorful and tasty mix. This way, you enjoy a treat that feels good and tastes good.
Storage Information
Storing Homemade Chocolate-Covered Orange Slices
To keep your chocolate-covered orange slices fresh, store them in an airtight container. This helps to keep moisture out and maintain the chocolate's shine. A simple food storage container works great. You can also use a glass jar with a tight seal.
Once stored, place your container in the refrigerator. The slices will stay fresh for up to one week. If you want to enjoy them longer, consider freezing them.
Freezing Options
To freeze chocolate-covered orange slices, first let them cool completely. Then, place them in a single layer on a baking sheet. Freeze for about an hour. This prevents them from sticking together.
After freezing, transfer the slices to a freezer-safe bag or container. Remove as much air as possible. This step helps to maintain their texture.
When you're ready to enjoy them, take out the slices and let them thaw in the fridge. Avoid thawing them at room temperature, as it can make the chocolate sticky. Enjoy your sweet treat!
FAQs
How do I choose the best chocolate for dipping?
When choosing chocolate for dipping, I recommend semi-sweet chocolate. It has a rich flavor that pairs well with oranges. You can also use dark chocolate for a deeper taste. Milk chocolate is sweeter but can be too mild. Look for high-quality brands for the best results. They melt smoothly and create a nice texture.
Can I make chocolate-covered orange slices with other fruits?
Yes, you can! Chocolate pairs well with many fruits. Try strawberries, bananas, or pineapple. Each fruit gives a new taste. For a fun twist, mix different fruits on a plate. This way, you can enjoy a variety of flavors.
How long do chocolate-covered orange slices last?
Chocolate-covered orange slices can last up to one week. Store them in an airtight container in the fridge. This keeps them fresh and tasty. If you notice any moisture, dry the slices before dipping. This helps the chocolate stick better.
Are chocolate-covered orange slices healthy?
Chocolate-covered orange slices have some health benefits. Oranges are rich in vitamin C. They also provide fiber. Dark chocolate contains antioxidants. It can be good for your heart in moderation. Enjoy these treats as a sweet snack without guilt!
Can I use dairy-free chocolate?
Absolutely! There are many dairy-free chocolate options. Look for vegan chocolate chips in stores. These work just as well for dipping. They melt nicely and taste great. Enjoy your treats without dairy worries!
You learned how to make tasty chocolate-covered orange slices. We covered the needed ingredients, simple steps to prepare them, and tips for success. Customizations like dark chocolate or added spices can enhance your treat. Proper storage keeps them fresh longer. Whether for a snack or a gift, these treats impress everyone. Enjoy making and sharing your delicious creations today!