Chocolate Chip Cookie Dough Truffles Decadent Delight

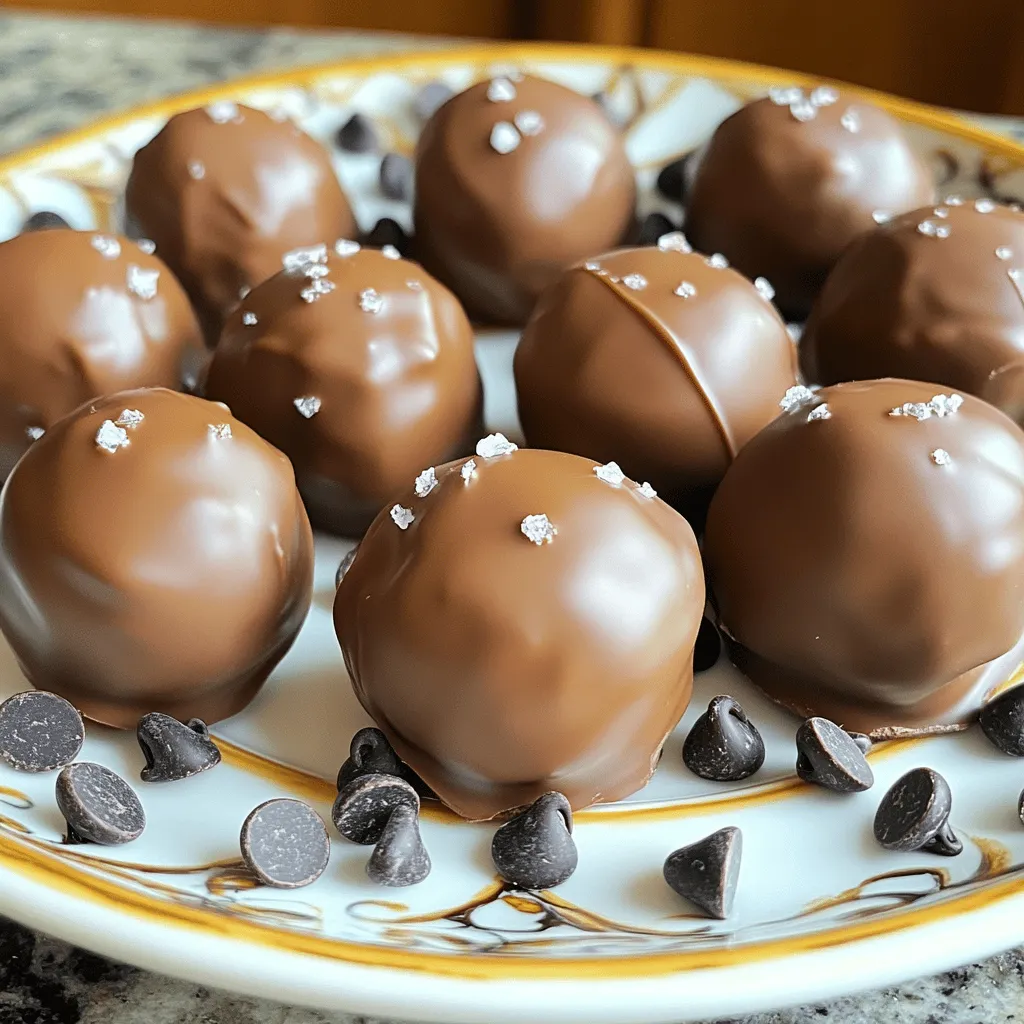
Indulge your sweet tooth with my Chocolate Chip Cookie Dough Truffles! These decadent treats blend creamy cookie dough with a rich chocolate coating, offering pure bliss in every bite. I’ll guide you through the simple steps to make these tempting truffles at home, plus share tips and tricks to make them even better. Get ready to impress your friends and family with this easy, fun, and delicious recipe!

- 1 cup all-purpose flour (heat-treated) - 1/2 cup unsalted butter, softened - 1/3 cup brown sugar, packed - 1/3 cup granulated sugar - 1/2 teaspoon vanilla extract - 1/4 teaspoon salt - 1/2 cup mini chocolate chips - 8 oz. milk chocolate, for coating - Sea salt flakes, for garnish Heat-treated flour is key for safety. Raw flour can contain bacteria that might make you sick. Heating it in the microwave kills these germs. To do this, place the flour in a bowl, then microwave for one minute. Allow it to cool slightly before mixing it into your dough. This step keeps your truffles safe and tasty. For the best taste, use high-quality chocolate. Milk chocolate is sweet and creamy, perfect for coating. You can also try dark chocolate for a richer flavor. If you want a fun twist, use white chocolate. Each chocolate type gives a unique taste. Experiment and find your favorite! To start, we need to prepare the cookie dough. First, heat-treat the flour. Place 1 cup of all-purpose flour in the microwave for 1 minute. This step kills any bacteria. Let the flour cool for a bit. Next, in a large bowl, cream 1/2 cup of softened unsalted butter with 1/3 cup each of brown and granulated sugar. Mix until it feels light and fluffy. Add in 1/2 teaspoon of vanilla extract and a pinch of salt. Stir until combined. Now, slowly add the heat-treated flour to the mix. Use low speed and mix until just combined. Don't overmix here; we want a soft dough. Finally, fold in 1/2 cup of mini chocolate chips. Make sure they spread evenly throughout the dough. Scoop out small bits of dough and roll them into 1-inch balls. Place these balls on a parchment-lined baking sheet. Chill them in the fridge for about 30 minutes. This helps them firm up for coating. While your dough balls chill, it's time to melt the chocolate. Take 8 ounces of milk chocolate and place it in a microwave-safe bowl. Heat it in intervals of 30 seconds. Stir after each interval until the chocolate is smooth. Be careful not to burn it. This melted chocolate will create a rich coating for your truffles. Once your dough balls are chilled, it's time to dip them. Use a fork to pick up each ball and dip it into the melted chocolate. Let any extra chocolate drip off before placing them back on the parchment-lined sheet. While the chocolate is still wet, sprinkle a tiny bit of sea salt flakes on each truffle. This adds a nice touch of flavor. After dipping, place the truffles back in the refrigerator for about 15 to 20 minutes. This time allows the chocolate to set and harden. Enjoy the process of making these treats; they are a fun way to impress family and friends! One big mistake is not heat-treating the flour. This step is key to safety. Always microwave the flour for one minute. Let it cool before using it. Overmixing the dough is another issue. Mix just until combined to keep truffles soft. Lastly, when dipping, let excess chocolate drip off. This keeps the coating neat. You can make these truffles your own! Try using different types of chocolate. Dark chocolate adds a rich taste. You can also add nuts for crunch. Chopped pecans or walnuts work well. Want a twist? Add a splash of almond extract. It gives a nice flavor boost! Chilling the dough is crucial for the right texture. After rolling the dough into balls, chill them for 30 minutes. This helps them firm up. When coating, chill the truffles after dipping too. For 15-20 minutes, this sets the chocolate. Remember, cold truffles are easier to handle! {{image_2}} If you want nut-free truffles, simply skip any nuts. The cookie dough stays rich and tasty without them. Focus on the chocolate chips for sweetness and texture. You can also add seeds like sunflower seeds for a little crunch. This way, you still enjoy those truffles without any nut worries. You can switch up the chocolate coating for fun. Try dark chocolate for a richer flavor. White chocolate gives a sweet contrast and looks pretty too. For a twist, use flavored chocolates, like mint or orange. Each choice adds a new taste to your truffles. To make your truffles even better, think about adding flavors. A bit of almond or hazelnut extract can change the taste. You can also mix in crushed cookies or candy pieces. If you love a good crunch, add mini pretzels or rice crisps. These little changes make your truffles unique and exciting. To keep your truffles fresh, store them in an airtight container. Use a container that fits the truffles without too much space. This helps prevent them from getting squished. I like to layer parchment paper between the truffles. This keeps them from sticking together. Place the container in the refrigerator for the best freshness. Freezing is a great way to save truffles for later. First, let the truffles set in the fridge. Then, place them on a baking sheet in a single layer. Freeze them for about an hour. After that, transfer the truffles to a freezer-safe bag. Make sure to remove as much air as possible. You can enjoy a sweet treat anytime! When stored properly, chocolate chip cookie dough truffles can last up to two weeks in the fridge. If you freeze them, they can last up to three months. Always check for signs of spoilage before eating. If they look or smell off, it's best to toss them. Enjoy your truffles at their best! Yes, you can eat raw cookie dough if it is made safely. We use heat-treated flour. It kills harmful bacteria. This makes the dough safe to eat. Remember to use pasteurized eggs if your recipe includes them. You can keep chocolate chip cookie dough truffles in the fridge for about a week. Store them in an airtight container. If you want to keep them longer, freeze them. They can last up to three months in the freezer. If you need a butter substitute, try using coconut oil or applesauce. For sugar, consider using honey or maple syrup. Adjust the amounts based on your taste. Each substitute can change the texture and flavor slightly, so experiment to find what you like best! In this blog post, we explored making delicious cookie dough truffles. We covered key ingredients, the need for heat-treated flour, and the best chocolate. You learned step-by-step instructions for dough prep, chocolate melting, and dipping. We shared tips for common mistakes, ways to customize, and best chilling practices. Variations include nut-free options, different coatings, and flavor boosts. Finally, we discussed storage tips and frequently asked questions. Remember, making truffles is fun and easy. Enjoy your tasty treats!

Ingredients

List of Ingredients

– 1 cup all-purpose flour (heat-treated)

– 1/2 cup unsalted butter, softened

– 1/3 cup brown sugar, packed

– 1/3 cup granulated sugar

– 1/2 teaspoon vanilla extract

– 1/4 teaspoon salt

– 1/2 cup mini chocolate chips

– 8 oz. milk chocolate, for coating

– Sea salt flakes, for garnish

Importance of Heat-Treated Flour

Heat-treated flour is key for safety. Raw flour can contain bacteria that might make you sick. Heating it in the microwave kills these germs. To do this, place the flour in a bowl, then microwave for one minute. Allow it to cool slightly before mixing it into your dough. This step keeps your truffles safe and tasty.

Recommended Types of Chocolate

For the best taste, use high-quality chocolate. Milk chocolate is sweet and creamy, perfect for coating. You can also try dark chocolate for a richer flavor. If you want a fun twist, use white chocolate. Each chocolate type gives a unique taste. Experiment and find your favorite!

Step-by-Step Instructions

Preparation of the Cookie Dough

To start, we need to prepare the cookie dough. First, heat-treat the flour. Place 1 cup of all-purpose flour in the microwave for 1 minute. This step kills any bacteria. Let the flour cool for a bit. Next, in a large bowl, cream 1/2 cup of softened unsalted butter with 1/3 cup each of brown and granulated sugar. Mix until it feels light and fluffy. Add in 1/2 teaspoon of vanilla extract and a pinch of salt. Stir until combined.

Now, slowly add the heat-treated flour to the mix. Use low speed and mix until just combined. Don’t overmix here; we want a soft dough. Finally, fold in 1/2 cup of mini chocolate chips. Make sure they spread evenly throughout the dough.

Scoop out small bits of dough and roll them into 1-inch balls. Place these balls on a parchment-lined baking sheet. Chill them in the fridge for about 30 minutes. This helps them firm up for coating.

Melting the Chocolate Coating

While your dough balls chill, it’s time to melt the chocolate. Take 8 ounces of milk chocolate and place it in a microwave-safe bowl. Heat it in intervals of 30 seconds. Stir after each interval until the chocolate is smooth. Be careful not to burn it. This melted chocolate will create a rich coating for your truffles.

Dipping and Setting the Truffles

Once your dough balls are chilled, it’s time to dip them. Use a fork to pick up each ball and dip it into the melted chocolate. Let any extra chocolate drip off before placing them back on the parchment-lined sheet.

While the chocolate is still wet, sprinkle a tiny bit of sea salt flakes on each truffle. This adds a nice touch of flavor. After dipping, place the truffles back in the refrigerator for about 15 to 20 minutes. This time allows the chocolate to set and harden. Enjoy the process of making these treats; they are a fun way to impress family and friends!

Tips & Tricks

Common Mistakes to Avoid

One big mistake is not heat-treating the flour. This step is key to safety. Always microwave the flour for one minute. Let it cool before using it. Overmixing the dough is another issue. Mix just until combined to keep truffles soft. Lastly, when dipping, let excess chocolate drip off. This keeps the coating neat.

Ways to Customize Your Truffles

You can make these truffles your own! Try using different types of chocolate. Dark chocolate adds a rich taste. You can also add nuts for crunch. Chopped pecans or walnuts work well. Want a twist? Add a splash of almond extract. It gives a nice flavor boost!

Best Practices for Chilling

Chilling the dough is crucial for the right texture. After rolling the dough into balls, chill them for 30 minutes. This helps them firm up. When coating, chill the truffles after dipping too. For 15-20 minutes, this sets the chocolate. Remember, cold truffles are easier to handle!

Variations

Nut-Free Options

If you want nut-free truffles, simply skip any nuts. The cookie dough stays rich and tasty without them. Focus on the chocolate chips for sweetness and texture. You can also add seeds like sunflower seeds for a little crunch. This way, you still enjoy those truffles without any nut worries.

Different Chocolate Coatings

You can switch up the chocolate coating for fun. Try dark chocolate for a richer flavor. White chocolate gives a sweet contrast and looks pretty too. For a twist, use flavored chocolates, like mint or orange. Each choice adds a new taste to your truffles.

Flavor Enhancements

To make your truffles even better, think about adding flavors. A bit of almond or hazelnut extract can change the taste. You can also mix in crushed cookies or candy pieces. If you love a good crunch, add mini pretzels or rice crisps. These little changes make your truffles unique and exciting.

Storage Info

Best Storage Practices

To keep your truffles fresh, store them in an airtight container. Use a container that fits the truffles without too much space. This helps prevent them from getting squished. I like to layer parchment paper between the truffles. This keeps them from sticking together. Place the container in the refrigerator for the best freshness.

Freezing Tips

Freezing is a great way to save truffles for later. First, let the truffles set in the fridge. Then, place them on a baking sheet in a single layer. Freeze them for about an hour. After that, transfer the truffles to a freezer-safe bag. Make sure to remove as much air as possible. You can enjoy a sweet treat anytime!

Shelf Life of Cookie Dough Truffles

When stored properly, chocolate chip cookie dough truffles can last up to two weeks in the fridge. If you freeze them, they can last up to three months. Always check for signs of spoilage before eating. If they look or smell off, it’s best to toss them. Enjoy your truffles at their best!

FAQs

Can I eat raw cookie dough?

Yes, you can eat raw cookie dough if it is made safely. We use heat-treated flour. It kills harmful bacteria. This makes the dough safe to eat. Remember to use pasteurized eggs if your recipe includes them.

How long can I keep chocolate chip cookie dough truffles?

You can keep chocolate chip cookie dough truffles in the fridge for about a week. Store them in an airtight container. If you want to keep them longer, freeze them. They can last up to three months in the freezer.

What can I substitute for butter or sugar?

If you need a butter substitute, try using coconut oil or applesauce. For sugar, consider using honey or maple syrup. Adjust the amounts based on your taste. Each substitute can change the texture and flavor slightly, so experiment to find what you like best!

In this blog post, we explored making delicious cookie dough truffles. We covered key ingredients, the need for heat-treated flour, and the best chocolate. You learned step-by-step instructions for dough prep, chocolate melting, and dipping. We shared tips for common mistakes, ways to customize, and best chilling practices. Variations include nut-free options, different coatings, and flavor boosts. Finally, we discussed storage tips and frequently asked questions.

Remember, making truffles is fun and easy. Enjoy your tasty treats!

- 1 cup all-purpose flour (heat-treated) - 1/2 cup unsalted butter, softened - 1/3 cup brown sugar, packed - 1/3 cup granulated sugar - 1/2 teaspoon vanilla extract - 1/4 teaspoon salt - 1/2 cup mini chocolate chips - 8 oz. milk chocolate, for coating - Sea salt flakes, for garnish Heat-treated flour is key for safety. Raw flour can contain bacteria that might make you sick. Heating it in the microwave kills these germs. To do this, place the flour in a bowl, then microwave for one minute. Allow it to cool slightly before mixing it into your dough. This step keeps your truffles safe and tasty. For the best taste, use high-quality chocolate. Milk chocolate is sweet and creamy, perfect for coating. You can also try dark chocolate for a richer flavor. If you want a fun twist, use white chocolate. Each chocolate type gives a unique taste. Experiment and find your favorite! To start, we need to prepare the cookie dough. First, heat-treat the flour. Place 1 cup of all-purpose flour in the microwave for 1 minute. This step kills any bacteria. Let the flour cool for a bit. Next, in a large bowl, cream 1/2 cup of softened unsalted butter with 1/3 cup each of brown and granulated sugar. Mix until it feels light and fluffy. Add in 1/2 teaspoon of vanilla extract and a pinch of salt. Stir until combined. Now, slowly add the heat-treated flour to the mix. Use low speed and mix until just combined. Don't overmix here; we want a soft dough. Finally, fold in 1/2 cup of mini chocolate chips. Make sure they spread evenly throughout the dough. Scoop out small bits of dough and roll them into 1-inch balls. Place these balls on a parchment-lined baking sheet. Chill them in the fridge for about 30 minutes. This helps them firm up for coating. While your dough balls chill, it's time to melt the chocolate. Take 8 ounces of milk chocolate and place it in a microwave-safe bowl. Heat it in intervals of 30 seconds. Stir after each interval until the chocolate is smooth. Be careful not to burn it. This melted chocolate will create a rich coating for your truffles. Once your dough balls are chilled, it's time to dip them. Use a fork to pick up each ball and dip it into the melted chocolate. Let any extra chocolate drip off before placing them back on the parchment-lined sheet. While the chocolate is still wet, sprinkle a tiny bit of sea salt flakes on each truffle. This adds a nice touch of flavor. After dipping, place the truffles back in the refrigerator for about 15 to 20 minutes. This time allows the chocolate to set and harden. Enjoy the process of making these treats; they are a fun way to impress family and friends! One big mistake is not heat-treating the flour. This step is key to safety. Always microwave the flour for one minute. Let it cool before using it. Overmixing the dough is another issue. Mix just until combined to keep truffles soft. Lastly, when dipping, let excess chocolate drip off. This keeps the coating neat. You can make these truffles your own! Try using different types of chocolate. Dark chocolate adds a rich taste. You can also add nuts for crunch. Chopped pecans or walnuts work well. Want a twist? Add a splash of almond extract. It gives a nice flavor boost! Chilling the dough is crucial for the right texture. After rolling the dough into balls, chill them for 30 minutes. This helps them firm up. When coating, chill the truffles after dipping too. For 15-20 minutes, this sets the chocolate. Remember, cold truffles are easier to handle! {{image_2}} If you want nut-free truffles, simply skip any nuts. The cookie dough stays rich and tasty without them. Focus on the chocolate chips for sweetness and texture. You can also add seeds like sunflower seeds for a little crunch. This way, you still enjoy those truffles without any nut worries. You can switch up the chocolate coating for fun. Try dark chocolate for a richer flavor. White chocolate gives a sweet contrast and looks pretty too. For a twist, use flavored chocolates, like mint or orange. Each choice adds a new taste to your truffles. To make your truffles even better, think about adding flavors. A bit of almond or hazelnut extract can change the taste. You can also mix in crushed cookies or candy pieces. If you love a good crunch, add mini pretzels or rice crisps. These little changes make your truffles unique and exciting. To keep your truffles fresh, store them in an airtight container. Use a container that fits the truffles without too much space. This helps prevent them from getting squished. I like to layer parchment paper between the truffles. This keeps them from sticking together. Place the container in the refrigerator for the best freshness. Freezing is a great way to save truffles for later. First, let the truffles set in the fridge. Then, place them on a baking sheet in a single layer. Freeze them for about an hour. After that, transfer the truffles to a freezer-safe bag. Make sure to remove as much air as possible. You can enjoy a sweet treat anytime! When stored properly, chocolate chip cookie dough truffles can last up to two weeks in the fridge. If you freeze them, they can last up to three months. Always check for signs of spoilage before eating. If they look or smell off, it's best to toss them. Enjoy your truffles at their best! Yes, you can eat raw cookie dough if it is made safely. We use heat-treated flour. It kills harmful bacteria. This makes the dough safe to eat. Remember to use pasteurized eggs if your recipe includes them. You can keep chocolate chip cookie dough truffles in the fridge for about a week. Store them in an airtight container. If you want to keep them longer, freeze them. They can last up to three months in the freezer. If you need a butter substitute, try using coconut oil or applesauce. For sugar, consider using honey or maple syrup. Adjust the amounts based on your taste. Each substitute can change the texture and flavor slightly, so experiment to find what you like best! In this blog post, we explored making delicious cookie dough truffles. We covered key ingredients, the need for heat-treated flour, and the best chocolate. You learned step-by-step instructions for dough prep, chocolate melting, and dipping. We shared tips for common mistakes, ways to customize, and best chilling practices. Variations include nut-free options, different coatings, and flavor boosts. Finally, we discussed storage tips and frequently asked questions. Remember, making truffles is fun and easy. Enjoy your tasty treats!

Chocolate Chip Cookie Dough Truffles

Indulge in the irresistible delight of chocolate chip cookie dough truffles! This easy recipe transforms classic cookie dough into luscious bite-sized treats, coated in smooth milk chocolate and topped with a hint of sea salt. Perfect for parties or a sweet treat at home, you’ll love how simple they are to make. Click through to explore the full recipe and find out how to create these delicious truffles that everyone will rave about!

Ingredients
  

1 cup all-purpose flour (heat-treated)

1/2 cup unsalted butter, softened

1/3 cup brown sugar, packed

1/3 cup granulated sugar

1/2 teaspoon vanilla extract

1/4 teaspoon salt

1/2 cup mini chocolate chips

8 oz. milk chocolate, for coating

Sea salt flakes, for garnish

Instructions
 

In a medium bowl, heat-treat the flour by placing it in the microwave for 1 minute. This helps kill any bacteria. Let it cool slightly.

    In a large mixing bowl, cream together the softened butter, brown sugar, and granulated sugar until light and fluffy.

      Add the vanilla extract and salt, mixing until well-combined.

        Gradually add the heat-treated flour, mixing on low speed until just combined. Be careful not to overmix.

          Fold in the mini chocolate chips, ensuring they are evenly distributed throughout the dough.

            Using your hands, scoop out small portions of the dough and roll them into 1-inch balls. Place them on a parchment-lined baking sheet.

              Chill the cookie dough balls in the refrigerator for about 30 minutes to firm up.

                While the dough balls are chilling, melt the milk chocolate in a microwave-safe bowl in 30-second intervals, stirring between each, until smooth.

                  Remove the dough balls from the fridge. Dip each ball into the melted chocolate using a fork, allowing any excess to drip off before placing them back on the parchment-lined sheet.

                    While the chocolate is still wet, sprinkle a pinch of sea salt flakes on top of each truffle for added flavor.

                      Place the chocolate-covered truffles back in the refrigerator for about 15-20 minutes to set.

                        Prep Time: 20 minutes | Total Time: 1 hour | Servings: 12 truffles

                          - Presentation Tips: Arrange the truffles on a decorative plate, and consider placing mini chocolate chips or a small pinch of sea salt around them for an extra touch of elegance.