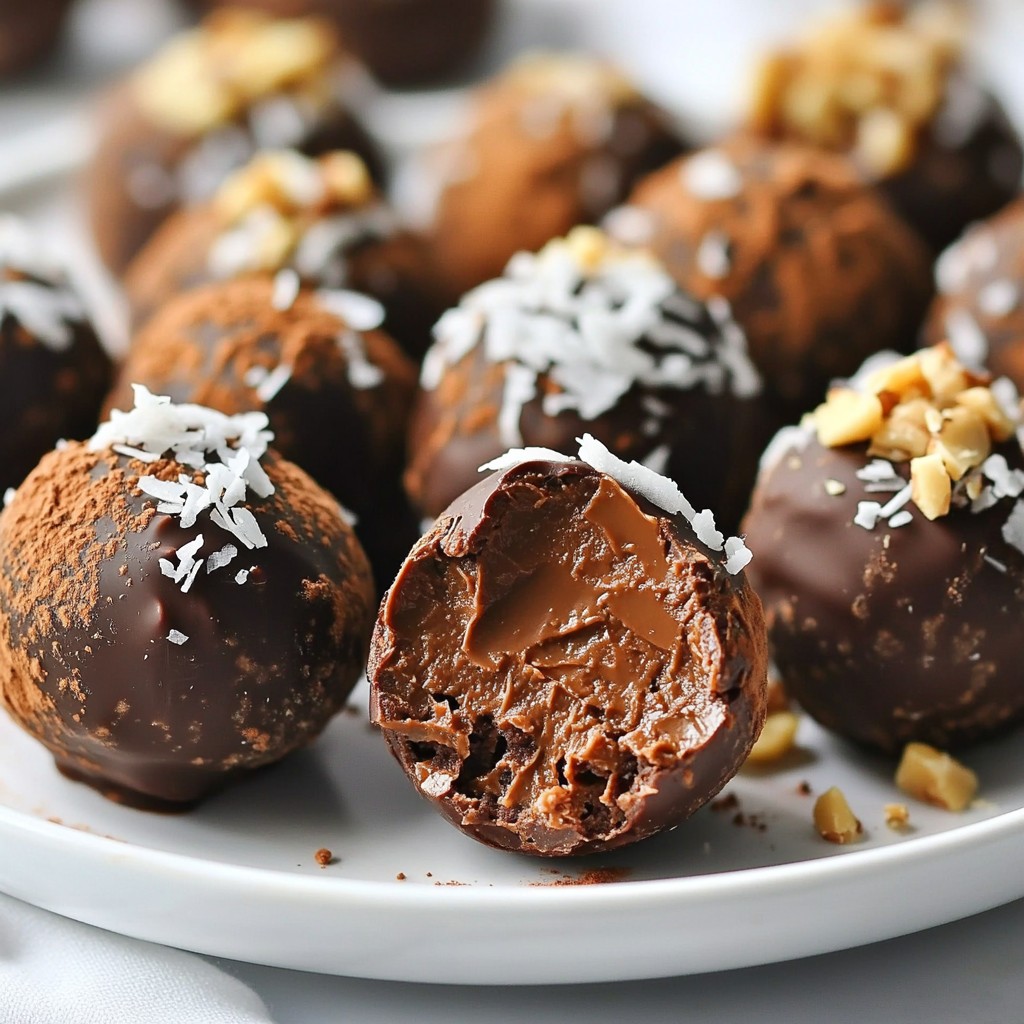
If you love rich treats that are also healthy, chocolate avocado truffles are for you! These bite-sized delights blend creamy avocado with dark chocolate, creating a rich, smooth morsel that satisfies any sweet tooth. Not only are they delicious, but they also offer a unique twist on traditional chocolate truffles. Stick around as I guide you through this easy recipe, tips, and ways to customize your treats!
Why I Love This Recipe
- Healthier Indulgence: These truffles use avocado, providing healthy fats while satisfying your chocolate cravings.
- Easy to Make: With just a few simple steps, you can whip up these delicious truffles in no time.
- Customizable Toppings: You can roll them in cocoa powder, nuts, or coconut to suit your taste preferences.
- Vegan-Friendly Option: Using dairy-free chocolate chips makes these truffles suitable for vegans and those with lactose intolerance.
Ingredients
List of Required Ingredients
To make these rich chocolate avocado truffles, gather the following:
- 1 ripe avocado, mashed
- 1 cup dark chocolate chips (dairy-free for vegan option)
- 1/4 cup pure maple syrup
- 1 teaspoon vanilla extract
- 1/4 teaspoon sea salt
- 1/2 cup unsweetened cocoa powder (for rolling)
Optional Toppings for Customization
You can make your truffles even more fun! Try these optional toppings:
- Shredded coconut
- Crushed nuts
- Cocoa nibs
Notes on Ingredient Quality
The quality of your ingredients matters. Use a ripe avocado for a creamy texture. A ripe avocado feels soft when you press it gently. For chocolate, choose good quality dark chocolate chips. They should have a rich taste. If you prefer a vegan option, select dairy-free chocolate. This choice enhances the flavor and keeps it plant-based.
Step-by-Step Instructions
Preparing the Chocolate
Start by melting the dark chocolate chips. You can use a microwave or stove. If using a microwave, heat in a bowl for 30 seconds at a time. Stir after each interval until smooth. If you prefer the stove, use a double boiler. This method gently melts the chocolate without burning it.
Combining Ingredients
Next, grab a mixing bowl. Add the mashed avocado, melted chocolate, maple syrup, vanilla extract, and sea salt. Mix everything well until it looks smooth and creamy. This blend gives the truffles a rich taste and a creamy texture.
Chilling and Rolling the Truffles
Once mixed, refrigerate the blend for about 30 minutes. This makes it easier to roll into balls. After chilling, use a tablespoon or melon baller to scoop the mixture. Roll it into small balls, about 1 inch wide.
Now, take the cocoa powder and coat the truffles. You can also use shredded coconut, crushed nuts, or cocoa nibs for extra flavor. Place the coated truffles on a parchment-lined sheet and chill them again for about 15 minutes. This step firms them up even more. Enjoy these delightful treats chilled or at room temperature.
Tips & Tricks
Achieving the Right Consistency
To get the best texture for your truffles, start with a ripe avocado. A ripe avocado feels soft but not mushy. When you mash it, aim for a smooth and creamy mix. If the mixture seems too thick, add a drop of maple syrup. If it's too runny, simply chill it longer. Cooling helps firm the mix, making it easier to roll into balls.
Suggestions for Variations
You can change these truffles in fun ways! Try adding a few drops of peppermint extract for a minty flavor. Or mix in a teaspoon of espresso powder for a coffee kick. For a fruity touch, add some orange zest. You can also swap cocoa powder for crushed nuts or coconut to coat your truffles. This gives them a unique taste and texture.
Common Mistakes to Avoid
One mistake is using unripe avocados, which makes the truffles grainy. Always check your avocado for ripeness first. Another mistake is forgetting to chill the mixture. Skipping this step makes the truffles hard to roll. Make sure to coat the truffles well in cocoa powder or toppings. Otherwise, they may stick together.
Pro Tips
- Choose the Right Avocado: Make sure your avocado is perfectly ripe for the creamiest texture. It should yield slightly when you press it gently.
- Chill for Easier Handling: Refrigerating the mixture before rolling makes it firmer and easier to shape into truffles.
- Experiment with Coatings: Get creative with your toppings! Try using crushed nuts or flavored cocoa powder for added taste and texture.
- Storage Tips: Store the truffles in an airtight container in the fridge for up to a week to maintain their freshness and flavor.
Variations
Vegan Adaptation
You can easily make these truffles vegan. Start with dairy-free chocolate chips. They taste just as rich and creamy as regular ones. The avocado provides healthy fats, making this treat even better. Use pure maple syrup for sweetness without dairy. This recipe stays delicious while being plant-based.
Flavor Additions
You can enhance the flavor of your truffles in many ways. Try adding a few drops of mint extract for a fresh taste. Espresso powder gives a nice coffee kick. You might also add a pinch of cinnamon for warmth. Each flavor adds a fun twist to the truffles. Experiment with what you love!
Alternative Coatings
Coating your truffles can change their look and taste. Instead of cocoa powder, try rolling them in shredded coconut. Chopped nuts add a nice crunch. You could also use cocoa nibs for a chocolatey bite. Spices like chili powder can give a spicy surprise. Coating choices let you be creative with your treats!
Storage Info
Best Practices for Storing Truffles
To keep your chocolate avocado truffles fresh, store them in an airtight container. This helps keep moisture out and prevents them from absorbing other odors. I like to layer parchment paper between the truffles to avoid sticking. Place the container in the fridge for the best texture.
Shelf Life Expectations
These truffles last about one week in the fridge. After that, they may lose their creamy texture and flavor. For the best taste, enjoy them within the first few days. If you want to keep them longer, freezing is a great option.
Freezing Instructions
To freeze your truffles, first let them chill in the fridge. Once firm, place them in a single layer in a freezer-safe container. You can also use a freezer bag. Be sure to remove as much air as possible. They can last for up to three months in the freezer. When you want to eat them, just let them thaw in the fridge overnight. Enjoy the rich, creamy treat!
FAQs
What are chocolate avocado truffles?
Chocolate avocado truffles are creamy treats made with ripe avocado and dark chocolate. They blend the rich taste of chocolate with the smoothness of avocado. This mix creates a unique flavor and texture. You can enjoy these truffles as a dessert or a snack. They are easy to make and fun to eat!
Can I use milk chocolate instead of dark chocolate?
Yes, you can use milk chocolate instead of dark chocolate. However, using milk chocolate will change the taste. Milk chocolate is sweeter and creamier. This choice may not be as rich as dark chocolate. If you prefer a sweeter truffle, milk chocolate is a great option.
Are these truffles healthy compared to traditional ones?
Yes, these truffles are healthier than many traditional ones. They use avocado, which adds healthy fats. The dark chocolate contains less sugar than milk chocolate. Plus, these truffles have no heavy cream or butter. They offer a guilt-free treat that still satisfies your sweet tooth.
How long can I keep these truffles in the fridge?
You can keep these truffles in the fridge for about one week. Store them in an airtight container. This helps keep them fresh and tasty. If you want to enjoy them later, you can freeze them too! Just remember to let them thaw before serving.
In this blog post, we explored how to make chocolate avocado truffles. We covered ingredients, customization options, and tips for perfecting your truffles. Remember, using fresh, high-quality ingredients makes a big difference. Don't forget to try variations like vegan adaptations or different flavor additions. Storing your truffles properly will keep them fresh longer. With these simple steps, you can impress anyone with your tasty treats. Enjoy making and sharing your delicious creations!