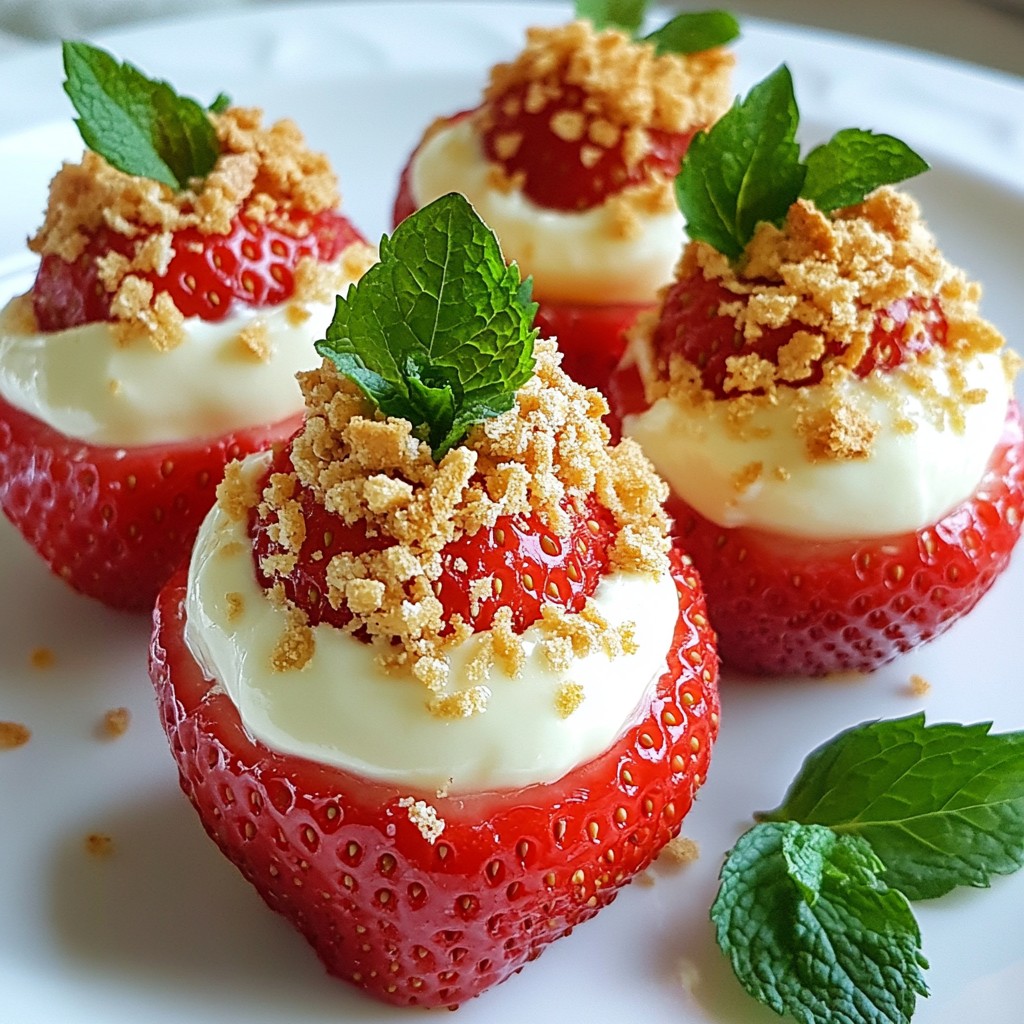
Are you ready to treat yourself to a dessert that’s easy and incredibly tasty? Cheesecake Stuffed Strawberries are a fun twist on a classic treat. In this post, I’ll share simple steps to make this delicious snack, plus tips on choosing the best strawberries. Whether you're hosting a party or just need a sweet fix, these strawberries are sure to impress. Let’s dive into making this delightful treat!
Why I Love This Recipe
- Delicious Flavor Combination: The creamy cheesecake filling perfectly complements the sweet, juicy strawberries, creating a delightful contrast that’s hard to resist.
- Easy and Quick to Prepare: This recipe takes only 15 minutes from start to finish, making it a perfect last-minute dessert or snack option.
- Customizable Presentation: You can easily adjust the toppings and garnishes to suit your taste or theme, making it versatile for any occasion.
- Healthier Dessert Option: Using fresh strawberries and a light cheesecake filling provides a guilt-free way to indulge your sweet tooth.
Ingredients
List of Required Ingredients
To make cheesecake stuffed strawberries, you need the following items:
- 12 large fresh strawberries
- 8 oz cream cheese, softened
- 1/4 cup powdered sugar
- 1 teaspoon vanilla extract
- 1/2 teaspoon lemon juice
- 1/4 cup crushed graham crackers
- Optional: fresh mint leaves for garnish
Substitutions for Ingredients
You can swap ingredients if you need to. Here are some options:
- Use mascarpone cheese instead of cream cheese for a richer flavor.
- Try honey or maple syrup instead of powdered sugar for a natural sweetener.
- If you do not have graham crackers, use crushed cookies or nuts for a different crunch.
- For a dairy-free version, use vegan cream cheese.
Tips for Choosing Fresh Strawberries
When picking strawberries, focus on quality. Here are my top tips:
- Look for bright red strawberries with a shiny surface.
- Avoid berries with white or green spots.
- Check for firmness; soft berries may be overripe.
- Choose strawberries with fresh green tops, as they indicate freshness.
- Smell the strawberries; a sweet fragrance means they are ripe and ready to eat.

Step-by-Step Instructions
Preparation of Strawberries
Start by rinsing the strawberries under cold water. Use paper towels to dry them gently. Next, slice off the green tops. You want to make space for the filling. Carefully hollow out the center of each strawberry. Use a small spoon or a melon baller for this. Be careful not to break the strawberries as you do this.
Making the Cheesecake Filling
In a mixing bowl, combine the softened cream cheese and powdered sugar. Add the vanilla extract and lemon juice to this mix. Blend everything together using a hand mixer or spatula. You want it to be smooth and creamy. This step is key for a tasty filling.
Filling the Strawberries
Take a piping bag or a zip-top bag with a corner snipped off. Fill it with the cheesecake mixture. Pipe the filling into each hollowed strawberry. Make sure to fill them generously for the best flavor. After filling, sprinkle crushed graham crackers on top. This adds a nice crunch. Place the strawberries on a serving platter. For extra flair, garnish with fresh mint leaves. They add both color and flavor.
Tips & Tricks
Achieving the Perfect Creamy Filling
To get that smooth, creamy filling, use softened cream cheese. It mixes better this way. Blend it with powdered sugar, vanilla extract, and lemon juice. This mix should be smooth and easy to pipe. If it's too thick, add a tiny bit of milk. This small step helps achieve the right texture.
Best Practices for Hollowing Strawberries
Start with large, ripe strawberries for the best results. Rinse and dry them first. Cut off the green tops, then use a small spoon or a melon baller. Be gentle as you hollow them out. Make enough space for the filling, but don't cut too deep. You want to keep the shape and integrity of the berry.
Presentation Tips for Serving
For a beautiful presentation, arrange the filled strawberries on a nice plate. Add a sprinkle of crushed graham crackers on top for crunch. If you like, garnish with fresh mint leaves. This adds color and flavor. A simple touch makes your dessert look fancy and inviting.
Pro Tips
- Choose the Right Strawberries: Select large, ripe strawberries for the best flavor and to ensure there's enough space for the cheesecake filling.
- Soften Cream Cheese Properly: Let the cream cheese sit at room temperature for about 30 minutes before mixing for a smooth and creamy filling.
- Variations on Toppings: Experiment with different toppings like crushed nuts, chocolate shavings, or coconut flakes for a unique twist.
- Chill Before Serving: For best results, refrigerate the stuffed strawberries for at least 30 minutes before serving to allow the flavors to meld and the filling to firm up slightly.
Variations
Flavor Variations (Chocolate, Nutella, etc.)
You can change the flavor of your cheesecake filling. Try mixing in chocolate or Nutella. Just add these to the cream cheese mix. Use 1/4 cup of chocolate or Nutella for a rich taste. You can also add cocoa powder for a chocolate cheesecake. This makes each bite taste like dessert heaven.
Alternative Garnishes
Garnishes add fun and flair. Instead of graham crackers, use crushed cookies or nuts. Crushed Oreos give a nice chocolate crunch. You can also drizzle melted chocolate on top for extra sweetness. Fresh berries, like blueberries or raspberries, make great garnishes too. They add color and a fresh taste.
Using Other Fruits
Strawberries are great, but other fruits work too. Try using hollowed-out bananas or peaches. Each fruit gives a new taste and texture. Melons, like cantaloupe, can also be fun to stuff. Just make sure the fruit is firm enough to hold the filling. This way, you can enjoy cheesecake in many forms!
Storage Info
How to Store Cheesecake Stuffed Strawberries
To keep your cheesecake stuffed strawberries fresh, store them in the fridge. Place them in a single layer in a container. Cover the container loosely with plastic wrap or a lid. This will help keep them fresh without making them soggy.
Shelf Life and Freshness Tips
These tasty treats stay fresh for about 1 to 2 days. After that, the strawberries may start to lose their firmness. Check them daily. If they look soft or mushy, it's time to eat them. For the best taste, enjoy them the day you make them.
Freezing Instructions
Freezing cheesecake stuffed strawberries is not ideal. The texture changes when thawed. If you want to freeze them, do this: First, fill the strawberries and place them on a baking sheet. Freeze them until solid. Then, move them to a freezer-safe bag. They can last up to a month this way. When you're ready to eat, let them thaw in the fridge. Expect a softer texture, but they will still taste good!
FAQs
Can I make cheesecake stuffed strawberries ahead of time?
Yes, you can make cheesecake stuffed strawberries ahead of time. Prepare them a few hours before serving. This helps the flavors blend. Just keep them in the fridge until you are ready to enjoy them.
What can I use instead of cream cheese?
If you want a substitute for cream cheese, try mascarpone cheese. It gives a similar creamy texture. You can also use Greek yogurt for a lighter option. Just keep in mind that the taste may change a bit.
Are cheesecake stuffed strawberries healthy?
Cheesecake stuffed strawberries can be a healthier treat. Strawberries are full of vitamins and fiber. The cream cheese adds some protein, but it also has fat. The key is to enjoy them in moderation.
How do I prevent strawberries from leaking?
To stop strawberries from leaking, pick firm ones. Hollow them gently to avoid breaking the skin. After filling, chill them before serving. This helps the filling set and keeps the strawberries intact.
Can I use a different sweetener for the filling?
Yes, you can use other sweeteners. Honey or maple syrup can work well. If you prefer a low-calorie option, try stevia or erythritol. Just adjust the amount to taste.
You learned how to make cheesecake stuffed strawberries, from choosing fresh fruit to making a creamy filling. I shared tips on hollowing out strawberries and presenting them beautifully. You also discovered fun variations and how to store these treats.
As you create your own versions, let your taste guide you. Enjoy the process of making these tasty snacks, and don’t hesitate to get creative with flavors and toppings! Happy cooking!