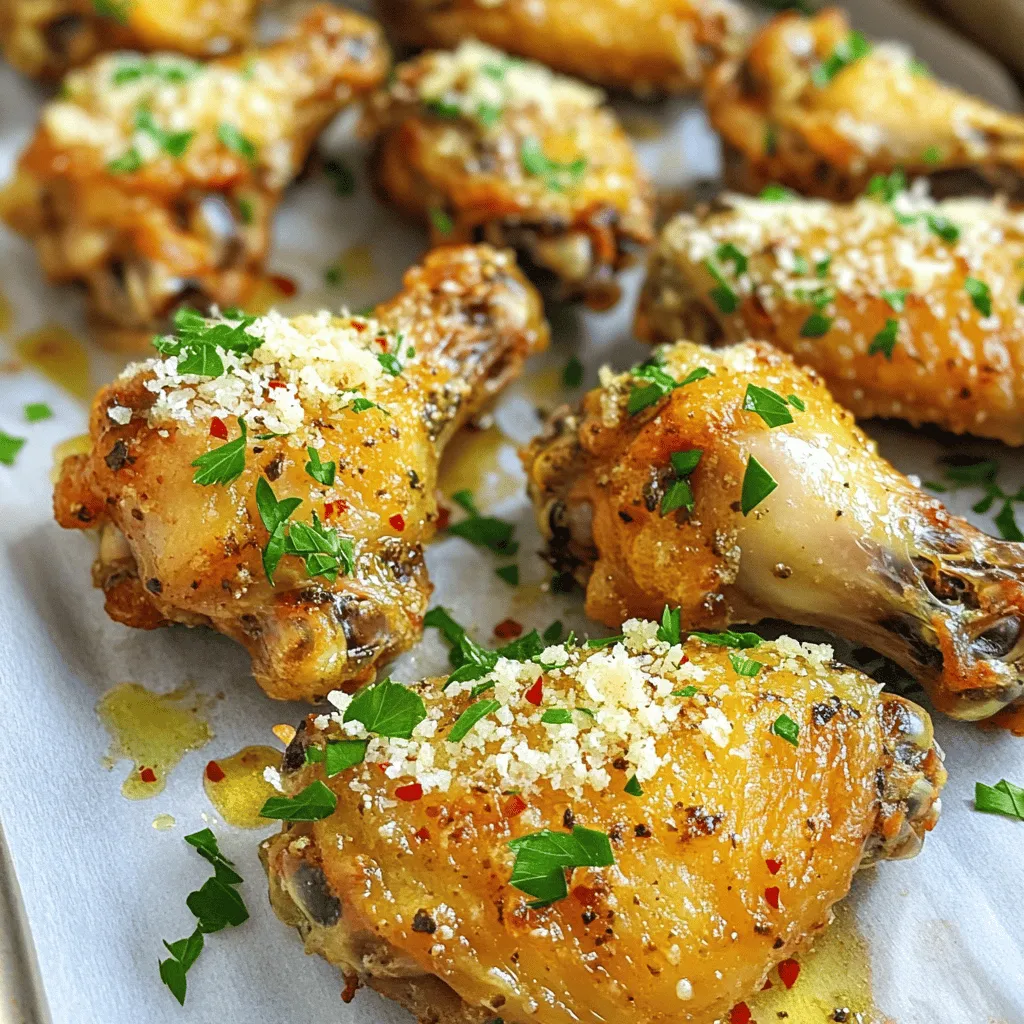
If you crave a crispy and flavorful snack, I have just the recipe for you: Baked Garlic Parmesan Wings! These wings are easy to make and packed with delicious flavor. No frying is needed, so you can enjoy a healthier treat. I’ll walk you through the steps, tips, and possible variations. Get ready to impress your friends and family with this standout dish! Let’s dive into the goodness!
Ingredients
List of Ingredients with Measurements
– 2 pounds chicken wings
– 1/4 cup olive oil
– 1 tablespoon garlic powder
– 1 teaspoon onion powder
– 1 teaspoon paprika
– 1 teaspoon black pepper
– 1 teaspoon salt
– 1 cup grated Parmesan cheese
– 1/4 cup fresh parsley, chopped
– 2 tablespoons lemon juice
– 1/2 teaspoon red pepper flakes (optional for heat)
Optional Ingredients for Extra Flavor
– Try adding 1 teaspoon of cayenne pepper for more heat.
– Use fresh garlic instead of garlic powder for a bolder taste.
– Mix in some Italian seasoning for an herby twist.
Recommended Tools and Equipment
– Large mixing bowl for combining ingredients.
– Baking sheet lined with parchment paper or foil for easy cleanup.
– Measuring cups and spoons to ensure accuracy.
– A pair of tongs for flipping the wings while baking.
– Small bowl for mixing the garlic Parmesan sauce.
These tools make the cooking process smooth and fun. You can easily find these items in most kitchens. Using fresh ingredients elevates the flavor of your wings. Enjoy creating this tasty dish!
Step-by-Step Instructions
Preparing the Oven and Baking Sheet
Start by preheating your oven to 400°F (200°C). This step is key for crispy wings. Next, line a baking sheet with parchment paper or aluminum foil. This makes cleanup easy. Make sure to use a large sheet, so the wings have space.
Mixing the Marinade and Coating the Wings
In a large bowl, combine the olive oil, garlic powder, onion powder, paprika, black pepper, and salt. Mix these ingredients well until combined. Then, add the chicken wings. Toss them gently until every wing is coated with the mixture. This ensures the wings will be packed with flavor.
Baking Process for Perfectly Crispy Wings
Spread the wings in a single layer on the prepared baking sheet. This step is crucial for even cooking. Bake the wings in the oven for 40-45 minutes. Flip them halfway through cooking for even crispiness. Watch for a golden brown color; that’s when they are done.
Making the Garlic Parmesan Sauce
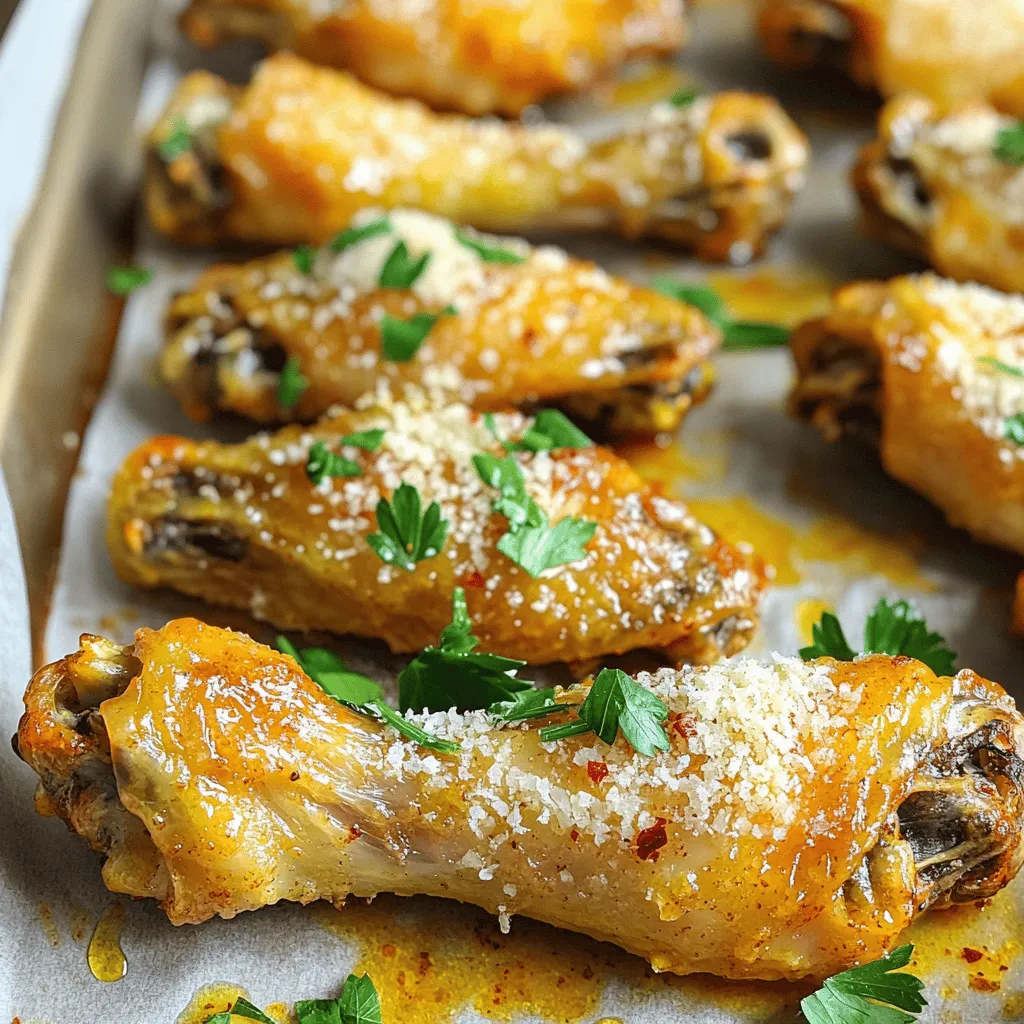
While the wings bake, prepare the garlic Parmesan sauce. In a small bowl, mix the grated Parmesan cheese, chopped parsley, lemon juice, and red pepper flakes if you like heat. This sauce adds a rich, tangy flavor. When the wings are out of the oven, toss them in this sauce until well coated. Return the wings to the oven for 5 more minutes. This allows the cheese to melt and stick. Enjoy your crispy, flavorful wings!
Tips & Tricks
How to Achieve Crispiness Without Frying
To get crispy wings, use high heat. Baking at 400°F (200°C) works well. Make sure to coat the wings in olive oil. This keeps them moist while they cook. Spread them out on the baking sheet. Avoid stacking them. This helps air circulate and makes them crispy. Flip the wings halfway through cooking. This gives both sides a chance to brown.
Recommended Cooking Times for Different Oven Types
Most home ovens cook well at 400°F (200°C). If you have a convection oven, bake for 35-40 minutes. The fan helps cook the wings faster. For electric ovens, stick to 40-45 minutes. Always check for a golden brown color. The wings should look crispy and smell amazing. Use a meat thermometer if you want to be sure. The wings should reach an internal temperature of 165°F (74°C).
Common Mistakes to Avoid
One mistake is not drying the wings first. Pat them dry with paper towels. This helps them get crispier. Another mistake is overcrowding the baking sheet. Give the wings space. This helps them cook evenly. Don’t forget to toss the wings in the garlic Parmesan mix right after baking. If you wait too long, the cheese won’t stick well. Finally, always watch the wings closely. They can go from golden to burnt quickly!
Variations
Spicy Garlic Parmesan Wings
To add some heat, try spicy garlic Parmesan wings. Start with the basic recipe. Then, mix in red pepper flakes. You can use one teaspoon for mild spice or up to one tablespoon for a big kick. This spicy twist adds an exciting flavor to your wings. You can also use hot sauce in the garlic Parmesan mixture if you want. Just remember to balance the heat with the cheese for a tasty treat.
Herb-Infused Flavor Options
Herbs can make your wings even better. Add fresh herbs like rosemary or thyme in the garlic Parmesan sauce. You can mix in one tablespoon of either herb for a nice flavor. If you prefer dried herbs, use half a teaspoon instead. This will give your wings a lovely aroma and a fresh taste. You can also try a mix of herbs. Blend them with the cheese for a unique twist.
Alternative Cheese Choices
While Parmesan is great, you can switch it up. Try using Asiago cheese for a sharper flavor. Grate it just like Parmesan. You can also mix mozzarella with Parmesan for a creamy texture. This will create a fun cheese pull when you take a bite. Experiment with different cheeses to find the perfect match for your taste. Each option brings a new and exciting flavor to the wings.
Storage Info
How to Properly Store Leftover Wings
After enjoying your baked garlic Parmesan wings, you may have some left. To store them, let the wings cool to room temperature. Place them in an airtight container. This way, they stay fresh and tasty. If you have a lot, consider separating layers with parchment paper. This helps prevent sticking. Store the container in the fridge for up to three days.
Reheating Tips for Maximum Crispiness
When you’re ready to eat the wings again, reheating is key. Preheat your oven to 375°F (190°C). Spread the wings in a single layer on a baking sheet. Bake for about 10-15 minutes. This will help them regain their crispiness. You can also use an air fryer for about 5-7 minutes. Both methods will keep your wings delicious!
Freezing for Long-Term Storage
For long-term storage, freezing is a great option. First, let the wings cool completely. Then, place them in a freezer-safe bag. Remove as much air as possible before sealing. Label the bag with the date, so you remember when you froze them. They can last in the freezer for up to three months. When you’re ready to eat, thaw them in the fridge overnight before reheating.
FAQs
Can I use frozen chicken wings for this recipe?
Yes, you can use frozen chicken wings. Just be sure to thaw them first. This helps with even cooking and crispiness. To thaw, place them in the fridge overnight or run them under cold water for a quick thaw. Once thawed, follow the recipe as usual. This way, you still get that tasty garlic and Parmesan flavor.
What temperature should I cook chicken wings?
Cook chicken wings at 400°F (200°C). This temperature makes them crispy on the outside and juicy inside. Preheating your oven is key. It ensures even cooking and a nice brown color. Line your baking sheet with parchment paper for easy cleanup and better results.
How do I know when the wings are fully cooked?
Check the internal temperature of the wings. They should reach 165°F (74°C) when done. Use a meat thermometer to confirm this. The wings should also look golden brown and crispy. If you flip them halfway through baking, it helps them cook evenly. Enjoy your delicious wings!
This blog shared how to make delicious chicken wings at home. You learned about key ingredients, optional flavors, and the right tools. The step-by-step guide ensured your wings come out crispy and tasty. I provided tips to avoid common mistakes, cooking time advice, and various flavor options to try.
In the end, whether you store them or try a spicy twist, these wings make a great meal. Enjoy your cooking adventure!