FREE DINNER EBOOK! Get your copy!
  • Cookie Policy
  • GDPR Policy
  • Disclaimer
  • Terms Of Use
  • Visit my other site: Fun Cookie Recipes
cozy citrus kitchen
  • Home
  • Dinner
  • Desserts
  • Drinks
  • Appetizers
  • Contact
  • About
  • Privacy Policy
  • Home
  • Dinner
  • Desserts
  • Drinks
  • Appetizers
  • Contact
  • About
  • Privacy Policy
  • Cookie Policy
  • GDPR Policy
  • Disclaimer
  • Terms Of Use
Visit my other site: Fun Cookie Recipes

HOME / CATEGORIES /

Latest

To make Cajun Chicken Caesar Wraps, you need: - 2 boneless, skinless chicken breasts - 2 tablespoons Cajun seasoning - 2 tablespoons olive oil - 4 large whole wheat tortillas - 1 cup romaine lettuce, chopped - 1/2 cup grated Parmesan cheese - 1/3 cup Caesar dressing - Salt and pepper to taste These main ingredients give your wraps great flavor and texture. The chicken brings protein, while the Cajun seasoning adds a spicy kick. Whole wheat tortillas offer a healthy base for your meal. You can add extra freshness with: - Sliced tomatoes - Sliced avocado Adding these ingredients boosts the flavor and makes the wraps more colorful. Tomatoes add a juicy bite, while avocados contribute creaminess. Feel free to mix and match based on your taste. If you have dietary needs, here are some swaps: - Use tofu or tempeh instead of chicken for a plant-based option. - Replace whole wheat tortillas with gluten-free wraps. - Choose dairy-free Caesar dressing to make it vegan. These substitutions help you enjoy Cajun Chicken Caesar Wraps while sticking to your diet. Just remember to adjust cooking times if you use different proteins. {{ingredient_image_1}} Start by preheating your grill or stovetop grill pan over medium-high heat. This step is key for a nice char. In a bowl, mix together the Cajun seasoning and olive oil. This mix will add flavor to your chicken. Coat the chicken breasts evenly with this marinade. Let them sit for about 15 minutes. This allows the flavors to soak in. Once the grill is hot, place the chicken on it. Cook for about 6-7 minutes on each side. Use a meat thermometer to check if it reaches 165°F. Once done, take the chicken off the grill and let it rest before slicing. This keeps the juices inside the meat. In a large bowl, combine the chopped romaine lettuce, sliced chicken, grated Parmesan cheese, and Caesar dressing. Toss everything gently until it's all coated. This mix is full of flavor! Now, grab your tortillas. Place a good amount of the chicken Caesar mix in the center of each tortilla. If you like, add slices of tomato and avocado for extra taste. Fold the sides of the tortilla inward. Then, roll it from one end to the other. Make sure the filling stays inside. Serve the wraps right away for the best taste. You can also wrap them in foil for lunch later. To make it look nice, slice each wrap in half diagonally. Arrange them on a platter, adding some extra lettuce and a sprinkle of Parmesan. This adds a pop of color and makes it appealing. Enjoy your tasty creation! To make your Cajun Chicken Caesar Wraps stand out, the marinade is key. Mix Cajun seasoning with olive oil. This blend helps the chicken soak up flavor. Let it marinate for at least 15 minutes. You can also marinate for a few hours. This adds depth to the taste. Feel free to experiment with the seasoning. Add garlic powder or paprika for a twist. Grilling chicken can be easy with the right steps. Preheat your grill to medium-high. This ensures even cooking and nice grill marks. Cook each chicken breast for 6-7 minutes on each side. Use a meat thermometer to check the internal temperature. It should reach 165°F (75°C). Let the chicken rest for a few minutes before slicing. This keeps it juicy and tender. Serving your wraps well makes them more appealing. Slice each wrap in half diagonally. Place them on a nice platter. Add extra lettuce and a sprinkle of Parmesan on top for a pop. You can also use colorful tomatoes and avocado for a fresh look. This makes your meal not just tasty but also beautiful. Pro Tips Marinate for Maximum Flavor: Allow the chicken to marinate for at least 15 minutes, or even up to 2 hours if time permits, to enhance the Cajun flavors. Grill to Perfection: Ensure your grill is adequately preheated to achieve those beautiful grill marks and to cook the chicken evenly. Freshness is Key: Add freshly sliced tomatoes and avocado just before serving to keep them crisp and vibrant. Wrap It Right: When rolling the wrap, ensure you fold in the sides first to keep all the delicious filling tucked securely inside. {{image_2}} You can easily make this wrap vegetarian. Instead of chicken, try grilled or roasted vegetables. Bell peppers, zucchini, and mushrooms work great. You can also use chickpeas for protein. Simply season them with Cajun spices before grilling. This gives a nice flavor and texture. If you love heat, add more spice! You can stir in some hot sauce into the Caesar dressing. Another option is to sprinkle crushed red pepper flakes on top. For a smoky flavor, try chipotle seasoning on the chicken. These small changes pack a big punch. For a gluten-free wrap, swap out the whole wheat tortillas. Look for gluten-free tortillas made from rice or corn. You can also serve the filling in a bowl if you prefer. This way, you enjoy all the flavors without the gluten! To store leftover wraps, first let them cool down. Place them in an airtight container. You can keep them in the fridge for up to three days. If you want to keep them longer, wrap them tightly in foil or plastic wrap. This way, they stay fresh and tasty. If you want to freeze your wraps, make sure they are fully cooled. Wrap each one in plastic wrap or foil. Then, place them in a freezer-safe bag. You can freeze them for up to three months. This is a great way to have a quick meal ready for later. To reheat your wraps, the oven works best. Preheat your oven to 350°F (175°C). Remove the wrap from the fridge or freezer and unwrap it. Place it on a baking sheet. Heat for about 10-15 minutes until warm. You can also use a microwave, but the oven keeps the wrap crispy. Enjoy your tasty meal! Cajun seasoning is a spice blend from Louisiana. It brings heat and depth to dishes. You can make your own mix at home. Combine paprika, cayenne, garlic powder, onion powder, oregano, thyme, and black pepper. Adjust the spices based on your taste. This way, you control the heat and flavor. Yes! You can use various lettuce types. Romaine is crisp and holds up well. Iceberg offers a nice crunch. You can also try spinach or mixed greens for a twist. Each type adds its own flavor and texture. Just choose what you like best! Several sides work great with these wraps. Consider sweet potato fries for a tasty crunch. A fresh salad adds color and nutrition. You might like coleslaw for a creamy contrast. Corn on the cob is another fun choice. Each side complements the wraps nicely! This blog post covered everything about Cajun Chicken Caesar Wraps. We discussed key ingredients and many tasty options. I shared tips for grilling chicken and adding flavor. You now have ideas for substitutions and storage. Remember, wraps can be fun and versatile. Feel free to experiment with different flavors and ingredients. Enjoy your cooking and make this dish your own!

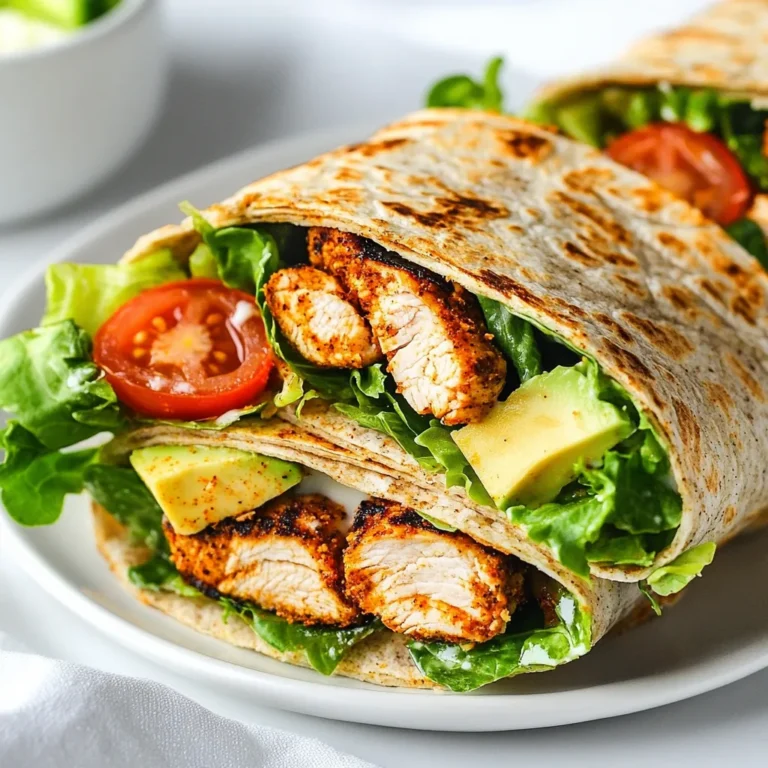
Cajun Chicken Caesar Wraps Simple and Tasty Meal

- 2 cups rotini pasta - 1 ½ cups cooked chicken breast, shredded - 1 cup cherry tomatoes, halved - 1 cup corn kernels (fresh or frozen) - 1 cup green bell pepper, diced - ½ cup red onion, finely chopped - ½ cup shredded cheddar cheese - ¾ cup BBQ sauce (choose your favorite) - ¼ cup ranch dressing - Salt and pepper to taste - Fresh cilantro or parsley for garnish Gathering the right ingredients is key for a tasty BBQ chicken pasta salad. First, you need rotini pasta. This fun shape holds sauce well. Next, grab 1 ½ cups of cooked chicken breast. Shredding the chicken makes it easy to mix. Don’t forget about the veggies! You’ll need 1 cup of cherry tomatoes, halved for sweetness. Add 1 cup of corn kernels for crunch. Then, dice 1 cup of green bell pepper. This adds a nice, fresh bite. Use ½ cup of finely chopped red onion for a bit of zing. Now, let’s talk cheese! You’ll want ½ cup of shredded cheddar cheese. This will melt into the salad nicely. Then, you’ll need ¾ cup of BBQ sauce. Pick your favorite brand or type. Finally, grab ¼ cup of ranch dressing. This brings creaminess to the dish. Season with salt and pepper to taste. For a nice finish, use fresh cilantro or parsley as a garnish. This adds color and a touch of flavor. {{ingredient_image_1}} First, boil 2 cups of rotini pasta in salted water. Follow the package instructions for cooking time, usually around 8-10 minutes. You want the pasta to be firm but not hard. This is called al dente. Once done, drain the pasta in a colander. Rinse it under cold water to stop the cooking process and cool it down. This helps prevent a mushy texture. In a large bowl, mix together 1 ½ cups of shredded chicken, 1 cup of halved cherry tomatoes, 1 cup of corn kernels, diced green bell pepper, and ½ cup of finely chopped red onion. These ingredients bring color and flavor to the salad. Gently add the cooled pasta to this vegetable and chicken mix, tossing carefully so everything combines well. To make the dressing, take ¾ cup of your favorite BBQ sauce and mix it with ¼ cup of ranch dressing in a separate bowl. Stir it well until the two sauces blend smoothly. This dressing adds a nice zing to the salad and makes it extra tasty. Pour the BBQ ranch dressing over your pasta salad. Gently fold the ingredients together. This ensures that every bite is full of flavor. Then, stir in ½ cup of shredded cheddar cheese. Season with salt and pepper to taste. Cover the bowl and refrigerate the salad for at least 30 minutes. Chilling is key, as it allows the flavors to meld together, making each bite delicious. You can make this BBQ chicken pasta salad your own! Here are some ideas: - Adding extras: Try mixing in avocado for creaminess or crispy bacon for crunch. - Substituting dressings: Swap ranch for a honey mustard or a spicy sauce to change the flavor. Make your meal even better with these tips: - Pairing with sides: Serve your salad with garlic bread or fresh fruit. These sides will balance the flavors. - Presentation tips: Use a large bowl for serving. Garnish with fresh herbs for a pop of color. Keep your pasta salad tasting great with these tricks: - Ingredient substitutions: Use different veggies like cucumbers or bell peppers. You can even add beans for protein. - Ensuring freshness: Store leftovers in an airtight container. It will stay fresh for up to three days in the fridge. Pro Tips Use Fresh Ingredients: Opt for fresh vegetables and high-quality BBQ sauce for a vibrant flavor that enhances the overall dish. Customize Your Protein: Feel free to substitute the chicken with grilled shrimp or tofu for a different protein option. Add Crunch: Incorporate some chopped nuts, like pecans or walnuts, for an added crunch and flavor dimension. Serve Cold: This salad is best served cold, so make sure to refrigerate it long enough for the flavors to blend beautifully. {{image_2}} If you want a meat-free option, consider using chickpeas or tofu. Both add protein and texture. For a vegan twist, try jackfruit as a meat substitute. It has a great texture and takes on flavors well. You can also use tempeh or seitan for a hearty choice. Make your salad spicy by adding jalapeños. They give a nice kick that pairs well with BBQ sauce. For a sweeter taste, add fruits like pineapple or mango. Their natural sweetness balances the tangy BBQ and ranch dressing. You can swap rotini for gluten-free pasta if needed. Whole-wheat pasta is another healthy option. For a cold pasta salad, consider using small shapes like macaroni or orzo. They soak up the flavors beautifully and make for easy eating. You can keep BBQ chicken pasta salad in the fridge for up to three days. Store it in an airtight container to keep it fresh. Glass or plastic containers work well. Make sure the lid is tight. This helps maintain the flavors and texture. When it’s time to eat, you can serve the salad cold or warm it up. If you prefer it warm, use the microwave. Heat it in short bursts. Stir in between to warm it evenly. If the flavors seem dull after storage, add a splash of BBQ sauce or ranch dressing. This will brighten up the taste. Enjoy it fresh! Yes, you can make BBQ chicken pasta salad ahead of time. I recommend making it up to a day in advance. This gives the flavors time to blend and deepen. When you chill it, the taste improves. The pasta absorbs the sauce, making it even more tasty. For the best flavor, choose a BBQ sauce that you enjoy. I like sauces that are sweet and tangy. Brands like Sweet Baby Ray's or Stubb's work great. If you're feeling adventurous, try making your own BBQ sauce. Just mix ketchup, brown sugar, vinegar, and spices for a quick homemade option. Yes, this salad is great for meal prep. To store, divide it into meal-sized containers. Use airtight containers to keep it fresh. Each serving is filling, with chicken and pasta providing protein and carbs. Keep in mind that the flavors get better as it sits, making it a perfect choice for busy days. This blog post covered how to create a tasty BBQ chicken pasta salad. You learned about the key ingredients and step-by-step cooking instructions. I shared tips on customizing your salad and keeping it fresh. Don’t forget the variations for different diets or flavors. Proper storage and reheating keep your salad enjoyable. Remember, you can make it ahead for the best taste. Enjoy sharing this dish with your loved ones. It's easy, fun, and full of flavor!

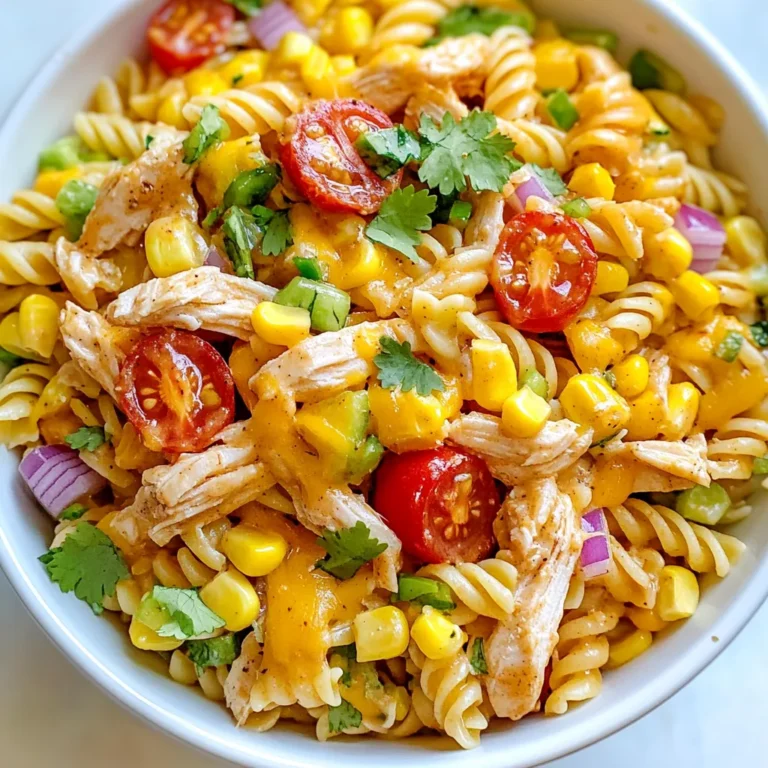
BBQ Chicken Pasta Salad Tasty and Simple Dish

To make a delicious Caramel Apple Dump Cake, you will need: - 2 cans (21 oz each) apple pie filling - 1 cup caramel sauce (divided) - 1 tsp ground cinnamon - 1 box yellow cake mix (15.25 oz) - 1 cup unsalted butter, melted You can add these for extra flavor: - 1 cup chopped pecans or walnuts - 1/2 cup rolled oats - Vanilla ice cream or whipped cream for serving If you have special dietary needs, consider these swaps: - Use gluten-free cake mix for a gluten-free option. - Substitute coconut oil for butter if you want a dairy-free version. - Replace nuts with seeds for a nut-free option. To start, gather your ingredients. You will need two cans of apple pie filling, caramel sauce, ground cinnamon, yellow cake mix, melted butter, and optional nuts or oats. Preheat your oven to 350°F (175°C). Next, grab a 9x13 inch baking dish. Spread the apple pie filling evenly at the bottom. Drizzle half of the caramel sauce over the filling, about ½ cup. Then, sprinkle ground cinnamon on top. In a mixing bowl, combine the yellow cake mix, oats, and nuts if you choose to use them. Mix well to combine. Now, sprinkle the cake mix mixture evenly over the apple pie filling. Make sure to cover it completely. Pour the melted butter evenly over the cake mix layer. Do not stir; it should look a bit clumpy. Place the baking dish in your preheated oven. Bake for 35-40 minutes. The top should turn golden brown and bubble. Once baked, take the cake out of the oven and let it cool for a few minutes. Drizzle the remaining caramel sauce over the top. This adds a nice touch. Serve the cake warm. It pairs perfectly with a scoop of vanilla ice cream or a dollop of whipped cream. Enjoy this simple and delicious treat! To make a great caramel apple dump cake, follow these simple tips. First, use high-quality apple pie filling. This gives your cake a rich flavor. Next, evenly spread the filling in the baking dish. This helps it cook evenly. Mix the ground cinnamon with the cake mix, so the flavor spreads well. Pour the melted butter carefully over the cake mix. This keeps the top from being too dry. Lastly, let the cake cool a bit before serving. It helps the flavors blend nicely. Avoid these common mistakes when making your dump cake. Do not skip the cinnamon. It adds warmth and spice to the dish. Ensure you cover all the apple filling with the cake mix. If you leave gaps, the filling may burn. Don't stir the butter into the cake mix. This can ruin the texture. Also, watch your baking time. Overbaking makes the cake dry. Check it around 35 minutes to see if it's golden brown. Toppings can take your dump cake to the next level. Try adding more caramel sauce on top. This makes it sweet and sticky. Chopped nuts add a nice crunch. Pecans or walnuts work great. You can also sprinkle some oats on top before baking. They add flavor and texture. Finally, serve your dump cake warm with a scoop of vanilla ice cream. The cold ice cream melts into the warm cake, making each bite a delight. {{image_2}} You can switch up the fruit in this dump cake. Try using peach pie filling for a sweet twist. Cherry pie filling adds a nice tart flavor. You can also use mixed berries for a fun and fruity mix. Each fruit changes the taste, but they all work great with caramel. If you want a nut-free version, skip the nuts. The cake will still taste amazing. For a gluten-free option, use a gluten-free cake mix instead of yellow cake mix. Double-check that your caramel sauce is also gluten-free. This way, everyone can enjoy the dessert without worry. Get creative with your toppings! Instead of vanilla ice cream, try a scoop of cinnamon ice cream. Add a sprinkle of sea salt on top for a sweet and salty combo. You can even mix in some chocolate chips for added richness. These twists keep the dessert fun and exciting! To keep your caramel apple dump cake fresh, let it cool first. Once cool, cover it tightly with plastic wrap or foil. You can also use an airtight container. Store it in the fridge for up to four days. This helps keep the flavors locked in and the cake moist. When you’re ready to enjoy it again, reheat it gently. Preheat your oven to 350°F (175°C). Place the leftover cake in an oven-safe dish. Cover it with foil to prevent it from drying out. Heat for about 15-20 minutes. You can also use a microwave for quick reheating. Heat in short bursts of 30 seconds until warm. If you want to save some for later, freezing works great! Cut the cake into portions and wrap each piece tightly in plastic wrap. Place the wrapped pieces in a freezer bag or container. You can freeze it for up to three months. To serve, thaw it in the fridge overnight and reheat as needed. Enjoy your sweet treat whenever you like! A dump cake is a simple dessert. You layer ingredients in a pan without mixing. It often includes fruit filling, cake mix, and butter. As it bakes, the cake mix forms a crust. The fruit stays soft and sweet. It's easy to make and fun to eat. Yes, you can prep this recipe ahead. Just assemble it in the baking dish. Cover it and store it in the fridge. Bake it when you are ready. This way, you save time on busy days. It still tastes fresh and delicious. To make this cake nut-free, simply skip the nuts. The recipe will still taste great. You can also add more oats for texture. You can use 1 cup of rolled oats instead of nuts. This keeps the flavor while making it safe for nut allergies. Yes, homemade apple filling works well in this recipe. Just make sure it’s cooked and sweetened to your taste. Use about 42 ounces of filling. Spread it evenly in the pan, just like the canned version. Your dump cake will still be tasty and comforting. This blog post covered everything you need for a successful Caramel Apple Dump Cake. We discussed required ingredients, helpful substitutions, and tips for making it perfect. I shared steps for preparation, baking, and serving. Plus, I gave variations and storage ideas to keep it fresh. Now you’re ready to create a delicious dessert that impresses everyone. Enjoy your baking and let the flavors shine!

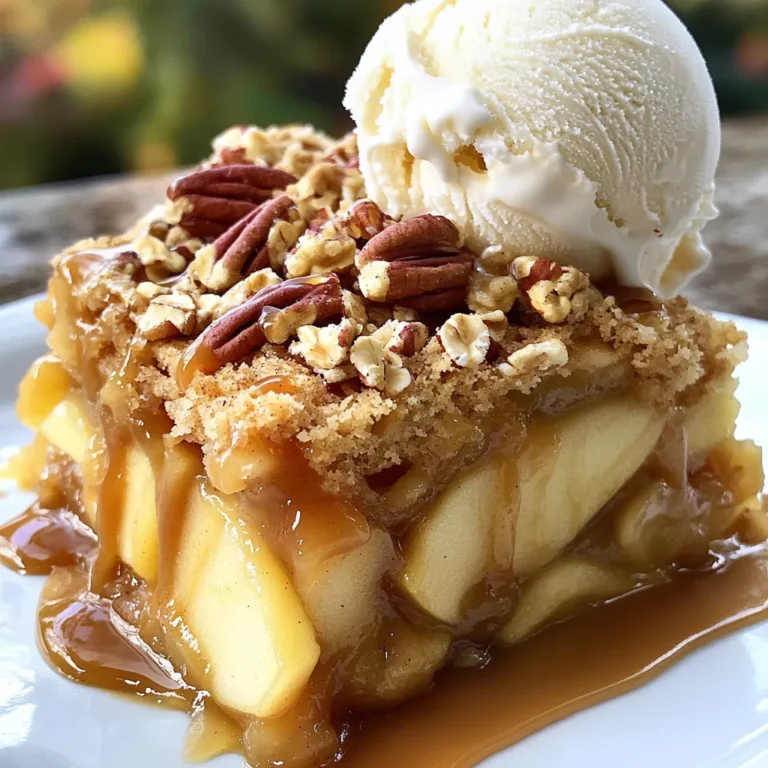
Caramel Apple Dump Cake Simple and Delicious Treat

To make this tasty dish, you need a few main ingredients: - 2 cups fresh cheese tortellini - 4 tablespoons unsalted butter - 4 cloves garlic, minced - 1 cup cherry tomatoes, halved - 1 cup baby spinach - 1 teaspoon red pepper flakes (adjust to taste) - Salt and pepper to taste These ingredients blend well to create a rich and flavorful meal. Fresh cheese tortellini gives a nice texture. The garlic adds depth, while cherry tomatoes provide sweetness. Baby spinach adds color and nutrients. You can take this meal to the next level with some extras: - Fresh basil leaves for garnish - Grated Parmesan cheese for serving Basil gives a fresh taste. Parmesan adds a salty finish. You can serve this dish with crusty bread for a complete meal. This dish is not only quick but also balanced. Here’s a rough breakdown for one serving: - Calories: ~400 - Protein: ~12g - Carbohydrates: ~50g - Fat: ~18g These numbers can vary based on the exact ingredients used. It’s a satisfying meal packed with flavor and nutrients. Start by boiling a large pot of salted water. This helps add flavor to the tortellini. Once boiling, add 2 cups of fresh cheese tortellini. Cook them until they float, which takes about 3 to 5 minutes. Fresh tortellini cooks quickly, so keep an eye on them. After they float, drain the tortellini and set them aside. This step is key to making sure they stay tender. In a large skillet, melt 4 tablespoons of unsalted butter over medium heat. Once the butter is melted, add 4 cloves of minced garlic. Sauté the garlic for about 1 minute. You want it fragrant but not brown, as that can make it bitter. Next, add 1 cup of halved cherry tomatoes. Cook them for 2 to 3 minutes until they soften. This adds a fresh, juicy flavor to your dish. Now, it’s time to bring everything together. Stir in the cooked tortellini and 1 cup of baby spinach. Gently toss all the ingredients in the skillet. Cook for about 2 minutes until the spinach wilts down. This adds color and nutrients to your meal. Season the mixture with 1 teaspoon of red pepper flakes, salt, and pepper. Mix well to combine all the flavors. Finally, remove the skillet from heat. Garnish with fresh basil leaves and a sprinkle of grated Parmesan cheese. Your Minute Garlic Butter Tortellini Skillet is ready to enjoy! To make this dish pop, use fresh ingredients. Fresh garlic brings a strong taste. Use good quality butter for a rich flavor. Don't rush the sautéing process. Let the garlic cook gently until it smells great. When you add the tomatoes, let them soften a bit. This helps release their juices, adding more depth to the sauce. Mixing in fresh basil at the end gives a nice aroma and taste. Fresh tortellini cooks quickly, usually in just 3-5 minutes. They float when ready. Frozen tortellini takes longer, about 7-10 minutes. Always check the package for exact times. If using frozen, you don’t need to thaw them first. Just throw them right into the boiling water. They will taste great, but fresh has a lighter texture. If you have leftovers, store them in an airtight container. Keep them in the fridge for up to 3 days. Reheat in a skillet over low heat. Add a splash of water to help steam the pasta. This keeps it moist and tasty. You can also freeze leftovers. Place them in a freezer-safe container for up to 2 months. Just remember to label them with the date! {{image_2}} You can add proteins to this dish for more flavor and nutrition. Cooked chicken works well. Just chop it into bite-sized pieces. Shrimp adds a nice touch too. Simply sauté it until pink. If you prefer a plant-based option, tofu is perfect. Use firm tofu, cube it, and cook until golden. Each option adds taste and makes the meal heartier. Adding vegetables boosts the dish's health. You can toss in bell peppers, zucchini, or broccoli. These veggies add color and crunch. Just chop them small and stir them into your skillet. You can also use frozen peas or corn for ease. They require little prep and cook quickly. This way, you get extra nutrients without much effort. While garlic butter is tasty, feel free to mix it up. You can use olive oil instead of butter for lighter flavors. A splash of lemon juice brightens the dish nicely. If you like a creamy sauce, stir in some heavy cream or cream cheese. You might also add pesto for a unique twist. Each variation gives a new taste to your tortellini skillet. After enjoying your Minute Garlic Butter Tortellini Skillet, store leftovers in an airtight container. Make sure the dish cools to room temperature before sealing it. This helps prevent condensation, which can make the pasta soggy. You can keep it in the fridge for up to three days. If you want to eat it later, try to separate the ingredients. This keeps the flavors fresh and the textures right. To reheat your tortellini skillet, place it in a pan over low heat. Add a splash of water or broth to keep it moist. Stir often to heat everything evenly. This usually takes about 5 to 7 minutes. You can also use the microwave. Just put it in a microwave-safe bowl and cover it loosely. Heat it for about 1-2 minutes, stirring halfway through. Check to make sure it's hot all the way through. If you want to freeze your tortellini skillet, it’s best to do so without the fresh ingredients like spinach and tomatoes. Cooked tortellini can freeze well, but fresh veggies can become mushy when thawed. To freeze, let the dish cool completely and then transfer it to a freezer-safe container. It can last for up to three months in the freezer. When you're ready to eat, thaw it overnight in the fridge, then reheat as outlined above. Yes, you can use frozen tortellini. Just remember to cook it longer. Follow the package instructions for timing. Frozen tortellini usually takes about 5-7 minutes to cook. Make sure it floats to know it’s done. Drain it and then add it to the skillet as normal. The taste will still be great! To serve more people, simply increase the ingredients. For each extra serving, add more tortellini, butter, and garlic. If you want to serve four, use 3 cups of tortellini and 6 tablespoons of butter. Also, add more tomatoes and spinach for balance. Just keep the cooking times the same. Everyone will enjoy a tasty meal! If you need a butter substitute, try olive oil or vegan butter. Olive oil will give you a nice flavor. You can use the same amount as the butter. For a richer taste, try ghee. It’s a great option if you want a nutty flavor. Choose what fits your diet and enjoy! You can create a delicious garlic butter tortellini dish with ease. We covered key ingredients, step-by-step instructions, and helpful tips for the best results. Adding proteins or veggies gives you even more flavor. Remember to store leftovers well and reheat properly. Enjoy making this meal again and again! It’s simple, tasty, and perfect for any night. Cook with confidence and savor every bite of your garlic butter tortellini!

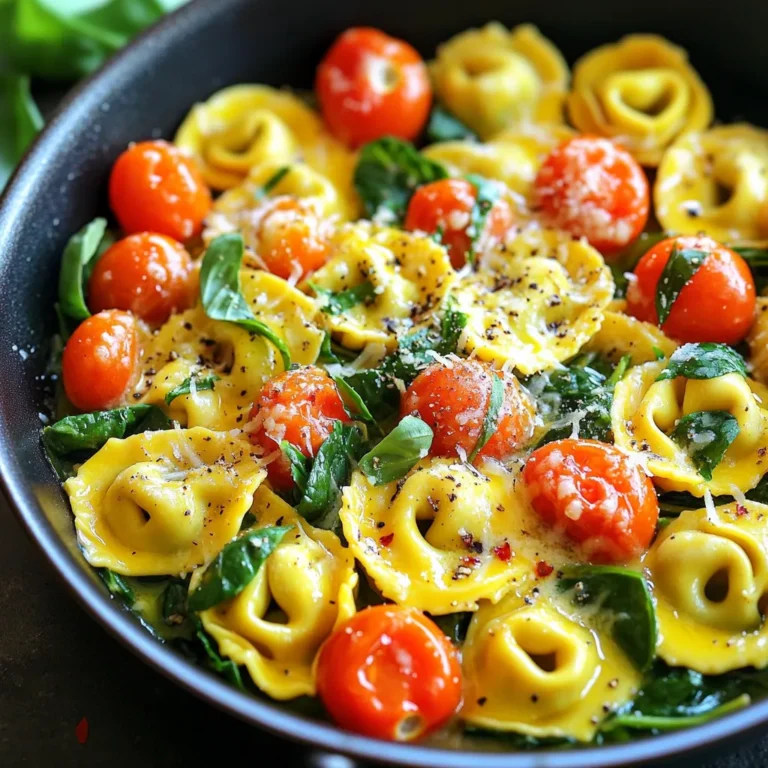
Minute Garlic Butter Tortellini Skillet Quick Meal

- 2 lbs boneless, skinless chicken thighs - 1/4 cup fresh lime juice - 1 cup chicken broth - 1 tablespoon chili powder - 1 teaspoon cumin - 1 teaspoon garlic powder - 1 teaspoon onion powder - 1/2 teaspoon smoked paprika - 1 teaspoon salt - 1/2 teaspoon black pepper - 1 can (15 oz) black beans, rinsed and drained - 1 cup corn (fresh, frozen, or canned) - 8 small corn tortillas - Fresh cilantro, chopped (for garnish) - Lime wedges (for serving) To make these tacos, I use simple yet vibrant ingredients. The chicken thighs bring a juicy base, while lime juice adds a zing. The chicken broth keeps things moist and flavorful. Next, the seasonings are key. Chili powder gives heat, while cumin adds depth. Garlic and onion powders enhance the taste. Smoked paprika adds a hint of smokiness that elevates the dish. Salt and black pepper round out the flavors. For the final touch, the additional ingredients bring color and texture. Black beans provide protein and fiber. Corn adds sweetness and crunch. The corn tortillas are perfect for wrapping everything up. Fresh cilantro and lime wedges finish the dish with brightness and freshness. These ingredients combine to create a hearty meal that satisfies any taco lover. To start, grab a bowl and squeeze in 1/4 cup of fresh lime juice. Next, add the following spices: - 1 tablespoon chili powder - 1 teaspoon cumin - 1 teaspoon garlic powder - 1 teaspoon onion powder - 1/2 teaspoon smoked paprika - 1 teaspoon salt - 1/2 teaspoon black pepper Mix these well. The lime juice will give your marinade a bright, zesty kick. This mix is key to flavorful chicken. Now, take your 2 lbs of boneless, skinless chicken thighs and place them in the slow cooker. Pour the marinade over the chicken, making sure every piece is coated well. Next, add 1 cup of chicken broth to keep the chicken moist while it cooks. Cover the slow cooker and set the time. Cook on low for 6-8 hours or high for 3-4 hours. You’ll know it’s done when the chicken pulls apart easily. Once cooked, take the chicken out and shred it using two forks. Return the shredded chicken to the slow cooker. Now, mix in 1 can of black beans (rinsed and drained) and 1 cup of corn, whether fresh, frozen, or canned. Stir until everything is well combined. Let this heat through for about 10-15 minutes on low. To serve, warm 8 small corn tortillas in a skillet or microwave. Fill each tortilla with the chicken mixture. Top with fresh cilantro and serve with lime wedges for that extra zing. Enjoy your delicious tacos! For softer chicken, cook on low heat. This allows the tissue to break down well. Aim for 6 to 8 hours on low. If you are short on time, high heat works too. Cook for 3 to 4 hours on high. If you choose different cuts, adjust your time. Chicken breasts often need less time. Cook them for 4 to 6 hours on low. To make your tacos shine, arrange them on a bright platter. Stack them neatly and keep them close. Place lime wedges and cilantro around for color. This adds a fun touch. For extra flavor, consider garnishing with avocado or salsa. These options not only taste great but also look appealing. Pair your tacos with simple sides. Rice or a fresh salad complements them well. You can also serve tortilla chips for crunch. For drinks, try pairing with a light beer or fresh lemonade. These beverages balance the spices in the tacos nicely. {{image_2}} You can switch chicken thighs for chicken breasts. Chicken breasts will cook faster and stay juicy. If you prefer turkey, feel free to use ground turkey. Ground beef works too, but it will change the flavor. For a meat-free meal, replace chicken with tofu or jackfruit. Tofu absorbs all the tasty spices well. Jackfruit has a texture similar to shredded meat. Use vegetable broth instead of chicken broth for a full flavor. Add jalapeños for a spicy kick. You can also try other spicy peppers like serranos. Experiment with different spices too. Adding oregano or coriander can give your dish a new twist. Fresh herbs like cilantro add brightness and flavor. To keep leftover tacos fresh, store them right away. Place tacos in an airtight container. You should refrigerate them within two hours of cooking. For best taste, eat leftovers within three days. When storing, keep the shredded chicken and toppings separate. This way, the tortillas won't get soggy. Use one container for the chicken and another for toppings like cilantro and lime. You can freeze cooked chili lime chicken for later use. First, let the chicken cool completely. Then, place it in a freezer-safe container. Make sure to label it with the date. Frozen chicken stays good for up to three months. When you're ready to eat, thaw the chicken in the fridge overnight. Reheat it in the microwave or on the stove. For best results, add a splash of chicken broth to keep it moist. In the fridge, leftover tacos last about three days. In the freezer, they can last up to three months. Always check for signs of spoilage. If you see mold or a strange smell, toss them out. For cooked chicken, look for any off-color or texture changes. This helps ensure you only eat safe, delicious food. To reduce spice levels, you can use less chili powder. Try adding more lime juice for flavor without the heat. Another option is to add a touch of honey or sugar to balance the spiciness. You can also serve the tacos with creamy toppings like sour cream or avocado. These will help cool down the heat. Yes, you can use frozen chicken. Just remember to cook it longer. If using a slow cooker, cook on low for about 8-10 hours. If you cook on high, it may take 4-5 hours. Always check that the chicken reaches at least 165°F for safety. Here are some popular toppings you can try: - Fresh cilantro - Diced tomatoes - Shredded lettuce - Sliced avocado - Sour cream - Salsa or pico de gallo - Shredded cheese - Jalapeños for extra heat These toppings will add color and flavor to your tacos. In this blog post, I shared how to make delicious slow cooker chili lime chicken tacos. We covered key ingredients, spices, and step-by-step cooking methods. You learned tips for storage, variations for different diets, and answers to common questions. Remember, cooking should be fun and creative. Enjoy making this dish your own and share it with friends! Tacos can be tasty, simple, and perfect for any occasion.

Slow Cooker Chili Lime Chicken Tacos Flavorful Meal

- 1 cup rolled oats - 1/2 cup canned pumpkin puree - 1/4 cup almond butter (or any nut butter of your choice) - 1/4 cup honey or maple syrup - 1/4 teaspoon vanilla extract - 1 teaspoon pumpkin spice (or cinnamon) - 1/2 cup mini chocolate chips - 1/4 cup chia seeds (optional) - Pinch of salt Each ingredient plays a big role in taste and texture. The rolled oats give a hearty base. They add fiber and help keep you full. Canned pumpkin puree brings warmth and moisture. It’s rich in vitamins and adds that lovely fall flavor. Almond butter or any nut butter adds creaminess. It also packs in healthy fats. The sweeteners like honey or maple syrup bring just the right amount of sweetness. Pumpkin spice or cinnamon gives that cozy taste. Mini chocolate chips make every bite feel like a treat. Lastly, chia seeds add a fun crunch and boost nutrition. If you have nut allergies, try sunflower seed butter or tahini. Both work well and taste great. For sweeteners, use agave syrup or date paste if you prefer a different flavor. You can even skip the sweeteners if you want a less sugary bite. Adjust according to your taste and needs! To start, gather all your ingredients. You will need rolled oats, canned pumpkin puree, almond butter, honey or maple syrup, vanilla extract, pumpkin spice, mini chocolate chips, chia seeds, and a pinch of salt. Having everything ready makes the cooking process easy and fun. In a large bowl, combine the rolled oats, pumpkin puree, almond butter, honey or maple syrup, vanilla extract, pumpkin spice, and a pinch of salt. Use a spatula or spoon to mix everything well. If the mixture feels sticky, add a bit more oats or nuts. This helps you achieve the right texture for rolling. Once mixed, fold in the mini chocolate chips and chia seeds if you choose to use them. Make sure everything is evenly distributed. Now comes the fun part! Take about a tablespoon of the mixture and roll it into a ball using your hands. Repeat this until you use all of the mixture. Place the rolled energy balls on a baking sheet lined with parchment paper. Refrigerate them for at least 30 minutes to let them firm up. After they set, transfer the energy balls to an airtight container. Store them in the fridge for up to a week. Enjoy your snack anytime! To get the right texture for your energy balls, start with the base. Mix the rolled oats with pumpkin puree, almond butter, and sweetener. If it feels too sticky, add more oats. You want it to hold together but not be too wet. A good trick is to let it sit for a few minutes before rolling. This helps the oats absorb moisture. These energy balls are great for any time of day. You can enjoy them as a quick breakfast. They also work well as a snack after school or workouts. Try pairing them with a piece of fruit or a yogurt dip. They are perfect for lunchboxes or travel snacks, too! You can make these energy balls even better. Add shredded coconut or chopped nuts for crunch. A scoop of protein powder can boost nutrition. For extra sweetness, toss in a few more chocolate chips. If you like spice, feel free to add more pumpkin spice or a dash of nutmeg. These small changes keep the recipe fun and fresh! {{image_2}} You can easily change the flavor of your energy balls to fit the season. In fall, use pumpkin spice. In winter, try ginger and nutmeg. For spring, add fresh lemon zest for a bright taste. In summer, mix in fresh berries or coconut. These changes keep your snacks fun and exciting. Want to make your energy balls even better? Add chia seeds or flaxseeds for extra fiber. You can also mix in nuts like walnuts or almonds for added crunch. Dried fruits, like cranberries or raisins, can sweeten the mix. These add-ins boost nutrition and taste. To make these energy balls vegan, swap honey for maple syrup. Use a nut butter that is dairy-free. For gluten-free options, ensure your oats are certified gluten-free. You can still enjoy the same great taste while meeting your dietary needs. To keep your Pumpkin Chocolate Chip Energy Balls fresh, store them in an airtight container. This helps keep moisture out and prevents them from drying out. You can keep them in the fridge for the best taste and texture. If you want to enjoy them later, consider freezing them. These energy balls last up to a week in the fridge. After that, they may lose flavor and texture. Always check for any signs of spoilage before eating. If they look or smell off, it's best to toss them. To freeze your energy balls, first, place them on a baking sheet. Make sure they are not touching each other. Freeze them for about an hour until they are firm. After that, transfer them to a freezer bag or airtight container. They can stay frozen for up to three months. When you want to eat them, just take out as many as you need. Let them thaw in the fridge or at room temperature. Enjoy your tasty snack whenever you want! Yes, you can use sweet potato puree instead of pumpkin puree. Both add creaminess and flavor. Applesauce can work too, but it will change the taste. If you want a lighter texture, go for Greek yogurt. To make these energy balls vegan, simply replace honey with maple syrup. Use almond butter or any nut butter that is also vegan. Ensure that your chocolate chips are dairy-free. Each energy ball has about 100 calories. They contain 5 grams of protein and 3 grams of fiber. They also offer healthy fats from the nut butter and chia seeds. Yes, you can use agave syrup or coconut sugar as alternatives. Just keep in mind that the sweetness level may change. Adjust the amount to fit your taste. You can swap oats with gluten-free oats for a gluten-free option. For nut allergies, use sunflower seed butter. Add in protein powder for extra protein. In this blog post, we explored key ingredients for energy balls, from nut butter to sweeteners. I shared step-by-step instructions for making them, along with tips for the best texture and flavor. We discussed variations, like seasonal flavors and vegan options, plus storage tips to keep them fresh. These energy balls are easy to make and customize for your taste. Experiment with the ingredients and enjoy a healthy snack. Now, you can nourish yourself and have fun in the kitchen!

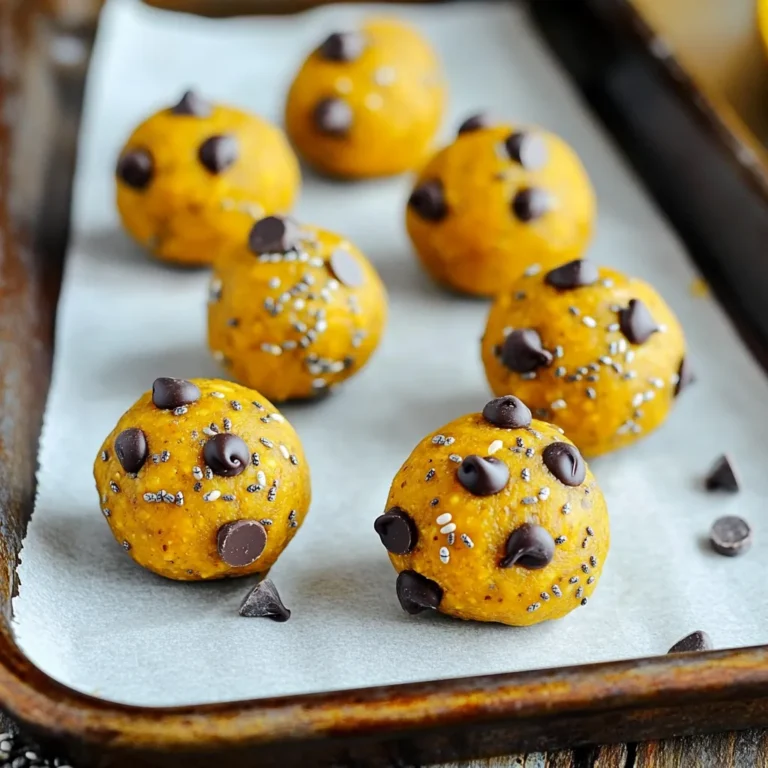
Pumpkin Chocolate Chip Energy Balls Simple Snack Treat

To make this delightful dish, you need: - 1 pound gnocchi (store-bought or homemade) - 2 cups broccoli florets - 1 red bell pepper, chopped - 1 cup cherry tomatoes, halved - 4 cloves garlic, minced - ½ cup grated Parmesan cheese These ingredients form the heart of the recipe. The gnocchi adds a soft and chewy base. The broccoli and bell pepper bring color and crunch. Cherry tomatoes add sweetness and juiciness. Garlic infuses a strong, rich flavor. Parmesan gives a salty and nutty finish. In addition to the main ingredients, gather these: - ¼ cup olive oil - 1 teaspoon garlic powder - 1 teaspoon Italian seasoning - Salt and pepper to taste Olive oil helps everything cook evenly. Garlic powder boosts the garlic flavor. Italian seasoning adds herbs for a fresh touch. Salt and pepper balance the dish, enhancing all the flavors. You can customize your dish with: - Fresh basil leaves, for garnish Basil adds a pop of color and fresh taste. Feel free to add more vegetables if you like. Zucchini or asparagus can work well too. You can also try adding a squeeze of lemon for brightness. First, gather all your ingredients. You need 1 pound of gnocchi, 2 cups of broccoli florets, 1 chopped red bell pepper, and 1 cup of halved cherry tomatoes. Also, grab 4 cloves of minced garlic, ½ cup of grated Parmesan cheese, ¼ cup of olive oil, 1 teaspoon of garlic powder, 1 teaspoon of Italian seasoning, and salt and pepper. Prep time is just 10 minutes. In a large mixing bowl, add the gnocchi, broccoli, bell pepper, and cherry tomatoes. Drizzle the olive oil over the mixture. Then, add the minced garlic, garlic powder, Italian seasoning, and salt and pepper. Mix everything well until the gnocchi and veggies are coated. The oil helps the flavors stick. Preheat your oven to 425°F (220°C). Spread the mixture evenly on a large baking sheet lined with parchment paper. Make sure the gnocchi and vegetables stay in a single layer. This step is key for even cooking. Sprinkle the grated Parmesan cheese on top. Bake for 20-25 minutes until the gnocchi is golden and the veggies are tender. Toss the mix halfway through for even browning. After baking, let it cool for a few minutes. Lastly, garnish with fresh basil leaves before serving. Enjoy your meal! To get the best taste, use fresh garlic. It adds a strong flavor. Mix in grated Parmesan cheese right before baking. This gives a nice crust. Don't skip the olive oil; it helps everything roast well. A pinch of salt and pepper boosts all the flavors. For even cooking, spread the gnocchi and veggies in a single layer. This way, they cook well and get crispy. Toss the mix halfway through baking. This helps everything brown nicely. If you notice some parts cooking faster, move them around. You can swap out veggies based on what you like. Try zucchini or asparagus instead of broccoli. If you prefer a little heat, add red pepper flakes. For a twist, use feta cheese instead of Parmesan. Make it your own and enjoy! {{image_2}} You can easily change this dish to suit a vegetarian diet. Use more veggies like zucchini, carrots, or peas. You can also swap the Parmesan cheese for a plant-based version. Nutritional yeast works great for a cheesy taste without dairy. If you want a heartier meal, add protein to the dish. Cooked chicken, shrimp, or sausage blend well with gnocchi and veggies. Just chop them into bite-sized pieces and mix them in before baking. You can also try chickpeas or lentils for a plant-based option. Using seasonal vegetables makes this dish even better. In spring, add asparagus or snap peas. During summer, use bell peppers and zucchini. In fall, sweet potatoes or Brussels sprouts shine. In winter, root vegetables like carrots or parsnips work well. These choices give you fresh flavors all year round. To store leftovers, let your dish cool down first. Then, transfer it to an airtight container. Keep it in the fridge. It will last up to three days. If you want to keep it longer, freezing is a great option. When it's time to eat again, reheating is simple. Preheat your oven to 350°F (175°C). Place the leftovers on a baking sheet. Cover them with foil to keep moisture in. Heat for about 15-20 minutes. You can also use a microwave for quick reheating. Just use a microwave-safe dish and cover it. Heat for 1-2 minutes, stirring halfway through. If you want to freeze your dish, portion it out first. Use freezer-safe containers or bags. Make sure to remove as much air as possible. Label the containers with the date. You can freeze it for up to three months. To reheat, thaw it in the fridge overnight before warming it up. Enjoy your easy meal anytime! Yes, you can use homemade gnocchi. Fresh gnocchi adds a special touch to this dish. If you make your own, ensure it is firm enough to hold up in the oven. The cooking time may change slightly, so keep an eye on it. You can add many vegetables to this recipe. Try zucchini, asparagus, or carrots for a colorful twist. Green beans or mushrooms also work great. Just cut them into similar sizes for even cooking. To check if it is fully cooked, look for a golden color. The gnocchi should be slightly crispy on the outside. The veggies should be tender but not mushy. You can use a fork to poke the largest pieces to see if they are soft. Yes, you can make this recipe dairy-free. Simply skip the Parmesan cheese or use a dairy-free alternative. Nutritional yeast can add a cheesy flavor without dairy. Always check labels to ensure all other ingredients are dairy-free. This guide covers everything you need to make sheet-pan garlic parmesan gnocchi. You learned about key ingredients, step-by-step cooking, and helpful tips. We also explored variations, storage tips, and answered common questions. Remember, you can easily modify the recipe to fit your taste. Enjoy trying different veggies or proteins. With a few simple steps and ingredients, you can create a delicious meal. Happy cooking!

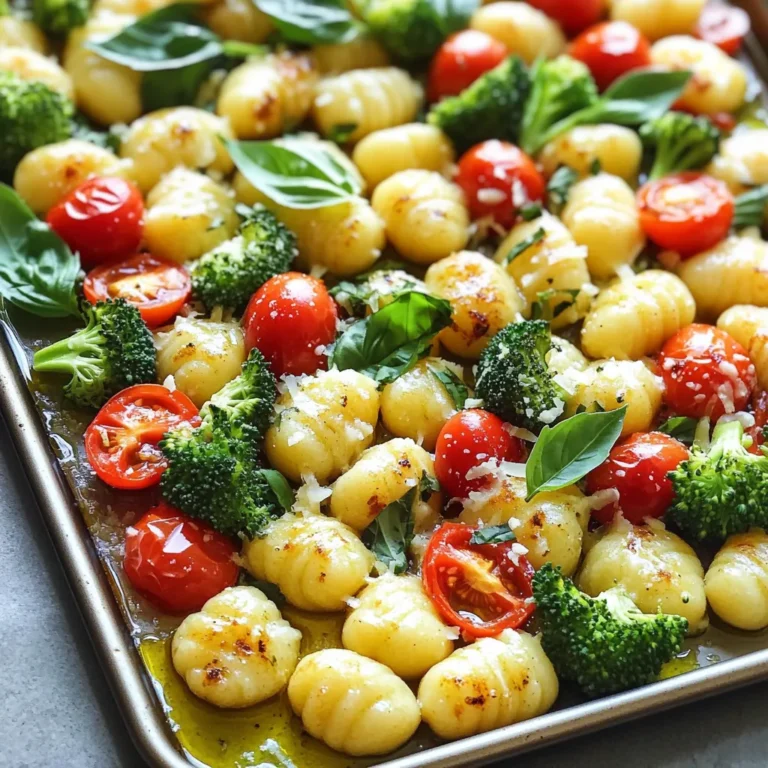
Sheet-Pan Garlic Parmesan Gnocchi & Veggies Delight

- 2 ripe avocados - 1 cup breadcrumbs (panko recommended) - 1/2 cup all-purpose flour - 2 large eggs, beaten - 1 teaspoon garlic powder - 1 teaspoon smoked paprika - 1/2 teaspoon salt - 1/4 teaspoon black pepper - Olive oil spray or cooking spray Gathering the right ingredients is key to making perfect crispy avocado fries. Start with ripe avocados. They should have a slight give when you press them gently. For the breading, I suggest using panko breadcrumbs. They create a crispier texture than regular breadcrumbs. Next, you'll need all-purpose flour and large eggs for the coating process. The flour helps the egg stick, while the egg binds the breadcrumbs. Now, let's talk seasonings. Garlic powder adds a nice flavor, while smoked paprika gives a subtle, smoky kick. Don't forget the salt and black pepper for balance. These seasonings make your fries taste great. Finally, grab your favorite cooking spray. I like using olive oil spray because it adds flavor without too many calories. This will help your avocado fries crisp up in the air fryer. To prep the avocados, start by cutting them in half. Use a knife to slice around the pit. Gently twist the two halves to separate them. Remove the pit with a spoon or knife, being careful not to bruise the flesh. Scoop out the inside with a spoon and slice it into wedges. Handle them gently to keep them intact. Next, set up your breading station. Grab three shallow bowls. In the first bowl, add the flour. In the second bowl, pour in the beaten eggs. In the third bowl, mix the breadcrumbs with garlic powder, smoked paprika, salt, and black pepper. This order is key to getting a good coating on the avocados. Now, it’s time to coat the avocado wedges. Take one wedge and dredge it in the flour first. Shake off any extra flour. Next, dip it in the beaten eggs and let the excess drip off. Finally, coat it in the breadcrumb mix. Make sure each wedge is evenly coated for the best crispiness. Preheat your air fryer to 375°F (190°C). This step takes about five minutes. While it heats up, spray the basket with cooking spray. This helps the fries get crispy and prevents sticking. A light coat is all you need. For cooking, place the breaded avocado wedges in a single layer in the air fryer. You may need to do this in batches. Lightly spray the tops of the wedges with cooking spray. Cook them for 8-10 minutes. Flip them halfway through for even browning. Check for a golden color and crisp texture before removing them. - Set your air fryer to 375°F (190°C) for best results. - Check your air fryer manual for exact settings. Some models may vary. - Choose avocados that are slightly soft when you press them. - Cut the avocado in half and twist to remove the pit. - Use a spoon to scoop the flesh gently without bruising. - Try dipping your avocado fries in sriracha mayo or lime aioli. - Arrange fries on a plate and add fresh cilantro or lime wedges for color. {{image_2}} You can spice up your avocado fries easily. Try adding chili powder or cayenne for heat. A little goes a long way! You can also switch your breadcrumbs. Use seasoned or gluten-free ones to change the flavor and texture. Mixing in cheese or fresh herbs can add more flavor to your breadcrumbs. Grated Parmesan or chopped parsley works great. You can also try other vegetables. Zucchini and sweet potatoes are good choices. Slice them thin, and follow the same breading method. Don’t forget about dipping sauces! A good dip can make your fries shine. You can make a simple yogurt dip with garlic and lemon. Or, try sriracha mayo for a spicy kick. Think about different cuisines too. A tangy chimichurri or cool tzatziki will pair well with your fries. To store leftover avocado fries, let them cool first. Place them in an airtight container. This keeps them fresh. They last for about 2-3 days in the fridge. To reheat, use your air fryer. Set it to 350°F (175°C). Cook for about 5-7 minutes. This method keeps them crispy. Avoid using a microwave, as this will make them soggy. Yes, you can freeze avocado fries! To freeze, place them in a single layer on a baking sheet. Freeze until solid, then transfer to a freezer bag. They can last up to 2 months in the freezer. For reheating, cook from frozen in the air fryer at 375°F (190°C) for about 10-12 minutes. Yes, you can! If you want to skip breadcrumbs, try these options: - Cornmeal: It gives a nice crunch. - Ground nuts: Almonds or walnuts add flavor. - Crushed crackers: Use your favorite flavor for a twist. - Coconut flakes: These add sweetness and crunch. These alternatives work well and taste great! Check these signs to find ripe avocados: - Color: Look for dark green or black skin. - Feel: Gently squeeze; it should yield slightly. - Shape: A round or plump shape indicates ripeness. - Stem: If the stem comes off easily, it’s ripe. Choose ripe avocados for the best fries! Here are tasty sauces to enjoy with your avocado fries: - Sriracha mayo: Creamy and spicy. - Lime aioli: Zesty and fresh. - Yogurt dip: Cool and tangy. - Chipotle sauce: Smoky and bold. These dips enhance the flavor of your fries! Air fryer avocado fries stay crispy for about: - 1 hour: If kept at room temperature. - 2-3 hours: In an oven set to low heat. To maintain crispiness: - Avoid stacking: Keep them in a single layer. - Use paper towels: Absorb extra moisture. Follow these tips to enjoy crisp fries longer! In this post, we explored making crispy avocado fries. We covered key ingredients, cooking techniques, and tips to achieve the perfect crunch. Remember to choose ripe avocados and use the right cooking spray for best results. Feel free to experiment with spices and dips that suit your taste. Enjoy your delicious creation, and keep these tips handy for cooking success!

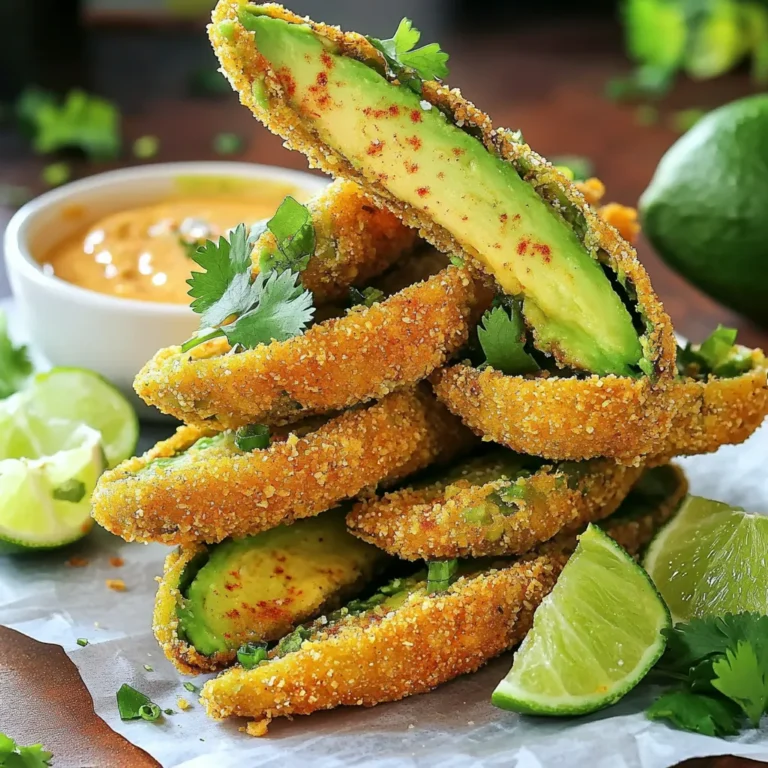
Air Fryer Crispy Avocado Fries Easy and Tasty Snack

- 1 cup rolled oats - 2 cups almond milk (or milk of choice) - 1/2 cup Greek yogurt (optional for creaminess) To start, rolled oats are the base of this dish. They soak up the liquid and become soft overnight. Almond milk adds a nice creaminess and nutty flavor. If you want a rich texture, Greek yogurt is a great option. - 1/4 cup dried cranberries - 1 orange, zested and juiced - 2 tablespoons maple syrup (adjust based on sweetness preference) Dried cranberries bring a sweet and tart taste. Zest and juice from the orange add freshness and zing. Maple syrup sweetens the mix, and you can adjust it to your liking. - 1/2 teaspoon cinnamon - 1 tablespoon chia seeds (for added texture and nutrition) - Fresh orange segments and extra cranberries for topping Cinnamon adds warmth and spice. Chia seeds not only thicken the oats but also boost nutrition. For serving, top with fresh orange segments and extra cranberries for a fun look and taste. {{ingredient_image_1}} - In a large mixing bowl, combine: - 1 cup rolled oats - 2 cups almond milk (or any milk of choice) - 1/2 cup Greek yogurt (optional for creaminess) - 1/4 cup dried cranberries - Zest and juice of 1 orange - 2 tablespoons maple syrup - 1/2 teaspoon cinnamon - 1 tablespoon chia seeds Make sure to mix well. You want all the oats to be covered in the liquid. This helps them soften and blend the flavors. Cover the bowl tightly with plastic wrap. You can also use individual jars if you prefer. Store in the fridge for at least 6 hours or overnight. This soaking time allows the oats and chia seeds to absorb the liquid. In the morning, stir well. If the oats are too thick, add a splash of almond milk to get the right texture. For a nice look, serve in bowls or jars. Top with fresh orange segments and extra cranberries. This not only adds color but also enhances the flavor. You can easily adjust sweetness with maple syrup. Start with two tablespoons. Taste and add more if needed. Maple syrup gives a nice flavor. You can also use honey or agave nectar. If you want to skip Greek yogurt, try a dairy-free option. Coconut yogurt works well for creaminess. You can also use regular yogurt if you prefer. Soaking time is key for great overnight oats. Leave them in the fridge for at least six hours. This allows the oats and chia seeds to soak up the liquid. If you like creamier oats, add more Greek yogurt or milk. Stir well in the morning. If it's too thick, add a splash of milk to make it just right. Layer the oats in clear glass jars. This makes them look beautiful and colorful. You can also top them with fresh orange segments. A sprinkle of extra cranberries adds a nice touch too. For a final pop, add a sprig of mint on top. It's a simple way to impress your guests! Pro Tips Use Fresh Ingredients: Opt for fresh oranges and high-quality dried cranberries to enhance the flavor and nutritional value of your overnight oats. Customize Your Sweetness: Adjust the amount of maple syrup based on your preference or swap it for honey or agave syrup for a different flavor profile. Experiment with Toppings: Try adding nuts, seeds, or shredded coconut on top for an extra crunch and flavor contrast. Make It Ahead: Prepare multiple jars at once for a quick grab-and-go breakfast option throughout the week. {{image_2}} You can switch up the fruits in your cranberry orange overnight oats. Try using strawberries, blueberries, or even diced apples. Each fruit adds its own unique flavor. You can also mix in nuts or seeds for a nice crunch. Chopped almonds, walnuts, or even sunflower seeds work well. They add texture and extra nutrition to your meal. If you want a vegan version, simply replace Greek yogurt with coconut yogurt. You can also use oat or soy milk instead of almond milk. This makes the recipe dairy-free. For gluten-free oats, ensure you choose certified gluten-free rolled oats. These swaps keep your breakfast tasty and safe for different diets. Don’t be afraid to experiment with spices! Try adding a pinch of nutmeg or a splash of vanilla extract. These will deepen the flavors. If you like chocolate, mix in some cocoa powder or chocolate chips. Peanut butter also makes a great addition for a rich, nutty taste. Each change can create a new favorite version of your overnight oats. To store your cranberry orange overnight oats, choose airtight containers. Glass jars work well. They keep the oats fresh and make it easy to see the layers. If you use a bowl, cover it tightly with plastic wrap. This prevents the oats from drying out. Always make sure the mixture is fully submerged in liquid. This helps the oats stay soft and creamy. In the refrigerator, these oats last about 3 to 5 days. After that, they may start to lose flavor and texture. Signs of spoilage include a sour smell or changes in color. If you see any mold, throw them away. Always trust your senses when it comes to food safety. You might want to enjoy your leftovers warm. To reheat, use the microwave. Heat in short bursts, stirring in between. This keeps the texture smooth. If the oats feel too thick, add a splash of almond milk. Stir well before serving. Enjoy your delicious creation! Overnight oats are a simple and healthy breakfast. You soak rolled oats in liquid overnight. This makes the oats soft and creamy. They absorb the flavors of other ingredients. You can mix in fruits, nuts, or seeds. In the morning, they are ready to eat. This saves time on busy mornings. Yes, you can easily make these oats vegan. Use almond milk or any plant-based milk. Skip the Greek yogurt or replace it with coconut yogurt. This keeps the creaminess without dairy. You can still enjoy the great taste and texture. To make your oats sweeter, add more maple syrup. You can also use honey or agave syrup. For natural sweetness, try mashed bananas or applesauce. Start with a small amount and adjust to your taste. This way, you can enjoy your oats just how you like them! This blog post covered how to make delicious cranberry orange overnight oats. We discussed key ingredients like rolled oats, almond milk, and optional Greek yogurt. I shared tips for mixing, storing, and serving your oats to achieve the best texture and flavor. You can customize them to suit your taste with various add-ins and seasonal fruits. These oats are not just tasty; they’re also easy to prepare. Enjoy your nutritious breakfast and feel free to get creative!

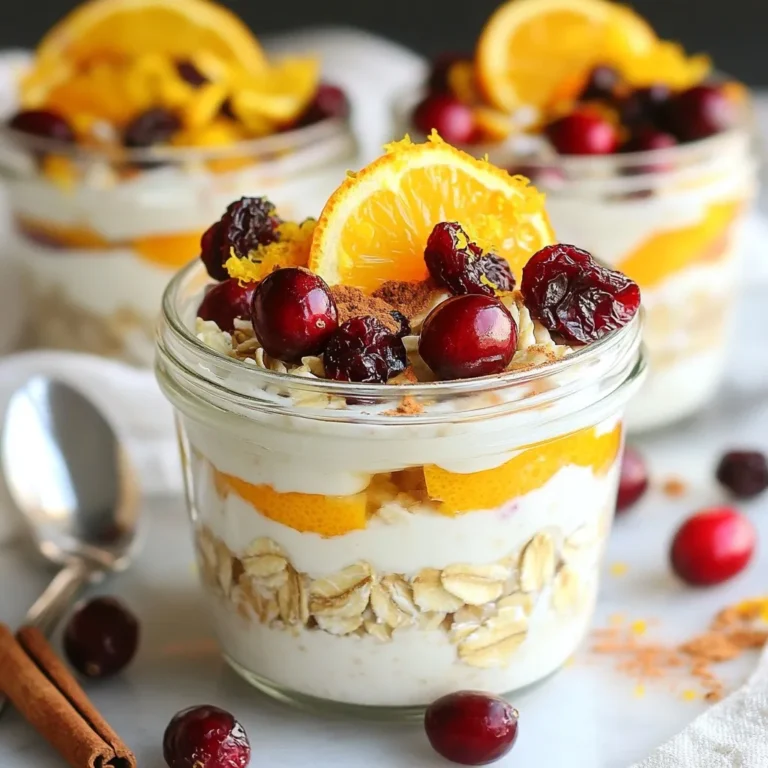
Cranberry Orange Overnight Oats Perfectly Simple Recipe

To make Chocolate Peppermint Energy Balls, gather these simple ingredients: - 1 cup rolled oats - 1/2 cup almond butter - 1/4 cup honey or maple syrup - 1/4 cup unsweetened cocoa powder - 1/4 cup mini dark chocolate chips - 1/4 teaspoon peppermint extract - 1/4 teaspoon vanilla extract - Pinch of sea salt - Optional: crushed peppermint candies for rolling These energy balls are not only delicious but also packed with nutrients. Each ball contains: - Protein: Almond butter provides healthy protein. - Fiber: Rolled oats add fiber, aiding digestion. - Healthy Fats: Almond butter gives good fats for energy. - Antioxidants: Cocoa powder and dark chocolate chips are rich in antioxidants. One energy ball has around 100 calories. Adjust your serving to fit your snack needs. You can switch some ingredients if needed: - Nut Butter: Use peanut butter or sunbutter if you have nut allergies. - Sweetener: Maple syrup works well instead of honey for a vegan option. - Cocoa Powder: Carob powder can replace cocoa if you want a different taste. - Chocolate Chips: Use dairy-free chips for a vegan treat. - Peppermint Extract: Peppermint oil can replace extract, but use less. Feel free to explore these options while making your energy balls. Each change can lead to a new flavor adventure! To start, gather your ingredients. You’ll need rolled oats, almond butter, honey or maple syrup, unsweetened cocoa powder, mini dark chocolate chips, peppermint extract, vanilla extract, and a pinch of sea salt. In a large mixing bowl, combine the rolled oats, almond butter, and honey or maple syrup. Next, add the unsweetened cocoa powder, mini dark chocolate chips, peppermint extract, vanilla extract, and sea salt. Mix everything until it forms a sticky dough. I find using my hands helps to blend it well. Once you mix the ingredients, refrigerate the dough for about 15 to 20 minutes. Chilling makes it easier to shape the balls. The cold helps the mixture firm up. This step is key for easy rolling. While you wait, you can clean up your space or prepare your toppings. After chilling, scoop out about one tablespoon of the mixture. Roll it into a ball shape using your hands. If you want, roll each ball in crushed peppermint candies for a festive touch. Place the finished energy balls on a parchment-lined plate. Store them in an airtight container in the fridge. Enjoy these tasty snacks for up to one week! To shape energy balls perfectly, keep the mixture cold. After mixing, chill it for 15-20 minutes. This makes the dough firm and easier to handle. Use a tablespoon to scoop the mixture. Roll it gently in your hands to form a tight ball. If your hands get sticky, wet them slightly with water. This helps prevent the mixture from sticking to your fingers. Store your energy balls in an airtight container. They last up to one week in the fridge. If you want to keep them longer, you can freeze them. Just make sure to separate each ball with parchment paper. This way, they won't stick together. When you're ready to eat, take them out and let them thaw for a bit. This keeps them fresh and tasty. You can boost the flavor of your energy balls with fun add-ins. Try adding a scoop of protein powder for extra nutrition. Chia seeds or flaxseeds add a nice crunch and are great for fiber. If you like spice, a dash of cinnamon pairs well with chocolate. For a fruity twist, mix in dried cherries or cranberries. You can even swap the dark chocolate chips for white chocolate for a different taste. {{image_2}} You can change the flavor of your energy balls easily. Try using different nut butters like peanut or cashew. Swap out the peppermint extract for orange or almond for a fun twist. Adding spices like cinnamon or nutmeg can add warmth to the flavor. You can also mix in other types of chocolate chips, like white chocolate or milk chocolate, for a different taste. Making these energy balls allergy-friendly is simple. If you have nut allergies, use sunflower seed butter instead of almond butter. You can replace honey with agave syrup for a safe option. If oats are a concern, use puffed rice or quinoa flakes. These swaps still keep the energy balls tasty and fun. To keep these energy balls vegan, use maple syrup instead of honey. Make sure your chocolate chips are dairy-free. For gluten-free energy balls, use certified gluten-free oats. These small changes let everyone enjoy a healthy snack without worry. You still get that delicious chocolate and peppermint flavor in every bite! To keep your Chocolate Peppermint Energy Balls fresh, use an airtight container. This container should be kept in the fridge. Make sure to layer parchment paper between the balls. This prevents them from sticking together. These energy balls last about one week in the fridge. If you want them to last longer, freeze them. Place the balls in a single layer on a baking sheet. Freeze for two hours, then transfer to a container. In the freezer, they can last for up to three months. To keep your energy balls fresh, always use clean hands when handling them. Avoid excess moisture, as it can lead to spoilage. If you plan to eat them later, only roll them in crushed peppermint before serving. This keeps the coating crisp and tasty. Chocolate Peppermint Energy Balls can last up to one week. Keep them in an airtight container in the fridge. This helps maintain their freshness and flavor. If you want to enjoy them longer, you can freeze them. When frozen, they can last for about three months. Just thaw them before eating. Yes, you can use different nut butters in this recipe. Peanut butter, cashew butter, or sunflower seed butter all work well. Each nut butter adds its own unique taste to the energy balls. Make sure to choose a nut butter that you love. This will make your energy balls even more delicious. Yes, Chocolate Peppermint Energy Balls are a healthy snack option. They contain rolled oats, which provide fiber and energy. The almond butter adds healthy fats and protein. Honey or maple syrup gives a touch of natural sweetness without being too sugary. Plus, dark chocolate chips add antioxidants. The combination makes for a balanced, nutritious treat. In this post, we explored how to make Chocolate Peppermint Energy Balls. I shared ingredients, nutritional facts, and suggested substitutions. You learned step-by-step instructions and tips to shape and store these treats. I also offered variations for different tastes and dietary needs. These energy balls are simple, healthy, and tasty. You can customize them easily. Enjoy making your own delicious snacks! Remember, the options are endless.

Chocolate Peppermint Energy Balls Healthy Snack Boost

PREV 1 … 8 9 10 … 52 NEXT
cozy citrus kitchen

explore

DessertsDinnerAppetizersDrinks

Our Policies

  • Cookie Policy
  • Copyright Policy
  • Disclaimer
  • GDPR Policy
  • Terms Of Use
Back to Top
  • About
  • Contact Us
  • Privacy Policy
© 2025 cozy citrus kitchen