FREE DINNER EBOOK! Get your copy!
  • Cookie Policy
  • GDPR Policy
  • Disclaimer
  • Terms Of Use
  • Visit my other site: Fun Cookie Recipes
cozy citrus kitchen
  • Home
  • Dinner
  • Desserts
  • Drinks
  • Appetizers
  • Contact
  • About
  • Privacy Policy
  • Home
  • Dinner
  • Desserts
  • Drinks
  • Appetizers
  • Contact
  • About
  • Privacy Policy
  • Cookie Policy
  • GDPR Policy
  • Disclaimer
  • Terms Of Use
Visit my other site: Fun Cookie Recipes

HOME / CATEGORIES /

Latest

- 1 cup Arborio rice - 4 cups vegetable broth - 3 tablespoons olive oil - 2 tablespoons unsalted butter - 4 cloves garlic, minced - 1 small onion, finely chopped - 1/2 cup grated Parmesan cheese - 1/2 cup heavy cream - Salt and pepper to taste - Fresh parsley, chopped (for garnish) Each ingredient plays a key role in making creamy garlic parmesan risotto special. - Arborio rice gives risotto its creamy texture. This short-grain rice absorbs liquid well. - Vegetable broth adds depth of flavor. It keeps the dish rich and savory. - Olive oil helps sauté the garlic and onion. It adds a nice, fruity taste. - Unsalted butter brings creaminess and richness. It also enriches the overall flavor. - Garlic gives a strong, savory taste. It makes the dish aromatic and warm. - Onion adds sweetness. It balances the flavors in the risotto. - Parmesan cheese provides a salty, nutty flavor. It enhances the creaminess. - Heavy cream makes the risotto extra rich. It gives a velvety finish. - Salt and pepper season the dish. They bring all the flavors together. - Fresh parsley adds color and freshness. It brightens up the dish. If you can't find an ingredient, here are some easy swaps. - Arborio rice: You can use Carnaroli rice or even sushi rice if needed. - Vegetable broth: Chicken broth works well too for a different flavor. - Olive oil: Any cooking oil, like canola or sunflower, can replace it. - Unsalted butter: Use salted butter but reduce added salt. - Garlic: Garlic powder can be a quick substitute, but fresh is best. - Onion: Shallots or leeks can give a similar flavor. - Parmesan cheese: Grana Padano or Pecorino Romano can be used, too. - Heavy cream: Use half-and-half for a lighter option. - Fresh parsley: Any fresh herb, like basil or chives, can add a nice touch. With these ingredients, you're ready to make a delicious creamy garlic parmesan risotto! {{ingredient_image_1}} Start by warming the vegetable broth. Pour four cups into a medium saucepan. Set the heat to low and let it warm gently. Keeping the broth warm helps the rice cook evenly. You will use this broth gradually as you make the risotto. In a large skillet, heat three tablespoons of olive oil. Add one tablespoon of unsalted butter for extra richness. Use medium heat for this step. Now, add four cloves of minced garlic and one small chopped onion. Sauté them for about three to four minutes. You want the onion to turn soft and clear. This step builds a great base flavor for your risotto. Once the onion is ready, stir in one cup of Arborio rice. Toast the rice for about two minutes. You will see the edges turn slightly clear. This process adds depth to the flavor. Next, start adding the warm vegetable broth, one ladleful at a time. Stir often and let the rice soak up the broth before adding more. This part takes about 18 to 20 minutes. You want the rice to be creamy and just tender. When the rice is done, lower the heat. Mix in half a cup of heavy cream and the last tablespoon of butter. Then, stir in half a cup of grated Parmesan cheese. It should melt and blend well. Season with salt and pepper to taste. Let the risotto rest for a minute. This helps it thicken. Serve it hot, topped with chopped fresh parsley for a nice touch. Enjoy your creamy garlic Parmesan risotto! To get that rich, creamy texture in your risotto, use Arborio rice. This rice has high starch content, which helps create creaminess. Always add warm broth slowly. Stir often to release more starch from the rice. When the rice is almost done, mix in heavy cream and butter. This adds even more creaminess and flavor. Sauté your garlic and onion first. This builds a strong flavor base. Toast the rice briefly before adding broth. This step enhances its nutty flavor. Stir continuously while adding broth. This keeps the rice from sticking and helps it cook evenly. Use a wooden spoon for best results. Keep your broth warm but not boiling. Hot broth helps the rice cook evenly. Stir the rice every few minutes to avoid lumps. Aim for a cooking time of about 18-20 minutes. The rice should be tender yet slightly firm in the center. Let it rest for a minute before serving. This helps it thicken and makes it even better. Pro Tips Use Quality Broth: The flavor of your risotto largely depends on the broth you use. Opt for a high-quality vegetable broth for the best taste. Stir Constantly: Stirring the risotto continuously helps to release the starch from the rice, creating that creamy texture you desire. Gradual Broth Addition: Add the broth gradually and allow the rice to absorb it fully before adding more. This ensures even cooking and enhances creaminess. Rest Before Serving: Let the risotto rest for a minute after cooking. This allows it to thicken slightly and enhances the overall flavor. {{image_2}} You can boost the flavor of your risotto with simple add-ins. Try adding: - 1 cup of sautéed mushrooms - 1 cup of fresh spinach - 1/2 cup of sun-dried tomatoes These ingredients bring new tastes and textures. For a spicy kick, add a pinch of red pepper flakes. You can also swap Parmesan for other cheeses, like feta or goat cheese. Each choice gives the dish a unique twist. If you want to add protein, consider these options. Grilled chicken or shrimp makes a great pairing. - For chicken, use about 1 cup, diced and cooked. - For shrimp, add 1 cup, cooked and peeled. You can also use cooked sausage or bacon for a hearty boost. If you're feeling adventurous, try adding some crab meat for a touch of luxury. Making this dish vegan is easy. Replace the butter and heavy cream with plant-based options. Use: - 3 tablespoons of vegan butter - 1/2 cup of coconut cream or cashew cream For cheese, try nutritional yeast or a vegan cheese blend. These swaps keep the creamy texture while making it plant-based. Always check your broth to ensure it’s vegan-friendly. Enjoy the risotto your way! To keep your creamy garlic Parmesan risotto fresh, first let it cool. Place it in an airtight container. This helps lock in flavors and moisture. Make sure to store it in the fridge. It will last up to three days. If you notice any leftover risotto, avoid letting it sit out too long. When you are ready to enjoy your risotto again, add a splash of broth. Heat it in a pot over low heat. Stir it often to prevent sticking. If you want, you can add a bit of butter for extra creaminess. This should take about 5 to 10 minutes to reheat. Always taste it to check if you need more seasoning. Yes, you can freeze risotto! Portion it out in small containers. Leave some space at the top. Risotto expands when frozen. It will last up to three months in the freezer. To reheat, let it thaw in the fridge overnight. Then, heat it with a splash of broth. This keeps the texture nice and creamy. You can make risotto ahead of time, but it may lose its creamy texture. To reheat, add a bit of broth while warming it up. This helps restore its creamy nature. To keep your risotto from getting too thick, stir in broth gradually. Use just enough broth so the rice absorbs it slowly. If it thickens too much, add more broth or water while stirring. Creamy Garlic Parmesan Risotto pairs well with many dishes. You can serve it with grilled chicken or shrimp for protein. Leafy greens or a fresh salad also complement the dish nicely. For a vegetarian option, add sautéed mushrooms or roasted vegetables. In this post, we covered the key ingredients and their roles in making risotto. I shared step-by-step instructions for perfecting your dish. Tips and tricks helped you achieve a creamy texture with essential techniques. We also explored variations to suit your taste, alongside storage information for leftovers. Remember, cooking risotto is about practice and patience. With these insights, you can create a dish that impresses every time. Enjoy your risotto adventures!

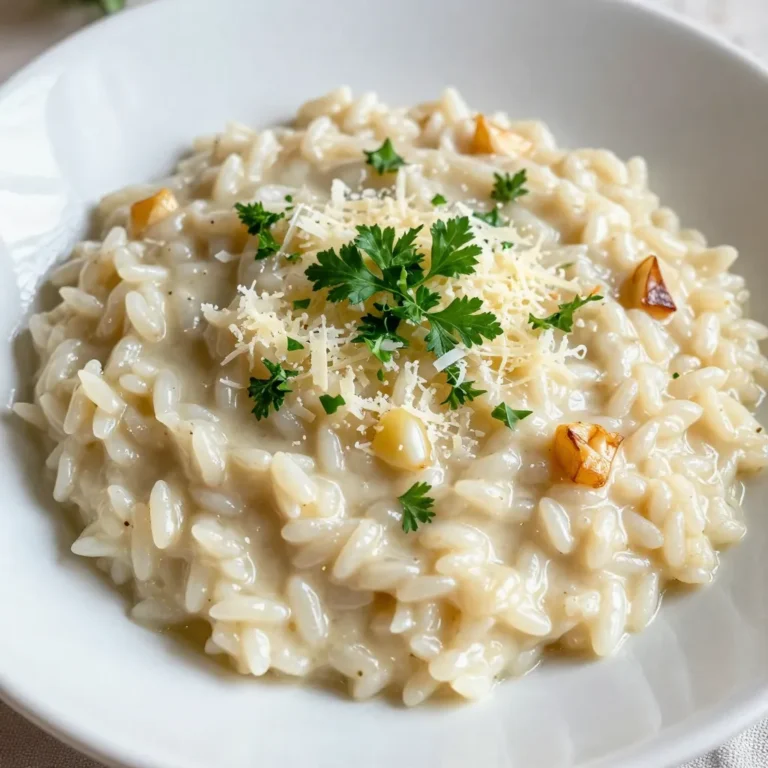
Creamy Garlic Parmesan Risotto Flavorful Dinner Dish

To make Vanilla Chai Energy Bites, you need these simple ingredients: - 1 cup rolled oats - ½ cup almond butter (or any nut/seed butter) - ¼ cup honey or maple syrup - 1 teaspoon vanilla extract - 1 teaspoon ground cinnamon - ½ teaspoon ground ginger - ¼ teaspoon ground cardamom - ¼ teaspoon ground cloves - ¼ teaspoon salt - ½ cup shredded coconut (unsweetened) - ¼ cup chopped nuts (walnuts or pecans) - 2 tablespoons chia seeds These ingredients all work together to create a tasty snack. The oats give you fiber, while the nut butter adds healthy fats. Honey or maple syrup sweetens the bites naturally. Vanilla extract brings in that lovely, warm flavor. The spices—cinnamon, ginger, cardamom, and cloves—give it that chai taste. Shredded coconut adds a nice chew, and nuts give a crunchy texture. Finally, chia seeds add some extra nutrition, making these bites a well-rounded snack. Feel free to adjust the nuts or sweeteners based on what you like. This recipe is quite flexible! {{ingredient_image_1}} - Step 1: In a large bowl, combine 1 cup of rolled oats, ½ cup of almond butter, ¼ cup of honey or maple syrup, and 1 teaspoon of vanilla extract. Mix until everything is well blended. This forms the base of your energy bites. - Step 2: Next, add the ground spices: 1 teaspoon of ground cinnamon, ½ teaspoon of ground ginger, ¼ teaspoon of ground cardamom, ¼ teaspoon of ground cloves, and ¼ teaspoon of salt. Stir well to ensure the spices spread evenly. Each spice adds warmth and depth to the flavor. - Step 3: Now, fold in ½ cup of unsweetened shredded coconut, ¼ cup of chopped nuts like walnuts or pecans, and 2 tablespoons of chia seeds. Mix well until all the ingredients are fully incorporated. The chia seeds pack a nutritional punch! - Step 4: Refrigerate the mixture for 20 to 30 minutes. This makes it easier to handle. Chilling helps the ingredients stick together better. - Step 5: After chilling, scoop out small portions, about 1 tablespoon each, and roll them into bite-sized balls. This step is fun and allows you to shape them as you like! - Step 6: Place the energy bites on a parchment-lined baking sheet or plate. Chill them for another 10 to 15 minutes to firm up. This step ensures they hold their shape well. - Step 7: Once set, store the bites in an airtight container in the refrigerator. They will stay fresh for up to a week. Enjoy these bites as a quick snack or a tasty energy boost anytime! To make great energy bites, chilling the mixture is key. When the mixture is cold, it holds together better. Aim for about 20-30 minutes in the fridge. This step makes rolling easier. Using kitchen gadgets helps mix your ingredients well. A sturdy spoon or spatula works fine. If you have a mixer, that can save time too. Just be gentle to keep the texture right. For rolling uniform bites, use a tablespoon to scoop out the mixture. This helps keep each bite the same size. Wet your hands slightly to prevent sticking. Roll each piece into a smooth ball for a nice finish. You can switch almond butter for any nut or seed butter you like. Sunflower seed butter is a great choice for nut allergies. When it comes to sweeteners, honey and maple syrup are both tasty. Honey gives a rich flavor, while maple syrup adds a unique twist. Choose what you prefer or have on hand. For a different taste, try other nuts. Walnuts and pecans add great crunch and flavor. You can even mix them for extra variety in each bite. Pro Tips Storage Tip: Keep your energy bites in an airtight container in the refrigerator for maximum freshness and convenience. Custom Flavor Tip: Feel free to experiment with different spices or add-ins such as cocoa powder or dried fruits for a unique twist. Nut Butter Tip: Substitute almond butter with peanut butter or sunflower seed butter for a different flavor profile that suits your preference. Chill Time Tip: Allowing the mixture to chill before rolling helps to firm it up, making it easier to form into perfect bite-sized balls. {{image_2}} You can easily change the flavor of your Vanilla Chai Energy Bites. Here are three ideas: - Adding cacao powder for a chocolate twist: Mix in two tablespoons of cacao powder. This adds rich chocolate flavor while keeping it healthy. - Incorporating dried fruits like cranberries or apricots: Chop up half a cup of dried fruit. This adds sweetness and texture. - Spicing it up with additional flavors like nutmeg or allspice: Add a pinch of nutmeg or allspice to the mix. This gives your bites a warm, cozy taste. These bites can fit many diets. Here are some adjustments you can make: - Making it vegan-friendly: Replace honey with maple syrup. This keeps it sweet without any animal products. - Gluten-free alternatives for rolled oats: Use certified gluten-free rolled oats. This makes the recipe safe for those with gluten allergies. - High-protein options: Add a scoop of protein powder. This boosts the protein content, making it a great pre-workout snack. To keep your Vanilla Chai Energy Bites fresh, use airtight containers. Glass jars or plastic containers work well. Make sure to seal them tightly. This keeps out air and moisture. Store the bites in the refrigerator. They like cool and dry places. Avoid leaving them in warm or humid spots. Heat can make them soggy. Humidity can cause them to spoil faster. These energy bites last about one week in the refrigerator. Check them before eating. If you see mold or they smell off, it's best to toss them. Fresh energy bites should feel firm and smell sweet and spicy. Enjoy them while they’re fresh for the best flavor! How many calories are in Vanilla Chai Energy Bites? Each bite has about 100 calories. This makes them a great snack choice. You can enjoy them without feeling guilty. Can these energy bites be frozen? Yes, you can freeze these bites for later. Just place them in a sealed bag. They stay fresh for up to three months. What are the health benefits of chia seeds? Chia seeds pack a punch! They are full of fiber, protein, and healthy fats. They also help keep you full and boost energy levels. How to make these energy bites more nutritious? You can add more seeds, like hemp or pumpkin seeds. You could also mix in dried fruits for extra vitamins. This makes the bites even better for you. Are there any allergens to consider with these ingredients? Yes, be mindful of nut allergies. The almond butter could cause issues for some. You can swap it with sunflower seed butter for a nut-free option. These energy bites are easy and fun to make. We covered simple ingredients, step-by-step instructions, and helpful tips. You learned how to customize your bites and where to store them. Enjoy experimenting with flavors and adjustments that fit your needs. With this guide, you can make tasty, healthy snacks anytime. Start creating and enjoy your delicious energy bites!

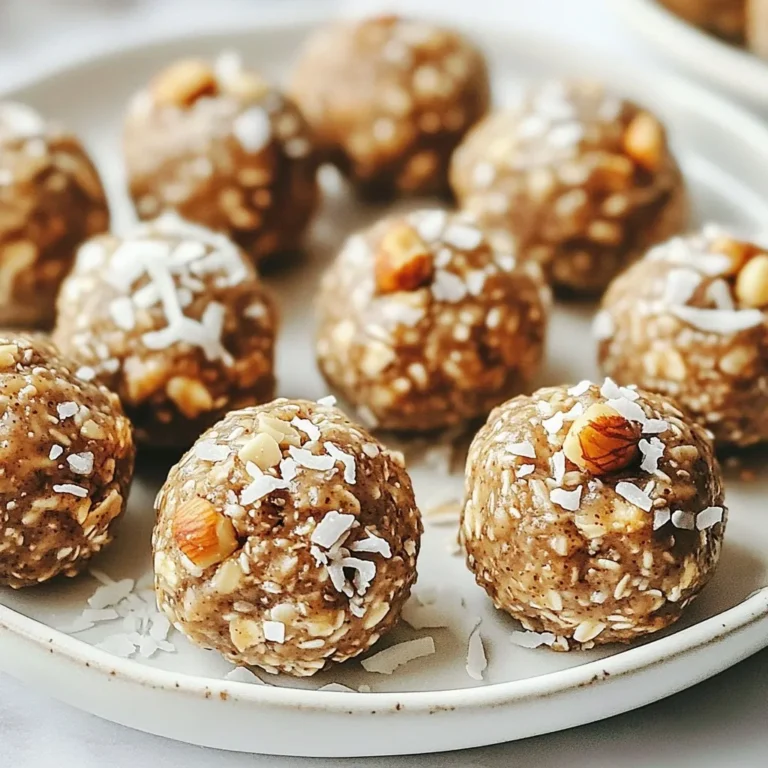
Vanilla Chai Energy Bites Simple and Healthy Snack

- 1 lb fresh asparagus, trimmed Fresh asparagus is the star of this dish. Look for bright green stalks that are firm and straight. The tips should be tightly closed. Trim off the woody ends before cooking. This helps ensure a tender bite. - 3 tablespoons olive oil - 4 cloves garlic, minced - Zest of 1 lemon - Juice of 1 lemon - 1 teaspoon sea salt - ½ teaspoon black pepper - ½ teaspoon red pepper flakes (optional) The seasoning brings out the best in asparagus. Olive oil adds richness. Garlic gives a bold flavor. The lemon zest and juice add brightness. Sea salt and black pepper enhance the taste. Red pepper flakes add a kick, but they are optional. - Grated Parmesan cheese (for serving, optional) Parmesan cheese adds a nice touch. It gives a savory flavor to the roasted asparagus. You can sprinkle it on right before serving for a creamy finish. {{ingredient_image_1}} First, you must preheat the oven to 425°F (220°C). This step ensures the asparagus roasts evenly. While it heats, grab a large bowl. In this bowl, mix 3 tablespoons of olive oil, 4 minced garlic cloves, the zest and juice of 1 lemon, 1 teaspoon of sea salt, ½ teaspoon of black pepper, and optional red pepper flakes. Stir it well to blend the flavors. Now, take your 1 pound of fresh asparagus and trim the ends. Once trimmed, add them to your bowl with the lemon-garlic mix. Toss the asparagus gently until every piece is coated with the mixture. This coating adds flavor and helps them roast beautifully. Next, spread the coated asparagus on a baking sheet lined with parchment paper. Ensure they are in a single layer. This helps them roast evenly. Place the baking sheet in your preheated oven. Roast the asparagus for 12 to 15 minutes. You should stir them halfway through to get a nice, even crisp. When they are tender and slightly crispy, they are ready! Once done, take them out and let them cool for a minute. If you want, sprinkle some grated Parmesan cheese on top before serving for an extra treat. When choosing asparagus, look for firm, bright green stalks. They should be smooth and straight, not limp or wrinkled. The tips should be closed and compact. If you see any flowers, avoid those. Choose thin to medium stalks for the best flavor and tenderness. To roast asparagus perfectly, preheat your oven to 425°F (220°C). This high heat helps the asparagus get crispy. Make sure to coat the asparagus well in the lemon-garlic mixture. Spread them out in a single layer on the baking sheet. This way, they will cook evenly. Stir halfway through to avoid burning. You can add different flavors to your asparagus. For a spicy kick, include red pepper flakes. If you love cheese, try adding grated Parmesan after roasting. You can also mix in herbs like thyme or rosemary for a fresh taste. A dash of balsamic vinegar adds a lovely depth. Experiment and find what you love! Pro Tips Choose Fresh Asparagus: Look for bright green, firm asparagus stalks with tightly closed tips for the best flavor and texture. Roasting Technique: Ensure the asparagus is in a single layer on the baking sheet to achieve even roasting and a crispy texture. Customize Seasoning: Feel free to adjust the amount of garlic, lemon, or red pepper flakes to suit your personal taste preferences. Serving Suggestions: Pair the asparagus with grilled chicken or fish for a complete meal, or serve it as a vibrant side dish at gatherings. {{image_2}} You can add protein to make this dish heartier. Chicken pairs well with lemon and garlic. Try thinly sliced chicken breasts. Simply add the chicken to the bowl with the asparagus. Toss it in the same lemon-garlic mix. You can also use shrimp for a seafood twist. They cook quickly and add a nice flavor. If you want a veggie boost, add cherry tomatoes or bell peppers. These add color and sweetness. Just toss them in with the asparagus. You can also sprinkle in some fresh herbs. Basil or thyme brings freshness and depth. This adds variety to the dish without much effort. Feel free to switch up the flavors. Instead of lemon, use lime for a zesty kick. Or add balsamic vinegar for a sweet tang. You can also experiment with different spices. Cumin or smoked paprika can change the taste completely. Just remember to balance the flavors to keep it tasty. After making lemon garlic roasted asparagus, let it cool down. Store it in an airtight container. It will last up to three days in the fridge. Keep it away from strong-smelling foods. This avoids unwanted flavors. I recommend placing a paper towel in the container. This helps absorb moisture and keeps the asparagus crisp. When you're ready to eat, reheating is easy. You can use the oven or microwave. For the oven, set it to 350°F (175°C). Spread the asparagus out on a baking sheet and warm it for about 10 minutes. This keeps the texture nice. If you use a microwave, heat it for 30 seconds. Check it, then heat more if needed. Be careful not to overcook it. You want it warm, not mushy. Freezing roasted asparagus is possible, but it changes the texture. First, cool it completely. Then, place it in a freezer-safe bag. Remove as much air as you can. It can last up to two months in the freezer. When you want to use it, thaw it overnight in the fridge. Reheat as mentioned before. You may find it softer, but it will still taste great. You can use frozen asparagus, but fresh gives the best taste. Frozen asparagus tends to be softer. If you use it, adjust the cooking time. Roast for about 8-10 minutes. Check for tenderness often to avoid overcooking. Lemon garlic roasted asparagus pairs well with many dishes. Here are some ideas: - Grilled chicken - Baked salmon - Quinoa salad - Pasta with olive oil - Steak or pork chops These options create a balanced meal. The fresh flavors of asparagus enhance everything on your plate. You know asparagus is cooked when it turns bright green and is tender. It should be slightly crispy on the ends. Use a fork to test it. If it goes in easily, it’s ready! Be careful not to overcook, as it can become mushy. This blog post covered everything you need to know about cooking asparagus. We explored fresh asparagus, seasoning, and optional garnishes. I shared step-by-step instructions for roasting and tips for picking the best asparagus. You also learned about tasty variations, storage methods, and answers to common questions. Enjoy this healthy, versatile veggie in your meals. With these tips, you can make delicious roasted asparagus every time.

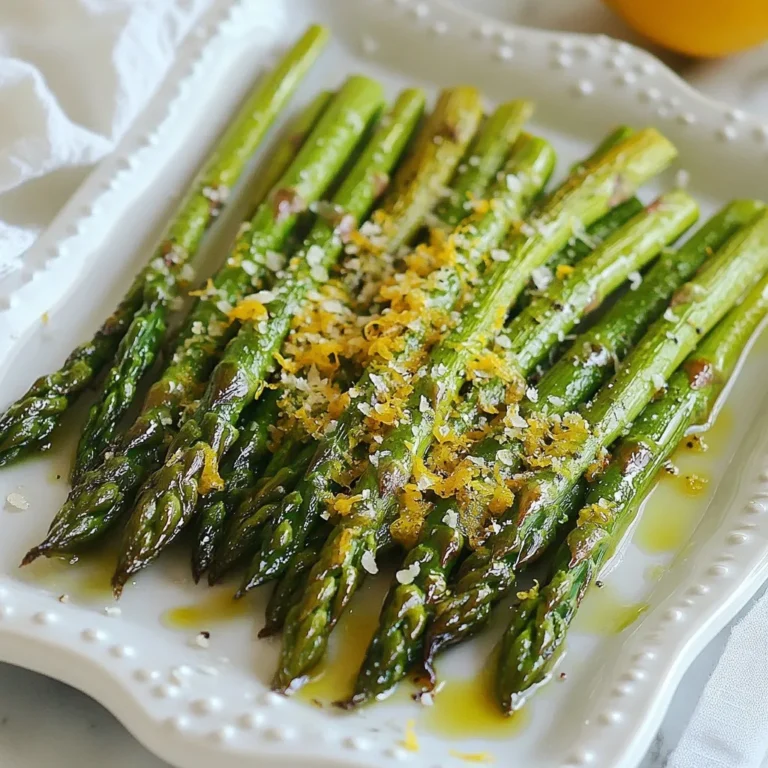
Lemon Garlic Roasted Asparagus Tasty and Simple Recipe

- 1 cup coconut milk (canned or cartoned) - 1/2 cup almond milk (or any plant-based milk) - 1/4 cup chia seeds - 2 tablespoons honey or maple syrup (adjust for sweetness) - 1 ripe mango, diced - 1 teaspoon vanilla extract - A pinch of salt - Shredded coconut and fresh mint for garnish You can switch coconut milk for oat milk if you prefer. Use soy milk if you like. If you want it sweeter, use agave syrup instead of honey. You can skip the mango and use berries for a different taste. For garnish, try using sliced almonds or seeds instead of coconut. Coconut milk adds creaminess and healthy fats. Almond milk is low in calories and nutty. Chia seeds are rich in fiber and omega-3s. Honey or maple syrup gives natural sweetness and energy. Mango is packed with vitamins and antioxidants. Vanilla extract adds warmth and flavor. Salt enhances all the tastes in the dish. Shredded coconut adds texture, while mint gives a fresh touch. {{ingredient_image_1}} Start by gathering your ingredients. In a mixing bowl, combine 1 cup of coconut milk and 1/2 cup of almond milk. Add 1 teaspoon of vanilla extract, 2 tablespoons of honey or maple syrup, and a pinch of salt. Stir this mix well until it is smooth and creamy. This base will give your pudding a rich flavor. Next, slowly whisk in 1/4 cup of chia seeds. Make sure they get evenly mixed in. Chia seeds are tiny but mighty. They will absorb the liquid, creating a thick pudding. Stir until you don’t see any clumps of chia seeds. Now, cover the bowl with a lid or plastic wrap. Place it in the fridge for at least 4 hours, or overnight if you can wait. This time allows the chia seeds to soak up the liquid and swell up. Once it’s ready, give it a good stir to break up any clumps. This step is key for a smooth texture. Now, your coconut mango chia pudding is ready to be layered with fresh mango and served! To make your chia pudding smooth and creamy, you need to mix well. After adding the chia seeds, whisk slowly. This helps prevent clumps from forming. Let the mixture sit for a few minutes. Then whisk again. This extra step gives you a nice texture. Sweetness is key in this recipe. You can use honey or maple syrup. Start with two tablespoons, then taste. If you want it sweeter, add more. You can also skip the sweetener if you prefer a natural taste. Adjusting the sweetness can help you find your perfect balance. Garnishes add flair to your pudding. I love using shredded coconut on top. It adds a nice texture and flavor. Fresh mint leaves also brighten the dish. You can also add diced fruit for color. Try adding berries or additional mango pieces for a tasty touch. Pro Tips Use Ripe Mango: For the best flavor and sweetness, ensure your mango is fully ripe. It should have a slight give when gently pressed and a sweet aroma. Chill Overnight: For optimal texture and flavor, let the chia pudding chill overnight. This allows the seeds to absorb more liquid and thicken perfectly. Experiment with Sweeteners: Feel free to adjust the sweetness of your pudding by using different sweeteners such as agave syrup or date syrup, depending on your preference. Garnish Creatively: Add a variety of toppings such as nuts, seeds, or other fruits for added texture and flavor. Fresh mint not only enhances presentation but adds a refreshing taste. {{image_2}} You can mix flavors with coconut mango chia pudding. Try adding passion fruit for a tangy twist. It pairs well with the sweetness of mango. Pineapple also works great. Its bright taste adds a fun touch to the pudding. For a tropical vibe, blend in some diced kiwi or starfruit. Each fruit brings its unique taste. You can create endless combinations to suit your mood. This recipe is easy to make vegan or sugar-free. Replace honey with agave syrup or maple syrup for sweetness. Both options keep the flavor rich without using animal products. To make it sugar-free, choose a sugar substitute like stevia. Just remember to adjust the amount to match your taste. You can use unsweetened almond milk to lower sugar content even more. This way, you can enjoy a healthy treat without guilt. Layering makes your pudding look and taste even better. Start with a thin layer of chia pudding in a glass. Then, add a layer of diced mango. Repeat this process for a beautiful effect. You can also switch it up. Try adding a layer of shredded coconut or nuts for a crunchy texture. Use a clear glass to show off the layers. This makes it fun to eat and great for sharing. Store your coconut mango chia pudding in an airtight container. This keeps it fresh and tasty. You can use glass jars or plastic containers with tight lids. Make sure to place it in the fridge right after making it. This helps maintain its creamy texture and flavor. Coconut mango chia pudding lasts about 5 days in the fridge. After that, it may lose quality. Always check for any changes in smell or texture before eating. If it looks or smells off, it’s best to toss it. You don’t need to heat this pudding. It tastes best served cold. For a fun twist, layer it with extra diced mango or a splash of coconut milk. You can also add a sprinkle of shredded coconut on top. Enjoy it as a snack or dessert. Chia seeds are tiny but mighty. They are high in fiber. This helps with digestion. They also have protein, which is great for strength. Chia seeds are rich in omega-3 fatty acids, which are good for your heart. Plus, they help keep you full, making them a smart snack choice. Yes! Fresh mango is a fantastic choice. It adds a bright flavor and a juicy texture. Just peel and chop it into small pieces. You’ll enjoy the same great taste with fresh mango. If you love mango, feel free to add more! Absolutely! This pudding is perfect for meal prep. You can make it a day or two ahead. Just store it in the fridge. The chia seeds will soak up the liquid and thicken nicely. This makes it a quick and easy treat when you're ready to eat. You can easily make this pudding nut-free. Just swap out the almond milk. Use coconut milk or oat milk instead. Both options work well in this recipe. You still get a creamy texture without any nuts. Yes, you can use different kinds of milk. Coconut milk is the star, but other plant-based milks work too. Consider soy milk or rice milk. Each milk gives a unique flavor. Choose your favorite for the best taste! This blog post covered the ingredients, instructions, tips, variations, and storage for coconut mango chia pudding. You learned about each ingredient's benefits and how to mix them. I shared tricks for a perfect texture and fun flavor options. Remember, you can tailor this recipe to fit your taste. With proper storage, your pudding stays fresh and ready to enjoy. Keep these tips in mind as you create your own delicious dessert. I hope you feel excited to try this recipe!

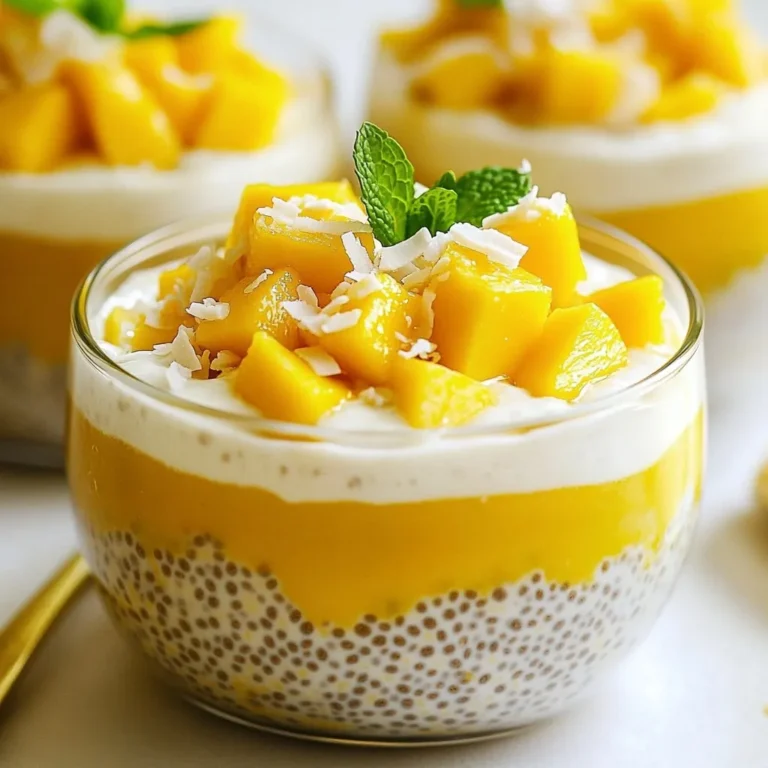
Coconut Mango Chia Pudding Simple and Delicious Treat

- 1 cup almond flour - 1 cup rolled oats - ½ cup almond butter (or peanut butter) - ¼ cup maple syrup - ¼ cup brown sugar - 1 teaspoon vanilla extract - ½ teaspoon salt - ½ cup dark chocolate chips - ¼ cup chopped nuts (optional) You need these simple ingredients to make no-bake cookie dough bars. Almond flour gives a nice base. Rolled oats add texture and fiber. Almond butter or peanut butter makes it creamy. Maple syrup and brown sugar bring sweetness. Vanilla extract adds a warm flavor. A bit of salt enhances everything. For fun, add dark chocolate chips. If you like nuts, toss in some chopped nuts too! - Alternative nut butters: You can swap almond butter for peanut or cashew butter. Each gives a unique taste but keeps it creamy. - Sweetener options: If you want, use honey or agave syrup instead of maple syrup. Adjust the amount based on taste. - Gluten-free alternatives: If you need gluten-free, ensure your oats are certified gluten-free. You can also try coconut flour in place of almond flour. These substitutions let you customize your bars. They help fit your taste and dietary needs. {{ingredient_image_1}} To make these no-bake cookie dough bars, start with the dry mix. In a bowl, combine 1 cup of almond flour and 1 cup of rolled oats. Stir until they blend well. Next, you’ll need to mix the wet ingredients. In another bowl, whisk together ½ cup of almond butter, ¼ cup of maple syrup, ¼ cup of brown sugar, 1 teaspoon of vanilla extract, and ½ teaspoon of salt. Make sure this mixture is smooth and creamy. Now, it's time to bring them together. Pour the wet mixture into the dry one. Mix until they combine. The dough will be thick. This is normal! Gently fold in ½ cup of dark chocolate chips and ¼ cup of chopped nuts if you like. Now, let’s assemble the bars. Line an 8x8 inch baking pan with parchment paper. This helps with easy removal. Press the cookie dough mixture into the pan. Spread it evenly so it sets well. Next, refrigerate the pan for at least 30 minutes. This helps the bars firm up. They will be easier to cut once set. When your bars are ready, it’s time to cut them. Use a sharp knife for clean cuts. To avoid sticking, you can warm the knife slightly. For serving, you can arrange the bars on a nice platter. Drizzle some melted chocolate on top for a sweet touch. A sprinkle of sea salt adds a nice contrast. Enjoy your delicious no-bake cookie dough bars! To get the right texture for your no-bake cookie dough bars, focus on moisture. If the mix feels too dry, add a touch more almond butter or maple syrup. This will help bind the ingredients better. On the other hand, if it's too wet, simply add a bit more almond flour or oats. Aim for a thick dough that holds together well. Next, think about thickness. When you press the mixture into the baking pan, make sure it's even. Use a spatula to spread it out flat. A thicker bar will give you a chewier bite, while a thinner one will be crispier. Flavor is key in any recipe. To give your bars an extra kick, try adding spices. A dash of cinnamon or nutmeg can elevate the taste. Just a little goes a long way. You can also incorporate extracts. While vanilla extract is a must, consider adding almond or coconut extract for a fun twist. These small changes can transform your bars into something special. Presentation makes a difference when serving treats. Arrange your bars on a decorative platter for a nice touch. You can drizzle melted chocolate over the top for added flair. Another fun idea is to sprinkle sea salt on top. This adds a nice contrast to the sweetness of the bars. For serving, cut them into squares or bars based on your preference. Use colorful plates to make the dish pop! Pro Tips Use Smooth Almond Butter: For the best texture, use a creamy almond butter that spreads easily. This will ensure your bars have a uniform consistency. Chill Longer for Firmness: If you prefer a firmer bar, let the mixture chill in the refrigerator for an hour instead of 30 minutes. This helps the bars hold their shape better. Experiment with Mix-Ins: Feel free to customize your bars by adding dried fruits, different types of nuts, or even a scoop of protein powder for an extra boost! Store in an Airtight Container: To keep your bars fresh, store them in an airtight container in the refrigerator. They can last up to a week! {{image_2}} You can change the flavor of your no-bake cookie dough bars easily. First, try different nut butters. Almond butter gives a light taste, while peanut butter is rich and creamy. Each one brings a unique flavor. Next, add fun mix-ins. Dried fruit like cranberries or raisins can add sweetness. Shredded coconut adds a nice chew and tropical feel. Just mix them in after adding the chocolate chips. This lets you create your favorite flavor! If you want vegan options, swap the honey and brown sugar. Use maple syrup as a sweetener. Make sure your nut butter is also vegan. This way, everyone can enjoy these tasty bars. For sugar-free versions, you can use a sugar substitute. Look for sweeteners like stevia or erythritol. These keep your bars sweet without extra sugar. Just adjust the amount based on the brand. Get creative with seasonal themes! For holidays, try adding spices like cinnamon or nutmeg. These spices give a warm touch. You can also fold in mini chocolate eggs for Easter or red and green sprinkles for Christmas. Incorporating seasonal flavors keeps your bars fresh. In summer, you might add fresh berries. In fall, pumpkin spice can give a cozy twist. The options are endless, so have fun with it! To keep your no-bake cookie dough bars fresh, store them in the fridge. Use an airtight container. This helps keep them moist and tasty. You can also wrap them in plastic wrap for extra protection. If you want to save some for later, freeze them. Cut the bars into pieces before freezing. Place them in a freezer-safe bag or container. They can last for a long time in the freezer. These bars can last about one week in the fridge. After that, they may lose their flavor and texture. Always check for signs of spoilage. If they smell off or look dry, it’s best to toss them. Freshness is key to enjoying these delicious treats. Keep an eye on their appearance and smell to make sure they stay good. Can I use different types of flour? Yes, you can use different flours. Almond flour gives a nice taste and texture. If you want a gluten-free option, try oat flour or coconut flour. Each will change the flavor a bit, so choose what you like best. How can I make these bars vegan? To make these bars vegan, use maple syrup as the sweetener. Almond butter is already vegan, but you can swap it for peanut butter or any nut-free butter. Just make sure your chocolate chips are dairy-free. Are these cookie dough bars safe to eat raw? Yes, these cookie dough bars are safe to eat raw. We use almond flour and oats, which don't pose a risk like raw flour or eggs. Enjoy the dough without any worries! What are the serving sizes? This recipe yields 16 bars. Each bar is a great snack or dessert. You can cut them smaller for bite-sized treats or larger for a more filling snack. How to pair them with beverages? Pair these bars with milk, almond milk, or coffee. They also go well with tea, especially chai or green tea. A cold glass of almond milk can balance the sweetness nicely. Can the recipe be doubled? Yes, you can easily double the recipe. Just use a larger pan and adjust the mixing time. Make sure to store any extras in the fridge or freezer. How to make smaller or larger batches? To make smaller batches, cut the ingredients in half. For larger batches, simply multiply by two or three. Just keep the mixing method the same for best results. You can make delicious cookie dough bars with simple ingredients like almond flour and oats. I covered substitutes for nut butters and sweeteners, so everyone can enjoy them. The steps are easy, from mixing to cutting. I shared tips for texture, flavor, and presentation too. With variations for dietary needs and seasonal themes, there’s a bar for everyone. Store them properly for the best taste and use the FAQs for common concerns. Enjoy making these bars your way!

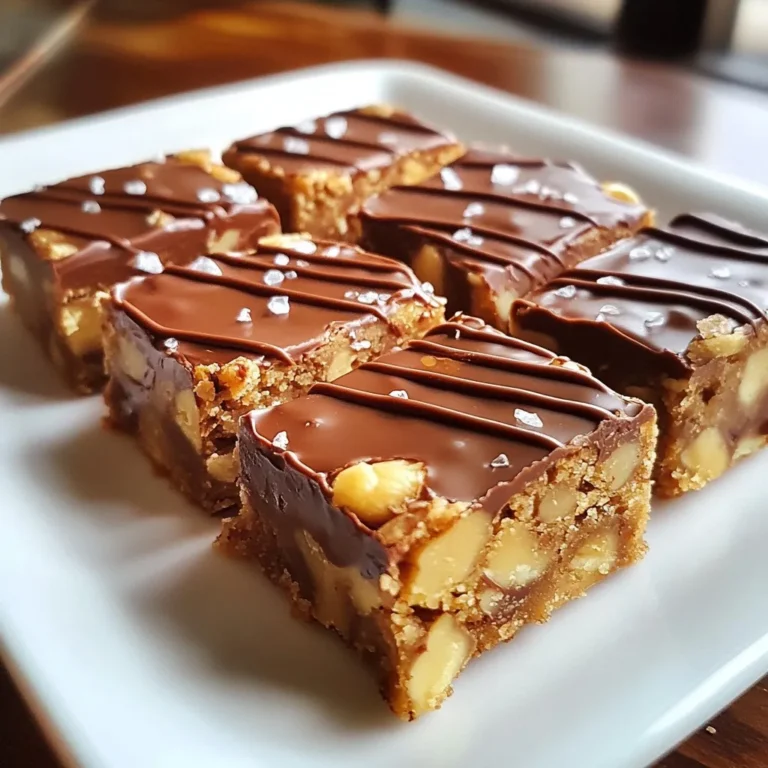
No-Bake Cookie Dough Bars Easy and Tasty Treat

For this tasty Peach Raspberry Crumble, gather these simple ingredients: - 4 fresh peaches, peeled and sliced - 1 cup fresh raspberries - 1/2 cup granulated sugar - 1 tablespoon lemon juice - 1 teaspoon vanilla extract - 1 cup all-purpose flour - 1/2 cup rolled oats - 1/2 cup brown sugar - 1/2 teaspoon ground cinnamon - 1/4 teaspoon salt - 1/2 cup unsalted butter, melted When measuring ingredients, use dry measuring cups for flour and oats. For sugar, scoop and level off. Use a liquid measuring cup for lemon juice and vanilla extract. This helps keep your recipe right. If you don’t have a scale, remember: 1 cup of flour weighs about 120 grams. You can swap some ingredients if needed. If you can’t find fresh peaches, use canned peaches. Just drain them well. For a berry mix, swap out raspberries for blueberries or blackberries. If you need a gluten-free option, you can use almond flour instead of all-purpose flour. For dairy-free, try coconut oil instead of butter. {{ingredient_image_1}} To start, gather all your ingredients. You need four fresh peaches, one cup of raspberries, and some sugar. Peel and slice the peaches into thin wedges. Toss the peaches and raspberries in a large bowl. Next, add half a cup of granulated sugar, one tablespoon of lemon juice, and one teaspoon of vanilla extract. Gently mix these ingredients together. This makes a lovely fruity base! Now, you need to prepare the crumble topping. In another bowl, combine one cup of all-purpose flour, half a cup of rolled oats, half a cup of brown sugar, half a teaspoon of ground cinnamon, and a quarter teaspoon of salt. Mix these dry ingredients well. Pour in half a cup of melted unsalted butter. Stir until the mixture looks crumbly. Preheat your oven to 350°F (175°C). While it warms, lightly grease a 9-inch baking dish. Spoon the fruit mixture into the dish, spreading it evenly. Next, sprinkle the crumble topping over the fruit. Make sure to cover it all. Place the dish in the oven and bake for 30 to 35 minutes. Keep an eye on it. You want the crumble to turn golden brown and the fruit to bubble. The smell will make your mouth water! When the baking time is done, carefully remove the dish from the oven. Let it cool for a few minutes. This makes it easier to serve. For a special touch, serve the crumble warm. Top it with a scoop of vanilla ice cream or a dollop of whipped cream. Garnish with a few whole raspberries for color. Enjoy your delicious Peach Raspberry Crumble! To get that perfect crumble, focus on the butter. Use cold, unsalted butter. Cut it into small pieces before mixing. This keeps the crumble light and airy. Mix it with your dry ingredients until it looks like small pebbles. Don't overmix, or it may turn into dough. You want a nice, crumbly texture that bakes to a crisp. One common mistake is using overly ripe fruit. This can make the filling runny. You want fruit that is ripe but firm. Another mistake is not greasing the baking dish. A greased dish helps the crumble come out easily. Lastly, don’t skip the cooling time. Letting it cool helps the filling set. You can add a twist to your crumble easily. Try adding nuts like pecans or almonds for crunch. Spices like nutmeg or ginger can add warmth. If you like coconut, shredded coconut works well too. For extra sweetness, mix in a handful of chocolate chips or dried fruit. These add-ins can make your crumble unique and delicious! Pro Tips Choose Ripe Peaches: Select peaches that are slightly soft to the touch and have a sweet aroma for the best flavor in your crumble. Use Fresh Raspberries: Fresh raspberries add a burst of flavor and vibrant color. If using frozen, do not thaw to prevent excess moisture. Adjust Sweetness: Taste the fruit mixture before baking and adjust the sugar based on the sweetness of the peaches and raspberries. Let it Rest: Allow the crumble to cool for a few minutes after baking to set the juices, making it easier to serve. {{image_2}} You can change fruits based on the season. Instead of peaches and raspberries, try these: - Apples and cranberries in fall - Cherries and plums in summer - Blueberries and strawberries in spring Each fruit brings its own taste. Apples add crispness, while cherries bring a sweet burst. Have fun mixing and matching! You can easily make this dish gluten-free. Just swap all-purpose flour for gluten-free flour. Look for blends that work in baking. Also, check the oats. Make sure they are certified gluten-free. This way, everyone can enjoy the crumble! Want to get creative? Add new flavors to your crumble. Consider these ideas: - Almond extract instead of vanilla for a nutty twist - Fresh mint leaves for a cool taste - A dash of ginger for warmth These combinations add layers of flavor. They make your peach raspberry crumble even more special! Have fun experimenting! To store leftovers, let the crumble cool first. Cover it with plastic wrap or foil. You can also place it in an airtight container. Keep it in the fridge for up to four days. This helps keep the flavors fresh. When it's time to enjoy leftovers, preheat your oven to 350°F (175°C). Place the crumble in a baking dish. Heat for about 15-20 minutes. You can also use a microwave. Heat it for 30 seconds to 1 minute. Just check that it is warm all the way through. You can freeze Peach Raspberry Crumble for later too! First, let it cool completely. Then cover it tightly with plastic wrap. You can also use a freezer-safe container. It will stay good for up to three months. When you want some, thaw it in the fridge overnight. Bake it at 350°F (175°C) for about 25-30 minutes to warm it up. Enjoy your lovely treat again! Yes, you can use frozen fruit. Just remember to thaw and drain excess juice. Frozen peaches and raspberries work well. They may need a little longer to bake. Adjust the baking time based on the moisture. This way, you still get a tasty crumble. To make the topping less sweet, reduce the brown sugar. You can cut it by half. Adding more oats can help too. Oats add texture without extra sweetness. You could also try using a sugar substitute. This way, you keep the flavor but lower the sugar. I love to serve the crumble warm. A scoop of vanilla ice cream is perfect. You can also add a dollop of whipped cream. Fresh mint leaves on top add a nice touch. For a fun twist, try serving it with yogurt. Enjoy this dessert with your favorite toppings! In this blog post, we covered the essential ingredients and precise measuring tips for your Peach Raspberry Crumble. I shared step-by-step instructions for preparation, baking, cooling, and serving. We explored tips for the perfect crumble texture and common mistakes to avoid. You learned about delicious variations, storage methods, and answers to frequently asked questions. Remember, with practice, you can master this recipe. Enjoy creating a tasty dish that everyone will love!

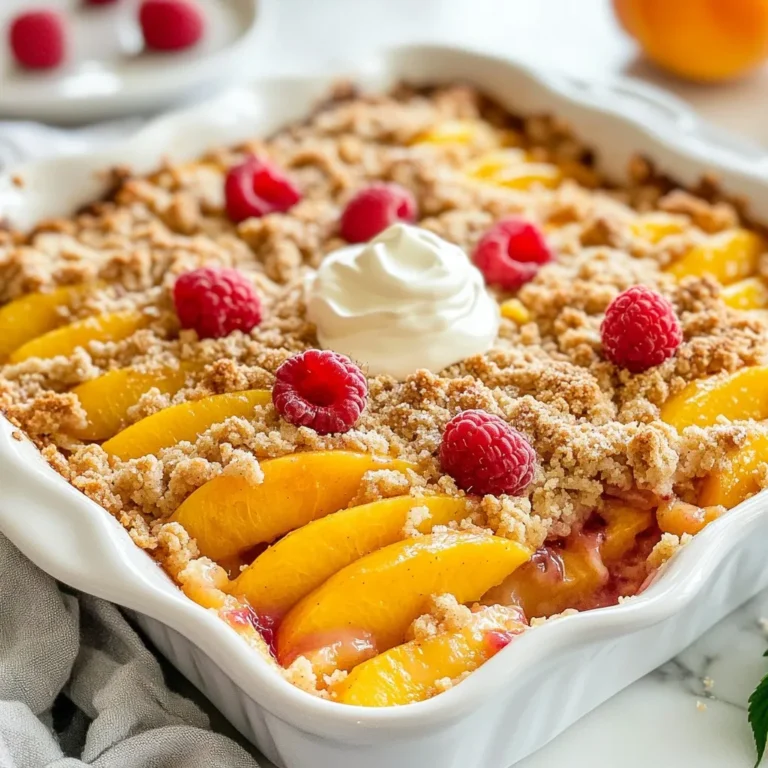
Peach Raspberry Crumble Delightful and Simple Recipe

To make the best salted caramel apple dip, you need simple, fresh ingredients. Here’s what you will need: - 2 large apples (Granny Smith or Honeycrisp), sliced - 1 cup caramel sauce (store-bought or homemade) - 1/2 cup cream cheese, softened - 1/4 cup powdered sugar - 1 teaspoon vanilla extract - 1/2 teaspoon sea salt - 1/4 cup chopped pecans or walnuts (optional for crunch) - Additional sea salt for garnish These ingredients work together to create a sweet and salty treat. The apples give a crisp bite. The cream cheese adds a rich creaminess. Caramel sauce brings a warm sweetness, while sea salt balances it all. You can add nuts for a fun crunch. If you want to make it special, use homemade caramel sauce. Choosing the right apples is key. Granny Smith apples are tart and crisp, perfect for contrast. Honeycrisp apples are sweet and juicy, adding a different flavor. Either way, you will enjoy this dip! To start, take your softened cream cheese and beat it. Use an electric mixer for this. Mix until it is smooth and creamy. This step is key for a great texture. Next, add the powdered sugar and vanilla extract. Mix again until everything is well combined. You want a sweet and creamy base for your dip. Now, it’s time for the caramel. Gradually pour in the caramel sauce while mixing. Keep the mixer running to ensure it blends well. The dip should turn a beautiful caramel color. Once mixed, add the sea salt. Stir until it is fully blended. This adds a touch of salty flavor that makes the dip shine. Pour the mixture into a serving bowl. If you like nuts, sprinkle chopped pecans or walnuts on top. They add a nice crunch. Drizzle some extra caramel sauce over the dip for a sweet touch. Finish with a sprinkle of sea salt for contrast. Finally, arrange your sliced apples around the dip. You can serve them on a platter or in individual servings. Enjoy every bite of this sweet, salty, and creamy delight! For this dip, I love using Granny Smith or Honeycrisp apples. Granny Smith apples add a nice tartness. This balances the sweet caramel. Honeycrisp apples bring a crunch and sweetness. Both types slice well and hold their shape. Choose firm apples with bright color for the best flavor. You can make this dip your own! Add more flavor by mixing in spices like cinnamon or nutmeg. Want some crunch? Toss in chopped pecans or walnuts. For a creamier dip, use more cream cheese. You can also try flavored caramel, like sea salt or chocolate. Adjust the sea salt for your taste. To get a smooth dip, ensure your cream cheese is soft. Let it sit at room temperature for a bit. Mix slowly to avoid lumps. When adding the caramel sauce, pour it in gradually. This helps blend it well. If it’s too thick, add a splash of milk. For a silky finish, mix until it’s well combined. {{image_2}} You can make your salted caramel apple dip even better with fun toppings. Try adding chocolate chips for a sweet twist. You can also use shredded coconut for a tropical flair. Crushed graham crackers can add a nice crunch. Get creative and mix it up based on your taste! While apples are great, you can dip other fruits too. Pears are a tasty choice and pair well with caramel. Sliced bananas work nicely, adding a creamy texture. Strawberries are another fun option, bringing a juicy burst of flavor. Experiment with different fruits to find your perfect match. If you want a lighter dip, use light cream cheese instead of regular. This change keeps the taste while cutting some calories. For sweetness, consider sugar alternatives like honey or agave syrup. These options can help you enjoy the flavors without the extra sugar. You can still indulge while staying on track with your health goals! To store any leftover salted caramel apple dip, place it in an airtight container. This keeps it fresh and creamy. Make sure to cover the dip with plastic wrap if the container is not completely sealed. Store it in the fridge for up to three days. I do not recommend freezing this dip. Freezing can change the texture of cream cheese. The dip may become watery when thawed. If you need to save some, stick to the fridge. You do not need to heat this dip. It tastes best chilled. If you prefer it warm, gently heat it in the microwave. Use short bursts of 10 seconds, stirring in between. This helps keep the dip smooth and tasty. Yes, you can make this dip ahead of time. Prepare the dip and store it in the fridge. It stays fresh for up to two days. Just cover it well with plastic wrap or a lid. When ready to serve, add the toppings, like nuts and extra caramel. You can serve a variety of items with this dip. Here are some great options: - Sliced apples (like Granny Smith or Honeycrisp) - Pear slices - Pretzels for a salty crunch - Graham crackers for a sweet touch - Marshmallows for a fun twist Feel free to mix and match to find your favorites! Salted Caramel Apple Dip lasts for about two days in the fridge. Keep it in an airtight container. After that, the dip may lose its taste and texture. If you see any change in color or smell, it’s best to toss it. Always check before eating leftovers! This blog shared how to make a tasty Salted Caramel Apple Dip. You learned the right ingredients and simple steps to create it. I also shared tips to choose apples and customize the dip. You can even find ways to store leftovers or enjoy it with different fruits. Try this sweet treat at your next gathering. It’s easy and fun to make. Enjoy experimenting with flavors and toppings to find your perfect mix!

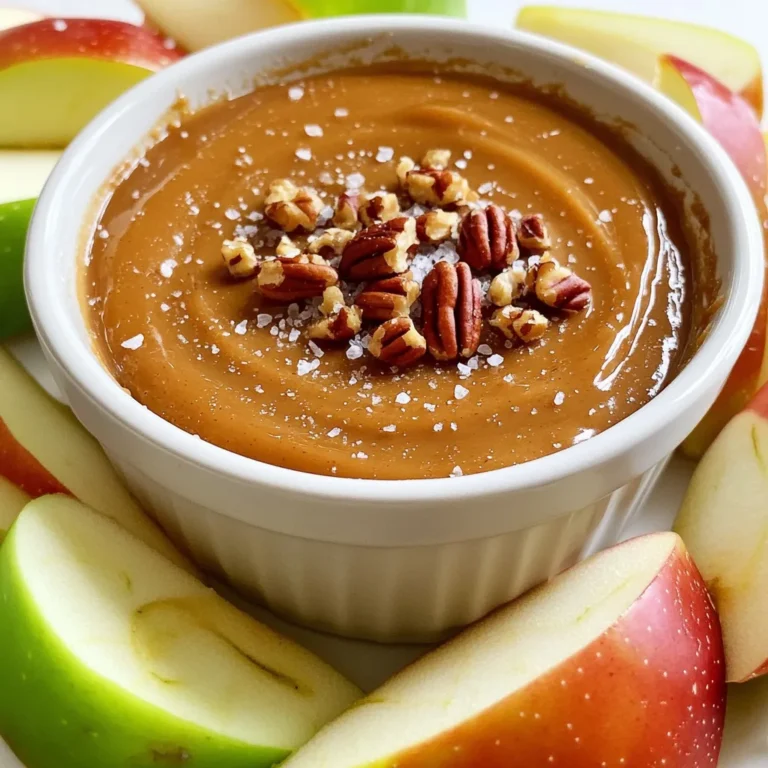
Salted Caramel Apple Dip Irresistible Dessert Delight

- 12 oz cheese tortellini - 1 cup cherry tomatoes, halved - 1 cup fresh spinach, chopped - ½ cup mozzarella balls, halved These main ingredients come together to create a fresh and colorful dish. The cheese tortellini adds a soft, chewy texture. Cherry tomatoes bring a burst of sweetness. Fresh spinach gives the salad a nice crunch and a pop of green. Mozzarella balls add creaminess and flavor. Together, they make a hearty base for the salad. - ½ cup pesto (store-bought or homemade) - ½ cup Greek yogurt - 2 tablespoons olive oil - 1 tablespoon lemon juice The dressing is where the magic happens. Pesto brings bold flavors from basil, garlic, and nuts. Greek yogurt adds creaminess without too many calories. Olive oil gives richness, while lemon juice brightens the taste. These ingredients blend well to create a smooth, creamy dressing that coats the tortellini perfectly. - Salt and pepper - ¼ cup pine nuts, toasted Adding salt and pepper enhances all the flavors. Pine nuts offer a crunchy texture and nutty taste. They also add a nice touch when toasted. These optional ingredients let you customize your salad based on your taste. Feel free to add or skip these items as you see fit. To start, fill a large pot with salted water. Bring it to a rolling boil. Add 12 ounces of cheese tortellini to the pot. Cook the tortellini for about 3 to 5 minutes or until it is al dente. This means it should be firm but cooked through. Once done, drain the tortellini in a colander. Rinse it under cold water. This stops the cooking process and cools it down for the salad. Next, grab a small bowl. In it, whisk together ½ cup of pesto, ½ cup of Greek yogurt, 2 tablespoons of olive oil, and 1 tablespoon of lemon juice. Keep whisking until the mixture is smooth and creamy. If the dressing is too thick, add a splash of water. This helps to thin it out for better coating on the salad. Now, take a large mixing bowl. Combine the cooked tortellini, 1 cup of halved cherry tomatoes, 1 cup of chopped fresh spinach, and ½ cup of halved mozzarella balls. Pour the creamy pesto dressing over the top. Gently toss all the ingredients together to coat them evenly. Season with salt and pepper to taste. Finally, sprinkle ¼ cup of toasted pine nuts on top for added crunch. For the best flavor, cover the salad and let it chill in the refrigerator for 30 minutes before serving. Enjoy your fresh and flavorful creamy pesto tortellini salad! To make your creamy pesto tortellini salad shine, start with the right seasoning. Always taste your dish as you go. A pinch of salt can enhance the flavors. If you want more zing, squeeze in lemon juice. This brightens the dish and balances the creaminess. Choose high-quality pesto. A fresh, vibrant pesto can change everything. You can use store-bought, but homemade pesto is best. It adds unique flavor and freshness. Blend fresh basil, garlic, nuts, olive oil, and cheese for a tasty mix. Add crunch to your salad with toasted pine nuts. They provide a lovely nutty flavor and a satisfying bite. Toast them lightly in a pan to bring out their taste. You can also try walnuts or almonds if you prefer. For creaminess, Greek yogurt works wonders. It gives a rich taste while keeping it light. If you want to switch it up, use sour cream or silken tofu. Both offer a different, yet smooth texture. This salad tastes great with fresh bread or grilled chicken. Pair it with a light white wine for a perfect meal. You can also serve it as a side dish at a picnic or BBQ. The ideal serving temperature is chilled. Let it sit in the fridge for at least 30 minutes before serving. This helps the flavors blend and makes every bite refreshing. {{image_2}} You can switch out the tortellini for gluten-free options. Look for brands made with rice or chickpeas. This way, everyone can enjoy the dish. For a dairy-free dressing, use a vegan yogurt. There are many good choices available. This keeps the creamy texture without the dairy. Want more protein? Add grilled chicken or shrimp. They pair well with the salad. You can also toss in seasonal veggies like bell peppers or zucchini. They add color and crunch to your plate. Try using different types of pesto. Basil pesto is classic, but sun-dried tomato or arugula pesto works great too. You can also add spices like red pepper flakes for heat. Fresh herbs like basil or parsley can brighten the flavor even more. To keep your Creamy Pesto Tortellini Salad fresh, use airtight containers. Glass or plastic containers work well. Make sure they seal tightly. Store the salad in the fridge. It will stay good for about three days. If you want to enjoy leftovers warm, use the stovetop. Heat gently over low heat. This method helps keep the texture nice. You can use the microwave to reheat, but be careful. Heat in short bursts to avoid sogginess. Stir in between to keep it even. Freezing tortellini salad is easy but not always ideal. If you must freeze it, pack it tightly in a freezer-safe container. Leave a little space for expansion. It can last up to three months in the freezer. To thaw, move it to the fridge overnight. Once thawed, stir well before serving. You may want to add fresh ingredients like spinach and tomatoes for a fresher taste. Creamy Pesto Tortellini Salad can last in the fridge for about 3 to 5 days. To keep it fresh, store it in an airtight container. Make sure to seal it well. Check for signs of spoilage, like off smells or changes in texture, before eating. If you see any of these, it’s best to throw it away. Yes, you can make this salad ahead of time! I recommend prepping it up to a day in advance. This gives the flavors time to blend well together. After mixing everything, cover the salad and chill it in the fridge for at least 30 minutes. If you plan to make it even earlier, just wait to add the pine nuts until serving. This keeps them crunchy. Absolutely! Creamy Pesto Tortellini Salad is great for meal prep. It’s easy to pack and can be portioned into containers. Each serving is about one cup, making it perfect for lunches or quick dinners. You can also pair it with protein, like grilled chicken or shrimp, for a more filling meal. Just remember to store it properly to keep it fresh all week! Creamy Pesto Tortellini Salad uses cheese tortellini, fresh veggies, and a tasty dressing. You can mix in your favorite proteins or decide on different pesto flavors for variety. Storing leftovers is simple, and it even freezes well. In summary, this salad is flexible, delicious, and perfect for any meal. Enjoy making it your own!

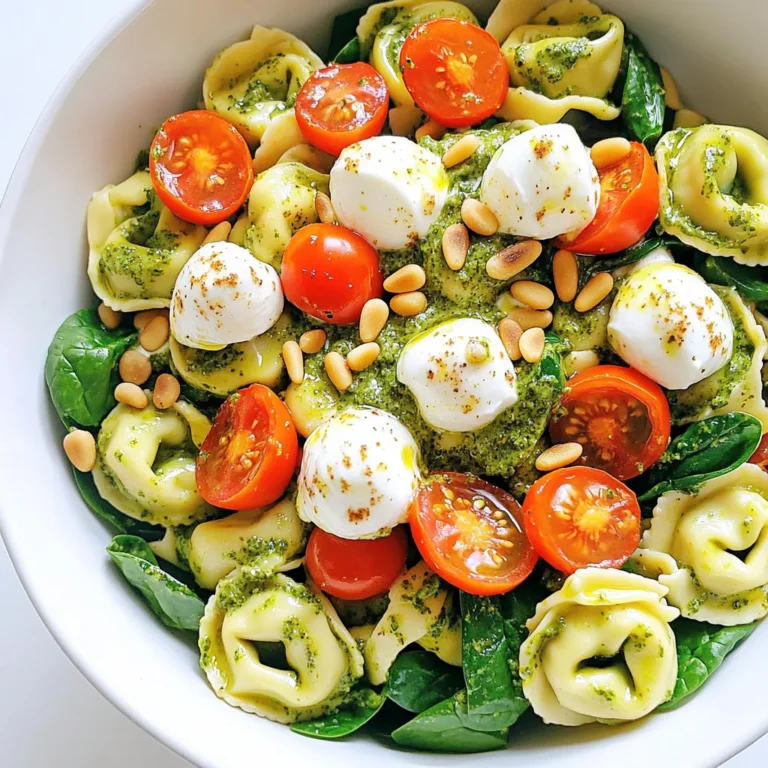
Creamy Pesto Tortellini Salad Fresh and Flavorful Dish

For this cobbler, you need: - 2 cups fresh strawberries, hulled and halved - 2 cups fresh peaches, pitted and sliced Fresh fruits are key to a great cobbler. Strawberries add sweetness, while peaches give a juicy touch. Choose ripe fruits for the best flavor. If you pick them yourself, try to get them at their peak. You will also need: - 1 cup granulated sugar, divided - 1 teaspoon vanilla extract - 1 tablespoon lemon juice Sugar helps the fruits shine. Use half a cup to mix with the fruit. The rest goes in the batter. Vanilla extract adds warmth, and lemon juice brightens the flavors. Just a hint of tartness enhances the fruits. Gather these dry items: - 1 cup all-purpose flour - 2 teaspoons baking powder - 1/2 teaspoon salt Flour forms the base of the batter. Baking powder makes it rise and fluffy. Salt is vital; it boosts all the other flavors. Together, they create a lovely texture for your cobbler. Start by washing the strawberries and peaches. Hull and halve the strawberries. Slice the peaches after removing the pit. In a large bowl, mix the fruit with 1/2 cup of sugar, vanilla extract, and lemon juice. Gently toss the fruit to coat it well. Let this sit for about 10 minutes. This step helps the fruit release its sweet juices. In a separate bowl, whisk together the flour, the remaining 1/2 cup of sugar, baking powder, and salt. Make sure there are no lumps. This mix will give your cobbler its light texture. Pour the milk and melted butter into the dry mix. Stir until just combined. Don’t worry about the lumps; they add character. Now, pour the batter into a greased 9x13 inch baking dish. Spread it evenly. Spoon the fruit mixture over the batter, letting some juices soak in. If you like, sprinkle a pinch of cinnamon on top. Bake in a preheated oven at 350°F for 40-45 minutes. The cobbler is done when golden brown and a toothpick comes out clean. Let it cool slightly before serving. Enjoy this warm with vanilla ice cream on top! To make the best strawberry peach cobbler, use ripe, fresh fruit. The flavor shines when the fruit is sweet. Letting the fruit sit with sugar brings out its juices. This step is key for a juicy filling. Mix the ingredients gently to keep the fruit intact. A few lumps in the batter are okay. This adds texture to the cobbler. Serve the cobbler warm right from the oven. Add a scoop of vanilla ice cream on top. The cold ice cream melts into the warm fruit. This makes each bite a delightful mix of hot and cold. For a fancy touch, add a sprig of mint. It adds color and a fresh taste. Pair your cobbler with whipped cream or yogurt for a creamy finish. A scoop of vanilla ice cream works best with this dish. You can also enjoy it with a hot cup of tea or coffee. The warm flavors of the cobbler and the drink blend well together. You can even serve it alongside a light salad for balance. This makes for a well-rounded meal. {{image_2}} You can switch up the fruits in your cobbler. Try using blueberries, raspberries, or even apples. Each fruit brings its own flavor and texture. Mixing fruits can create a unique taste. For example, peach and blueberry work well together. You can also use other summer fruits for a fresh twist. If you need a gluten-free option, swap all-purpose flour for a gluten-free blend. Many brands offer mixes that work well in baking. Just make sure the blend has xanthan gum. This ingredient helps with texture. You can still enjoy the same great flavor with this change. You can add fun extras to your cobbler. Nuts like walnuts or pecans add crunch. You can also mix in oats for a chewy texture. For toppings, consider whipped cream or vanilla ice cream. A sprinkle of cinnamon on top adds warmth. Get creative and make it your own! After you enjoy your strawberry peach cobbler, you may have some left. To store leftovers, let the dish cool to room temperature. Then, cover it tightly with plastic wrap or foil. You can also transfer it to an airtight container. This keeps the cobbler fresh for up to three days in the fridge. When you are ready to eat the leftovers, preheat your oven to 350°F (175°C). Place the cobbler in an oven-safe dish. Cover it with foil to prevent burning. Heat for about 15-20 minutes. If you want it warm and bubbly, remove the foil for the last 5 minutes. You can also reheat in the microwave, but the oven gives better results. If you want to save some cobbler for later, freezing is a great option. First, let it cool completely. Cut the cobbler into serving pieces. Wrap each piece in plastic wrap, then place them in a freezer bag. Be sure to squeeze out as much air as possible. You can freeze it for up to three months. When you're ready to eat, thaw it in the fridge overnight and reheat as needed. Yes, you can use frozen fruit. Frozen strawberries and peaches work well in this recipe. However, they may release more juice than fresh ones. To fix this, drain some juice before mixing the fruit with sugar and lemon juice. This keeps your cobbler from getting too watery. Your cobbler is done when the top turns golden brown. Insert a toothpick into the center. If it comes out clean, it's ready. You should also see some bubbling around the edges. This means the fruit is cooking well with the batter. Serve your cobbler warm for the best taste. A scoop of vanilla ice cream on top adds richness. You can also garnish with a sprig of mint for a nice touch. This makes the dish look pretty and adds fresh flavor. You learned how to make a tasty strawberry peach cobbler by using fresh fruits, sugar, and dry ingredients. I provided step-by-step instructions to prep, mix, and bake. Tips and tricks help perfect your dish, while variations open doors to new flavors. Don't forget about storing leftovers properly and reheating them for the next day. Now, you can impress your friends and family with this delicious treat. Enjoy this sweet dessert anytime!

Strawberry Peach Cobbler Delightful and Easy Recipe

For this tasty dish, you will need: - 8 oz linguine or spaghetti - 1 lb shrimp, peeled and deveined - 4 tablespoons unsalted butter - 4 cloves garlic, minced - 1 teaspoon red pepper flakes - 1 lemon, zested and juiced - 1/4 cup fresh parsley, chopped - Salt and pepper to taste - Grated Parmesan cheese, for serving These ingredients work together to create a rich and flavorful meal. The shrimp gives protein, while the pasta adds carbs. The garlic and butter mix makes the dish taste great. You can add these for more taste: - Cherry tomatoes for sweetness - Fresh basil or chives for herbs - A splash of white wine for acidity - Spinach for extra greens These optional ingredients can enhance the dish. They add color and more depth to each bite. To make your meal even better, consider these sides: - A simple green salad with vinaigrette - Garlic bread to soak up the sauce - Steamed vegetables like broccoli or asparagus These sides balance the meal. They provide freshness and texture to your plate. Enjoy your cooking and the delicious flavors! To start, fill a large pot with water and add a pinch of salt. Bring it to a boil. Once boiling, add 8 oz of linguine or spaghetti. Follow the package directions for cooking time. You want the pasta to be al dente. This means it should be firm but not hard. When the pasta is ready, save 1/2 cup of the water. Drain the rest and set the pasta aside. Next, grab a large skillet and place it over medium heat. Add 2 tablespoons of unsalted butter and let it melt. Once the butter is melted, add 1 lb of peeled and deveined shrimp. Arrange the shrimp in a single layer for even cooking. Season with salt, pepper, and 1 teaspoon of red pepper flakes. Cook the shrimp for 2-3 minutes on each side. They should turn pink and look cooked through. Remove the shrimp from the skillet and set them aside. In the same skillet, add the remaining 2 tablespoons of butter. Then, add 4 minced garlic cloves. Sauté for about 1 minute. Be careful not to burn the garlic. It should smell great! Now, return the cooked shrimp to the skillet. Add the zest and juice of 1 lemon. Toss in the cooked pasta, too. If it seems dry, add a bit of the reserved pasta water. This helps coat the pasta well. Finally, stir in 1/4 cup of chopped fresh parsley. Taste and adjust the salt and pepper if needed. To get the best shrimp, cook them for 2-3 minutes on each side. The shrimp should turn pink and opaque. If you overcook them, they become rubbery. Always remove them from the heat as soon as they are done. Red pepper flakes add heat to your dish. Start with 1 teaspoon if you like mild spice. You can add more if you prefer it hot. Mix the flakes in with the shrimp as they cook. Taste as you go to find your perfect level. Fresh herbs like parsley bring brightness to your dish. Chop them finely and add them at the end of cooking. Citrus, like lemon zest and juice, adds a fresh kick. Always zest before juicing for the best flavor. Use both to make your shrimp pasta shine! {{image_2}} If you don’t have shrimp, don’t worry! You can easily swap shrimp for other proteins. Chicken works well. Cut it into small pieces and cook it the same way. You can also use scallops. They cook fast and taste great in garlic butter. Tofu is a good choice for a vegan option. Just cube it and sauté until golden. Each protein adds its own flavor, making the dish new and exciting. Adding veggies can make this dish more colorful and healthy. Spinach is a great choice. It wilts quickly and adds nice flavor. You can also add bell peppers for crunch. Just slice them and sauté with the garlic. Zucchini is another option. Slice it thin and cook it until soft. Broccoli florets can boost the dish too. Blanch them first, then toss them in. These additions will give your meal more nutrition and flavor. For those avoiding gluten, many great pasta options exist. Look for gluten-free linguine or spaghetti made from rice or quinoa. These options cook well and taste great. You can also try spiralized veggies like zucchini or carrots. They make a fun and healthy noodle substitute. Just sauté them lightly, and they will soak up the garlic butter flavor. Enjoy all the great tastes without the gluten! To keep your garlic butter shrimp pasta fresh, place it in an airtight container. Make sure to cool the pasta to room temperature before sealing it. This helps prevent moisture build-up. Store the container in the fridge. It stays good for up to three days. If you want to enjoy it later, don’t forget to note the date. When you reheat the pasta, aim for the best texture. Use a skillet over low heat for even warming. Add a splash of water or extra butter to help with moisture. Stir gently so the shrimp and pasta heat evenly. You can also use the microwave. Just cover the dish and heat in short bursts. Stir in between to avoid hot spots. If you want to freeze the pasta, let it cool completely first. Place it in a freezer-safe bag or container. Press out any extra air before sealing. It can last up to three months in the freezer. When ready to eat, move it to the fridge overnight to thaw. For a quick option, you can also thaw it in the microwave. Reheat as mentioned above for the best taste and texture. Yes, you can use frozen shrimp. Just be sure to thaw them first. Place the shrimp in cold water for about 15 minutes. This helps them cook evenly. Frozen shrimp might have more water, so rinse them well before cooking. This step ensures your dish stays flavorful. I recommend using linguine or spaghetti. They both hold the sauce well. The long strands of pasta mix perfectly with the shrimp and garlic butter. If you prefer a thicker texture, you can try fettuccine. Choose what you enjoy most! You can use olive oil instead of butter. Start by heating 4 tablespoons of olive oil in the skillet. The flavor will still be great, and it keeps the dish lighter. You can also try vegan butter for a similar taste. The key is to sauté the garlic until fragrant, just like in the original recipe. Garlic butter shrimp pasta is a tasty and easy dish. We covered all the main ingredients and how to cook each step well. You learned tips on adjusting flavors and cooking shrimp just right. There are great variations to suit your needs, plus easy storage and reheating methods. Now, you can make delicious meals, impress friends, and enjoy every bite. Happy cooking!

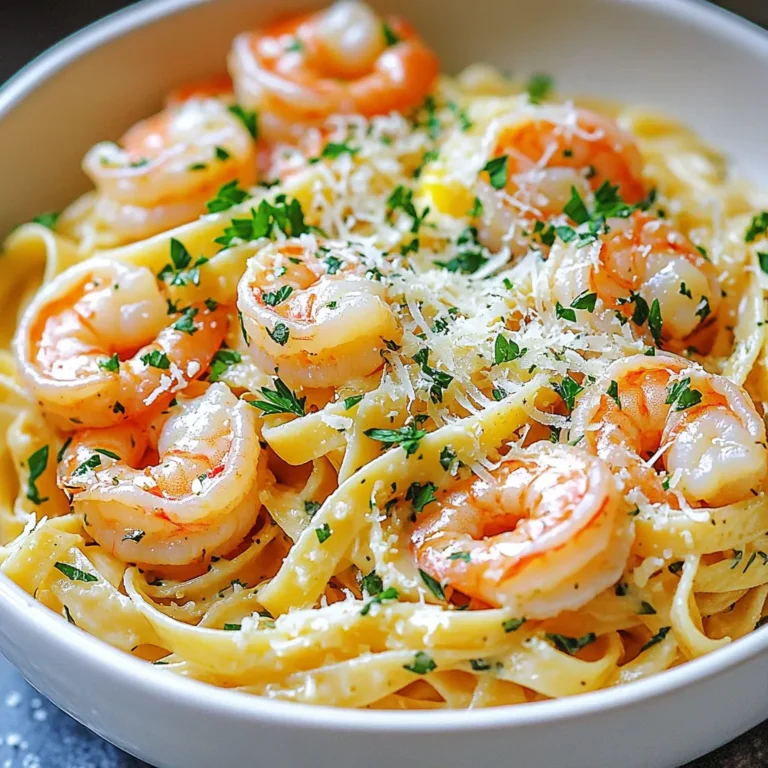
Garlic Butter Shrimp Pasta Quick and Delectable Recipe

PREV 1 … 6 7 8 … 72 NEXT
cozy citrus kitchen

explore

DessertsDinnerAppetizersDrinks

Our Policies

  • Cookie Policy
  • Copyright Policy
  • Disclaimer
  • GDPR Policy
  • Terms Of Use
Back to Top
  • About
  • Contact Us
  • Privacy Policy
© 2026 cozy citrus kitchen