FREE DINNER EBOOK! Get your copy!
  • Cookie Policy
  • GDPR Policy
  • Disclaimer
  • Terms Of Use
  • Visit my other site: Fun Cookie Recipes
cozy citrus kitchen
  • Home
  • Dinner
  • Desserts
  • Drinks
  • Appetizers
  • Contact
  • About
  • Privacy Policy
  • Home
  • Dinner
  • Desserts
  • Drinks
  • Appetizers
  • Contact
  • About
  • Privacy Policy
  • Cookie Policy
  • GDPR Policy
  • Disclaimer
  • Terms Of Use
Visit my other site: Fun Cookie Recipes

HOME / CATEGORIES /

Latest

- 200g dark chocolate (70% cocoa), chopped - 3 tablespoons unsalted butter, cut into pieces - 4 large eggs, separated - 1/4 cup granulated sugar - 1/2 teaspoon pure peppermint extract - 1/2 cup heavy cream - Whipped cream and crushed peppermint candy for garnish To make a rich peppermint chocolate mousse, you need a few simple but key ingredients. The dark chocolate brings a deep flavor, while the butter adds creaminess. The large eggs create a light texture, and the sugar balances the taste. Peppermint extract gives the mousse its festive zing. Heavy cream is crucial for that airy feel, making it melt in your mouth. Finally, garnishes like whipped cream and crushed peppermint candy add a lovely finish. When choosing chocolate, go for 70% cocoa. It will give you the best taste. Unsalted butter is important too; it lets the chocolate shine. For the eggs, large ones work best, ensuring enough volume. The peppermint extract should be pure for the best flavor. Heavy cream needs to be fresh; it whips better that way. Gather these ingredients before you start. This mousse is quick to make, but having everything ready helps you move smoothly through each step. {{ingredient_image_1}} To start, you need to melt the dark chocolate and butter. Use a double boiler for this. Fill a pot with water and simmer it on low heat. Place a heatproof bowl on top, making sure it doesn’t touch the water. Add 200g of chopped dark chocolate and 3 tablespoons of unsalted butter to the bowl. Stir occasionally until the mixture is smooth and melted. Once melted, remove it from the heat and let it cool slightly. Next, grab a separate bowl. In this bowl, whisk 4 large egg yolks and 1/4 cup of granulated sugar together. Keep whisking for about 2-3 minutes. The mixture should become pale and a bit thick. This step is key to adding richness to your mousse. Now, it’s time to combine the mixtures. Slowly pour the melted chocolate into the egg yolk mixture. Stir gently to mix well, making sure the chocolate isn’t too hot. If it is, it will cook the yolks. After that, add 1/2 teaspoon of pure peppermint extract and stir until everything is evenly combined. In a clean bowl, beat the 4 large egg whites with an electric mixer. Set it to medium speed and whip until you see stiff peaks. This process makes the mousse light and fluffy. Carefully fold a third of these egg whites into the chocolate mixture to lighten it. Then, fold in the rest in two additions, being gentle to keep the airy texture. Now it's time to whip the cream. In another bowl, beat 1/2 cup of heavy cream until soft peaks form. This takes just a few minutes. Gently fold the whipped cream into the chocolate mixture. Make sure it’s well combined but still light and airy. Once mixed, spoon the mousse into individual serving bowls or dessert glasses. Place them in the refrigerator for at least 2 hours, or until they are set. This chilling time helps the mousse firm up and develop its flavors. To ensure smooth chocolate, keep the heat low. If chocolate gets too hot, it can seize up. Use a double boiler. This method helps control the heat. Stir the chocolate and butter often. Remove it from heat once melted. Let it cool slightly before mixing with eggs. This step keeps the eggs from cooking. Folding is key to a light mousse. After beating the egg whites, fold them gently into the chocolate mix. Take care not to stir too hard. This keeps the air in the mixture. To check for stiff peaks, lift the whisk out of the egg whites. The peaks should stand tall without drooping. This step shows that the egg whites are ready. For a fun serving idea, use small dessert glasses. They look great and make serving easy. When it's time to serve, add a dollop of whipped cream on top. Sprinkle crushed peppermint candy for a festive touch. This adds color and a nice crunch to each bite. Pro Tips Quality Chocolate Matters: Use high-quality dark chocolate with at least 70% cocoa for a richer flavor and smoother texture in your mousse. Room Temperature Eggs: Allow your eggs to come to room temperature before using them; this helps them whip up better and incorporate more air. Gentle Folding Technique: When combining the whipped egg whites and cream, use a gentle folding motion to maintain the light and airy consistency of the mousse. Chill for Best Results: Let the mousse set in the refrigerator for at least 2 hours; this allows the flavors to meld and the texture to become perfectly creamy. {{image_2}} You can switch up the flavor of your mousse easily. Try adding vanilla extract for a warm, sweet note. A bit of orange zest can give it a bright, citrus twist. If you want to change the chocolate, use milk chocolate for a sweeter taste or white chocolate for a creamy, rich experience. Each option brings a new spin to your mousse. If you need a vegan version, swap the eggs for silken tofu or aquafaba. Use coconut cream instead of heavy cream to keep it rich and creamy. For those watching sugar, you can use stevia or erythritol as a sugar-free alternative. These swaps keep the mousse delicious without the guilt. When serving, get creative with your dishes! You can use small cups or jars for a fun look. Pairing the mousse with fresh berries or a drizzle of chocolate sauce makes it even better. You can also serve it alongside cookies or brownies for a tasty dessert platter. To keep your peppermint chocolate mousse fresh, store it in the fridge. Place it in an airtight container. This helps avoid any unwanted odors or flavors. You can also cover each bowl with plastic wrap. The mousse will stay good for about 3 to 4 days in the fridge. Make sure to eat it before then to enjoy its best taste and texture. Can you freeze mousse? Yes, you can freeze peppermint chocolate mousse. However, it may change in texture. To freeze, place the mousse in a freezer-safe container. Leave some space at the top as it expands. To thaw properly, move it to the fridge for several hours or overnight. Avoid thawing it at room temperature, as this can make it watery. What can you do with leftover egg whites and yolks? You can make meringue cookies with the egg whites. Just whip them with sugar until they form stiff peaks. For the egg yolks, try making a rich custard or adding them to your morning scrambled eggs. What about extra whipped cream? Use it to top cakes or pancakes. You can also mix it into coffee for a creamy treat. This way, nothing goes to waste, and you enjoy everything you make! Peppermint chocolate mousse is a rich, creamy dessert. It combines dark chocolate and peppermint for a unique flavor. This mousse is light and airy, thanks to whipped cream and beaten egg whites. The peppermint adds a refreshing twist, perfect for festive occasions. Making peppermint chocolate mousse takes about 20 minutes to prepare. After mixing, you need to chill it for at least 2 hours. So, the total time is about 2 hours and 20 minutes. This wait is worth it for the perfect set mousse. Yes, you can make this mousse a day in advance. Just store it covered in the fridge. This way, the flavors have time to blend. It also allows you to enjoy your time when hosting guests. If you want a lighter version, use half-and-half or coconut cream. Both options will still give a nice texture. You can also try using Greek yogurt, but the mousse may be less airy. Yes, separating the eggs is key to a light mousse. The yolks add richness, while the whites provide volume. Beating the whites until stiff peaks form helps the mousse rise and stay fluffy. This technique is important for the right texture. Peppermint chocolate mousse is a delightful dessert made from simple ingredients. You learned how to melt chocolate and butter, prepare egg yolks, and whip cream. Each step adds to the rich flavor and smooth texture. Remember to try different flavors, like vanilla or orange zest, for a fun twist. Use creative serving ideas to impress your guests. With these tips, you can make a tasty mousse that everyone will love. Have fun creating your dessert masterpiece!

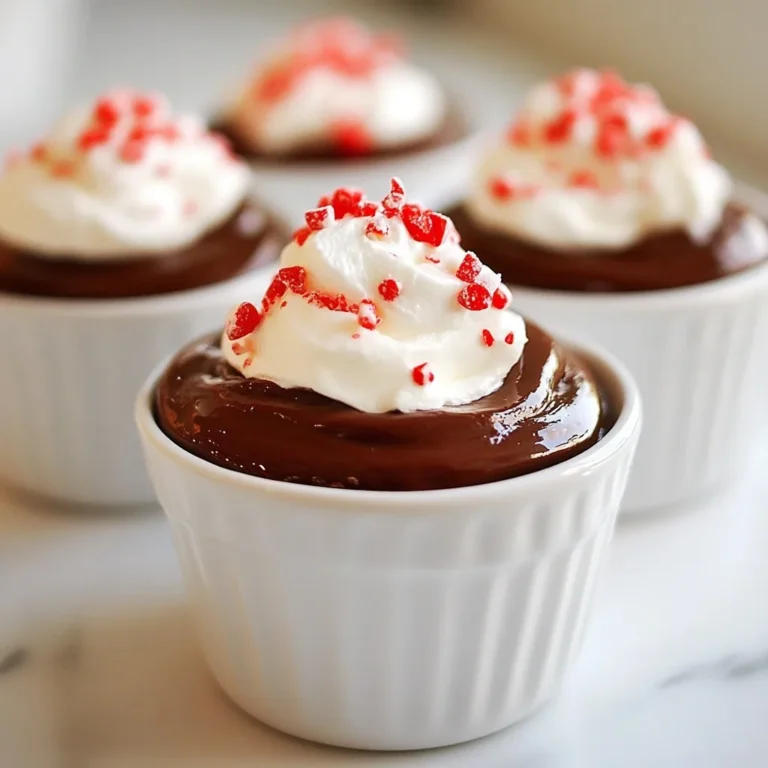
Peppermint Chocolate Mousse Delightful and Simple Recipe

To make your Caramel Apple Cheesecake Dip, gather these simple ingredients: - 8 oz cream cheese, softened - 1/2 cup powdered sugar - 1/4 cup brown sugar - 1 teaspoon vanilla extract - 1/2 cup sour cream - 1/2 teaspoon cinnamon - 1 cup finely chopped apples (use Granny Smith or Honeycrisp) - 1/2 cup caramel sauce, plus more for drizzling - 1/4 cup chopped pecans (optional) - Sliced apples and graham crackers for dipping You can customize your dip to suit your taste. Here are a few fun ideas: - Chopped nuts: Add walnuts or almonds for a crunchy texture. - Chocolate chips: Mix in mini chocolate chips for a sweet twist. - Other spices: Try nutmeg or ginger for a new flavor. - Creamy additions: Blend in a spoonful of Greek yogurt for extra creaminess. The best part of this dip is what you can use for dipping. Here are my favorites: - Sliced apples: They are fresh and crunchy. - Graham crackers: They add a sweet crunch. - Pretzel sticks: They give a nice salty touch. - Vanilla wafers: These are soft and sweet. Feel free to mix and match! {{ingredient_image_1}} 1. Start with 8 oz of cream cheese. Let it soften at room temperature. 2. In a large bowl, use an electric mixer to beat the cream cheese until smooth. 3. Gradually add 1/2 cup of powdered sugar and 1/4 cup of brown sugar. Mix well after each addition. 4. Next, add 1 teaspoon of vanilla extract and 1/2 cup of sour cream. Beat until smooth. 5. Sprinkle in 1/2 teaspoon of cinnamon. Mix it into the creamy base. 6. Chop 1 cup of apples finely. Granny Smith or Honeycrisp apples work best. 7. Stir the chopped apples into the mixture until evenly mixed. 8. Gently fold in 1/2 cup of caramel sauce. Save some caramel for later. 9. Transfer the dip to a serving bowl. Smooth the top with a spatula. 10. Drizzle extra caramel sauce over the top. This adds a nice touch. 11. If you like, sprinkle 1/4 cup of chopped pecans on top. 12. Serve the dip right away with sliced apples. 13. Graham crackers are also great for dipping. 14. If you want, refrigerate the dip for an hour. This helps the flavors blend. 15. Enjoy this sweet treat with family and friends! To make your dip creamy, start with softened cream cheese. Cold cream cheese will clump. Use an electric mixer to blend it well. Mix slowly at first, then speed up. This helps create a smooth base. After adding sugars, ensure they fully dissolve. Add sour cream gradually for a silky finish. For a bolder taste, try adding more cinnamon. You can also mix in some nutmeg for warmth. If you love caramel, drizzle extra on top. This adds a sweet touch and a nice look. You can also toss in some chocolate chips for extra fun. They will melt slightly and add richness. Serve your dip in a pretty bowl. Smooth the top with a spatula for a polished look. Drizzle caramel and sprinkle chopped pecans on top for flair. Use sliced apples and graham crackers around the bowl for dipping. This makes it easy for guests to grab a bite. You can also use a large platter for a buffet style. Pro Tips Choose the Right Apples: Granny Smith or Honeycrisp apples are ideal for this dip as they provide a nice tartness that balances the sweetness of the caramel and sugars. Let It Chill: Allowing the dip to chill for at least an hour enhances the flavors, making it even more delicious when served. Make It Ahead: This dip can be made a day in advance. Just store it in an airtight container in the refrigerator and drizzle the caramel right before serving. Experiment with Dippers: Besides sliced apples and graham crackers, try serving with pretzels, vanilla wafers, or even carrot sticks for a fun twist! {{image_2}} You can change the fruit based on the season. For fall, try pears or figs. In spring, use berries like strawberries and blueberries. These fruits pair well with the creamy dip and add fun colors. You can also mix different fruits for a fun twist. If you want a healthier option, try using honey or maple syrup instead of sugar. Both sweeteners give a nice flavor. Just use less, as they are sweeter than sugar. This change will make your dip a little less sweet but still tasty. To make this dip gluten-free, choose gluten-free graham crackers or fresh fruit for dipping. You can even serve it with rice cakes or pretzels. These options will make sure everyone can enjoy this tasty treat without worry. To keep your Caramel Apple Cheesecake Dip fresh, place it in an airtight container. Make sure to seal it well to avoid any air exposure. Store it in the fridge for up to three days. The flavors will blend and taste even better after a day. You can freeze this dip, but it's best to store it without the apples and caramel drizzles. Place the dip in a freezer-safe container. It should last up to two months in the freezer. When ready to eat, thaw it in the fridge overnight before serving. This dip is best served cold or at room temperature. If you want to warm it up, use a microwave. Heat it in short bursts, stirring in between. Avoid overheating, as it can change the texture. Once warmed, drizzle with fresh caramel and enjoy! Caramel Apple Cheesecake Dip will last for about 3 to 5 days in the fridge. Store it in an airtight container to keep it fresh. The flavors may deepen over time, making it even tastier! Yes, you can make this dip a day ahead. It saves time and lets the flavors blend. Just cover it well and keep it in the fridge. Before serving, give it a stir and add extra caramel sauce on top. You can use lots of fruits! Try pears, bananas, or strawberries. Grapes and pineapple also work well. Each fruit adds a unique taste that pairs beautifully with the dip. Yes, you can make a vegan version! Use vegan cream cheese and sour cream. Maple syrup can replace the sugars. Choose a vegan caramel sauce to keep it all plant-based and delicious. Absolutely! Store-bought caramel sauce saves time and is very convenient. Just drizzle it over the dip for that sweet, gooey finish. Make sure to pick a good quality sauce to enhance the flavor. This blog post gave you all the ingredients and steps to make a great dip. You learned how to mix, enhance flavors, and even customize the recipe. Tips on storage and reheating keep your dip fresh and tasty. Try different fruits and sweeteners to find your favorite blend. With all these ideas, you can create a fun snack for any event. Enjoy your dipping adventures!

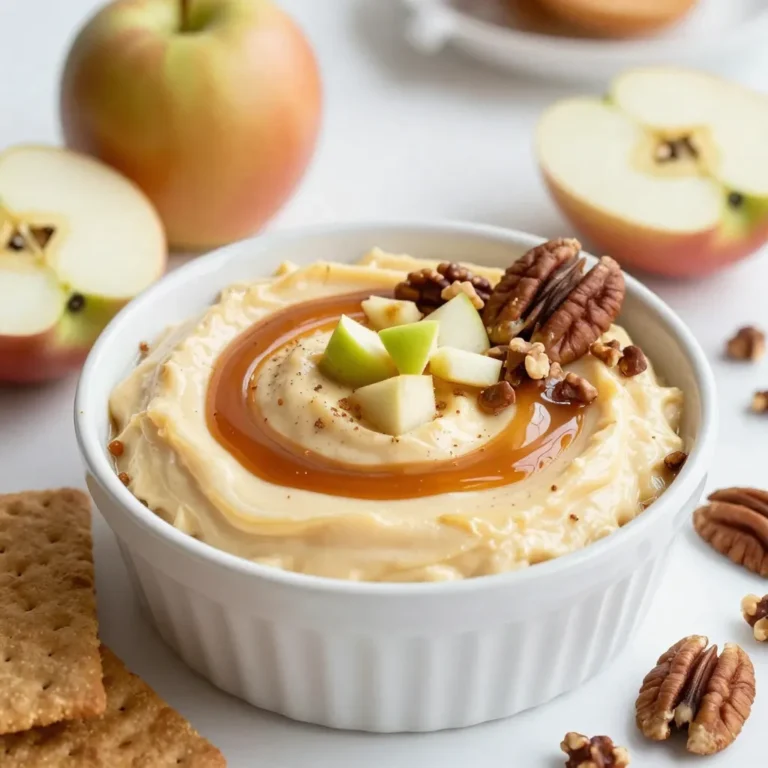
Caramel Apple Cheesecake Dip Creamy and Irresistible

- 4 ripe bananas, sliced and frozen - 2 tablespoons natural peanut butter - 2 tablespoons unsweetened cocoa powder - 1 tablespoon maple syrup (optional, for extra sweetness) - 1 teaspoon vanilla extract - A pinch of sea salt - Optional toppings: dark chocolate chips or chopped nuts For this vegan chocolate peanut butter nice cream, the main star is the ripe bananas. They make the base creamy and sweet, just like ice cream. I use ripe bananas because they have more flavor and sweetness. Slice them and freeze them first. This step is key to getting that nice cream texture. Next, I add natural peanut butter. It gives the nice cream a rich, nutty taste. Make sure to choose a brand without added sugars or oils. Then, I toss in unsweetened cocoa powder. This gives the nice cream that deep, chocolate flavor we all love. If you prefer a sweeter treat, you can add maple syrup. This ingredient is optional, but it can make your nice cream even better. I also add a little vanilla extract. It adds warmth to the flavor. Finally, I sprinkle in a pinch of sea salt. This brings out all the sweet and chocolate notes. For toppings, I love using dark chocolate chips or chopped nuts. They add texture and extra flavor. With these simple ingredients, you can make a delicious treat that is both vegan and healthy. {{ingredient_image_1}} To start, choose four ripe bananas. Make sure they are yellow with some brown spots. This means they are sweet and ready. Slice the bananas into small pieces. Then, place them in the freezer. Freeze them for at least two hours. This step is key for a creamy texture. Once the bananas are frozen, take them out. Place the frozen banana slices in a high-speed blender or food processor. Next, add two tablespoons of natural peanut butter. This will give the nice cream its rich flavor. Now, include two tablespoons of unsweetened cocoa powder for that chocolatey taste. If you want it sweeter, add one tablespoon of maple syrup. Include one teaspoon of vanilla extract and a pinch of sea salt. Blend the mixture on high until it is smooth. Stop to scrape down the sides if needed. This ensures all ingredients mix well. After blending, taste the nice cream. If it needs more sweetness, add a bit more maple syrup and blend again. You want a creamy and smooth texture. If you like soft-serve, you can eat it right away. For a firmer texture, transfer it to an airtight container and freeze for one to two hours. When ready to serve, scoop the nice cream into bowls or cones. You can add toppings for extra crunch and flavor. Dark chocolate chips or chopped nuts work great. Enjoy your vegan chocolate peanut butter nice cream with family or friends! To get a creamier texture, use very ripe bananas. Ripe bananas have more sugar and flavor. Freeze the bananas in slices before blending. This helps create a smooth base. Blend the mixture at high speed. Pause to scrape down the sides. This ensures even blending. If it's too thick, add a splash of almond milk. This adds creaminess without changing the flavor. You can swap peanut butter for other nut butters. Almond or cashew butter works well too. If you need to avoid nuts, use sunflower seed butter. For a sweeter taste, honey is a good choice. Just remember, honey is not vegan. You can also skip the maple syrup if you want less sugar. The bananas add natural sweetness already. Taste the nice cream before serving. If it isn’t sweet enough, add more maple syrup. Blend it again to mix well. If you prefer less sweetness, you can leave it out. The cocoa powder gives a rich flavor. The sea salt enhances all the flavors. Just a pinch will do! Pro Tips Use Overripe Bananas: The riper the bananas, the sweeter and creamier your nice cream will be. Look for bananas with brown spots for the best flavor! Chill Your Bowl: For an extra refreshing treat, chill your serving bowls in the freezer for a few minutes before serving the nice cream. Experiment with Flavors: Feel free to add other ingredients like almond butter, coconut milk, or different extracts for unique flavor combinations! Storage Tips: If you have leftovers, store the nice cream in an airtight container. Let it sit at room temperature for a few minutes before scooping to soften. {{image_2}} You can change up the flavor of your nice cream easily. For a minty twist, add a few drops of peppermint extract. Blend it in with the other ingredients. If you like coffee, mix in a tablespoon of instant coffee or espresso powder. This adds a nice kick. You can even try flavored nut butters, like almond or cashew, for a new taste. Peanut butter is great, but you can use other nut butters too. Almond butter gives a sweet and nutty flavor. Cashew butter adds creaminess. Sunflower seed butter is a safe choice for kids with nut allergies. Each nut butter brings its own unique taste, so don’t be afraid to experiment! Toppings can really make your nice cream special. Use dairy-free chocolate chips for a sweet crunch. Chopped nuts add a nice texture. You can even try shredded coconut for a tropical touch. For a fruity option, add some fresh berries. These toppings let you customize your nice cream to fit your mood! To keep your nice cream fresh, use an airtight container. This prevents freezer burn and keeps it tasty. Label the container with the date to track how long it has been stored. Avoid leaving it open in the freezer for too long. Vegan chocolate peanut butter nice cream lasts up to two weeks in the freezer. After that, it may lose flavor and texture. If you keep it in the right container, it can stay good and yummy for that entire time. When you are ready to enjoy your nice cream, take it out of the freezer. Let it sit at room temperature for about five to ten minutes. This softens it just enough to scoop. If it’s too hard, you can blend it again for a creamy texture. Serve it in bowls or cones, and add your favorite toppings like dark chocolate chips or nuts for extra fun! No, fresh bananas won’t work well. Frozen bananas give nice cream its creamy texture. They blend better and create a smooth treat. I always recommend using ripe, frozen bananas for the best results. If you use fresh bananas, your nice cream will be too runny. Yes, this recipe is great for kids. It is made from healthy ingredients, like bananas and peanut butter. Kids love the chocolate flavor too! Plus, you can involve them in making it. They can help slice the bananas or add the toppings. If you need a swap, try almond butter or sunflower seed butter. Both of these options work nicely. They also give a unique flavor twist. If you want to keep it nut-free, sunflower seed butter is a great choice. You can, but it will take more effort. A food processor is best for smooth nice cream. If you don’t have either, mash the frozen bananas well. Then, mix in the other ingredients by hand. It will not be as smooth, but still tasty! We explored how to make a delicious and healthy nice cream. You learned about the key ingredients like ripe bananas and natural peanut butter. We went through easy steps to blend them, achieve the right texture, and make it creamy. You can even try fun variations with flavors and toppings. Remember to store it properly so it stays fresh. Nice cream is simple to make and perfect for everyone. Enjoy your tasty treat anytime!

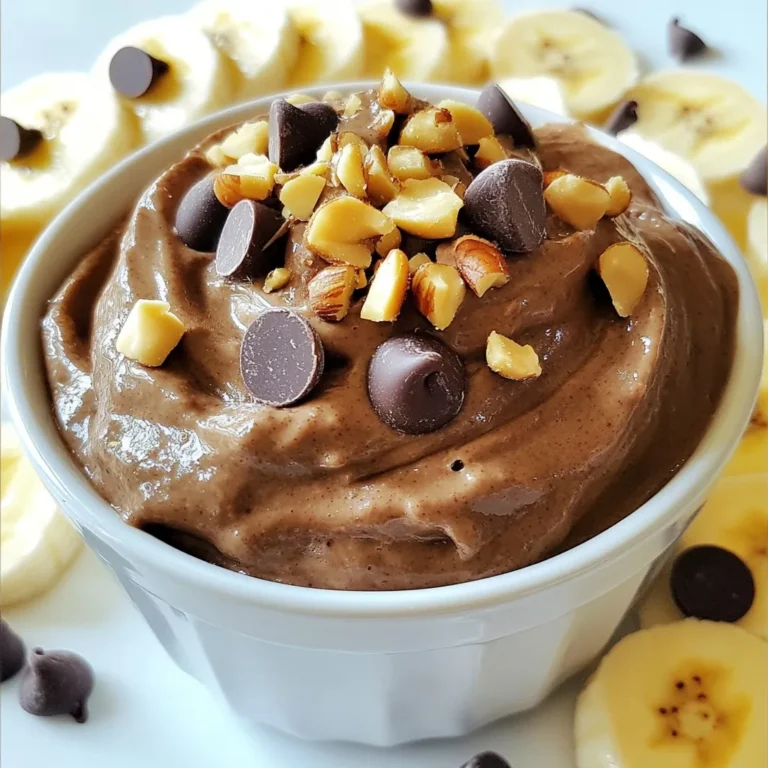
Vegan Chocolate Peanut Butter Nice Cream Delight

To make BBQ chicken flatbread pizza, you need some key ingredients. Here’s what you’ll need: - 2 large flatbreads or naan - 1 cup cooked chicken, shredded - 1/2 cup barbecue sauce - 1 cup shredded mozzarella cheese - 1/2 cup red onion, thinly sliced - 1/2 cup corn kernels (fresh or frozen) - 1/4 cup fresh cilantro, chopped - 1 cup cherry tomatoes, halved - 1 teaspoon olive oil - Salt and pepper to taste - Optional: jalapeño slices for heat Each ingredient adds a unique flavor. The flatbread is the base. The chicken gives protein and texture. BBQ sauce brings sweetness and tang. Cheese melts and binds it all together. Fresh veggies add crunch and color. You can make this pizza your own. Here are some fun optional toppings: - Sliced jalapeños for spice - Avocado slices for creaminess - Pineapple chunks for sweetness - Bell peppers for crunch - Feta cheese for a tangy twist Mix and match these toppings to make your pizza special. Don't be afraid to experiment! For the best taste, use high-quality ingredients. Choose a barbecue sauce you love. A smoky sauce works great. Fresh mozzarella melts better than pre-shredded cheese. If you can, use fresh herbs like cilantro. Fresh herbs add bright and bold flavors. Using fresh, vibrant ingredients will make your flatbread pizza shine. Enjoy the process and have fun in the kitchen! {{ingredient_image_1}} Start by gathering all your ingredients. You will need: - 2 large flatbreads or naan - 1 cup cooked chicken, shredded - 1/2 cup barbecue sauce - 1 cup shredded mozzarella cheese - 1/2 cup red onion, thinly sliced - 1/2 cup corn kernels (fresh or frozen) - 1/4 cup fresh cilantro, chopped - 1 cup cherry tomatoes, halved - 1 teaspoon olive oil - Salt and pepper to taste - Optional: jalapeño slices for heat Shred the chicken into small pieces. This helps it mix well with the sauce. Slice the red onion thinly. This makes it easy to spread on the flatbreads. If using frozen corn, make sure to thaw it first. Halve the cherry tomatoes for a fresh bite. Lastly, chop the cilantro. This adds a nice touch at the end. In a medium bowl, mix the shredded chicken with the barbecue sauce. Stir well until every piece of chicken is coated. This step is key. The sauce adds flavor and moisture. You can use any BBQ sauce you like, but a sweet or smoky one works best. Preheat your oven to 450°F (232°C). While it heats, take a baking sheet and line it with parchment paper. You can also lightly grease it. Place the flatbreads on the sheet. Brush a little olive oil on each flatbread. This helps them crisp up while baking. Next, spread the BBQ chicken mixture evenly over the flatbreads. Now, sprinkle the shredded mozzarella cheese on top. Add the sliced red onion, corn, and halved cherry tomatoes. Don’t forget to season with salt and pepper. If you like heat, add jalapeño slices now. Bake the flatbreads in the oven for 10-12 minutes. Look for melted cheese and golden edges. Once done, take them out and sprinkle fresh cilantro on top. Slice into pieces and enjoy your savory BBQ chicken flatbread pizza! To enjoy a crispy flatbread, start by preheating your oven to 450°F (232°C). Brush the flatbread lightly with olive oil. This simple step helps it brown nicely. Place the flatbread on a baking sheet lined with parchment paper. Avoid overcrowding the sheet. Bake for 10-12 minutes. Look for golden edges and melted cheese. Your flatbread will be crispy, tasty, and ready to enjoy. Choosing the right barbecue sauce is key. You can go for sweet, tangy, or smoky flavors. A classic choice is a Kansas City-style sauce. It has a rich sweetness. If you like heat, try a spicy barbecue sauce. You can even mix two sauces for unique flavors. Just make sure to coat your chicken well. This will ensure great taste in every bite. When serving your BBQ chicken flatbread pizza, think about side dishes. A fresh salad pairs well with the rich flavors. You can also serve coleslaw for a crunchy contrast. If you want to add some heat, serve jalapeño slices on the side. For drinks, sweet tea or lemonade works great. You can even try a light beer. These choices will enhance your meal and make it even more enjoyable. Pro Tips Use Fresh Ingredients: Fresh ingredients elevate the flavor of your BBQ chicken flatbread pizza. Opt for fresh cilantro, ripe cherry tomatoes, and high-quality barbecue sauce for the best results. Crispier Flatbread: For an extra crispy flatbread, pre-bake the flatbreads for 5 minutes before adding the toppings. This helps to ensure they don’t get soggy from the sauce. Mix Up the Cheese: While mozzarella is a classic choice, try blending it with other cheeses like cheddar or gouda for a richer flavor profile. Customize Your Toppings: Feel free to get creative with toppings! Add bell peppers, olives, or even pineapple for a unique twist on this BBQ chicken flatbread pizza. {{image_2}} You can make a tasty vegetarian BBQ flatbread pizza. Start by swapping the chicken for grilled veggies. Zucchini, bell peppers, and mushrooms work great. Use the same BBQ sauce to keep that rich flavor. Add extra cheese or a sprinkle of feta for a creamy touch. Top with fresh basil or arugula for a fresh taste. If you need a gluten-free option, use gluten-free flatbreads or naan. Many stores sell these now. Check the labels to ensure they are safe. You can also make your own using almond flour or chickpea flour. This will still give you the same great taste without the gluten. Get creative with flavors! You can try adding pineapple for a sweet touch. Pickled onions or jalapeños can give some spice. Swap the cheese for a dairy-free version if you prefer. You can also add beans or avocado for more texture and flavor. The sky's the limit, so have fun exploring new tastes! To store leftover BBQ chicken flatbread pizza, let it cool first. Place the slices in an airtight container. You can also use foil or plastic wrap. Make sure to keep it in the fridge. It will stay fresh for about 3 to 4 days. When you want to eat your leftover pizza, preheat your oven to 350°F (175°C). Place the slices on a baking sheet. Heat them for about 10 minutes. This will help keep the crust crispy and the cheese melty. If you prefer, you can use a microwave. Just heat for 30 seconds to 1 minute, but the crust may get soft. If you want to save your pizza for later, freezing works great. Cut the flatbread into slices. Wrap each slice in foil or plastic wrap. Place the wrapped slices in a freezer bag. Make sure to remove as much air as possible. Your pizza can stay in the freezer for up to 2 months. To eat, just thaw in the fridge and reheat as mentioned above. Yes, you can use store-bought flatbreads. They save time and taste great. Look for flatbreads that are thick enough to hold the toppings. Naan is a good option too. They will bake up crispy and delicious. To add spice, include jalapeño slices on top. You can also mix hot sauce into the barbecue sauce. If you like heat, try adding red pepper flakes or a spicy BBQ sauce. These options will give your pizza a nice kick. Some tasty sides include a fresh salad or coleslaw. You could also serve grilled vegetables or corn on the cob. Potato wedges or sweet potato fries pair well too. These sides will complement the pizza's flavors and make a complete meal. This blog post explored all you need for BBQ Chicken Flatbread Pizza. We covered essential ingredients, optional toppings, and the best flavors you can use. The step-by-step guide helped you prepare, cook, and assemble your flatbread. You learned tips for making it crispy and which BBQ sauces to choose. Plus, we shared tasty variations and how to store leftovers properly. Now, you can create your perfect flatbread pizza. Enjoy experimenting with flavors and making this dish your own!

Savory BBQ Chicken Flatbread Pizza Quick and Easy Recipe

To make Vegan Sweet Potato Shepherd's Pie, gather these key ingredients: - 2 large sweet potatoes, peeled and cubed - 1 cup vegetable broth - 1 tablespoon olive oil - 1 onion, diced - 2 cloves garlic, minced - 2 carrots, diced - 1 cup green peas (fresh or frozen) - 1 cup corn (fresh or frozen) - 1 teaspoon dried thyme - 1 teaspoon dried rosemary - Salt and pepper to taste - 1/4 cup nutritional yeast (optional for cheesy flavor) - Fresh parsley, chopped for garnish You can add some optional ingredients to enhance the dish: - Extra vegetables like bell peppers or mushrooms - A splash of soy sauce for depth - A pinch of smoked paprika for warmth This Vegan Sweet Potato Shepherd's Pie is not only tasty but also nutritious. Here's what you can expect per serving: - Calories: Approximately 280 - Protein: 6g - Carbohydrates: 50g - Fiber: 10g - Fat: 5g This dish is full of vitamins from the sweet potatoes and veggies. The nutritional yeast adds a cheesy flavor while providing B vitamins. It’s a great way to enjoy a healthy meal! {{ingredient_image_1}} Start by peeling and cubing two large sweet potatoes. This helps them cook faster. Place the cubes in a large pot of salted water. Boil them for 15 to 20 minutes. Check if they are tender by poking with a fork. Once they are soft, drain the water. Mash the sweet potatoes with a bit of salt and pepper. Make them smooth and creamy. Set them aside for later. In a large skillet, heat one tablespoon of olive oil over medium heat. Add one diced onion and sauté it for three to four minutes. You want the onion to be soft and translucent. Then, add two minced garlic cloves and two diced carrots. Cook for about five minutes, stirring often. This makes the carrots tender and brings out the flavors. Next, stir in one cup of green peas and one cup of corn. Season with one teaspoon of dried thyme, one teaspoon of dried rosemary, salt, and pepper. Cook for another five minutes until everything is warm. Now, pour in one cup of vegetable broth. Let it simmer for five to seven minutes. This blends all the flavors together nicely. If you like a cheesy taste, stir in 1/4 cup of nutritional yeast. In an oven-safe baking dish, layer the vegetable mix evenly at the bottom. This creates a tasty base for your pie. Preheat your oven to 375°F (190°C). Spread the mashed sweet potatoes over the veggie layer. Use a spatula to smooth it out. Make sure it covers the veggies well. Place the dish in the oven and bake for 20 to 25 minutes. You want the top to be slightly golden. After baking, take it out and let it cool for a few minutes. Enjoy your warm, hearty Vegan Sweet Potato Shepherd's Pie! To make the best sweet potato mash, start with large sweet potatoes. Peel and cube them to ensure even cooking. Boil them in salted water until tender, about 15-20 minutes. Drain the sweet potatoes and mash them while hot. For a super creamy texture, add a splash of vegetable broth. Mix well to get rid of any lumps. Season with salt and pepper to taste. If you want a cheesy flavor, add nutritional yeast. This gives your mash an extra boost. Adding herbs and spices can take your shepherd's pie to the next level. Use dried thyme and rosemary for a fragrant touch. These herbs add depth to the dish. Make sure to sauté the onion and garlic before adding other veggies. This will bring out their natural sweetness. Don’t forget to season with salt and pepper. Taste as you go to find the right balance. You can also try adding a pinch of smoked paprika for a hint of warmth. Presentation can make your dish even more appealing. After baking, let the pie cool for a few minutes. This helps the layers set. Serve it hot in the baking dish for a rustic look. Garnish with fresh chopped parsley for a pop of color. A sprinkle of black pepper adds an elegant touch. For a complete meal, serve it with a bright side salad. The colors and flavors will make your meal stand out. Pro Tips Choose the Right Sweet Potatoes: Opt for firm, smooth-skinned sweet potatoes for the best flavor and texture. Enhance Flavor with Herbs: Fresh herbs can elevate the taste; consider adding fresh thyme or rosemary if you have them. Layering Technique: Ensure even layers of vegetables and mashed sweet potatoes for a perfect bake and presentation. Make it Ahead: Prepare the filling and mashed sweet potatoes in advance and assemble just before baking to save time. {{image_2}} You can boost the protein in your Vegan Sweet Potato Shepherd's Pie by adding lentils or mushrooms. Lentils add a nice texture and are packed with protein. Cook one cup of lentils in vegetable broth until tender. Stir them into your veggie mix before layering on the sweet potatoes. Mushrooms also work well. They add rich umami flavors. Use about one cup of chopped mushrooms. Sauté them with the onions and garlic until they soften and their moisture evaporates. This will give your pie a hearty bite. Feel free to swap or add different vegetables based on what you have. For example, you could add bell peppers, zucchini, or spinach. Diced bell peppers give a sweet crunch. Zucchini adds moisture and lightness. Spinach can bring a lovely green color and nutrients. Just make sure to cook any veggies that need it before mixing them into your filling. To make your dish gluten-free, use gluten-free broth and double-check any packaged ingredients. Most vegetables are naturally gluten-free, so you won’t have to worry there. If you want a thicker filling, mix in some cornstarch with the broth. This will help bind your veggies without using any gluten. Enjoy a hearty meal without the gluten! To store your Vegan Sweet Potato Shepherd's Pie, let it cool first. Place it in an airtight container. You can keep it in the fridge for up to four days. If you have a big batch, you can also cover it tightly with plastic wrap. This helps keep the pie fresh and tasty. If you want to save some pie for later, freezing is a great option. First, let the pie cool completely. Then, cut it into individual portions. Wrap each piece in plastic wrap, followed by aluminum foil. This keeps out air and prevents freezer burn. You can freeze it for up to three months. When you're ready to eat, just thaw it in the fridge overnight. To reheat your shepherd's pie, you have a few options. The oven is best for keeping the top crispy. Preheat your oven to 350°F (175°C). Place the pie in an oven-safe dish and cover it with foil. Bake for about 20-25 minutes. If you're short on time, you can use the microwave. Heat it in a microwave-safe dish for about 2-3 minutes, checking it often. Make sure it's hot all the way through before you enjoy it! Yes, you can make this dish ahead. Prepare it up to the baking step. Store it in the fridge. When ready to eat, just bake it. This saves time on busy days. Some great sides include: - A fresh green salad - Roasted vegetables - Garlic bread These add color and nutrition to your meal. Yes, you can. Regular potatoes work well, but they taste different. Sweet potatoes add sweetness and creaminess. If you choose regular potatoes, mash them well for a great texture. Absolutely! Vegan Sweet Potato Shepherd’s Pie is perfect for meal prep. It stores well in the fridge and freezes nicely. You can enjoy it throughout the week, making it a smart choice. This blog post covered how to make a delicious Vegan Sweet Potato Shepherd’s Pie. We explored key ingredients, cooking steps, and helpful tips. You learned how to make creamy sweet potato mash and tried different ingredients for variety. This dish is versatile and great for meal prep. In summary, enjoy customizing the pie to fit your taste. You’ll impress your family and friends with this healthy and tasty meal. Make it your own, and share your creations!

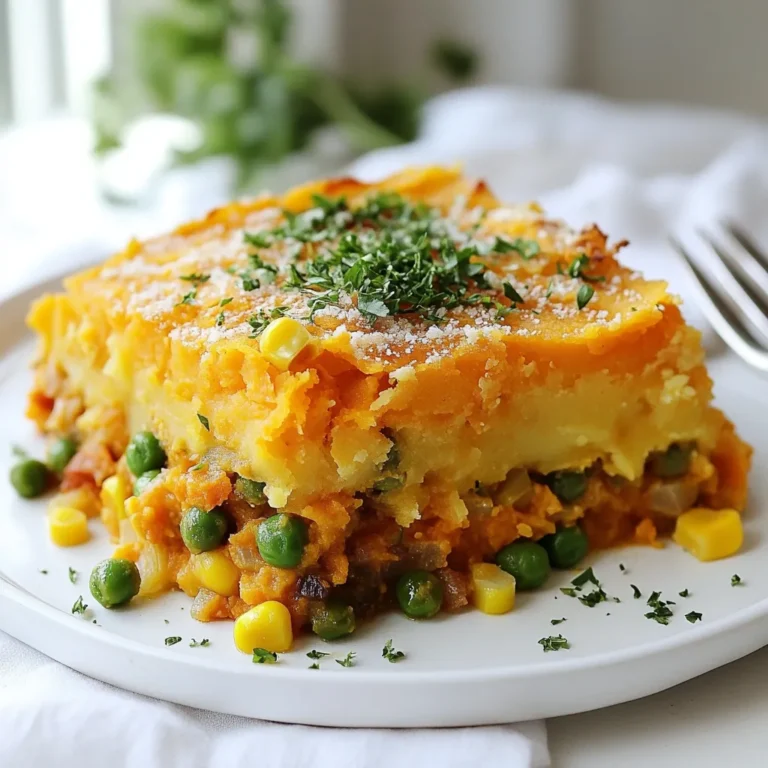
Vegan Sweet Potato Shepherds Pie Flavorful Comfort Dish

To make double chocolate mint cookies, you need the following ingredients: - 1 cup all-purpose flour - 1/2 cup unsweetened cocoa powder - 1/2 teaspoon baking soda - 1/4 teaspoon salt - 1/2 cup unsalted butter, softened - 1 cup granulated sugar - 1/2 cup brown sugar, packed - 2 large eggs - 1 teaspoon vanilla extract - 1/2 teaspoon peppermint extract - 1 cup semi-sweet chocolate chips - 1/2 cup mint chocolate chips - Optional: Crushed peppermint candy for garnish You can make these cookies your own by swapping some ingredients. For a gluten-free option, use a gluten-free flour blend instead of all-purpose flour. If you lack unsweetened cocoa powder, try using Dutch-process cocoa for a richer taste. You can replace butter with coconut oil for a dairy-free version. For a sweeter cookie, use chocolate chunks instead of chips. The quality of your ingredients matters. Use fresh baking soda for the best rise. Choose high-quality cocoa powder for rich flavor. I always opt for unsalted butter, as it lets me control the salt in my recipe. Fresh eggs will help create a better texture and moisture. Lastly, use real vanilla extract instead of imitation for depth in flavor. {{ingredient_image_1}} Start by preheating your oven to 350°F (175°C). This heat helps the cookies bake evenly. Next, line two baking sheets with parchment paper. This step keeps the cookies from sticking. Set these sheets aside while you mix your ingredients. In a medium bowl, whisk together the dry ingredients. Combine 1 cup of all-purpose flour, 1/2 cup of unsweetened cocoa powder, 1/2 teaspoon of baking soda, and 1/4 teaspoon of salt. Make sure there are no lumps. In another large bowl, cream together 1/2 cup of softened unsalted butter, 1 cup of granulated sugar, and 1/2 cup of packed brown sugar. Mix until it looks light and fluffy. Then, add in 2 large eggs one at a time. Follow this with 1 teaspoon of vanilla extract and 1/2 teaspoon of peppermint extract. Mix well until everything is combined. Gradually add the dry mixture into the wet mix, stirring gently until just combined. This keeps your cookies soft. Now it’s time to fold in the chocolate chips. Add 1 cup of semi-sweet chocolate chips and 1/2 cup of mint chocolate chips. Make sure they are evenly mixed throughout the dough. Using a tablespoon or a cookie scoop, drop spoonfuls of dough onto your baking sheets. Leave some space between each cookie; they will spread as they bake. Place the sheets in the oven and bake for 10-12 minutes. The edges should be firm, and the tops will look slightly cracked. Once done, take them out and let them cool on the baking sheets for 5 minutes. Then, transfer them to a wire rack to cool completely. If you want, sprinkle some crushed peppermint candy on top while they are warm. Enjoy your delicious Double Chocolate Mint Cookies! To get the best texture in your cookies, cream the butter and sugars well. I mix them until they are light and fluffy. This step adds air, making the cookies soft. Use room-temperature butter for easy mixing. Don't overmix the dough after adding flour. You want a thick, somewhat sticky dough. Chill the dough for 30 minutes if it feels too soft. This helps the cookies hold their shape while baking. One common error is not measuring your flour properly. Use a spoon to scoop flour into a cup, then level it off. Avoid packing it down, as this adds too much flour. Another mistake is baking at the wrong temperature. Always preheat your oven. If it's too hot, the cookies may burn. Lastly, don’t skip the cooling time. Letting cookies cool on the baking sheet helps them firm up. For a fun touch, sprinkle crushed peppermint candy on top of warm cookies. It adds color and extra flavor. You can also drizzle melted chocolate over the cookies for a nice look. Use a fork to create swirls. If you want to impress, add a mint leaf on top of each cookie. This makes them look fancy and inviting. Pro Tips Chill the Dough: For thicker cookies, chill the dough for at least 30 minutes before baking. This helps prevent spreading and results in a chewier texture. Use Quality Chocolate: Opt for high-quality chocolate chips for a richer flavor. Consider using a mix of dark and milk chocolate for added depth. Don’t Overbake: Keep an eye on the cookies as they bake. They should look slightly underbaked when you take them out, as they will continue to firm up while cooling. Experiment with Extracts: Feel free to adjust the amount of peppermint extract to suit your taste, or try adding a splash of orange extract for a unique twist! {{image_2}} To make these cookies gluten-free, swap the all-purpose flour for a gluten-free blend. Look for a blend that includes xanthan gum. This gum helps mimic the structure of wheat flour. The taste will be just as rich and chocolatey. You will still enjoy the minty twist with each bite. Get creative with flavors! You can mix in orange zest for a citrusy kick. Or try adding espresso powder for a coffee flavor. If you like nuts, hazelnuts or walnuts can add great texture. Just remember, keep the mint extract for that fresh taste. Nuts can enhance your cookies. Chopped pecans or almonds work well. They add crunch and richness. You may also consider adding dried fruit like cherries or cranberries. This will give your cookies a sweet and chewy surprise. Just be sure to adjust the amount of chocolate chips to keep the balance right. To keep your double chocolate mint cookies fresh, store them in an airtight container. This helps retain their soft texture. Place a piece of bread in the container to absorb excess moisture. The cookies will stay soft and delicious longer. Avoid stacking cookies too high to prevent them from getting squished. You can also separate layers with parchment paper for extra protection. You can freeze these cookies if you want to enjoy them later. First, let the baked cookies cool completely. Then, place them in a single layer on a baking sheet. Freeze them for about an hour until firm. After that, transfer the cookies to a freezer-safe bag or container. Make sure to remove as much air as possible before sealing. You can freeze them for up to three months. When stored properly, these cookies can last for about one week at room temperature. If you keep them in the fridge, they may last a bit longer. However, chilled cookies can lose some of their soft texture. If frozen, they will stay fresh for three months. Just thaw them at room temperature before enjoying! Yes, you can use other chocolate chips. Dark chocolate, white chocolate, or even milk chocolate chips work well. Each type adds a unique flavor. You can mix and match them for extra fun. Just remember, keep the total amount of chips the same for the best cookie texture. To boost the mint flavor, add more peppermint extract. Start with an extra 1/4 teaspoon. If you love mint, you can also mix in crushed peppermint candy. This adds crunch and extra mint flavor. Just remember not to overdo it, or it might overpower the chocolate. If your dough feels sticky, add a bit more flour. Start with 1 tablespoon at a time. Mix well after each addition until the dough is manageable. You can chill the dough for 30 minutes to make it easier to scoop out. This helps the cookies keep their shape when baking. In this post, I've covered the key ingredients, step-by-step instructions, and useful tips for baking cookies. We also explored variations, storage methods, and answered common questions. Remember, quality ingredients lead to better cookies. Enjoy trying different flavors and mix-ins. Avoid common mistakes to achieve the best texture. With these tips, you can create delicious cookies that impress everyone. Snack smart, store well, and let your baking shine!

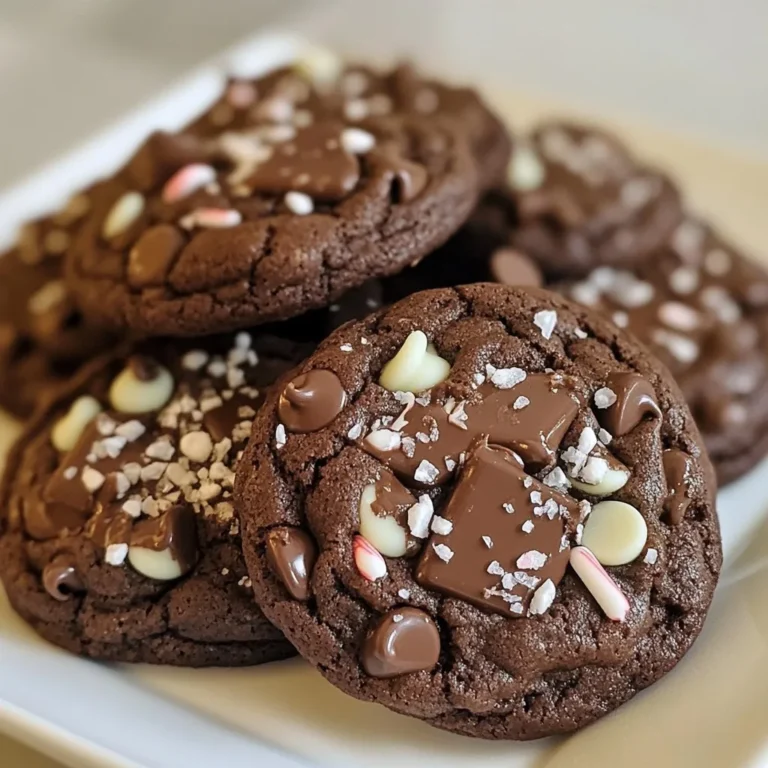
Double Chocolate Mint Cookies Tasty and Simple Treat

- 2 pounds chicken wings - 1/4 cup fresh lime juice - 1/4 cup olive oil - Zest of 2 limes The chicken wings are the star of this dish. You want fresh wings for the best taste. The lime juice and zest add a bright flavor that makes these wings pop. Olive oil keeps the wings moist while cooking. - 1/2 cup fresh cilantro, chopped - 3 cloves garlic, minced - 1 teaspoon cumin powder - 1 teaspoon smoked paprika - 1 teaspoon salt - 1/2 teaspoon black pepper Fresh cilantro gives a herbaceous kick. Garlic adds depth and flavor. Cumin and smoked paprika bring warmth and complexity. Salt and pepper are essential for seasoning. - 1 jalapeño, finely chopped (optional for heat) - Lime wedges and extra cilantro for garnish If you like spice, add jalapeño. It gives a nice heat to the wings. Lime wedges and extra cilantro make great garnishes. They also enhance the dish's look and freshness. {{ingredient_image_1}} To start, gather your marinade ingredients. In a large bowl, mix together: - 1/4 cup fresh lime juice - 1/4 cup olive oil - Zest of 2 limes - 1/2 cup fresh cilantro, chopped - 3 cloves garlic, minced - 1 teaspoon cumin powder - 1 teaspoon smoked paprika - 1 teaspoon salt - 1/2 teaspoon black pepper - 1 jalapeño, finely chopped (optional) Stir these until well combined. Next, add the chicken wings. Make sure each wing is coated in the marinade. Cover the bowl and place it in the fridge. Let it marinate for at least 1 hour. For more flavor, marinate overnight. When you are ready to cook, preheat your oven to 425°F (220°C). Prepare a baking sheet by lining it with parchment paper or foil for easy cleanup. Take the marinated wings out of the fridge. Lay them in a single layer on the baking sheet. Bake the wings for 25 to 30 minutes. Flip them halfway through to ensure even cooking. Check for doneness; the wings should be crispy and fully cooked. To make your wings extra crispy, switch your oven to broil. Broil the wings for an additional 2 to 3 minutes. Keep a close eye on them to prevent burning. After broiling, let the wings rest for a few minutes. This helps the juices settle. Now, they are ready to serve! For the best flavor, marinate the chicken wings for at least one hour. If you have time, let them sit overnight. This longer time allows the flavors to soak in deeply. Always cover the bowl with plastic wrap or a lid. This keeps the marinade from spilling and prevents the chicken from drying out. To ensure even cooking, lay the wings in a single layer on the baking sheet. This step lets hot air circulate around each wing. Flip them halfway through cooking to brown both sides. If you want an alternative method, try grilling the wings for a smoky taste. You can also fry them for a crispy layer, but this adds more calories. Serve the wings with fresh lime wedges and extra cilantro for a colorful touch. Pair them with a zesty cilantro-lime dipping sauce for added flavor. On the side, consider serving crunchy veggies or tortilla chips. Arrange everything on a large platter for a fun and inviting look. Pro Tips Marinate Longer for Flavor: For the best flavor, marinate the chicken wings overnight. This allows the flavors to penetrate the meat deeply. Use a Meat Thermometer: Ensure your wings are cooked through by using a meat thermometer; the internal temperature should reach 165°F (75°C). Experiment with Spice Levels: Adjust the amount of jalapeño based on your heat preference. You can also add extra spices like cayenne pepper for more kick. Perfectly Crispy Skin: For extra crispy skin, pat the wings dry with paper towels before marinating and baking. {{image_2}} To boost flavors, you can add different spices. Consider using chili powder for heat or oregano for earthiness. You might enjoy a bit of onion powder for depth. You can also swap herbs. Try using parsley or basil instead of cilantro. Each herb gives a unique twist to the wings. Grilling adds a smoky flavor. If you want to try grilling, marinate the wings first. Then, cook them on a medium heat grill until they are crispy. You can also use an Instant Pot or air fryer. In an Instant Pot, cook on high pressure for about 10 minutes. For an air fryer, set it to 400°F and cook for 25 minutes, shaking halfway. To change spice levels, modify the amount of jalapeño. If you want more heat, add two or three jalapeños. If you prefer less heat, skip them altogether. You can also explore different peppers or sauces. Try using chipotle peppers for a smoky kick. Sriracha or hot sauce can add a nice zing too. Adjust based on your taste! To keep your cilantro lime chicken wings fresh, store them in the fridge. Place the wings in an airtight container. This helps keep moisture in and air out. They will stay good for about 3 to 4 days. If you want to store them for longer, freezing is a great option. Place the wings in a freezer-safe bag. Make sure to remove as much air as possible. They can last up to 3 months in the freezer. When it's time to eat your leftovers, the best way to reheat them is in the oven. Preheat your oven to 350°F (175°C). Place the wings on a baking sheet. Bake for about 15 to 20 minutes. This method helps keep them crispy. Avoid using a microwave, as it can make the wings soggy. If you choose to use a skillet, heat it on medium. Add a little oil and cook the wings for about 5 to 7 minutes, flipping often. In the fridge, your wings will last for about 3 to 4 days. If you see any signs of spoilage, like a bad smell or change in color, it’s best to throw them out. Always trust your senses. If they look or smell off, do not eat them. Keeping track of how long they have been stored helps ensure your safety. The best way to prepare chicken wings starts with marinating. You want to mix lime juice, olive oil, lime zest, chopped cilantro, minced garlic, cumin, smoked paprika, salt, black pepper, and jalapeño in a large bowl. This marinade adds a burst of flavor. Coat the chicken wings well and let them sit in the fridge. I recommend marinating for at least one hour. For deeper flavor, leave them overnight. When cooking, preheat your oven to 425°F (220°C). Line a baking sheet with parchment. Place the wings in a single layer. Bake them for 25 to 30 minutes. Flip them halfway for even cooking. For that perfect crispy skin, broil them for an extra 2 to 3 minutes. Yes, you can use frozen chicken wings! However, cooking frozen wings takes a bit longer. You should bake them at the same temperature, but add about 10 to 15 minutes to the cooking time. Make sure they are cooked through to 165°F (74°C). If you have time, thawing them in the fridge overnight is better. This way, they absorb the marinade well. Making cilantro lime dipping sauce is simple and quick! Here’s a basic recipe: - 1/2 cup sour cream - 1/4 cup fresh lime juice - 1/4 cup fresh cilantro, chopped - Salt to taste Mix all the ingredients in a bowl. Stir until smooth. This sauce pairs perfectly with the chicken wings. The cool, creamy taste balances the wings' zesty flavor. Enjoy! In this blog post, we explored how to make perfect chicken wings. We discussed the key ingredients like fresh lime juice and garlic, and how to marinate them for the best flavor. You learned step-by-step instructions for baking and achieving that crispy texture. Remember, you can customize your wings with spices or cooking methods. Don’t forget to store and reheat leftovers correctly. With these tips, you can enjoy tasty wings every time. Now, go ahead and try making them yourself!

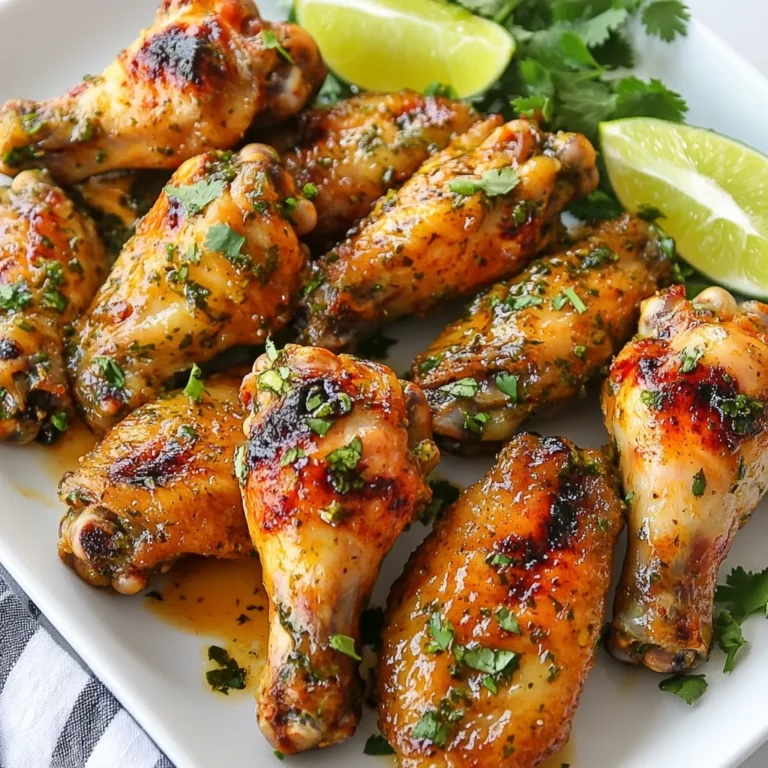
Cilantro Lime Chicken Wings Flavorful Party Snack

To make crispy garlic Parmesan Brussels sprouts, gather these simple ingredients: - 1 lb Brussels sprouts, trimmed and halved - 3 tablespoons olive oil - 4 cloves garlic, minced - 1/2 cup grated Parmesan cheese - 1 teaspoon garlic powder - 1 teaspoon onion powder - 1/2 teaspoon red pepper flakes (optional) - Salt and pepper to taste - Fresh parsley, chopped (for garnish) You can swap ingredients for different flavors. Here are some ideas: - Olive oil: Use avocado oil for a nutty taste. - Parmesan cheese: Try Pecorino Romano for a sharper bite. - Garlic powder: Use onion powder if you prefer less garlic flavor. - Red pepper flakes: Omit if you want a milder dish. Here are some handy conversions for this recipe: - 1 tablespoon = 3 teaspoons - 1 cup = 8 ounces - 1 pound = 16 ounces These conversions make it easy to adjust the recipe for your needs. Feel free to experiment! {{ingredient_image_1}} Start by washing one pound of Brussels sprouts. Trim the ends and cut them in half. This helps them cook evenly. Place all the sprouts in a large bowl. Add three tablespoons of olive oil. Then, mix in four cloves of minced garlic. For extra flavor, add one teaspoon of garlic powder and one teaspoon of onion powder. If you like spice, sprinkle in half a teaspoon of red pepper flakes. Season with salt and pepper to taste. Toss everything well until the sprouts are fully coated. Next, preheat your oven to 425°F (220°C). Line a baking sheet with parchment paper. Spread the Brussels sprouts on the sheet, cut side down. This helps them get crispy. Roast them for 20 to 25 minutes. Stir halfway through to ensure even cooking. They should turn golden brown and crispy when done. Once roasted, take them out of the oven. Sprinkle half a cup of grated Parmesan cheese over the hot Brussels sprouts. The heat will slightly melt the cheese. For an extra minute, return them to the oven. Finally, garnish with fresh chopped parsley before serving. Enjoy this tasty side dish! To get your Brussels sprouts crispy, start with high heat. Preheat your oven to 425°F (220°C). This temperature helps them cook fast and brown nicely. Always cut the Brussels sprouts in half. Place them cut side down on the baking sheet. This way, they get a nice sear. Don't overcrowd the pan. Give them space to breathe. If they touch, they will steam instead of crisp. One common mistake is not drying the Brussels sprouts well. After washing, make sure they are dry. Wet sprouts will not crisp up. Another mistake is using too much oil. You only need about three tablespoons for one pound. Too much oil can make them soggy. Lastly, avoid skipping the halfway stir. Stirring helps them cook evenly and get crisp all over. For great flavor, use fresh garlic. Minced garlic adds a tasty kick. You can also experiment with spices. Try adding smoked paprika or lemon zest for a twist. Don't forget the cheese! Grated Parmesan is key. It melts into the sprouts and adds a rich flavor. Top with fresh parsley to brighten the dish. This adds color and a fresh taste that makes every bite better. Pro Tips Cut for Crispiness: Make sure to cut the Brussels sprouts in half and place them cut side down on the baking sheet for an extra crispy texture. Fresh Garlic vs. Powder: While both fresh garlic and garlic powder can be used, fresh garlic will give a more robust flavor, so consider using both for depth. Parmesan Timing: Sprinkle the Parmesan cheese on the Brussels sprouts while they are still hot to ensure it melts perfectly, creating a delicious crust. Garnish with Freshness: Don’t skip the fresh parsley garnish; it adds a pop of color and a fresh flavor that complements the rich, savory Brussels sprouts. {{image_2}} You can add more flavor to your crispy garlic Parmesan Brussels. Try lemon juice for a fresh zing. A splash of balsamic vinegar brings a sweet and tangy twist. If you like heat, add more red pepper flakes. For a smoky taste, mix in some smoked paprika. These simple changes can make the dish new and exciting every time. While Parmesan is great, you can switch it up. Try pecorino Romano for a sharper taste. Or use cheddar for a richer flavor. Feta cheese adds a tangy bite that many love. Goat cheese melts well and gives a creamy texture. Experiment with your favorite cheese to discover what you like best. Crispy garlic Parmesan Brussels pair well with many main dishes. Serve them alongside roasted chicken or grilled steak for a tasty combo. They also go well with fish, like salmon or tilapia. For a vegetarian meal, pair them with quinoa or a hearty grain salad. This side dish adds color and crunch to any plate. To keep your crispy garlic Parmesan Brussels fresh, place them in an airtight container. Let the sprouts cool before sealing them. Store the container in your fridge. They will stay good for 3 to 4 days. If you want to enjoy them again, it's best to reheat them. When you are ready to eat the leftovers, preheat your oven to 350°F (175°C). Spread the Brussels sprouts on a baking sheet. Heat them in the oven for about 10 to 15 minutes. This method helps keep them crispy. You can also use a microwave, but they may turn soft. If you want to save some for later, freezing is easy. First, let the Brussels sprouts cool completely. Then, spread them in a single layer on a baking sheet. Freeze them for about 1 to 2 hours. After they are frozen, transfer them to a freezer-safe bag. They can last up to 3 months in the freezer. When you're ready to eat, just bake them straight from the freezer, adding a few extra minutes to the cooking time. Brussels sprouts are small but mighty! They are low in calories and high in fiber. This helps with digestion and keeps you full. They are rich in vitamins C and K, which support your immune system and bone health. Plus, Brussels sprouts have antioxidants that help fight free radicals in your body. Eating them can also lower the risk of certain diseases. So, adding these to your meals is a smart choice! Yes, you can prepare Brussels sprouts ahead of time! Trim and halve them, then store in the fridge for up to two days. You can also mix the seasonings and olive oil in a bowl. Just keep them in an airtight container. When you're ready to cook, toss the sprouts in the mix and roast them. This way, you'll save time during busy days. To make this dish vegan, skip the Parmesan cheese or replace it with a plant-based option. Nutritional yeast can give a cheesy flavor without dairy. You can also use vegan cheese shreds that melt well. Follow the same cooking steps, and you’ll enjoy a tasty vegan side dish! These swaps keep the flavor while catering to different diets. In this blog post, I shared how to make delicious Brussels sprouts. We covered ingredients, their swaps, and how to measure them. I also shared easy steps to prepare and roast the sprouts for crispiness, finishing with Parmesan. You learned tips to avoid common mistakes and boost flavor. We explored variations with different cheeses and serving ideas. Lastly, I provided storage tips for leftovers. Try this recipe for a tasty side dish that everyone will enjoy!

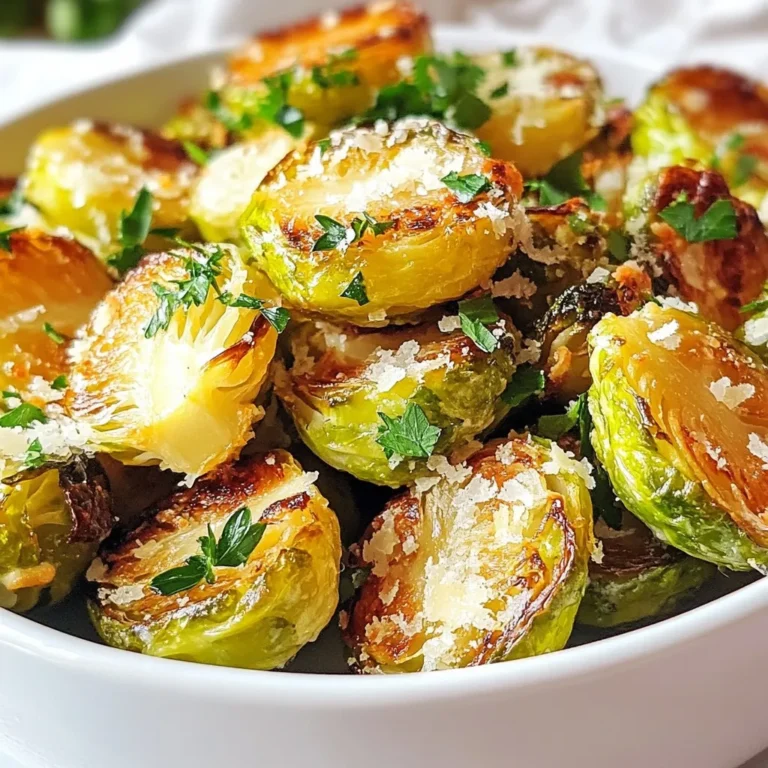
Crispy Garlic Parmesan Brussels for a Tasty Side

To create Lemon Basil Creamy Pasta, you need some key ingredients: - 8 oz fettuccine pasta - 1 tablespoon olive oil - 3 cloves garlic, minced - 1 cup heavy cream - Zest of 1 lemon - 2 tablespoons lemon juice - ½ cup grated Parmesan cheese - ¼ cup fresh basil leaves, chopped - Salt and pepper to taste These ingredients work together to create a simple yet flavorful dish. The fettuccine gives a nice texture, while the lemon adds brightness. Parmesan cheese makes the sauce creamy, and basil gives it a fresh taste. You can make your dish look even better by adding some garnishes: - Lemon slices - Basil sprigs These garnishes not only add color but also enhance the flavor. When you serve this pasta, sprinkle some lemon zest on top. It makes it look fancy and inviting. If you lack any ingredients, don't worry! You can make simple swaps: - Use penne or spaghetti instead of fettuccine. - Swap heavy cream for half-and-half or a plant-based cream for a lighter version. - For a different flavor, try using Asiago cheese instead of Parmesan. These substitutions keep the dish tasty while allowing you to use what you have. Adjusting the recipe can lead to new favorites! {{ingredient_image_1}} To start, fill a large pot with water. Add a good amount of salt and bring it to a boil. Once boiling, add 8 ounces of fettuccine pasta. Cook it according to the package instructions until it is al dente. This usually takes about 8 to 10 minutes. After cooking, drain the pasta in a colander, but save ½ cup of the starchy pasta water. You will need this for the sauce later. Next, take a large skillet and place it over medium heat. Pour in 1 tablespoon of olive oil. When the oil is hot, add 3 minced garlic cloves. Sauté the garlic for about 1 to 2 minutes. Watch it closely so it does not burn. You want it fragrant and golden, not brown. Reduce the heat slightly and add 1 cup of heavy cream to the skillet. Then, stir in the zest of 1 lemon and 2 tablespoons of lemon juice. Mix until smooth and warm. Gradually add ½ cup of grated Parmesan cheese. Stir until the cheese melts and blends well. If the sauce feels too thick, use the reserved pasta water to get the right consistency. Now, add the drained fettuccine to the skillet. Toss the pasta in the creamy lemon sauce. Fold in ¼ cup of chopped fresh basil. Season with salt and pepper to suit your taste. Make sure every piece of pasta is coated with this delightful sauce. Once combined, remove the skillet from heat. Let it sit for a minute to thicken slightly. Serve the pasta right away. Garnish with lemon slices and fresh basil sprigs for that extra pop. Enjoy your Lemon Basil Creamy Pasta! To make your sauce creamy, use heavy cream. It adds richness and smoothness. Heat it slowly. If it boils too fast, it can break. Stir in the Parmesan cheese while the sauce is warm. This helps it melt well. If your sauce is too thick, add some reserved pasta water. This will help you get the right consistency. Garlic can easily burn if cooked too long. To avoid this, cook it for just 1-2 minutes. Wait until it smells strong before adding cream. If garlic burns, it will taste bitter. Keep an eye on it and stir often. This way, you will have a fresh garlic flavor in your dish. Lemon Basil Creamy Pasta shines with simple flavors. You can add more depth with salt and pepper. Try adding a pinch of red pepper flakes for heat. Fresh herbs like parsley or thyme can also add a twist. Experiment with flavors based on what you love. Taste as you go. This ensures that your dish is just right for you. Pro Tips Use Fresh Ingredients: Fresh basil and lemon will elevate the flavor of your dish significantly. Always opt for fresh over dried when possible. Adjust Creaminess: If you prefer a lighter sauce, substitute half of the heavy cream with low-fat milk or vegetable broth for a delicious twist. Perfect Pasta: Make sure to cook your fettuccine al dente, as it will continue to cook slightly when combined with the sauce. Garnish Wisely: Adding a sprinkle of extra Parmesan and a few whole basil leaves right before serving can enhance both presentation and flavor. {{image_2}} You can easily boost your Lemon Basil Creamy Pasta with protein. Chicken or shrimp work great. For chicken, grill or pan-sear it first. Slice it into strips and toss it with the pasta. If you like shrimp, sauté them in olive oil until pink. Add them to the pasta right before serving. This adds flavor and makes your dish more filling. If you want a lighter dish, try adding veggies. Zucchini is a great choice. Slice it thin and sauté with garlic for a few minutes. Spinach is another option. Add it to the skillet just before combining with the pasta. It wilts quickly and adds a nice color and taste. These veggies keep the dish fresh and vibrant. For a gluten-free version, swap regular pasta for gluten-free pasta. There are many options available, like rice or chickpea pasta. Cook it according to the package instructions. The creamy lemon sauce pairs well with these alternatives. This way, everyone can enjoy the dish without concern for gluten. To keep your Lemon Basil Creamy Pasta fresh, store it in an airtight container. Let the pasta cool down before sealing it. This helps prevent moisture build-up, which can make the pasta soggy. It will last in the fridge for 3 to 4 days. If you want to enjoy it later, use a shallow container for faster cooling. When you're ready to eat, reheat the pasta gently. You can use a pan on low heat or a microwave. If using the microwave, cover the dish to keep moisture in. Add a splash of water or cream to bring back the creamy texture. Stir it well to ensure even heating. If you want to store your pasta for a longer time, freezing is a great option. Place the cooled pasta in a freezer-safe container or a zip-top bag. Make sure to squeeze out as much air as you can. The pasta can last up to 2 months in the freezer. To reheat from frozen, let it thaw overnight in the fridge. Then follow the reheating steps above for the best taste. To make this dish dairy-free, swap heavy cream with coconut cream or a nut-based cream. Use nutritional yeast instead of Parmesan cheese for a cheesy flavor. These swaps keep the creamy texture and enhance the taste. This pasta pairs well with a simple green salad. Garlic bread is also a great choice. For protein, grilled chicken or shrimp works nicely. You could also try roasted veggies for a colorful plate. Yes, you can use other herbs like parsley, oregano, or thyme. Each herb brings a unique flavor. If you want something fresh, try using mint. Just remember, the taste will change with different herbs. Lemon Basil Creamy Pasta lasts up to three days in the fridge. Store it in an airtight container. Reheat it gently on the stove or in the microwave. If it seems dry, add a splash of water or cream. In this blog post, we explored how to make delicious Lemon Basil Creamy Pasta. You learned about the essential and optional ingredients, plus how to customize the dish. The step-by-step guide made cooking easy, and the tips will help you perfect the recipe. We also covered variations and storage methods for your leftovers. In the end, this dish is simple, tasty, and versatile. Enjoy the bright flavors with every bite!

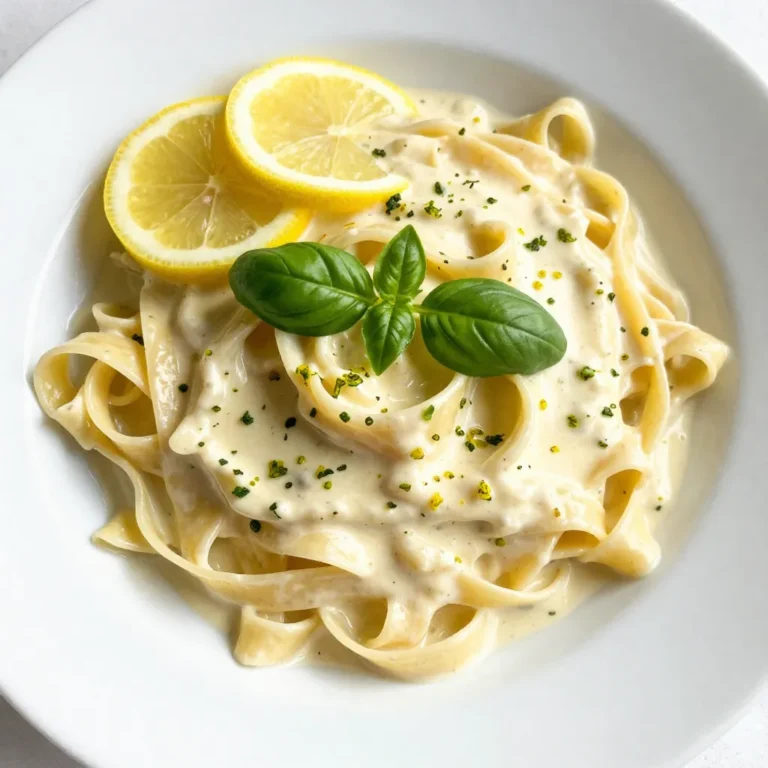
Lemon Basil Creamy Pasta Simple and Flavorful Dish

- 1 cup rolled oats - 1 cup milk (or dairy-free alternative) - 1/2 cup Greek yogurt - 1/4 cup cream cheese, softened - 2 tablespoons maple syrup (adjust to taste) - 1 teaspoon vanilla extract - 1/2 teaspoon cinnamon - 1/2 cup fresh blueberries (plus extra for topping) - 2 tablespoons crushed graham crackers (for the cheesecake flavor) - Pinch of salt These main ingredients create a creamy, sweet, and fruity base for your overnight oats. The rolled oats soak up the milk, getting soft and fluffy. Greek yogurt and cream cheese add that rich cheesecake taste. Blueberries give a burst of freshness in each bite. - Extra fresh blueberries for topping - More crushed graham crackers for garnish - Nuts or seeds for added crunch You can customize your oats with these optional ingredients. Topping them with blueberries adds color and flavor. Crushed graham crackers on top enhance the cheesecake vibe. Nuts or seeds can provide a nice crunch and boost nutrition. - Use almond milk or oat milk instead of dairy milk. - Swap Greek yogurt for any plain yogurt. - Try mascarpone cheese if you want a richer flavor. - Replace maple syrup with honey or agave syrup. These substitutions can help you fit your taste or dietary needs. Each swap will still give you a tasty dish. Feel free to experiment with these options to find your perfect mix! {{ingredient_image_1}} First, grab a mixing bowl. Add 1 cup of rolled oats, 1 cup of milk, and a pinch of salt. Stir well. You want the oats fully submerged in the milk. In a different bowl, beat together 1/4 cup of softened cream cheese and 1/2 cup of Greek yogurt. Mix until smooth and creamy. Next, add 2 tablespoons of maple syrup, 1 teaspoon of vanilla extract, and 1/2 teaspoon of cinnamon to the cream cheese mix. Stir well until combined. Finally, gently fold in 1/2 cup of fresh blueberries and 2 tablespoons of crushed graham crackers. Be careful to keep the blueberries whole. Now it’s time to layer the oats and cheesecake mixture. Take a jar or any container you like. Start with a layer of the oat mixture at the bottom. Then add a layer of the cream cheese mix. Repeat these layers until all the ingredients are gone. Finish with the cheesecake layer on top. This way, you get a beautiful look when you dig in. Cover the jar with a lid. Place it in the fridge overnight, or for at least 4 hours. This helps the oats soak in the milk and blend flavors. When you wake up, the oats will be soft, and the taste will be amazing. In the morning, stir the oats a bit. Top with extra fresh blueberries and some crushed graham crackers if you like. Enjoy your tasty breakfast! To get a creamy texture, mix the cream cheese and Greek yogurt well. Beat them until smooth. It helps if the cream cheese is at room temperature. This prevents lumps. You want a silky mixture that blends nicely with the oats. Stir in the milk slowly. This adds moisture and keeps the oats creamy. You can adjust the sweetness to your taste. Start with two tablespoons of maple syrup. If you like it sweeter, add more syrup. You could also try honey or agave syrup. Taste the mixture before layering. This way, you make sure it’s just right for you. Store any leftovers in an airtight container. This keeps the oats fresh and tasty. Make sure to eat them within three days. Before eating, give it a good stir. You can add more milk if it seems thick. Enjoy it cold or warm it up in the microwave. Just heat it for about 30 seconds. Pro Tips Use Overnight Oats for Meal Prep: Prepare multiple jars of these overnight oats at once to have a quick and healthy breakfast option ready for the week. Adjust Sweetness to Your Preference: Feel free to modify the amount of maple syrup based on your taste. You can also use honey or agave syrup as alternatives. Experiment with Fruits: While blueberries are delicious, you can mix in other fruits like strawberries, raspberries, or bananas for a different flavor profile. Make It Vegan: Substitute Greek yogurt and cream cheese with dairy-free alternatives like coconut yogurt and cashew cream for a vegan version of this recipe. {{image_2}} You can change the fruit in your blueberry cheesecake overnight oats for fun. Try strawberries, raspberries, or peaches. Each fruit gives a new taste. If you want something tropical, add mango or pineapple. Mix different fruits for a rainbow of flavors. You can even use frozen fruit if fresh is not available. Want to switch it up? You can add cocoa powder for a chocolate twist. Just mix in one tablespoon with the cream cheese. For a nutty flavor, add almond or peanut butter. A dash of lemon zest can brighten the taste, too. You can also try spices like nutmeg or ginger for a warm kick. If you prefer a vegan or dairy-free version, swap the milk for almond or coconut milk. Use dairy-free yogurt and cream cheese for the creamy base. Maple syrup is a great sweetener, and you can keep it! This way, you still enjoy the cheesecake flavor without dairy. I recommend using glass jars or airtight containers for your Blueberry Cheesecake Overnight Oats. They keep the oats fresh. The jars also make serving easy. Look for containers that have tight-fitting lids. This will prevent the oats from absorbing unwanted smells. These oats last up to four days in the fridge. The flavors actually improve over time. Just make sure to keep them sealed. Before eating, give them a good stir. Add more milk if they seem a bit thick. You can freeze Blueberry Cheesecake Overnight Oats, but it's best to eat them fresh. If you must freeze, use freezer-safe containers. They can last up to three months in the freezer. Allow them to thaw in the fridge overnight before eating. The texture may change slightly, but they will still taste great. Yes, you can use quick oats. Quick oats absorb liquid faster than rolled oats. This may change the texture slightly. Your oats will be creamier but less chewy. If you choose quick oats, check the soaking time. They may need less time in the fridge. You can store these oats for up to five days in the fridge. Keep them in a sealed container to maintain freshness. The flavors will continue to develop over time. However, the texture may soften as the oats sit. Yes, you can make this recipe ahead of time. It’s perfect for busy mornings. Prepare it the night before and let it chill overnight. You can also prep several jars at once. Just layer and store them in your fridge. This way, you have a quick breakfast ready to go! In this blog post, I covered the main ingredients for Blueberry Cheesecake Overnight Oats. You can mix in optional ingredients or substitute some to fit your taste. The instructions guide you through preparation and layering. I shared tips for creamy texture and sweetness. Explore various fruit options and even vegan choices. Proper storage helps keep your oats fresh longer. Overall, making these oats is simple and fun. Enjoy your healthy breakfast choice!

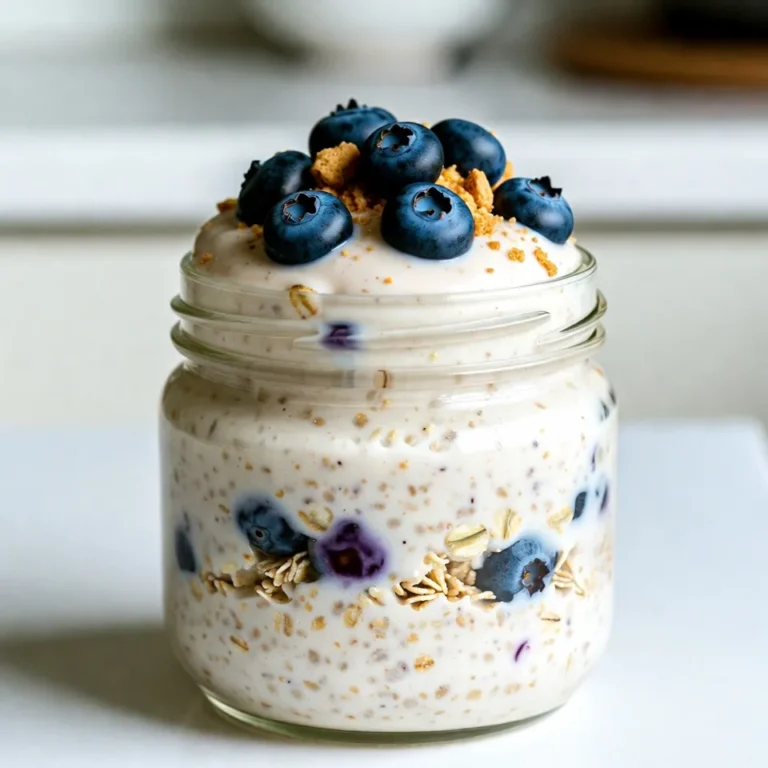
Blueberry Cheesecake Overnight Oats Tasty Breakfast Dish

PREV 1 … 5 6 7 … 72 NEXT
cozy citrus kitchen

explore

DessertsDinnerAppetizersDrinks

Our Policies

  • Cookie Policy
  • Copyright Policy
  • Disclaimer
  • GDPR Policy
  • Terms Of Use
Back to Top
  • About
  • Contact Us
  • Privacy Policy
© 2026 cozy citrus kitchen