FREE DINNER EBOOK! Get your copy!
  • Cookie Policy
  • GDPR Policy
  • Disclaimer
  • Terms Of Use
  • Visit my other site: Fun Cookie Recipes
cozy citrus kitchen
  • Home
  • Dinner
  • Desserts
  • Drinks
  • Appetizers
  • Contact
  • About
  • Privacy Policy
  • Home
  • Dinner
  • Desserts
  • Drinks
  • Appetizers
  • Contact
  • About
  • Privacy Policy
  • Cookie Policy
  • GDPR Policy
  • Disclaimer
  • Terms Of Use
Visit my other site: Fun Cookie Recipes

HOME / CATEGORIES /

Latest

To make this Strawberry Spinach Salad with Goat Cheese, you will need: - 4 cups fresh baby spinach - 2 cups strawberries, hulled and sliced - 1/2 cup goat cheese, crumbled - 1/4 cup pecans, toasted and roughly chopped - 1/4 red onion, thinly sliced - 1/4 cup balsamic vinegar - 2 tablespoons olive oil - 1 teaspoon honey - Salt and pepper to taste This salad is not just tasty; it is also good for you. Each serving has: - Calories: About 220 - Protein: 6 grams - Carbohydrates: 15 grams - Fiber: 3 grams - Fat: 17 grams The spinach gives you vitamins A and C. The strawberries add fiber and antioxidants. The goat cheese offers protein and calcium. Pecans give healthy fats and a nice crunch. You can make this salad even if you lack some ingredients. Here are some ideas: - Spinach: Use mixed greens or arugula for a different taste. - Strawberries: Swap with blueberries or raspberries for variety. - Goat Cheese: Try feta cheese for a saltier flavor. - Pecans: Use walnuts or almonds for a different crunch. - Balsamic Vinegar: Red wine vinegar works well in a pinch. - Olive Oil: Any light oil, like canola, can substitute. - Honey: Maple syrup or agave syrup can sweeten your dressing. These swaps keep the salad fresh and exciting! {{ingredient_image_1}} To make this strawberry spinach salad with goat cheese, start with the dressing. In a small bowl, whisk together the balsamic vinegar, olive oil, honey, salt, and pepper. This step is key for great flavor. Set the dressing aside while you prep the salad. Next, grab a large salad bowl. Add 4 cups of fresh baby spinach to the bowl. Then, slice your 2 cups of strawberries and add them in. The strawberries bring a sweet taste that pairs well with the spinach. Thinly slice 1/4 of a red onion and mix it in. After that, drizzle the dressing over the salad. Gently toss everything to coat. It’s important to mix it well so every bite is tasty. When making this salad, use fresh ingredients for the best taste. Rinse the spinach and strawberries well to remove any dirt. Dry the spinach gently with a towel to avoid a soggy salad. If you like crunch, toast the pecans before adding them. Just place them in a dry pan over medium heat for a few minutes. Watch them closely to avoid burning. For mixing, use a large spoon or your hands. Toss the salad gently to keep the spinach and strawberries intact. For a lovely presentation, serve the salad in a large shallow bowl. This makes it easy for everyone to serve themselves. To make it even prettier, garnish with extra strawberry slices on top. You can also sprinkle more goat cheese for a creamy finish. If you want individual servings, place salad on small plates. This adds a nice touch for special occasions. Enjoy every colorful bite! To make a great Strawberry Spinach Salad, start with fresh ingredients. Choose bright green baby spinach. Look for leaves that are crisp and not wilted. For strawberries, select ones that are vibrant red and firm. Smell them; they should have a sweet scent. Always wash your greens and fruit well to remove dirt and pesticides. Store your spinach and berries in the fridge, but use them quickly for the best taste. A good salad needs a balance of flavors. The sweet strawberries pair well with tangy goat cheese. The creamy cheese adds richness. To enhance this, use a mix of salty pecans and a light vinaigrette. The dressing should be sweet, sour, and a bit salty. This mix keeps the salad refreshing. Adjust the honey and vinegar to your taste. A pinch of salt can also lift all the flavors. Serve the salad in a large bowl for sharing or on individual plates. For a nice touch, garnish with extra strawberry slices and a sprinkle of goat cheese on top. This makes it look inviting. You can also add some grilled chicken or shrimp for extra protein. If you want to make it a meal, serve it with crusty bread or a light soup. Enjoy this salad fresh to appreciate all its flavors! Pro Tips Use Fresh Ingredients: Always opt for the freshest baby spinach and strawberries to enhance the flavor and texture of your salad. Toast the Pecans: Toasting the pecans before adding them to the salad brings out their natural oils and enhances their flavor. Let It Rest: Allowing the salad to sit for 5-10 minutes after tossing helps the flavors meld together for a more delicious experience. Experiment with Dressings: Feel free to customize the dressing by adding herbs or spices, such as Dijon mustard or fresh basil, for a unique twist. {{image_2}} You can enhance your salad with a few tasty additions. Try adding fresh herbs like mint or basil. They will give your salad a bright taste. Sliced avocado offers creaminess and richness, which pairs well with goat cheese. You can also add fresh citrus like orange or grapefruit slices for a zesty twist. Dried fruits like cranberries or apricots can add a nice chew and sweetness. If you want to boost the protein, consider adding grilled chicken or shrimp. These proteins blend well with the salad’s flavors. You can also use chickpeas or black beans for a plant-based source of protein. These options keep the salad filling and satisfying without losing its freshness. You can switch up the fruit based on what’s in season. In summer, use peaches or blueberries for a sweet contrast. In fall, consider adding apple slices or pomegranate seeds for a crunchy bite. Each fruit brings its own flavor, making each salad unique and exciting. To store your leftover strawberry spinach salad, place it in an airtight container. Make sure to keep the dressing separate. This keeps the salad fresh and crisp. Use the salad within 2 days for the best taste. For freshness, store spinach and strawberries in the fridge. Keep them dry and cool. Wrap spinach in a damp paper towel. Place it in a plastic bag. This helps it last longer. Strawberries should be kept in their original container, not washed until ready to eat. You don’t need to reheat this salad. It tastes best cold. If you want to serve it later, mix in the goat cheese just before serving. This keeps it creamy. You can also add fresh strawberries right before serving for extra flavor. Yes, you can make the dressing ahead of time. Just mix the balsamic vinegar, olive oil, honey, salt, and pepper in a small bowl. Store it in the fridge for up to a week. Before using, give it a good shake. This helps the flavors blend. If you want to switch up the cheese, try feta or blue cheese. Both add a nice tang. You can also use creamy ricotta for a different texture. Each cheese brings a unique flavor, making your salad special every time. To make this salad vegan, skip the goat cheese. You can use avocado for creaminess. Add some nuts or seeds for protein. A splash of lemon juice can brighten the flavor. This way, you keep it fresh and delicious without dairy. This blog post covers everything you need for a great salad. We started with fresh ingredients, giving you options and nutrition info. Next, we went through step-by-step preparation. I shared tips to help you mix and plate your dish nicely. We also discussed best practices and serving ideas for balanced flavor. Variations showed fun ways to customize your salad. Finally, we talked about storage for leftovers. Think of this salad as a canvas. You can mix, change, and enjoy it every time!

Strawberry Spinach Salad with Goat Cheese Delight

- 1 cup long-grain rice (jasmine or basmati preferred) - 2 cups vegetable broth - 2 tablespoons unsalted butter - 1 tablespoon olive oil - 3 cloves garlic (minced) - 8 ounces cremini mushrooms (sliced) - 1 small onion (finely chopped) - 1 teaspoon fresh thyme or ½ teaspoon dried thyme - Salt and pepper - Fresh parsley (for garnishing) - Optional: Grated Parmesan cheese Gathering the right ingredients is key for great garlic butter mushroom rice. Start with long-grain rice, like jasmine or basmati. It adds a lovely texture. The vegetable broth gives a rich flavor, so don’t skip it! I use unsalted butter and olive oil to create a golden base. Garlic brings a warm aroma, while cremini mushrooms add depth. Finely chopped onion adds sweetness. Fresh or dried thyme ties everything together with a hint of earthiness. Don’t forget to season with salt and pepper. Fresh parsley brightens the dish as a garnish. Grated Parmesan cheese is optional but adds a delightful creaminess. Each ingredient plays a role in making this dish comforting and delicious. {{ingredient_image_1}} Rinsing the rice is key for fluffiness. Simply place 1 cup of long-grain rice in a fine mesh strainer. Rinse it under cold water until the water runs clear. This step removes excess starch, which can make the rice sticky. Next, cook the rice in vegetable broth. Pour 2 cups of vegetable broth into a medium saucepan. Bring it to a boil. Once boiling, add the rinsed rice. Stir briefly to mix. Then, reduce the heat to low. Cover the pan and let it simmer for about 15 to 20 minutes. The rice will absorb the broth and become tender. While the rice cooks, let's sauté the mushroom mixture. Start by heating 1 tablespoon of unsalted butter and 1 tablespoon of olive oil in a pan over medium heat. Once the butter melts, add 1 small finely chopped onion. Cook it for 3 to 4 minutes until it turns translucent. Then, add 3 cloves of minced garlic and 8 ounces of sliced cremini mushrooms. Cook for 5 to 6 minutes, stirring occasionally. The mushrooms should become browned and soft. Add 1 teaspoon of fresh thyme or ½ teaspoon of dried thyme, along with salt and pepper to taste. Mix well and then set the mushroom mixture aside. Now, it’s time to combine everything. Once the rice is cooked, remove it from the heat. Use a fork to fluff the rice gently. Stir in the remaining tablespoon of butter and the sautéed mushroom mixture. Mix everything together until it's well blended. Taste the rice and adjust the seasonings if needed. You can add more salt, pepper, or thyme based on your preference. For a finishing touch, garnish with freshly chopped parsley and optional grated Parmesan cheese. Enjoy your flavorful garlic butter mushroom rice as a comforting meal! - Ensuring perfect rice texture: Rinse your rice well. This step washes away excess starch. Clean rice cooks up fluffy, not sticky. Use a fine mesh strainer for best results. Always measure the broth correctly. Too much liquid leads to mushy rice. - Choosing the right mushrooms: I love using cremini mushrooms for this dish. They add a rich, earthy taste. If you want, try button or shiitake mushrooms. Each type brings its own flavor. Just make sure they are fresh and firm. - Additional herbs and spices to try: Fresh herbs really boost flavor. Consider adding rosemary or oregano for a twist. A pinch of red pepper flakes can also add a nice kick. Experiment with what you enjoy! - Adjusting richness with butter and cheese: You can change the creaminess by adding more butter. For a cheesy touch, sprinkle grated Parmesan cheese before serving. It melts beautifully into the warm rice. - Serving suggestions: Serve this dish warm in a nice bowl. Pair it with grilled chicken or fish for a full meal. It makes a great side dish, too! - Creative garnishing options: Fresh parsley adds a pop of color. You can also use microgreens for a fancy touch. A squeeze of lemon juice brightens the flavors and makes it look appealing. Pro Tips Rinse the Rice: Rinsing the rice helps remove excess starch, resulting in a fluffier texture once cooked. Choose the Right Mushrooms: Cremini mushrooms add a rich flavor, but feel free to mix in shiitake or button mushrooms for variety. Butter for Flavor: Using unsalted butter allows you to control the saltiness of the dish while enhancing the overall flavor. Fresh Herbs: Fresh thyme elevates the dish, but if using dried, adjust the amount as it is more concentrated. {{image_2}} You can add chicken or shrimp to this dish for extra protein. Simply cook diced chicken breast or shrimp in the pan before adding the mushroom mixture. This adds flavor and makes the meal heartier. If you prefer vegetarian options, try adding beans or tofu. Cook them until warm and mix them in with the rice. These options keep the meal filling while keeping it meat-free. To make this dish vegan, swap the butter for olive oil or vegan butter. This change keeps the rich taste without using animal products. For a gluten-free option, ensure your broth is gluten-free. Most vegetable broths fit the bill, so check the label. Use rice that is naturally gluten-free, like jasmine or basmati. You can add different herbs or spices to change the flavor profile. For example, rosemary or oregano can give it a fresh twist. Just sprinkle in a little as you cook. Adding vegetables is another great way to mix things up. Peas, bell peppers, or spinach can boost the nutrition and color of the dish. Simply sauté them with the mushrooms for a tasty addition. To keep garlic butter mushroom rice fresh, store it in the fridge. Use airtight containers to prevent moisture loss. This way, it can stay good for about 3 to 4 days. Always let it cool to room temperature before sealing it. This helps avoid condensation inside the container. When reheating, the best method is the stovetop. Add a splash of broth or water to the rice. Heat it gently in a pan over low heat. Stir frequently to make sure every grain warms up. This method helps keep the rice fluffy. Avoid the microwave if possible, as it can make the rice soggy. To freeze garlic butter mushroom rice, first cool it completely. Then, portion it into freezer-safe bags or containers. Remove as much air as possible. This helps prevent freezer burn. When you're ready to eat, thaw it in the fridge overnight. Reheat on the stovetop as mentioned before to keep the taste and texture. You can use many grains in place of rice. Quinoa is a great option. It has a nice texture and is packed with protein. Bulgur wheat also works well and cooks quickly. For a low-carb choice, try cauliflower rice. It absorbs flavors well and offers a light base for your dish. Don't hesitate to experiment with different grains to find what you love! Yes, you can make this recipe ahead of time. Cook the rice and mushroom mixture as usual. Allow them to cool before storing. Place the rice and mushrooms in an airtight container in the fridge. They can last for about four days. When you're ready to eat, just reheat it in a pan. Add a splash of broth to keep it moist. To boost the flavor, add a squeeze of lemon juice at the end. This brightens the dish. You can also mix in some sautéed spinach or kale for extra greens. For a deeper taste, sprinkle in some smoked paprika or red pepper flakes. Consider using fresh herbs like basil or chives for a fresh touch. Experiment with these tips and find your perfect flavor! This blog post covers how to make garlic butter mushroom rice using simple ingredients. We started with the main components, like long-grain rice and vegetable broth. Then, we enhanced flavor with garlic, mushrooms, and thyme. I provided step-by-step instructions to prepare each part. In the end, you can have fun with this recipe. Try adding proteins or different herbs to make it your own. With easy storage tips and variations, enjoy this dish any time. Cooking can be simple and delicious.

Garlic Butter Mushroom Rice Flavorful Comfort Meal

To make this dish, you need a few key items. Here’s the list: - 1 pound large shrimp, peeled and deveined - 3 tablespoons butter - 4 cloves garlic, minced - 1 cup heavy cream - 1 cup grated Parmesan cheese - 1 teaspoon Italian seasoning - Salt and pepper to taste - 1 tablespoon fresh parsley, chopped (for garnish) These ingredients bring rich flavors and a creamy texture. The shrimp is the star here, and the garlic adds a warm aroma. The butter and cream create a silky sauce that you’ll love. To make this dish even heartier, consider adding pasta. Here’s what you can use: - 8 ounces linguine or your favorite pasta Cooking pasta gives you a complete meal. The creamy sauce coats the pasta and shrimp perfectly. It makes every bite feel indulgent. Not everyone has the same tastes or needs, and that's okay! Here are some swaps you can try: - Shrimp: Use chicken or tofu for a different protein. - Butter: Swap with olive oil for a lighter choice. - Cream: Use a dairy-free alternative like coconut cream. - Parmesan: Nutritional yeast works well for a vegan option. These options help you cater to dietary needs. You can still enjoy this dish while keeping flavors strong and satisfying. {{ingredient_image_1}} If you want pasta, boil water in a large pot. Add salt to the water for flavor. Cook the linguine as the package says until it is al dente. This usually takes about 8 to 10 minutes. Once done, drain the pasta and set it aside. Keep it warm for later. Take a large skillet and add the butter. Melt it over medium heat. Add the shrimp, making sure they are in a single layer. Season the shrimp with salt, pepper, and Italian seasoning. Cook the shrimp for 2 to 3 minutes on each side. You want them to turn pink and look opaque. Once cooked, remove the shrimp from the skillet and set them aside. In the same skillet, add the minced garlic. Sauté it for about 1 minute. Watch carefully so it does not burn. Once fragrant, pour in the heavy cream. Bring it to a gentle simmer. Gradually whisk in the grated Parmesan cheese. Keep stirring until the sauce is smooth and creamy. Now, return the shrimp to the skillet. Gently stir to coat the shrimp in the creamy sauce. Let it simmer for another minute. This helps the shrimp soak up the flavors. If you cooked pasta, add it to the skillet now. Toss the pasta with the shrimp and sauce until everything is well mixed. Taste and adjust the seasoning if needed. Serve hot, and garnish with chopped fresh parsley. This adds color and extra flavor to your dish. Enjoy your meal! To cook shrimp well, start with large, fresh shrimp. Peel and devein them for the best taste. Heat butter in a skillet over medium heat. Add shrimp, and season them with salt, pepper, and Italian seasoning. Cook for 2-3 minutes on each side. Look for a pink and opaque color. This means they are done. Remove the shrimp and set them aside. This keeps them juicy and tender. The key to a creamy sauce is using heavy cream. It adds richness and texture. After cooking the shrimp, keep the heat medium. Add minced garlic and sauté it until fragrant. Be careful not to burn the garlic; it can turn bitter. Pour in the heavy cream, and bring it to a gentle simmer. Slowly whisk in grated Parmesan cheese. This will create a smooth sauce that clings beautifully to the shrimp. For a full meal, serve the shrimp with pasta. Cook linguine or any pasta according to package instructions. Toss the pasta in the creamy sauce with shrimp for a delicious mix. Don’t forget to garnish with chopped parsley for color and flavor. Pair this dish with a fresh salad or garlic bread for a complete dining experience. Enjoy each bite of this tasty, creamy garlic Parmesan shrimp! Pro Tips Fresh Shrimp Matters: Using fresh or high-quality frozen shrimp will elevate the dish. Look for shrimp that are firm and have a mild scent. Don’t Overcook the Garlic: Sauté the garlic just until fragrant. Overcooking can lead to a bitter flavor in the sauce. Adjust the Creaminess: Feel free to adjust the amount of heavy cream and Parmesan cheese to suit your preference for a creamier or lighter sauce. Garnish for Flavor: Fresh parsley not only adds color but also enhances the flavor. Consider adding other herbs like basil or chives for variety. {{image_2}} You can make this dish even healthier by adding vegetables. I like to use spinach, bell peppers, or zucchini. Just chop them up and add them when you sauté the shrimp. Cook them until they are tender. This adds color and nutrients to your meal. Plus, it enhances the flavor. You can also try broccoli or asparagus for a nice crunch. If you love spice, this variation is for you. You can add red pepper flakes or diced jalapeños to the garlic when cooking. Start with a small amount and taste as you go. This gives the creamy sauce a nice kick. The heat pairs well with the richness of the cheese and cream. It makes each bite exciting and full of flavor. For a gluten-free option, skip the pasta. Instead, serve the shrimp over cauliflower rice or zucchini noodles. Both options are low-carb and very filling. Cauliflower rice adds a nice texture and absorbs the sauce well. Zucchini noodles are light and refreshing. You can also use gluten-free pasta if you want a traditional feel. Enjoy without the carbs, but still savor all the creamy goodness! After enjoying your creamy garlic Parmesan shrimp, let the dish cool. Place the leftovers in an airtight container. Store them in the fridge for up to three days. This keeps the shrimp fresh and safe to eat later. I recommend separating the shrimp from any pasta to maintain texture. To reheat, use a skillet over medium heat. Add a splash of cream to keep it creamy. Stir gently until heated through. If you prefer, you can also use a microwave. Heat in short bursts, stirring often. This prevents the shrimp from overcooking. You can freeze creamy garlic Parmesan shrimp, but it’s best to avoid freezing the sauce. The cream may change texture. Instead, freeze the shrimp and sauce separately. Use a freezer-safe container and store for up to three months. When ready to eat, thaw in the fridge overnight and reheat as mentioned above. For this recipe, I recommend using large shrimp. They hold up well in the sauce. You can also use jumbo shrimp if you want a meatier bite. Fresh shrimp gives the best flavor, but frozen shrimp works too. Just make sure to thaw it before cooking. Yes, you can use a different cheese. Try using mozzarella or Asiago for a twist. Both will give you a nice melt and add creaminess. Just remember, Parmesan has a strong flavor, so the taste might change a bit. To make more servings, simply increase the ingredients. For every extra pound of shrimp, add another cup of cream and cheese. You can also add more garlic for a bolder taste. Adjust the seasoning to keep the flavors balanced. Yes, you can make this dish dairy-free. Use coconut cream instead of heavy cream. For cheese, try a dairy-free cheese alternative. Just be aware that the flavor might change slightly. Adjust the seasonings to enhance the taste. This blog post covered how to make creamy garlic parmesan shrimp. We explored key ingredients, from main to optional choices. I shared step-by-step instructions for cooking pasta, sautéing shrimp, and making the sauce. Tips for perfect shrimp and creamy sauce revealed secrets for success. Consider adding veggies or spices for new flavors. Leftover storage tips help you enjoy this dish longer. I hope you feel ready to cook and enjoy this delicious meal!

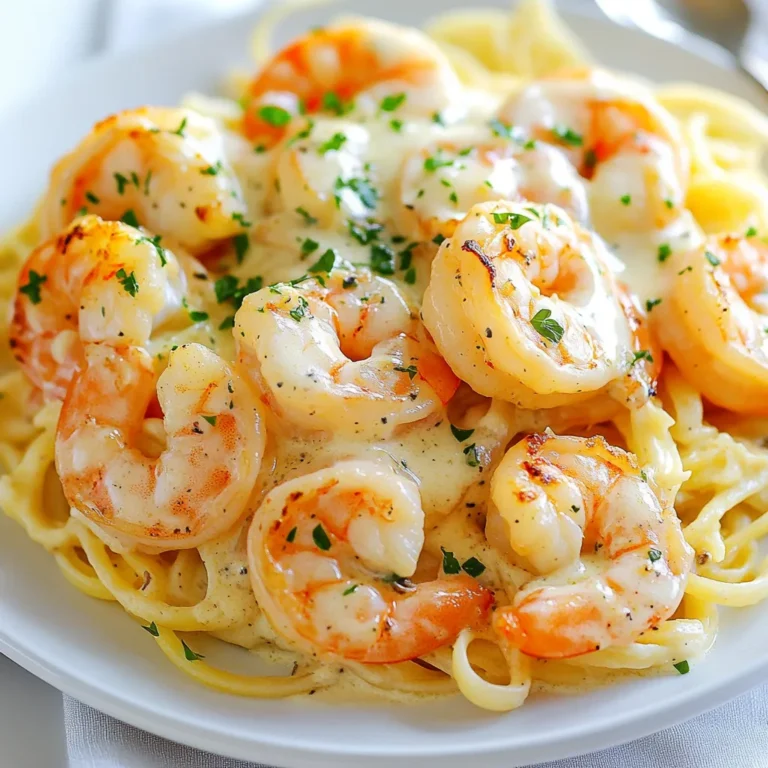
Creamy Garlic Parmesan Shrimp Flavorful and Easy Meal

To make creamy red pepper gnocchi, gather these simple ingredients: - 1 pound gnocchi (fresh or store-bought) - 2 large red bell peppers, roasted and peeled - 1 cup heavy cream - 1 small onion, finely chopped - 2 cloves garlic, minced - 1 tablespoon olive oil - 1 teaspoon dried oregano - 1/2 teaspoon smoked paprika - Salt and pepper to taste - Fresh basil leaves for garnish - Grated Parmesan cheese for serving (optional) Each ingredient plays a key role in this dish. The gnocchi serves as the base, giving it a hearty feel. Roasted red peppers add a sweet and smoky flavor. Heavy cream brings a rich, smooth texture to the sauce. Onion and garlic build the flavor foundation, while spices like oregano and smoked paprika add warmth and depth. Salt and pepper enhance all these flavors, and fresh basil is a bright finish. Parmesan cheese is optional but adds a nice touch of saltiness. {{ingredient_image_1}} To start, preheat your oven to 450°F (232°C). Cut the red bell peppers in half and remove the seeds. Place them cut side down on a baking sheet lined with parchment paper. Roast the peppers for about 20 minutes. Look for the skins to be charred and blistered. Once done, take them out and place them in a bowl. Cover the bowl with plastic wrap. This helps steam the peppers. After a few minutes, when they cool, peel off the skins. Set the roasted peppers aside for later. Next, heat one tablespoon of olive oil in a large skillet over medium heat. Add the chopped onion. Sauté the onion until it turns translucent, which takes about 5 minutes. Then, stir in the minced garlic and cook for one more minute. This will make your kitchen smell amazing. Add the roasted red peppers to the skillet. Toss in the oregano, smoked paprika, salt, and pepper. Cook the mixture for 3 to 4 minutes. This allows the flavors to blend well. Now, transfer the pepper mixture to a blender. Blend until smooth. Pour the puree back into the skillet. Add one cup of heavy cream and stir to combine. Taste and adjust any seasonings if needed. While you make the sauce, it's time to cook the gnocchi. Boil a large pot of salted water. Follow the package instructions for cooking the gnocchi. They usually float to the surface when done, which takes about 2 to 3 minutes. Once they float, drain the gnocchi. Gently fold the gnocchi into the creamy red pepper sauce. Let them soak up the flavors for about a minute. Now, you're ready to serve this delightful dish! To make the sauce just right, adjust the flavors with seasonings. A pinch of salt enhances taste. Smoked paprika adds a lovely depth. If you want more heat, add a dash of red pepper flakes. For texture, ensure the heavy cream blends well. If the sauce feels too thick, add a splash of water or broth. Aim for a smooth and creamy consistency. When choosing gnocchi, fresh options taste great. Store-bought gnocchi saves time and works well, too. To cook gnocchi, boil water in a large pot. Add salt once it starts bubbling. Gnocchi cooks quickly, usually within 2-3 minutes. Watch for them to float to the top. This means they are done! Overcooking can make them mushy, so keep an eye on them. Garnishing makes your dish pop. Fresh basil leaves add color and freshness to the plate. A sprinkle of grated Parmesan cheese enhances flavor, too. For a beautiful dish, serve the gnocchi in a shallow bowl. Add extra sauce on top to make it look inviting. You can even drizzle a bit of olive oil for shine. Pro Tips Roasting Peppers: Roasting the peppers until the skins are charred enhances their sweetness and adds depth to the sauce. Gnocchi Cooking: Make sure to cook the gnocchi in well-salted water, as this adds flavor and helps them taste even better. Adjusting Creaminess: If you prefer a lighter sauce, you can substitute half of the heavy cream with vegetable broth for a delicious twist. Fresh Basil: Adding fresh basil at the end preserves its vibrant flavor, making your dish aromatic and refreshing. {{image_2}} You can boost your creamy red pepper gnocchi by adding protein. Chicken works well. Simply grill or sauté diced chicken breast until cooked. Toss it in with the gnocchi for a hearty meal. Shrimp is another great option. Cook shrimp until pink and tender, then mix it in. If you prefer vegetarian choices, consider adding chickpeas or lentils. They are filling and tasty. Tofu is also a great choice. Use firm tofu, sauté until golden, and add it to the dish. Adding vegetables gives your dish more color and nutrition. Spinach is a lovely choice. Toss fresh spinach into the sauce just before serving, allowing it to wilt slightly. You can also add peas for sweetness. They cook quickly and add a lovely pop of color. When adding extra vegetables, keep the flavors balanced. If you add more veggies, taste as you go. Adjust the seasoning if needed. This keeps your dish flavorful and bright. If you like heat, there are many ways to spice up your gnocchi. Try adding red pepper flakes to the sauce. Start with a pinch and adjust to your taste. For a smoky flavor, add more smoked paprika. For those who enjoy a kick, consider fresh jalapeños. Chop them finely and stir them into the sauce. This gives a fresh, zesty taste that pairs well with the creamy sauce. To keep your creamy red pepper gnocchi fresh, store it in the fridge. Place it in an airtight container. Make sure to cool the gnocchi completely before sealing the container. This helps prevent moisture build-up, which can make the dish soggy. When you want to enjoy your leftovers, you have a few options. You can use the stove, microwave, or oven. If you choose the stove, heat it on low. Add a splash of cream or broth. This keeps it moist and creamy. Stir gently to avoid breaking the gnocchi. If you use the microwave, heat it in short bursts. Stir in between to heat evenly. Avoid overheating to keep the gnocchi from becoming mushy. You can freeze creamy red pepper gnocchi for later meals. First, let it cool completely. Then, place the gnocchi in a freezer-safe container. Make sure to leave some space in the container for expansion. To thaw, place it in the fridge overnight. For reheating, use the stove or microwave as mentioned earlier. This keeps the flavors intact and ensures a tasty meal anytime! Gnocchi is made from simple ingredients. Here are the common ones: - Potatoes - Flour - Eggs - Salt Some recipes may vary. You can find gluten-free options too. Gnocchi has a soft and chewy texture. This makes it perfect for soaking up sauces. Yes, jarred roasted red peppers work well. They save time and effort. Here are some pros and cons: Advantages: - Ready to use - No peeling required - Great flavor Disadvantages: - May have added preservatives - Taste can differ from fresh Using jarred peppers can make cooking easier, but fresh ones offer a better taste. To make creamy red pepper gnocchi vegan, swap out a few ingredients: - Use plant-based cream instead of heavy cream. - Skip the Parmesan cheese or use a vegan version. - Ensure the gnocchi does not contain eggs. These simple swaps keep the dish creamy and delicious, while being friendly to a vegan diet. This blog post covered a flavorful creamy red pepper gnocchi recipe. We discussed key ingredients, step-by-step cooking, and smart tips for making it perfect. Exploring variations, you now know how to customize the dish to your taste. Plus, we shared storage tricks for enjoying leftovers later. In closing, this dish is easy and versatile. You can impress anyone with your cooking skills. Dive in, have fun, and enjoy every bite!

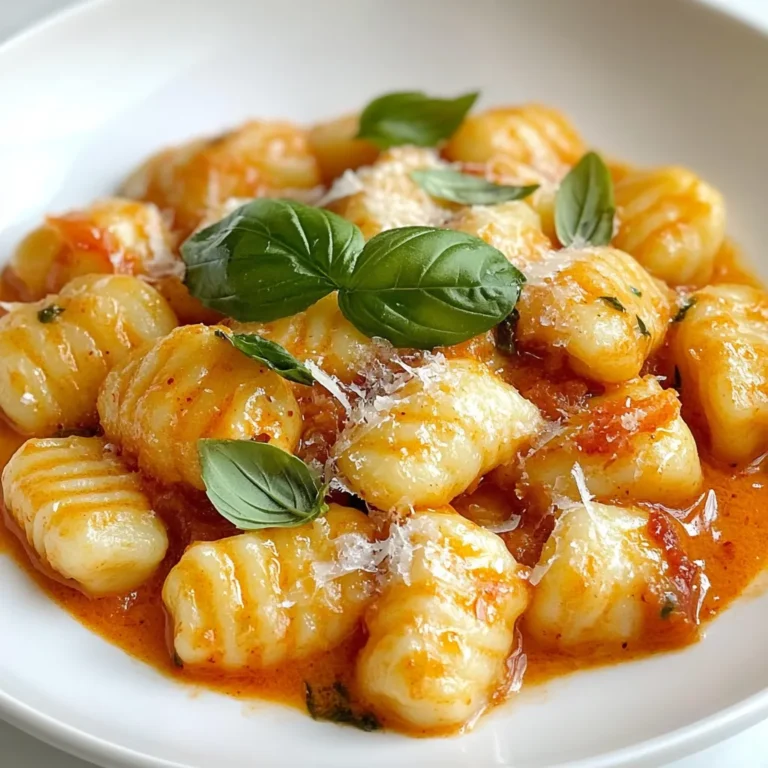
Creamy Red Pepper Gnocchi Delightful Dinner Idea

To make Greek chicken stuffed pitas, you'll need some tasty ingredients. Here’s a list: - 2 boneless, skinless chicken breasts - 1 tablespoon olive oil - 2 teaspoons dried oregano - 1 teaspoon garlic powder - Salt and pepper to taste - 4 whole wheat pitas - 1 cup cherry tomatoes, halved - 1 cucumber, diced - ½ red onion, thinly sliced - ½ cup feta cheese, crumbled - 1 cup plain Greek yogurt - 2 tablespoons lemon juice - Fresh parsley for garnish These ingredients create a fresh and flavorful meal. The chicken brings protein, while the veggies add crunch. Feta cheese gives each bite a salty kick, and the yogurt adds creaminess. For this recipe, boneless, skinless chicken breasts work best. They are easy to cook and season. Their mild flavor lets the spices shine through. You can also use chicken thighs if you prefer a juicier cut. Just remember to adjust the cooking time since thighs take longer to cook. Feel free to add your twist to the stuffed pitas. Here are some ideas: - Sliced olives for extra flavor - Bell peppers for more crunch - Spinach or arugula for added greens - Hummus instead of yogurt for a different spread These options let you personalize your meal. You can experiment and find what you enjoy most. {{ingredient_image_1}} To start, grab a bowl. Add 1 tablespoon of olive oil. Then, mix in 2 teaspoons of dried oregano and 1 teaspoon of garlic powder. Season this mix with salt and pepper to taste. This marinade packs in flavor and helps keep the chicken juicy. Rub the marinade all over 2 boneless, skinless chicken breasts. Make sure every bit of the chicken is coated. Let it sit for a few minutes to soak up the flavors. Next, preheat your grill or grill pan over medium-high heat. It should be hot, but not smoking. Place the marinated chicken on the grill. Grill each side for 6-7 minutes. The chicken is done when the juices run clear. Use a meat thermometer if you have one. The internal temperature should reach 165°F. After grilling, remove the chicken and let it rest for a few minutes. This step helps keep the juices inside. Now it’s time to assemble the pitas. First, warm the 4 whole wheat pitas in a skillet or microwave for about 10 seconds. This makes them soft and easy to fill. Open each pita pocket gently. Fill them with sliced grilled chicken. Then add cherry tomatoes, cucumber, and thinly sliced red onion. Don’t forget the feta cheese; sprinkle about ½ cup inside each pita. Finally, drizzle the quick tzatziki sauce made from Greek yogurt and lemon juice over the top. Garnish with fresh parsley for a bright touch. Serve right away with lemon wedges on the side for extra zing. To keep your chicken juicy, start with a good marinade. I mix olive oil, oregano, garlic powder, salt, and pepper. This blend adds flavor and moisture. Grill the chicken on medium-high heat for 6-7 minutes per side. When the chicken is done, let it rest for a few minutes. This resting time allows the juices to settle back in. Slicing it too soon can make it dry. For warm pitas, I recommend using a skillet or microwave. Heat them in a skillet on low for about 10 seconds. If using a microwave, wrap them in a damp paper towel. Heat for about 10 seconds as well. You want them soft and easy to fold. Don’t overheat, or they can become tough. To make the meal complete, serve the stuffed pitas with sides. A fresh Greek salad pairs well with these pitas. You can also add extra tzatziki sauce for dipping. For a fun twist, include some roasted veggies on the side. Fresh lemon wedges enhance the flavors, too. They add brightness and zing to each bite. Pro Tips Marinate for More Flavor: Allow the chicken to marinate in the olive oil and spice mixture for at least 30 minutes, or up to 2 hours, before grilling to enhance the flavor. Choose Fresh Ingredients: Use fresh vegetables and herbs for the filling to elevate the taste and texture of your pitas. Customize the Tzatziki: Add grated cucumber or minced garlic to your tzatziki sauce for an extra burst of flavor. Serve with a Side: Pair the stuffed pitas with a simple Greek salad or roasted vegetables for a complete meal. {{image_2}} You can easily add heat to your Greek chicken stuffed pitas. Start by mixing 1-2 teaspoons of cayenne pepper or red pepper flakes into the marinade. This simple change gives your chicken a spicy kick. Grilling the chicken with these spices will make each bite deliciously bold. You can also add sliced jalapeños inside the pita for extra heat. This spicy twist will impress anyone who loves a flavorful dish. If you want a meat-free option, you can use grilled vegetables instead of chicken. Try bell peppers, zucchini, and eggplant. Toss these veggies in the same marinade and grill them until tender. This vegetarian version keeps the flavors of Greek cooking while being lighter. You can also use falafel for a protein boost. Just fill your pitas with grilled veggies, feta, and tzatziki for a satisfying meal. Sauces can make your Greek chicken stuffed pitas even better. Tzatziki is classic, but you can try hummus for a creamy touch. A spicy harissa sauce adds a unique flavor and heat. For a tangy kick, use a lemon tahini dressing. Each sauce offers a new taste experience. Feel free to mix and match sauces based on your mood or guests. The right sauce makes each bite exciting and fresh. To store leftover stuffed pitas, start by letting them cool. Place them in an airtight container. This helps keep them fresh and tasty. You can also wrap each pita in plastic wrap for extra protection. Make sure to store them in the fridge. They should stay good for about 2 to 3 days. If you want to freeze your stuffed pitas, wrap each one tightly in plastic wrap. Then place them in a freezer bag. This helps to avoid freezer burn. When you’re ready to eat, take a pita out and let it thaw in the fridge overnight. To reheat, simply warm it in a skillet or microwave for about 10-15 seconds. This keeps the pita soft and the filling warm. The ingredients have different shelf lives. Here’s a quick look: - Chicken breasts: Fresh chicken lasts 1-2 days in the fridge. Cooked chicken stays good for about 3-4 days. - Whole wheat pitas: These can last up to a week in the pantry or a month in the freezer. - Cherry tomatoes: Fresh tomatoes stay good for about a week in the fridge. - Cucumber: A cucumber lasts about 5-7 days in the fridge. - Feta cheese: Unopened feta can last several months. Once opened, it’s best to use it within a week or two. - Greek yogurt: This can last 1-3 weeks past the sell-by date if unopened. Once opened, it lasts about 5-7 days. By following these tips, you can enjoy Greek chicken stuffed pitas for days! Yes, you can prepare Greek Chicken Stuffed Pitas ahead of time. Cook the chicken and let it cool. Slice it and store it in the fridge. You can also make the tzatziki sauce in advance. Just keep it in an airtight container. When you are ready to eat, warm the pitas and fill them with the chicken and toppings. This makes meal prep easy and quick! There are many tasty sides you can enjoy with Greek Chicken Stuffed Pitas. Here are some ideas: - Greek salad: Crispy cucumbers, juicy tomatoes, and olives. - Chips: Pita chips or veggie chips for crunch. - Roasted vegetables: Zucchini or bell peppers add color and taste. - Fruit salad: A light and sweet mix to balance the meal. These sides make your meal more fun and filling! Making Greek Chicken Stuffed Pitas healthier is easy. Here are some tips: - Choose whole wheat pitas: They have more fiber than regular pitas. - Add more veggies: Include spinach, bell peppers, or shredded carrots. - Use low-fat yogurt: This keeps the tzatziki creamy but lighter. - Limit feta cheese: Use just a sprinkle to cut down on fat and calories. These changes keep the dish flavorful while boosting its health benefits! Greek chicken stuffed pitas are easy and tasty. We covered key ingredients, like chicken and sauces, and shared helpful tips for grilling. You now know how to keep the chicken juicy and how to store leftovers. Feel free to get creative with variations, such as spicy options or vegetarian styles. This dish offers endless possibilities. Enjoy making it your own!

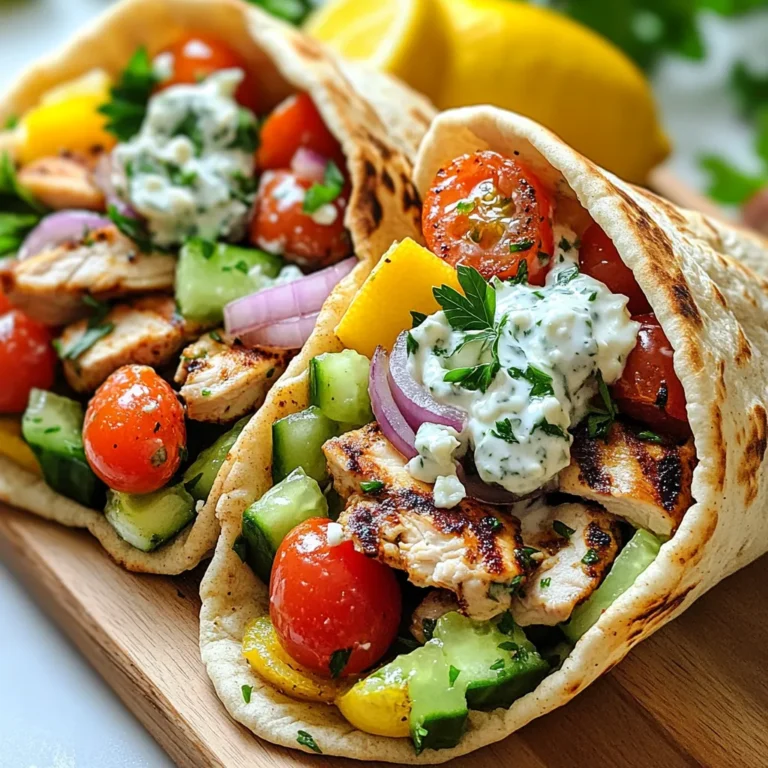
Greek Chicken Stuffed Pitas Flavorful and Easy Recipe

- 2 salmon fillets, skinless and cubed - 2 cups mixed bell peppers, sliced - 1 cup snow peas, trimmed - 1 cup broccoli florets - 3 cloves garlic, minced - 1 tablespoon ginger, minced - 1/4 cup teriyaki sauce, alcohol-free - 1 tablespoon sesame oil - 2 tablespoons vegetable oil - 1 tablespoon sesame seeds, for garnish - Cooked rice or quinoa - Salt and pepper to taste Gathering these ingredients makes this stir-fry easy and quick. Salmon is great for its rich flavor and health benefits. The colorful bell peppers add a nice crunch and sweetness. Snow peas bring a fresh taste, while the broccoli gives a hearty bite. Garlic and ginger add a zesty kick. Teriyaki sauce is sweet and salty, tying all the flavors together. Sesame oil adds depth and a nutty aroma. Sesame seeds are a lovely touch on top. You can choose to serve this dish with warm rice or quinoa. A pinch of salt and pepper can enhance the taste. Feel free to mix things up based on what you have at home! {{ingredient_image_1}} - Preparing the salmon: First, pat the salmon cubes dry with a paper towel. This helps them sear better. Season the salmon lightly with salt and pepper to enhance the flavor. - Mixing the teriyaki sauce: In a small bowl, mix the teriyaki sauce, sesame oil, minced garlic, and ginger. This sauce adds a sweet and savory kick to the dish. - Heating the pan: In a large non-stick skillet or wok, heat 1 tablespoon of vegetable oil over medium-high heat. A hot pan helps to cook the salmon evenly. - Cooking the salmon: Add the cubed salmon to the skillet. Cook for about 4-5 minutes until golden brown and cooked through. Remove the salmon from the skillet and set aside to keep it tender. - Stir-frying the vegetables: In the same skillet, add the remaining tablespoon of oil. Toss in the sliced bell peppers, snow peas, and broccoli. Stir-fry for about 3-4 minutes until the vegetables turn vibrant and tender-crisp. - Adding the teriyaki sauce: Return the cooked salmon to the skillet with the vegetables. Pour the teriyaki sauce mixture over everything. Gently toss to combine and coat all the ingredients. - Finishing touches and serving: Cook for another 1-2 minutes until everything is heated through and well mixed. Sprinkle with chopped green onions and sesame seeds for a lovely garnish. Serve the stir-fry over warm rice or quinoa for a complete meal. - Cook salmon until it is golden and flakes easily with a fork. - Use bell peppers, snow peas, and broccoli for a colorful mix. These veggies add crunch and flavor. - Add fresh herbs like cilantro for a burst of freshness. - Adjust the teriyaki sauce to make it sweeter or saltier to fit your taste. - Serve the stir-fry over rice or quinoa for a nice base. - Garnish with sesame seeds and green onions for extra color and texture. Pro Tips Fresh Salmon is Key: Always opt for fresh, high-quality salmon to enhance the flavor and texture of your stir-fry. Prep Ingredients Ahead: Cut and prepare all vegetables and ingredients before starting to cook. This ensures a smooth cooking process and prevents overcooking. Customize Your Veggies: Feel free to swap in your favorite vegetables like carrots, zucchini, or bok choy for a personalized touch. Serve Immediately: For the best experience, serve the stir-fry immediately after cooking to maintain the vibrant colors and crisp texture of the vegetables. {{image_2}} You can easily change the protein in this dish. Instead of salmon, use chicken or tofu. Both options work great and taste delicious. For the veggies, mix it up! Try snap peas, carrots, or bok choy. These swaps keep the dish fresh and exciting. If you want to make your own teriyaki sauce, it's simple! Combine soy sauce, honey, garlic, and a splash of vinegar. Adjust the sweetness by adding more honey or sugar. For saltiness, add a bit more soy sauce. This makes your dish just how you like it. Need gluten-free options? Use tamari instead of soy sauce. It’s a great substitute that keeps the flavor. For a low-carb version, skip the rice. Serve the stir-fry over cauliflower rice instead. This way, you enjoy the same flavors while keeping it light. - Store any leftovers in an airtight container. - Keep the stir-fry in the fridge for up to three days. - To reheat, use a skillet on medium heat. - Add a splash of water to keep it moist while cooking. - You can freeze the stir-fry for up to two months. - Use a freezer-safe container and seal it tightly. - Thaw the stir-fry in the fridge overnight before cooking. - Reheat in a skillet until hot and cooked through. - Leftovers last in the fridge for about three days. - Look for signs of spoilage such as off smells or discoloration. - If it looks slimy or dry, it’s time to toss it out. Can I use frozen salmon for this recipe? Yes, you can use frozen salmon. Just thaw it first. Place it in the fridge overnight or run it under cold water. Once thawed, pat it dry and season like fresh salmon. What if I don’t have teriyaki sauce? You can make a quick substitute. Mix soy sauce, honey, and a splash of rice vinegar. This will mimic the sweet and salty taste of teriyaki sauce. How do I know if the salmon is cooked through? Check the color of the salmon. It should change from bright pink to a pale, opaque color. Use a fork to flake it; it should break apart easily. The internal temperature should reach 145°F (63°C). Can I make this recipe in advance? Yes, this dish can be made in advance. Cook the salmon and veggies, then cool and store them in the fridge. Reheat before serving for the best taste. Is salmon safe to eat raw? Salmon can be safe raw if it is sushi-grade. Always check for quality and source. If unsure, cook it fully to avoid any risk. What are the health benefits of salmon? Salmon is rich in omega-3 fatty acids, which are good for heart health. It is also high in protein and vitamins. Eating salmon can support brain health and reduce inflammation. This post covered a tasty salmon stir-fry. We looked at key ingredients like salmon and fresh veggies. I shared steps to prepare and cook, along with handy tips for a great meal. You can swap proteins or sauces to fit your taste. Remember, cooking can be fun, and your meals can be healthy. Try these ideas to impress your friends and family. Eating well is rewarding, so enjoy every bite and share your creations!

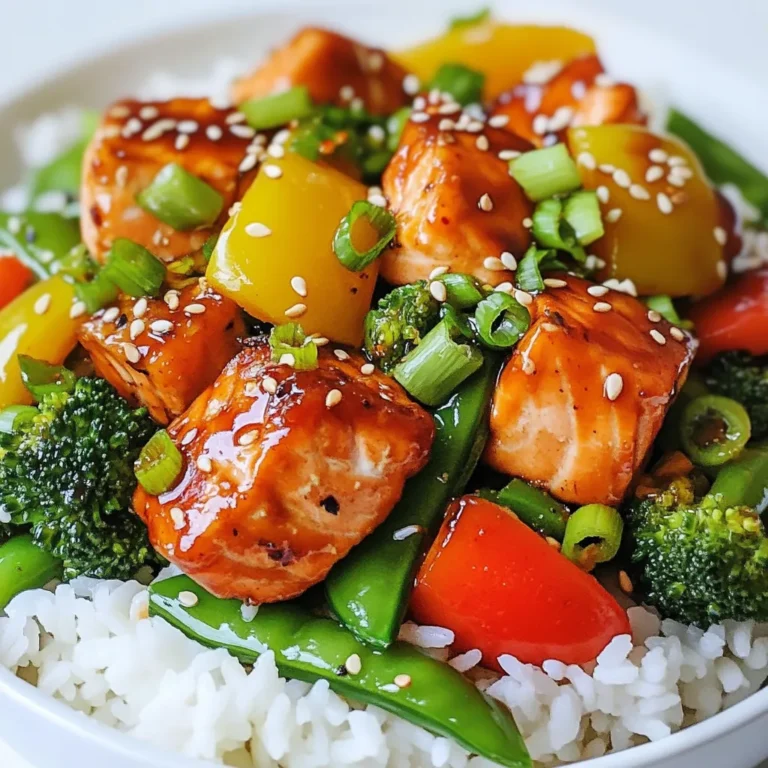
Teriyaki Salmon Stir-Fry Flavorful and Easy Dish

- 4 large portobello mushroom caps - 1 cup cherry tomatoes, halved - 1 cup fresh mozzarella balls, halved - 1 cup fresh basil leaves, chopped - 2 tablespoons balsamic glaze - 2 tablespoons olive oil - 1 teaspoon garlic powder - Salt and pepper to taste - Optional: Grated Parmesan cheese for topping When choosing portobello mushrooms, look for caps that are firm and smooth. They should be dark brown and free from spots. Avoid any that feel slimy or have a strong odor. For tomatoes, choose plump cherry tomatoes that are bright and shiny. They should feel heavy for their size. Fresh mozzarella should be soft and slightly springy. Always go for basil that is bright green with no browning or wilting. Fresh herbs bring out the best flavors in your dish. If you can't find portobello mushrooms, you can use large cremini or shiitake mushrooms. For mozzarella, consider using burrata or even feta cheese for a tangy twist. If you are out of balsamic glaze, a mix of vinegar and honey can work well. For those who want to skip cheese, you can add more vegetables or nuts for a different texture. {{ingredient_image_1}} First, heat your oven to 400°F (200°C). Grab four large portobello mushroom caps. Use a damp cloth to clean them well. Make sure to remove the stems gently. This will give you a nice space to fill later. In a large bowl, mix one cup of halved cherry tomatoes, one cup of halved fresh mozzarella balls, and one cup of chopped fresh basil leaves. This mix brings freshness and flavor. Drizzle two tablespoons of balsamic glaze and two tablespoons of olive oil over the mix. Add one teaspoon of garlic powder. Season with salt and pepper to taste. Stir the mixture gently to combine all the flavors. Place the cleaned portobello caps, gill-side up, on a baking sheet lined with parchment paper. Spoon the Caprese mixture into each cap. Pack the filling slightly for a hearty bite. If you like, sprinkle some grated Parmesan cheese on top. Bake them in your preheated oven for about 20 minutes. The mushrooms should be tender, and the cheese will be melted and bubbly. Once they are done, let them cool for a couple of minutes before serving. Enjoy the fresh and flavorful meal! When making Caprese stuffed portobellos, avoid overcooking the mushrooms. If they get too soft, they lose their shape. Clean the caps gently; don’t use water, as they can soak it up. Make sure to season the filling well. Under-seasoned food can taste bland and uninviting. Finally, pack the filling too lightly. If you don’t fill them well, they won’t have enough flavor. To boost the flavor of your dish, try adding fresh herbs. Oregano or thyme pairs well with the basil. A pinch of red pepper flakes adds heat and zest. You can also use fresh garlic instead of garlic powder for a more robust taste. Consider a splash of lemon juice for brightness. This adds a fresh, zesty touch that balances the richness of the cheese. Serve your stuffed portobellos on a rustic wooden board for a lovely display. Drizzle some extra balsamic glaze around the plate for a nice touch. Fresh basil leaves scattered on top make the dish pop. You could also pair them with a light salad for a complete meal. A side of crusty bread works well, too, perfect for soaking up any juices. Pro Tips Choose Fresh Ingredients: For the best flavor, select ripe cherry tomatoes, fresh mozzarella, and vibrant basil. Don’t Overstuff: While it’s tempting to pack the filling, leaving some space will help the mushrooms cook evenly. Experiment with Cheese: Try adding different cheeses like goat cheese or feta for a unique twist on flavor. Let Them Rest: Allow the stuffed mushrooms to cool for a few minutes after baking to enhance the flavors and avoid burns. {{image_2}} Caprese stuffed portobellos are already vegetarian. You can keep it simple with the classic recipe. For a twist, try adding roasted red peppers. They add a sweet, smoky flavor. You can also use different cheeses like goat cheese or feta. Each cheese gives a new taste. This recipe is gluten-free. Make sure your balsamic glaze does not have gluten. You can easily check the label. Use fresh ingredients and avoid any bread-based toppings. This way, you keep the meal safe for gluten-sensitive friends. You can get creative with other ingredients too. Try adding spinach or arugula for some greens. You can mix in olives for a briny taste. If you like spice, add crushed red pepper flakes. Just be careful not to overpower the flavors. These changes keep the dish fresh and fun! After your meal, let the Caprese stuffed portobellos cool down. Then, place them in an airtight container. You can store them in the fridge for up to three days. This keeps them fresh and tasty. If you want to keep them longer, consider freezing them. To reheat, preheat your oven to 350°F (175°C). Place the stuffed portobellos on a baking sheet. Cover them with foil to keep them moist. Heat for about 15 minutes. Check if they are warm all the way through. You can also use a microwave. Heat them for about one minute. Enjoy them warm for the best taste. You can freeze these delicious mushrooms for up to two months. Pack them tightly in a freezer-safe container. Make sure to label the container with the date. When you are ready to eat, thaw them in the fridge overnight. Then, reheat them in the oven as mentioned above. This way, you can enjoy this meal anytime! Yes, you can prepare the Caprese filling in advance. Mix the cherry tomatoes, mozzarella, and basil. Store it in the fridge for up to a day. You can stuff the portobello caps just before baking. This saves time and keeps the mushrooms fresh. These stuffed mushrooms pair well with many sides. You can serve them with a light salad or garlic bread. A fresh arugula salad adds a nice touch. You might also enjoy them with grilled vegetables or a simple pasta dish. Yes, you can use other mushrooms if you like. For example, large shiitake or cremini mushrooms work well. Just make sure they are big enough to hold the filling. Each type adds a different flavor and texture, so feel free to experiment! You learned how to create tasty Caprese stuffed portobellos. I shared tips on choosing fresh ingredients and ways to make your dish shine. We covered mistakes to avoid and how to store leftovers. You even saw fun variations and answered key questions. Now, go ahead and try making these portobellos. They can impress your family or guests. Your skills in the kitchen will grow with each dish you create. Enjoy cooking and tasting!

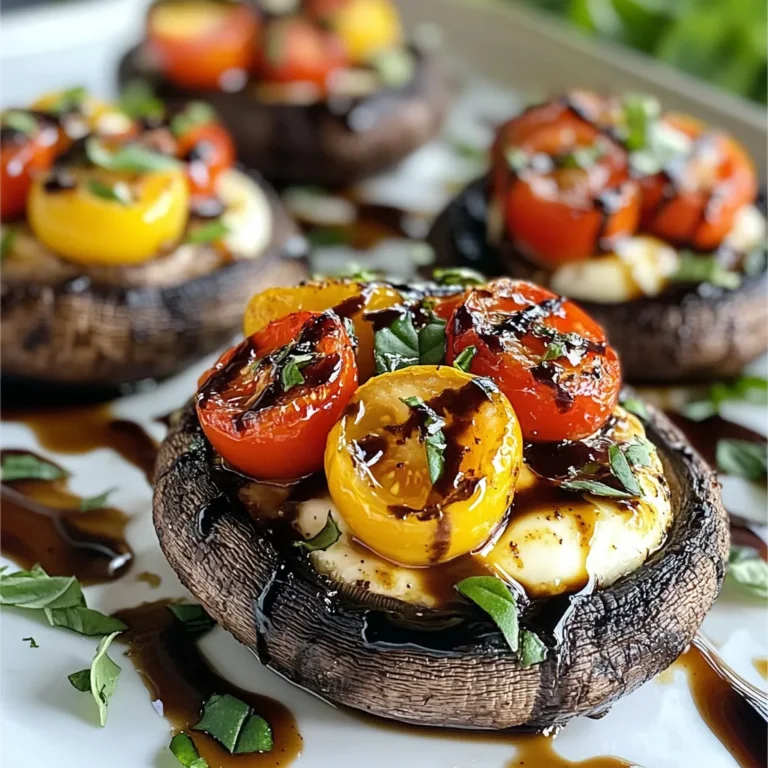
Caprese Stuffed Portobellos Fresh and Flavorful Meal

The main ingredients make this dish rich and tasty. You need: - 1 cup quinoa, rinsed and drained - 2 cups vegetable broth - 1 tablespoon olive oil - 1 small red onion, diced - 2 cloves garlic, minced - 1 red bell pepper, diced - 1 yellow bell pepper, diced - 1 can (15 oz) black beans, rinsed and drained - 1 can (15 oz) corn, drained - 1 can (14.5 oz) diced tomatoes with green chilies Quinoa is the star here. It cooks fluffy and adds protein. Vegetable broth gives it a savory base. Olive oil smooths everything out. Onions and garlic create a delicious aroma. The bell peppers add color and sweetness. Black beans bring extra protein and fiber. Corn adds a nice crunch. Lastly, the diced tomatoes add juiciness and zest. The right spices make this dish pop. You will use: - 1 tablespoon chili powder - 1 teaspoon cumin - 1 teaspoon smoked paprika - Salt and pepper to taste Chili powder gives heat and depth. Cumin adds a warm, earthy flavor. Smoked paprika brings a subtle smokiness. Salt and pepper enhance all the flavors. Mix these spices well to get a balanced taste in every bite. Garnishes make the meal look and taste even better. Use: - 1 avocado, sliced (for garnish) - Fresh cilantro, chopped (for garnish) - Lime wedges (for serving) Sliced avocado adds creaminess and healthy fats. Fresh cilantro gives a bright, fresh note. Lime wedges add zing when squeezed over the dish. Together, these garnishes make each serving feel special and fresh. Enjoy! {{ingredient_image_1}} 1. First, bring 2 cups of vegetable broth to a boil in a medium saucepan. 2. Once boiling, add 1 cup of rinsed quinoa. 3. Reduce the heat to low and cover the pot. 4. Let it cook for about 15 minutes. The quinoa will be fluffy when done. 1. While the quinoa cooks, heat 1 tablespoon of olive oil in a large skillet over medium heat. 2. Add 1 small diced red onion. Cook for 3 to 4 minutes until soft. 3. Next, add 2 cloves of minced garlic. Stir for 1 minute to avoid burning. 4. Now, toss in 1 diced red bell pepper and 1 diced yellow bell pepper. Sauté for 5 more minutes until they soften. 1. Once the veggies are ready, mix in the cooked quinoa. 2. Add 1 can of rinsed black beans, 1 can of drained corn, and 1 can of diced tomatoes with green chilies. 3. Sprinkle in 1 tablespoon of chili powder, 1 teaspoon of cumin, 1 teaspoon of smoked paprika, salt, and pepper to taste. 4. Stir everything well and heat through for about 5 to 7 minutes. Adjust the seasoning if needed. 5. Serve hot, garnished with avocado slices, fresh cilantro, and lime wedges on the side. To make quinoa great, start by rinsing it well. Rinsing removes bitter saponins. Place the quinoa in a fine mesh strainer. Rinse under cold water for about 2 minutes. This step makes your quinoa taste better. Cooking time is key. Use a 2:1 ratio of broth to quinoa. Bring the broth to a boil before adding quinoa. Reduce heat and cover. Cook for about 15 minutes. Check if it is fluffy and all liquid is gone. If needed, cook a few more minutes. Seasoning can make or break your dish. I recommend adjusting the chili powder to your taste. If you like heat, add more chili powder or some cayenne. You can also try adding a dash of hot sauce for extra kick. For deeper flavor, add some cumin and smoked paprika. These spices bring warmth and complexity. Don’t forget to taste as you go. Adjust salt and pepper to fit your needs. Serve your Tex Mex quinoa in a large bowl. It looks great with bright colors. Top each serving with sliced avocado and chopped cilantro. The green adds a nice pop to the dish. Lime wedges on the side are a must. They add freshness and zest when squeezed on top. You can also serve this dish in colorful bowls. It makes the meal feel special and fun. Pro Tips Perfectly Cooked Quinoa: To achieve fluffy quinoa, make sure to rinse it thoroughly before cooking to remove any bitterness from the saponins. This will enhance the flavor and texture. Veggie Variations: Feel free to customize the vegetables in this skillet. Zucchini, corn, or even spinach can be great additions for extra nutrition and flavor. Spice it Up: Adjust the spice levels according to your taste. If you prefer more heat, consider adding diced jalapeños or a pinch of cayenne pepper to the skillet. Meal Prep Friendly: This dish can be made ahead of time and stored in the refrigerator for up to 4 days. Reheat it quickly for a nutritious and satisfying meal. {{image_2}} You can easily boost this meal with protein. Adding chicken, shrimp, or tofu makes it heartier. If you choose chicken, cook it in the skillet before adding the vegetables. For shrimp, toss them in after the veggies soften. If you prefer tofu, make sure to press it first to remove excess water. Then, cube it and sauté it until golden. This adds a nice texture and taste. This dish is naturally vegetarian and can be made vegan by sticking to plant-based ingredients. Use vegetable broth, and skip any dairy garnishes. To make it vegan, add more beans or nuts for protein. You can also add roasted sweet potatoes for a sweet twist. Just make sure everything you use is dairy-free. Quinoa is great, but you can swap it for other grains too. Rice works well, especially brown rice for added fiber. Farro is another option that adds a chewy texture. If you want something different, try barley or bulgur wheat. Each grain gives a unique flavor and can change up this dish. Just adjust the cooking time based on the grain you select. To store leftovers of the Tex Mex Quinoa Skillet, let it cool first. Then, transfer it to an airtight container. This helps keep the dish fresh. You can store it in the fridge for up to four days. When you're ready to eat, just reheat it in the microwave or on the stove. For freezing, portion the skillet into smaller containers. Make sure you leave some space in each container. This space allows for expansion as the dish freezes. It’s best to consume it within three months for the best taste. When you want to enjoy it again, thaw it in the fridge overnight. Reheat it on the stove or in the microwave until hot. In the fridge, the Tex Mex Quinoa Skillet lasts about four days. If you freeze it, it can stay good for about three months. Always check for any off smells or changes in texture before eating. This ensures you enjoy a safe and tasty meal every time. Quinoa is a small, round seed that cooks like a grain. It is high in protein and fiber. It has all nine essential amino acids, making it a complete protein. Quinoa is also rich in vitamins and minerals, including magnesium, iron, and B vitamins. Here are key benefits: - Gluten-Free: Safe for those with gluten allergies. - High in Protein: Supports muscle growth and repair. - Rich in Fiber: Aids digestion and helps you feel full. - Low Glycemic Index: Helps maintain stable blood sugar levels. Eating quinoa can boost your health and add variety to meals. You can use it in salads, bowls, or as a side dish. Yes, you can prepare the Tex Mex quinoa skillet ahead of time. Meal prepping saves time and helps with healthy eating. Here are some tips: - Cook Quinoa in Advance: Make quinoa ahead and store it in the fridge for up to five days. - Sauté Veggies Early: You can cook the onion, garlic, and peppers and store them separately. - Combine Later: Mix the cooked quinoa, veggies, and beans when ready to eat. This dish reheats well, making it a great choice for busy days. Just warm it on the stove or in the microwave. If you don't have vegetable broth, don't worry! You can use many alternatives. Here are some great options: - Water: Simple and easy; just add extra spices for flavor. - Chicken Broth: Adds a richer taste if you are not vegetarian. - Bone Broth: A nutritious choice that adds depth to the flavor. - Homemade Broth: Simmer vegetable scraps with water for a fresh option. Feel free to use whatever you have on hand. Each choice will bring its own twist to the dish. This Tex Mex Quinoa Skillet combines wholesome ingredients and bold flavors. We covered main components like quinoa, beans, and spices that bring this dish to life. Helpful tips for cooking, enhancing flavor, and presentation can elevate your meal. Don't forget about variations to fit your diet, and easy storage tips for leftovers make this even better. It’s a fun, healthy option for any meal. Enjoy making this dish your own!

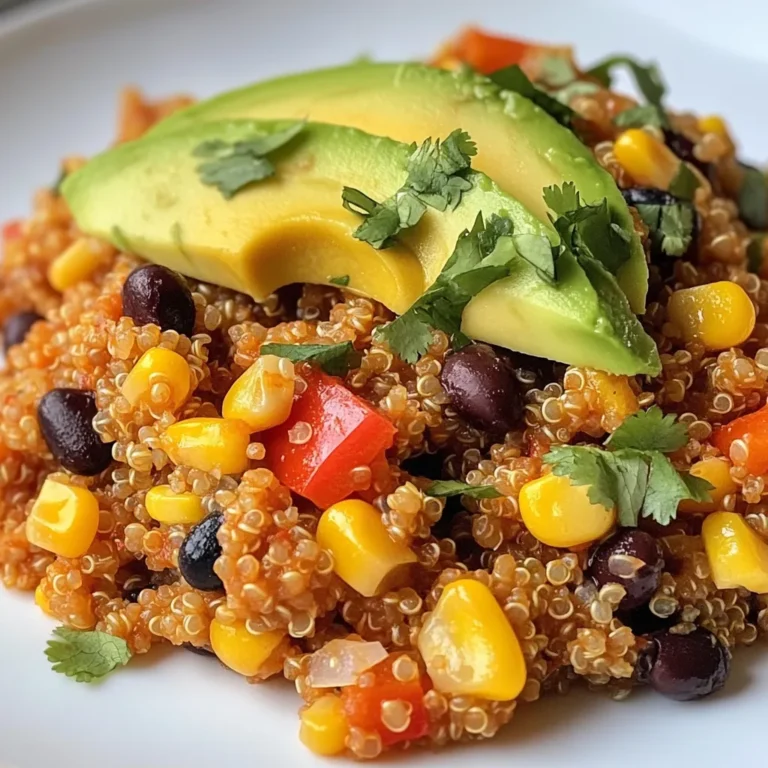
Tex Mex Quinoa Skillet Flavorful and Easy Meal

To make the best Caramelized Onion Swiss Burgers, you need a few key ingredients. Here’s what you’ll need: - Ground beef (80/20 blend) - Salt and pepper - Swiss cheese - Onions - Butter and olive oil - Burger buns - Dijon mustard (optional) - Toppings (arugula or lettuce) These ingredients come together to create a juicy and flavorful burger. The ground beef gives the patty its richness. The Swiss cheese adds a nice, creamy texture that melts beautifully. Onions, when caramelized, bring out a sweet flavor that pairs perfectly with the savory beef. Using butter and olive oil helps to caramelize the onions to a golden brown. The burger buns hold everything together and add a satisfying crunch when toasted. You can always add Dijon mustard for a little kick, but fresh arugula or lettuce adds a crisp bite. This list is simple but essential for that perfect burger experience. Make sure to gather everything before you start cooking. Having all your ingredients ready will make the process smoother and more fun! {{ingredient_image_1}} To start, set your skillet over medium heat. Add two tablespoons of butter and one tablespoon of olive oil. Let them melt together. Once melted, add two large onions, thinly sliced. Stir the onions every few minutes. This helps them cook evenly. Cook for about 20 to 25 minutes. You want them soft and golden brown. Lightly season with salt. This will bring out their natural sweetness. While the onions cook, it's time to prepare the patties. Take one pound of ground beef and divide it into four equal portions. Shape each portion gently into a patty, about three-quarters of an inch thick. Use your thumb to make a small indentation in the center of each patty. This keeps them flat while cooking. Season both sides with salt and pepper. Next, choose your cooking method. You can use a skillet or a grill. Heat it to medium-high. Add the burger patties and cook for about four to five minutes. Look for a nice browning on one side. Then, flip the patties over. After flipping, place a slice of Swiss cheese on each patty. It's best to cover the skillet with a lid. This helps the cheese melt quickly. Cook for another three to four minutes. Check the doneness to ensure it's to your liking. While the burgers cook, you can toast the buns. Use a separate skillet or place them under the broiler. Lightly toast until they are golden brown. Timing is key here, so keep an eye on them. You want them crisp but not burnt. Now it's time to build your burger. On the bottom half of each bun, spread a thin layer of Dijon mustard if you like. Place the cooked patty with melted Swiss cheese on top. Add a generous helping of caramelized onions next. If you want, layer fresh arugula or lettuce on top. Finally, place the other half of the bun on top. Enjoy your delicious creation! To make great caramelized onions, you need patience. Cook them low and slow. Start with medium heat. Let the onions soften and turn golden brown over about 20-25 minutes. Stir them occasionally. This helps them cook evenly. A pinch of salt brings out their sweetness. If you want more flavor, add a bit of balsamic vinegar or a sprinkle of sugar halfway through cooking. This boosts the taste even more. The choice of ground beef is key for your burger. I recommend using an 80/20 blend. This means 80% lean meat and 20% fat. This mix gives you juicy burgers. If you choose a leaner mix, like 90/10, your burger may dry out. The fat helps with flavor and moisture. Always season your beef with salt and pepper. This simple step adds great taste. Your burger can be as unique as you want! Try adding Dijon mustard for a tangy kick. Fresh arugula or lettuce adds a nice crunch. For grill marks, press down lightly on the patties while they cook. This gives that great outdoor grill look. You can also experiment with toppings like pickles, tomatoes, or even avocado. The choice is yours, so be creative! Pro Tips Perfect Patty Shape: Ensure your patties are slightly larger than the buns, as they will shrink while cooking. This helps avoid any burger-to-bun ratio issues! Onion Caramelization: Stir the onions occasionally but allow them to sit undisturbed for a few minutes at a time. This enhances their caramelization and deepens the flavor. Cheese Melting: Covering the skillet with a lid when adding cheese helps trap steam, ensuring it melts evenly over the burger. Flavor Boost: For an extra layer of flavor, consider adding a splash of balsamic vinegar to the caramelized onions towards the end of cooking. {{image_2}} You can change the cheese to suit your taste. Try Gouda for a smoky flavor. Cheddar adds a sharp bite, while blue cheese gives a tangy twist. Each cheese pairs well with toppings. For instance, Gouda complements crispy bacon. Cheddar works great with fresh tomatoes. Blue cheese adds depth to caramelized onions. If you want a lighter option, use ground turkey or chicken. They still taste great with caramelized onions. For a vegetarian choice, try black bean patties. Lentil patties also work well and have a hearty texture. Both options soak up flavors nicely. Get creative with your burger mix! Add spices like garlic powder or cumin to the meat. This gives your burgers a flavorful kick. For toppings, consider caramelized mushrooms for an earthy taste. Crispy bacon adds crunch and a savory element. Each twist makes your burger unique and fun! To keep your burger patties fresh, place them in a sealed container. Store them in the fridge for up to three days. For longer storage, you can freeze them. Wrap each patty in plastic wrap, then place them in a freezer bag. They will stay good for about three months. When you're ready to eat, just thaw them overnight in the fridge. Store your caramelized onions in an airtight container. They will stay fresh in the fridge for about a week. To keep the flavor strong, avoid keeping them near strong-smelling foods. When you're ready to use them, reheat them in a skillet over low heat. Stir occasionally until they warm through. If you have unopened burger buns, store them in a cool, dry place. Once opened, keep the buns in a sealed bag to avoid drying out. For day-old buns, you can toast them to bring back some crispness. Just place them in a skillet or under the broiler for a few minutes until golden. This adds great texture to your burgers! To check if your burger is done, use a meat thermometer. Insert it into the center of the patty. For beef, aim for 160°F for safety. You can also look at the burger's color. The juices should run clear, not pink. The meat should look brown on the outside. Press the patty gently; it should feel firm but springy. These steps will help you cook a safe and tasty burger. Yes, you can make caramelized onions ahead of time. Cook them and let them cool. Store them in an airtight container in the fridge. They will stay fresh for up to five days. When you're ready to use them, just reheat in a pan over medium heat. Add a splash of water or oil if they seem dry. This will bring back the sweet, rich flavor you love. Fries are a classic side that goes well with burgers. You can choose regular potato fries or sweet potato fries for a twist. Salads also make a great match. A simple green salad with vinaigrette or a creamy coleslaw can add freshness. For drinks, try a cold soda, iced tea, or a light beer. These beverages balance the rich flavors of the burger and keep the meal refreshing. Making a Caramelized Onion Swiss Burger is simple and fun. We covered the key ingredients, from juicy ground beef to the sweetness of caramelized onions. I shared easy steps to craft the perfect burger at home. Don’t forget the tips for customization and storage to keep meals fresh. Enjoy experimenting with different cheeses or toppings to find your favorite combination. With practice, you’ll impress your friends and family with delicious burgers every time. Keep these steps in mind, and have fun in the kitchen!

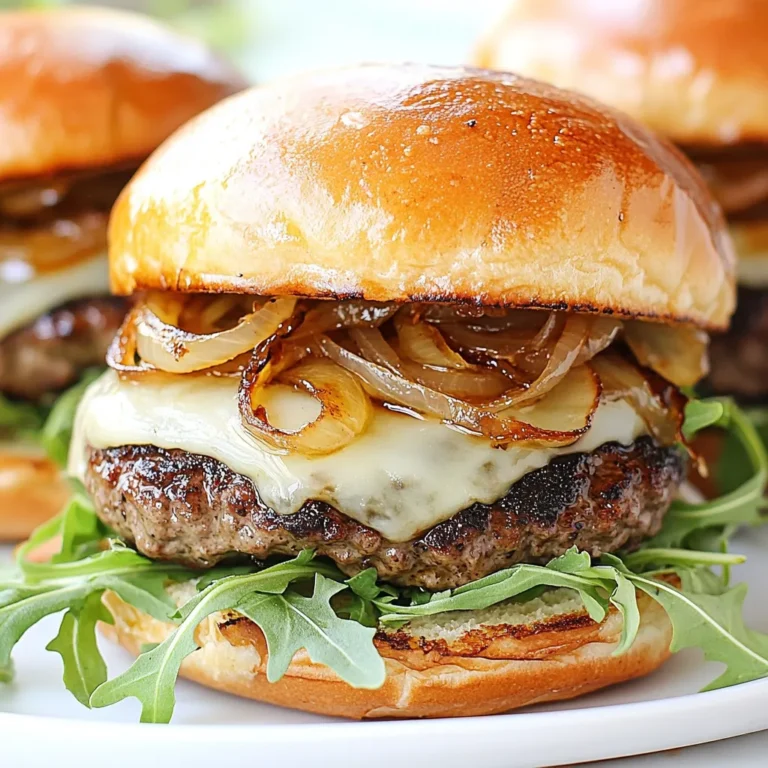
Caramelized Onion Swiss Burgers Juicy and Flavorful Treat

- 1 pound rotini pasta - 2 cups cooked chicken, shredded - 1 can (15 oz) white beans, drained and rinsed - 1 can (4 oz) diced green chilies To make White Chicken Chili Mac, you need a few key ingredients. The rotini pasta gives it a fun shape that holds sauce well. I love using shredded chicken for a hearty touch. White beans add creaminess and protein, while diced green chilies bring a nice kick. - 1 cup shredded Monterey Jack cheese - Fresh cilantro, chopped When serving, I recommend adding shredded Monterey Jack cheese. It melts beautifully and adds a rich flavor. Fresh cilantro brightens the dish and adds color, making it look as good as it tastes. - 1 tablespoon olive oil - 4 cups chicken broth - 1 cup heavy cream - Spices: 1 teaspoon ground cumin and 1 teaspoon chili powder In addition to the main ingredients, you need some cooking staples. Olive oil is perfect for sautéing. Chicken broth adds depth and flavor to the dish. Heavy cream creates that creamy texture we all love. Cumin and chili powder are essential for that warm, spicy flavor. {{ingredient_image_1}} First, fill a large pot with water and add salt. Bring the water to a boil. Once it is boiling, add 1 pound of rotini pasta. Cook the pasta until it is al dente, about 8 to 10 minutes. After cooking, drain the pasta and set it aside. Next, use the same pot and heat 1 tablespoon of olive oil over medium heat. Add a small onion, finely chopped. Sauté the onion until it becomes translucent, about 3 to 4 minutes. Then, stir in 2 cloves of minced garlic, 1 teaspoon of ground cumin, and 1 teaspoon of chili powder. Cook this mixture for about 1 minute until the spices smell nice and fragrant. Now, pour in 4 cups of chicken broth and bring it to a simmer. Add in 2 cups of cooked, shredded chicken, 1 can of drained white beans, and 1 can of diced green chilies. Stir everything together well. Lower the heat and mix in 1 cup of heavy cream. Let it warm through for about 3 to 4 minutes. Finally, add the cooked rotini pasta back into the pot and stir until it is well mixed. Season with salt and pepper to taste. Remove from heat and stir in 1 cup of shredded Monterey Jack cheese until it melts. Your creamy dish is ready to enjoy! To make your White Chicken Chili Mac shine, focus on the pasta first. Cook the rotini until it is al dente, which means it should have a slight bite. This texture holds up well when mixed with the other ingredients. After cooking, drain it and set it aside to keep it from overcooking. Next, keep the cream from separating. When you add the heavy cream, do so over low heat. Stir gently and watch the temperature. If it gets too hot, the cream can split, ruining your dish. To boost the flavor, think about adding spices. Smoked paprika or cayenne can add warmth. A pinch of oregano or thyme can also bring out the flavors of the chicken and beans. You can also switch up the cheese. Try pepper jack for some heat or a sharp cheddar for a bolder flavor. Each cheese offers a unique texture and flavor, enhancing your dish. Garnishing makes a big difference. Top your chili mac with fresh cilantro for a pop of green. You can also add a sprinkle of cheese right before serving. This adds flavor and makes the dish look inviting. Serve in colorful bowls to make the meal more appealing. Pro Tips Use Rotini for Texture: The twists and turns of rotini pasta hold onto the creamy sauce and chunks of chicken beautifully, providing a satisfying bite in every spoonful. Make it Spicier: If you enjoy a kick, consider adding some diced jalapeños or a splash of your favorite hot sauce when simmering the broth for an extra layer of heat. Substitute for a Lighter Option: For a lighter version, you can swap the heavy cream with half-and-half or a plant-based cream alternative, which still yields a creamy texture. Garnish Creatively: Fresh cilantro adds a burst of flavor, but feel free to mix it up with avocado slices, lime wedges, or even a sprinkle of tortilla strips for added crunch. {{image_2}} You can change the proteins in this dish. Ground turkey works well. If you want a vegetarian option, use beans instead of chicken. Great northern or cannellini beans add good texture. You can also switch up the pasta. While rotini is perfect, you can try elbow macaroni or even gluten-free pasta. Just cook according to package instructions. To make this dish vegetarian, swap chicken broth with vegetable broth. You can add extra beans for protein. Use coconut cream instead of heavy cream for a lighter option. If you like spice, add more chili powder. You can also use jalapeños for extra heat. For less spice, use mild green chilies or skip them altogether. White Chicken Chili Mac pairs great with a fresh salad. A simple green salad adds crunch. You can also serve it with cornbread for a cozy meal. For a fun twist, add tortilla chips on top. They add a nice crunch and flavor. You can garnish with extra cilantro for a fresh touch. To keep your White Chicken Chili Mac fresh, store it in an airtight container. This helps prevent drying out. Place it in the fridge within two hours of cooking. It stays good for about 3 to 4 days. Label the container with the date, so you know when it was made. When it’s time to enjoy your leftovers, you have a few options. The best way is to reheat it on the stove. Pour the chili mac into a pot over low heat. Stir it often to warm it evenly. If it looks thick, add a splash of chicken broth or cream to bring back its creamy texture. You can also use a microwave. Heat it in a bowl, covered with a damp paper towel. Stir halfway through to ensure it heats evenly. Yes, you can freeze White Chicken Chili Mac! It freezes well. Let it cool completely before packing it. Use a freezer-safe container or a heavy-duty freezer bag. Remove as much air as possible to avoid freezer burn. It can be frozen for up to 3 months. When ready to eat, thaw it in the fridge overnight and reheat as mentioned above. Enjoy the flavors again! Yes, you can make White Chicken Chili Mac in advance. This dish holds up well when stored. To store it, let it cool first. Place it in an airtight container. You can keep it in the fridge for up to three days. When you're ready to eat, reheat it gently on the stove. Add a splash of chicken broth to keep it creamy. If you want a lighter option, try using half-and-half. You can also use coconut milk for a dairy-free choice. Another option is Greek yogurt; just stir it in at the end to avoid curdling. Each substitute will give a different taste and texture, so choose what suits your needs. Leftovers of White Chicken Chili Mac last about three days in the fridge. Always store it in a tightly sealed container. If it starts to smell or look off, it's best to throw it away. Always check for any signs of spoilage before eating. This article covered how to make a tasty White Chicken Chili Mac. We explored each ingredient and the steps to cook it perfectly. You learned tips for storing leftovers and how to make the dish your own. In the end, this recipe is fun and versatile. With simple swaps, you can cater to different tastes. Enjoy making this comforting meal and share it with others. Your kitchen will smell amazing, and your family will love it!

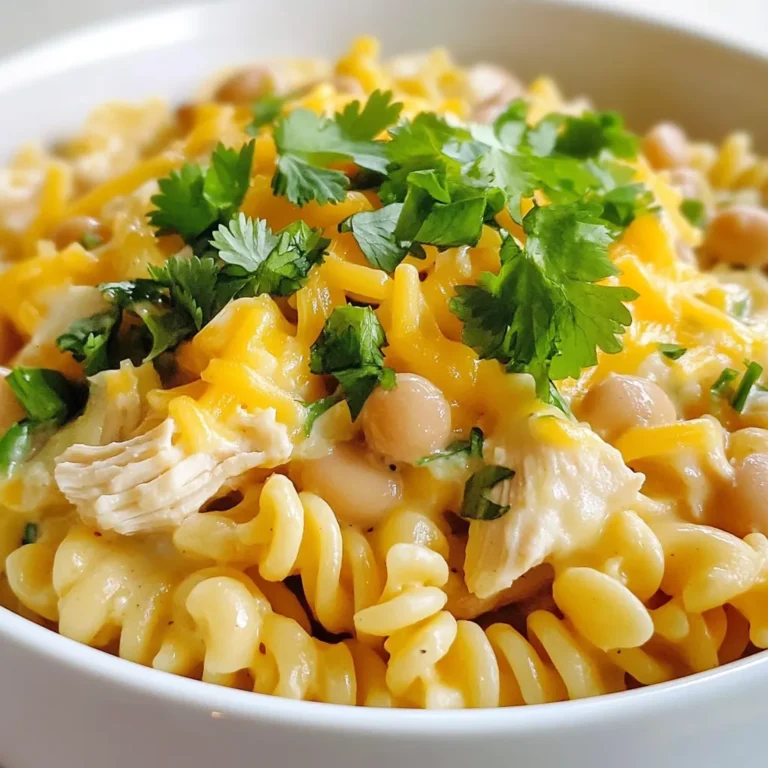
White Chicken Chili Mac Creamy and Flavorful Dish

PREV 1 … 50 51 52 NEXT
cozy citrus kitchen

explore

DessertsDinnerAppetizersDrinks

Our Policies

  • Cookie Policy
  • Copyright Policy
  • Disclaimer
  • GDPR Policy
  • Terms Of Use
Back to Top
  • About
  • Contact Us
  • Privacy Policy
© 2025 cozy citrus kitchen