FREE DINNER EBOOK! Get your copy!
  • Cookie Policy
  • GDPR Policy
  • Disclaimer
  • Terms Of Use
  • Visit my other site: Fun Cookie Recipes
cozy citrus kitchen
  • Home
  • Dinner
  • Desserts
  • Drinks
  • Appetizers
  • Contact
  • About
  • Privacy Policy
  • Home
  • Dinner
  • Desserts
  • Drinks
  • Appetizers
  • Contact
  • About
  • Privacy Policy
  • Cookie Policy
  • GDPR Policy
  • Disclaimer
  • Terms Of Use
Visit my other site: Fun Cookie Recipes

HOME / CATEGORIES /

Latest

- 2 tablespoons olive oil - 1 large onion, diced - 3 cloves garlic, minced - 1 red bell pepper, diced - 2 carrots, diced - 2 cans (15 oz each) black beans, rinsed and drained - 1 can (15 oz) diced tomatoes, with juices - 2 tablespoons chipotle in adobo sauce, chopped - 1 tablespoon ground cumin - 1 tablespoon chili powder - 1 teaspoon smoked paprika - 1 cup vegetable broth - Salt and black pepper to taste The base of this chili starts with olive oil. It helps cook the onions and adds flavor. Next, I use aromatic veggies like onion, garlic, red bell pepper, and carrots. They create a solid flavor foundation. Then, I add the star ingredients: black beans and diced tomatoes. The beans give protein, while the tomatoes add a juicy texture. Chipotle in adobo sauce brings a smoky kick. It’s spicy but not too hot. Ground cumin, chili powder, and smoked paprika build the chili's depth. Lastly, vegetable broth ties all the flavors together. - Fresh cilantro - Lime wedges Garnishes add freshness and brightness to the dish. I love using fresh cilantro for a herbal note. Lime wedges add a zesty touch. Squeezing lime over the chili transforms the flavor and balances the spice. - Large pot - Cooking utensils A large pot is a must for cooking this chili. It allows all the ingredients to mix well. Basic cooking tools like a spatula or wooden spoon help stir and serve the chili. These simple tools make the process easy and fun. {{ingredient_image_1}} 1. Heat the olive oil in a large pot over medium heat. 2. Add the diced onion and sauté for about 5 minutes. It should turn translucent. 3. Next, stir in the minced garlic, diced red bell pepper, and diced carrots. 4. Cook these for an extra 3 to 4 minutes. The veggies should soften but not brown. 1. Add the rinsed black beans and diced tomatoes with their juices to the pot. 2. Mix in the chopped chipotle in adobo sauce, ground cumin, chili powder, and smoked paprika. 3. Pour in the vegetable broth and stir everything well. 4. Bring the mixture to a boil and then reduce the heat to simmer. 5. Cover the pot and let the chili cook for 30 to 35 minutes. Stir it occasionally. 1. Taste the chili and add salt and black pepper as needed. 2. If you want it spicier, add more chipotle from the can. 3. Once the chili thickens and flavors meld together, remove it from heat. 4. Serve hot with fresh cilantro on top and lime wedges on the side for extra flavor. To make your chili pop, you can adjust the spice levels. Start with the chipotle in adobo sauce. If you like it spicy, add more. If you prefer less heat, use less. You can also add fresh herbs at the end. Chopped cilantro gives a nice touch and bright flavor. Sautéing is key to building flavor. Heat your olive oil first. Add the onion and garlic, and cook until soft. This step helps release the onion's sweetness. After adding other veggies, let them soften too. Letting the chili simmer is very important. It allows the flavors to mix well. Cover the pot and let it cook for 30 to 35 minutes. Stir it occasionally to prevent sticking. This chili is naturally vegan. To keep it gluten-free, make sure your broth fits this need. You can also swap in different beans. Kidney or pinto beans work well. If you'd like more heat, add extra chipotle. For a milder taste, reduce the amount of spice. Pro Tips Adjust the Spice Level: If you prefer a milder chili, start with less chipotle in adobo sauce and add more to taste as it cooks. Make it Ahead: This chili tastes even better the next day! Make a big batch and store it in the fridge for up to 5 days or freeze it for future meals. Add Extra Veggies: Feel free to toss in more vegetables like zucchini or corn for added nutrition and flavor. Serve with Toppings: Enhance the flavor by serving with toppings like avocado, sour cream, or shredded cheese for a creamy contrast. {{image_2}} You can switch beans for a new taste. Try kidney or pinto beans instead of black beans. They add a different texture and flavor. Adding veggies can also change your chili. Zucchini and corn are great options. They boost nutrition and color. Feel free to mix and match your favorites. You can play with flavors in your chili. If you want it smoky, use more smoked paprika. For heat, add more chipotle. You can also try different peppers. Jalapeños or serranos can bring in fresh spice. Adjust these to suit your taste and mood. Serve your chili in many fun ways. Pair it with rice or cornbread for a filling meal. These sides soak up all that tasty sauce. Creative toppings can make your bowl even better. Try avocado slices or shredded cheese. Fresh cilantro adds a nice touch too. Lime wedges bring a zesty kick that brightens every bite. Enjoy exploring these options! To store leftovers, let the chili cool first. Then transfer it to an airtight container. This keeps it fresh in the fridge. The shelf life of the chili is about 4 to 5 days. Always check for any off smells before eating. You can freeze the chili for later use. To freeze, let it cool completely. Then, portion it into freezer-safe bags or containers. This helps save space. When you want to eat it, thaw it in the fridge overnight. For quick thawing, use the microwave on the defrost setting. To reheat the chili, the best methods are the stovetop or microwave. If using the stovetop, heat it gently in a pot over low heat. Stir often to prevent sticking. If it's too thick, add a splash of water or broth. In the microwave, heat in short bursts, stirring in between. Adjust the consistency if needed by adding liquid. Enjoy your warm, tasty chili! You can enjoy many tasty sides with Chipotle Black Bean Chili. Here are some ideas: - Cornbread: Soft and sweet, this bread pairs well with chili. - Rice: Serve white or brown rice to soak up the flavors. - Avocado: Creamy avocado adds a nice touch. - Sour cream: A dollop cools the heat. - Fresh cilantro: Sprinkle on top for added flavor. - Lime wedges: Squeeze over the chili for a fresh burst. These sides and toppings make your meal fun and delicious! If you want more heat, you can try these tips: - Add more chipotle in adobo sauce. Start with a teaspoon and adjust to taste. - Use fresh jalapeños or serrano peppers. Dice them and stir into the chili. - Sprinkle in cayenne pepper for extra spice. A little goes a long way! - Serve with hot sauce on the side. Let everyone decide their spice level. Adjusting spice is easy. Just taste and tweak until it's perfect for you! Yes, using canned beans is a great option! Here are the benefits: - Time-saving: Canned beans are quick and ready to use. - Consistent texture: They cook evenly and add creaminess to the chili. - Easy to find: Canned beans are available in most stores. - No soaking needed: You can skip the long soak time required for dried beans. Using canned beans makes this recipe even easier and still very tasty! This blog post covered the essential ingredients and steps to create a flavorful Chipotle Black Bean Chili. We explored how to sauté veggies, balance spices, and enhance flavors. I shared tips for dietary needs and fun variations to try. Remember, this chili is all about creativity and personal taste. Whether you like it smoky or spicy, there’s a way to make it your own. Enjoy your cooking, and share your chili journey with others!

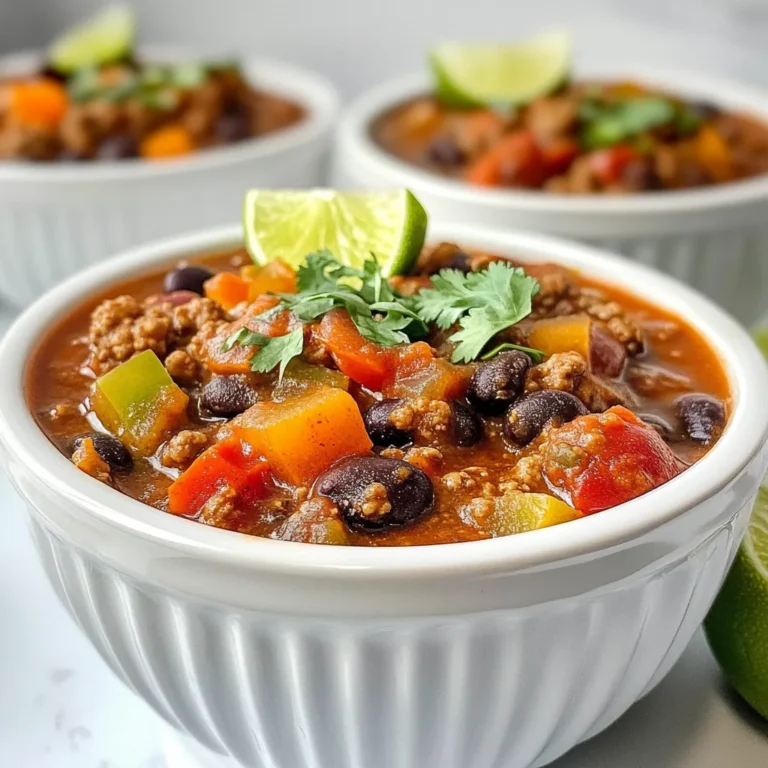
Chipotle Black Bean Chili Tasty and Easy Recipe

- 4 slices of thick bread (brioche or challah) - 2 ripe bananas, sliced - 2 large eggs - 1/2 cup whole milk - 1 tablespoon brown sugar - 1 teaspoon vanilla extract - 1 teaspoon ground cinnamon - 1 tablespoon unsalted butter - Maple syrup for serving - Fresh mint leaves for garnish (optional) To make Caramelized Banana French Toast, you need a few simple ingredients. First, choose thick bread, like brioche or challah. These types soak up the egg mixture well and add flavor. You will also need ripe bananas. They should be sweet and soft for the best results. Next, gather your eggs, whole milk, brown sugar, vanilla extract, and ground cinnamon. These ingredients create a rich and tasty batter. The brown sugar adds sweetness, while vanilla and cinnamon give a warm flavor. You’ll also need unsalted butter for cooking. It adds a nice richness to the toast. Finally, have maple syrup ready for drizzling on top. Fresh mint leaves make a lovely garnish, but they are optional. With these ingredients, you can create a delightful and tasty breakfast treat that everyone will enjoy! {{ingredient_image_1}} In a medium bowl, I start by whisking together 2 large eggs, 1/2 cup whole milk, 1 tablespoon brown sugar, 1 teaspoon vanilla extract, and 1 teaspoon ground cinnamon. I mix until fully blended. This mixture creates a rich and flavorful base for the toast. Next, I heat a large non-stick skillet over medium heat. I add 1/2 tablespoon of unsalted butter, letting it melt and coat the skillet. I dip each slice of thick bread, like brioche or challah, into the egg mixture. I make sure both sides are coated well. After the excess drips off, I place the bread on the skillet. I cook the slices for about 3-4 minutes on each side until they turn golden brown and are cooked through. Once done, I remove the French toast from the skillet and keep it warm. In the same skillet, I add the remaining butter and 2 sliced ripe bananas. I let them cook for about 2-3 minutes. I watch closely as they caramelize, turning golden brown and becoming tender. The smell is amazing, and the bananas add a sweet touch to the dish. For the best Caramelized Banana French Toast, pick thick slices of bread. Brioche and challah are top choices. Brioche is soft and buttery, while challah has a slightly sweet taste. Both absorb the egg mixture well, leading to a perfect texture. If you want a crispier bite, try a sturdy sourdough or whole-grain bread. To caramelize bananas correctly, start with ripe bananas. They should have some brown spots. This means they are sweet and soft. Cut the bananas into even slices. Heat your skillet to medium, and add butter until it melts. Place the banana slices in the skillet without crowding them. Cook for about two to three minutes. You want them golden brown and tender. Don’t rush this step; the longer they cook, the sweeter they get. When serving Caramelized Banana French Toast, think about toppings. Maple syrup is a must; it adds sweetness that pairs well. You can also sprinkle some chopped nuts for crunch. Fresh berries, like strawberries or blueberries, add color and flavor. A dollop of whipped cream can make it feel extra special. For a pop of color, add fresh mint leaves as a garnish. Pro Tips Choose the Right Bread: Use thick slices of brioche or challah for a rich and fluffy texture that holds the egg mixture well. Perfectly Caramelized Bananas: Allow the bananas to cook undisturbed for the first minute to achieve a nice golden color before gently flipping them. Keep it Warm: After cooking, place the french toast on a baking sheet in a warm oven (around 200°F) to keep it warm while you cook the rest. Enhance Flavor: Add a pinch of nutmeg to the egg mixture for an extra layer of warmth and spice that complements the bananas beautifully. {{image_2}} You can make your Caramelized Banana French Toast even more fun. Try adding nuts or chocolate! Chopped walnuts or pecans add a nice crunch. You can also sprinkle chocolate chips on top of your caramelized bananas. The heat will melt them, making your dish extra tasty. Another great idea is to use flavored syrups or sauces. Instead of maple syrup, try caramel or chocolate sauce. You could even use fruit syrups, like strawberry or raspberry. These flavors will change your French toast into a new treat. If you need gluten-free options, use gluten-free bread. Look for brands that suit your taste. You can still enjoy the same great flavor and texture with the right bread. For vegan alternatives, swap the eggs and milk. Use flaxseed meal mixed with water as an egg substitute. Almond milk or oat milk works well instead of dairy milk. You can still achieve that creamy goodness without animal products. You can serve this dish in fun ways. One idea is to make a breakfast casserole. Layer the bread, egg mixture, and caramelized bananas in a baking dish. Bake it until it's set and golden. This way, you can feed a crowd easily. If you want a twist, serve it as dessert. Use a scoop of ice cream on top of the warm French toast. Drizzle with chocolate or caramel sauce for a sweet finish. This makes it a fun treat for any time of day! To keep your Caramelized Banana French Toast fresh, store it in the fridge. First, let it cool down to room temperature. Then, place the slices in an airtight container. If you want to freeze it, wrap each slice in plastic wrap. Then, place them in a freezer bag. This way, you can enjoy this treat later! When you want to eat leftover French toast, reheating it right is key. For the best texture, use a skillet. Heat it on medium-low heat. Add a tiny bit of butter to the pan. Place the slices in and warm for a few minutes on each side. This method keeps the toast soft and tasty. In the fridge, Caramelized Banana French Toast lasts about 3 to 4 days. If you freeze it, it can last up to 2 months. Just remember, the sooner you eat it, the better it tastes! Yes, you can prep this recipe ahead of time. Here are some tips: - Prepare the egg mixture: Whisk together the eggs, milk, brown sugar, vanilla, and cinnamon. Store it in the fridge for up to 24 hours. - Slice the bread: Cut your bread into thick slices. Keep them in an airtight container to prevent them from drying out. - Caramelized bananas: Cook the bananas just before serving. They taste best fresh. Reheating French Toast can be easy. Here are methods to keep it tasty: - Oven method: Preheat the oven to 350°F (175°C). Place the French Toast on a baking sheet. Heat for 10-15 minutes. - Skillet method: Heat a non-stick skillet over low heat. Add a little butter and warm each slice for about 2-3 minutes per side. - Microwave method: Place on a microwave-safe plate. Heat for 15-20 seconds at a time. This may make it soft but is quick. You can easily boost the nutrition of this dish. Try these ideas: - Whole grain bread: Swap regular bread for whole grain or whole wheat bread. - Add fruit: Toss in some berries or nuts for more fiber and vitamins. - Use low-fat milk: Substitute whole milk with low-fat or almond milk. - Reduce sugar: Cut down on brown sugar or use a natural sweetener like honey or maple syrup. Caramelized Banana French Toast is a delicious treat made with simple ingredients. You can combine ripe bananas with thick slices of bread for a special breakfast. Follow the steps to whisk the egg mixture, cook the bread, and caramelize the bananas. Choose the right bread for the best flavor and try different toppings. Store any leftovers properly for later enjoyment. This dish is not just for breakfast; it can be a great dessert, too. Get creative with flavors and enjoy this delightful meal at any time!

Caramelized Banana French Toast Delightful Morning Treat

- 1 cup Greek yogurt (plain, low-fat) - 1 cup cream cheese (softened, low-fat) - 3 tablespoons honey or maple syrup - 1 teaspoon vanilla extract - 2 cups mixed berries (strawberries, blueberries, raspberries) - 1 cup granola (preferably nutty or berry-flavored) These ingredients create a creamy and tasty treat. The Greek yogurt adds protein, while the cream cheese gives it that rich texture. Honey or maple syrup provides sweetness. The mixed berries bring freshness and flavor, and granola adds a nice crunch. - Fresh mint leaves for garnish - Additional sweeteners like agave syrup - Different types of nuts for added crunch You can change this recipe to fit your taste. If you want a fresh touch, add mint leaves. If you like it sweeter, try agave syrup instead. Swap granola for nuts for a unique twist. - Calories: About 150 per serving - Protein: Roughly 8 grams - Carbohydrates: Around 20 grams - Fat: Approximately 6 grams - Fiber: About 2 grams This dessert is not only delicious but also healthy. Each serving packs protein and fiber, which keep you full. The mix of berries adds vitamins and antioxidants, making this parfait a smart choice for a sweet treat. {{ingredient_image_1}} Start by gathering your ingredients. You need Greek yogurt, cream cheese, honey (or maple syrup), and vanilla extract. In a mixing bowl, combine the softened cream cheese and Greek yogurt. Use a whisk to blend them well. Add honey or maple syrup next. This sweetens your mixture. Finally, add the vanilla extract. Mix until your cheesecake mixture is smooth and creamy. Make sure there are no lumps. This creamy base is key to the whole parfait. Now it’s time to build your parfaits. Grab some clear glasses or jars. Start by adding a spoonful of your creamy cheesecake mixture at the bottom of each glass. Next, layer in the mixed berries. Use strawberries, blueberries, and raspberries for color and taste. After the berries, sprinkle a layer of granola on top. This adds a nice crunch. Repeat these layers until you fill the glasses. Finish with a layer of berries on top for a pretty look. To let the flavors blend, cover the parfaits with plastic wrap. Place them in the fridge for at least 30 minutes. This chilling step is important. It helps the flavors meld into a tasty treat. When you are ready to serve, take them out of the fridge. For a bright touch, add fresh mint leaves on top. This makes your parfaits look fancy and adds extra flavor too. Enjoy your delicious and healthy berry protein cheesecake parfaits! To make your cheesecake mixture smooth, start with softened cream cheese. If you use cold cream cheese, it may clump. Mix the cream cheese, Greek yogurt, honey, and vanilla extract in a bowl. Whisk until there are no lumps. A hand mixer can help if you want it super smooth. The perfect texture is creamy and light, which makes each bite delightful. You can play with flavors to make this parfait your own. Try adding a splash of lemon juice for zest. You could also use almond extract instead of vanilla for a nutty twist. For a berry burst, blend some berries into the cheesecake mixture. This adds both flavor and color, making it even more fun to eat. Pair your parfait with fresh mint leaves. They add a nice touch of flavor and color. Serve your parfaits in clear glasses to show off the layers. You can also add a drizzle of honey on top for extra sweetness. If you want a crunch, serve with extra granola on the side. These tips help make your dessert look great and taste even better! Pro Tips Make It Lighter: For a lighter version, use low-fat cream cheese and Greek yogurt as specified. You can also substitute honey with unsweetened applesauce. Berry Variations: Feel free to mix and match your favorite berries. Blackberries and cherries also work beautifully in this parfait. Layering Technique: To create visually appealing layers, use a piping bag to add the cheesecake mixture for cleaner lines between layers. Make Ahead: These parfaits can be prepared a day in advance. Just layer and refrigerate, then garnish with mint right before serving. {{image_2}} You can mix and match berries for your parfaits. Strawberries, blueberries, and raspberries work well together. You can also use blackberries or cherries for a fun twist. Each berry brings its own flavor and color. This makes your parfaits look and taste amazing. Try different combinations to find your favorite mix. You can swap honey or maple syrup for other sweeteners. Stevia gives a sweet taste without extra calories. Agave syrup offers a mild flavor and is easy to use. Keep in mind that different sweeteners can change the taste. Always taste the mixture as you go. Adjust the sweetness to fit your liking. If you want a dairy-free or vegan parfait, there are great options. Use dairy-free cream cheese and yogurt made from nuts or soy. You can also try coconut yogurt for a tropical twist. Make sure to check labels for added sugars. This way, you enjoy a yummy dessert that fits your diet. To keep your Berry Protein Cheesecake Parfaits fresh, store them in the fridge. Use airtight containers or cover them tightly with plastic wrap. This helps keep moisture in and prevents any odors from spoiling the taste. Make sure to layer them carefully so they don’t mix or spill. If you plan to serve them later, wait to add the granola until just before serving. This keeps it crunchy. Your parfaits will last about 2 to 3 days in the fridge. After that, the berries may get mushy, and the granola will lose its crunch. If you notice any changes in smell or color, it’s best to toss them. Always check before you eat! You can freeze these parfaits, but it requires some care. Freeze them in single-serving containers. Skip the granola when you freeze. Add it right before you eat. Thaw the parfaits in the fridge overnight before serving. They can last about 2 months in the freezer. However, the texture may change slightly when thawed, so keep that in mind. Yes, you can make these parfaits ahead of time. In fact, making them a few hours or even a day in advance helps the flavors blend nicely. Just follow the steps to layer the parfaits, then cover them with plastic wrap. Store them in the fridge until you are ready to serve. This makes it easy to enjoy a delicious dessert anytime. The best way to layer the parfaits is to start with the cheesecake mixture. Spoon a generous amount into the bottom of your glass. Next, add a layer of mixed berries. I like to use a mix of strawberries, blueberries, and raspberries for color. Then, sprinkle a layer of granola for crunch. Repeat these layers until you reach the top of the glass. Finish with a layer of berries. This method looks great and tastes amazing! To make these parfaits lower in calories, swap out cream cheese for a lower-fat version. You can also use a sugar-free sweetener instead of honey or maple syrup. Choosing a lighter granola or using less of it will help too. You can even use Greek yogurt that is fat-free. These small changes keep the dessert tasty while reducing calories. This blog post covered how to make creamy cheesecake parfaits step by step. You learned about key ingredients, tips for perfect texture, and various flavor options. We also discussed storage best practices and answered common questions. These parfaits are simple and fun to make. I encourage you to try different flavors and share your creations. Enjoy your delicious treats and impress your friends!

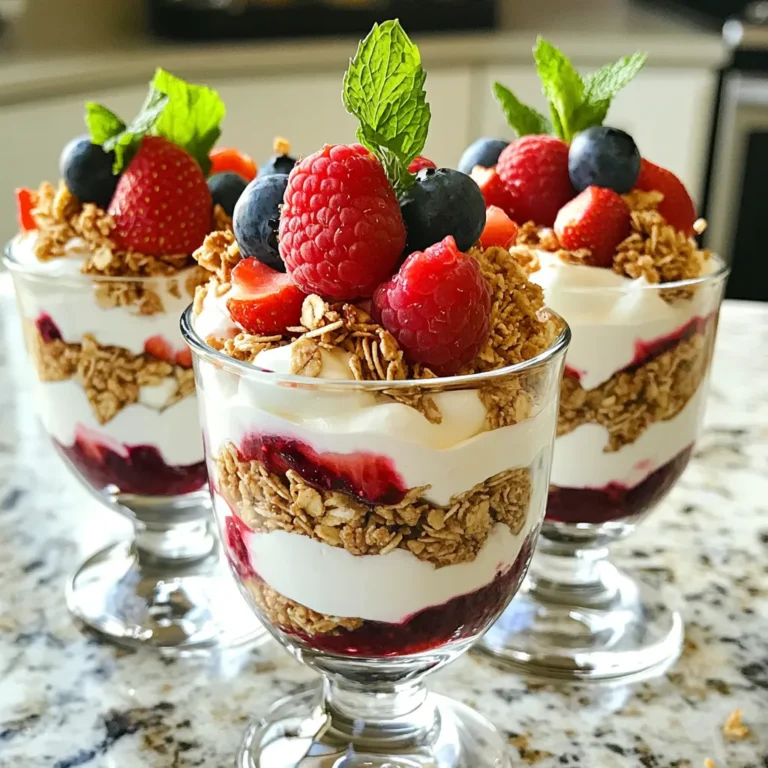
Berry Protein Cheesecake Parfaits Healthy Dessert Idea

For Greek Chicken Souvlaki Bowls, you need fresh and tasty ingredients. Here’s what you will need: - 1 lb boneless, skinless chicken thighs, cut into 1-inch cubes - 1 cup cooked quinoa or rice - 1 cup cherry tomatoes, halved - 1 cucumber, diced - 1/2 red onion, thinly sliced - 1/2 cup Kalamata olives, pitted and quartered - 1 cup Tzatziki sauce (store-bought or homemade) - Fresh parsley, chopped (for garnish) These items create a colorful and healthy base for your bowl. The marinade is key for flavor. Here’s what goes into it: - 3 tablespoons olive oil - Juice of 1 lemon - 3 cloves garlic, minced - 1 tablespoon dried oregano - Salt and pepper to taste This mix makes the chicken tender and full of flavor. The lemon and garlic add a nice zing that pairs well with the other fresh ingredients. To make your bowls even better, consider these add-ins: - Feta cheese, crumbled - Pita bread on the side - Extra veggies like bell peppers or spinach These options give you more flavor and texture. They also allow you to customize your dish to your liking. Enjoy mixing and matching to find your favorite version! {{ingredient_image_1}} To start, you need to create the marinade. In a large bowl, mix together these ingredients: - 3 tablespoons olive oil - Juice of 1 lemon - 3 cloves garlic, minced - 1 tablespoon dried oregano - Salt and pepper to taste This mixture adds flavor and keeps the chicken tender. Cut 1 pound of boneless, skinless chicken thighs into 1-inch cubes. Add the chicken to the marinade and stir well. Cover the bowl with plastic wrap. Let it sit in the fridge for at least 30 minutes, or up to 2 hours. The longer it marinates, the better the flavor. Next, it’s time to grill the chicken. Preheat your grill or grill pan over medium-high heat. Once hot, place the marinated chicken pieces in a single layer. Grill for about 10 to 15 minutes. Turn them occasionally. You want nice grill marks and the chicken should be cooked through. Check that the internal temperature reaches 165°F (75°C). Once done, remove the chicken and let it rest for a few minutes. Now, it’s time to build your bowls. Start with 1 cup of cooked quinoa or rice at the bottom of each bowl. Top it with the grilled chicken. Then, add: - 1 cup cherry tomatoes, halved - 1 cucumber, diced - 1/2 red onion, thinly sliced - 1/2 cup Kalamata olives, pitted and quartered Finally, drizzle 1 cup of Tzatziki sauce over everything. For a finishing touch, garnish with chopped fresh parsley. This adds color and a burst of flavor. Enjoy your Greek Chicken Souvlaki Bowls! To make a great marinade, start with good ingredients. Use fresh lemon juice, olive oil, and minced garlic. These flavors will soak into the chicken well. Mix them in a bowl with dried oregano, salt, and pepper. This mix is key to tasty chicken. Let it sit for at least 30 minutes. For even better taste, marinate it for up to 2 hours. Grilling chicken can be tricky. To keep it moist, do not overcook it. Grill the chicken for about 10-15 minutes. Turn the pieces often to get nice grill marks. The chicken is done when it reaches 165°F (75°C). Let the chicken rest for a few minutes after grilling. This helps the juices stay inside, making it tender and juicy. A beautiful bowl makes the meal more inviting. Start by placing cooked quinoa or rice at the bottom. Then, layer the grilled chicken on top. Add cherry tomatoes, diced cucumber, and sliced red onion. Don’t forget the Kalamata olives! Drizzle the Tzatziki sauce on top. For an extra touch, sprinkle some chopped parsley. You can also serve warm pita bread on the side. A little crumbled feta cheese can make it even better! Pro Tips Marinate Longer for Flavor: For the best flavor, marinate the chicken for at least 2 hours. This allows the spices and lemon to penetrate the meat effectively. Use a Meat Thermometer: Ensure your chicken is perfectly cooked by using a meat thermometer. The internal temperature should reach 165°F (75°C) for safe consumption. Customize Your Toppings: Feel free to mix and match toppings according to your preference. Adding ingredients like roasted red peppers or feta cheese can enhance the flavor profile. Presentation Matters: Serve the bowls in colorful dishes and arrange the ingredients in sections. This not only looks appealing but also allows guests to choose their favorite components. {{image_2}} You can easily make these bowls vegetarian or vegan. Instead of chicken, use cubed tofu or tempeh. Marinate them just like the chicken for great flavor. Grilling or pan-frying gives them a nice texture. You can also add hearty vegetables like bell peppers or zucchini. These add color and crunch to your meal. If you prefer other proteins, try shrimp or lamb. Marinate shrimp the same way as chicken. Grill them quickly for about 3-5 minutes. Lamb has rich flavors that pair well with the marinade. You can also use beef for a heartier option. Just adjust the cooking time based on the meat you choose. Experiment with different marinades for unique tastes. A yogurt-based marinade gives a creamy texture. You can mix yogurt, garlic, and spices like cumin or paprika. For a spicy twist, add chili flakes or harissa. Each marinade will change the flavor and make your bowl fun and fresh! After enjoying your Greek Chicken Souvlaki Bowls, you may have some leftovers. Store them in an airtight container. Keep the chicken, veggies, and sauce separate if possible. This keeps everything fresh and tasty. Leftovers will last in the fridge for about three days. To reheat your chicken, warm it in a pan over medium heat. This keeps it juicy and flavorful. You can also use the microwave. If using a microwave, cover the bowl with a lid or paper towel. Heat for 1-2 minutes or until hot. For the veggies, a quick sauté will do the trick. If you want to freeze your Greek Chicken Souvlaki Bowls, it’s best to freeze the chicken and quinoa or rice separately. Place them in freezer bags, removing as much air as possible. They can last up to three months in the freezer. When ready to eat, thaw in the fridge overnight. Reheat as mentioned before for a quick meal. To make Tzatziki sauce, you need a few simple ingredients. Start with 1 cup of plain yogurt. Add 1 cup of grated cucumber, which you should squeeze to remove excess water. Mix in 2 cloves of minced garlic, 1 tablespoon of olive oil, and 1 tablespoon of lemon juice. Season with salt and pepper to taste. Stir well and chill for about 30 minutes. This sauce is cool and refreshing, perfect for your Greek Chicken Souvlaki Bowls. Yes, you can use chicken breast instead of thighs. Chicken breast is leaner but can dry out faster. If you choose this option, cook the chicken carefully. Cut the breast into 1-inch cubes and marinate as directed. Grill until the internal temperature reaches 165°F (75°C). Keep an eye on the cooking time. Chicken breast often cooks quicker, so adjust as needed. Greek Chicken Souvlaki Bowls pair well with several sides. Consider serving warm pita bread or a Greek salad with feta cheese. You can also add roasted vegetables for extra flavor. If you want more protein, serve with hummus or a side of lentils. These additions will make your meal more filling and delicious. Greek chicken souvlaki bowls are tasty and easy to make. We covered the key ingredients, like chicken and marinade. You learned the steps to marinate and grill the chicken and assemble the bowls. I shared tips to keep the chicken moist and make your dish look great. You can even try vegetarian options or different proteins to mix it up. Remember to store and reheat leftovers wisely. Now, enjoy creating your tasty bowls and impress your friends!

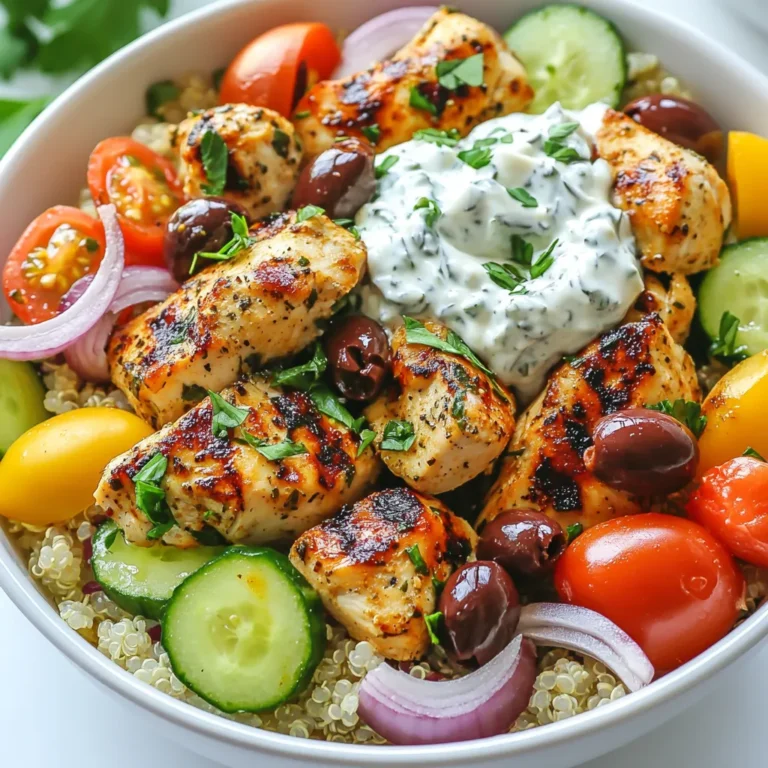
Greek Chicken Souvlaki Bowls Flavorful and Easy Meal

- Essential ingredients for Creamy Lemon Garlic Ramen - 2 packs of instant ramen noodles - 4 cups vegetable broth - 1 cup coconut milk - 4 cloves garlic, minced - 1 tablespoon olive oil - 2 tablespoons soy sauce - 2 tablespoons fresh lemon juice - 1 tablespoon lemon zest - 1 teaspoon ginger paste - Salt and pepper to taste - 1 cup baby spinach - 1/2 cup sliced mushrooms - 1/4 cup chopped green onions (for garnish) These ingredients create a rich, creamy broth that bursts with flavor. The garlic and ginger give it a warm and cozy taste. The lemon juice and zest add a bright kick that truly makes this dish shine. - Optional ingredients and garnishes - Chili flakes (optional, for extra heat) If you like spice, add chili flakes. They add a nice warmth without overpowering the dish. - Ingredient substitutions for dietary needs - You can swap coconut milk for almond milk for a lighter option. - Use gluten-free soy sauce if you need a gluten-free meal. - For added protein, consider adding tofu or a cooked protein of your choice. These swaps keep the dish delicious and friendly for different diets. Adjust as needed to fit your tastes and needs. {{ingredient_image_1}} To make Creamy Lemon Garlic Ramen, follow these simple steps: 1. Sauté garlic and ginger (2 minutes) 2. Cook mushrooms (4 minutes) 3. Add broth and simmer (5 minutes) 4. Cook noodles (3-4 minutes) 5. Add spinach and season (1 minute) This process takes about 20 minutes in total. It’s quick and rewarding! 1. Sautéing garlic and ginger: Start by heating 1 tablespoon of olive oil in a large pot over medium heat. Once the oil is hot, add 4 cloves of minced garlic and 1 teaspoon of ginger paste. Cook for about 1-2 minutes until fragrant. This step builds a great flavor base. 2. Cooking mushrooms and adding broth: Next, add 1/2 cup of sliced mushrooms to the pot. Cook these for about 3-4 minutes until they become soft. Then, pour in 4 cups of vegetable broth and bring it to a gentle boil. This adds depth to your ramen. 3. Incorporating noodles and spinach: Once the broth is boiling, stir in 1 cup of coconut milk, 2 tablespoons of soy sauce, 2 tablespoons of fresh lemon juice, and 1 tablespoon of lemon zest. Let this simmer for about 5 minutes. Then, add the 2 packs of instant ramen noodles. Cook them according to the package instructions, usually 3-4 minutes. Before finishing, stir in 1 cup of baby spinach and let it wilt. Taste your ramen and season with salt and pepper as needed. Now, your delicious Creamy Lemon Garlic Ramen is ready to serve! To cook instant ramen well, start with the right broth. Use vegetable broth for a rich base. Bring it to a gentle boil before adding your noodles. This helps the noodles cook evenly. Follow the package instructions for timing. It usually takes about 3 to 4 minutes. Stir gently to avoid clumping. For creaminess, coconut milk is key. It adds a silky texture without overpowering the flavors. Stir it in after the broth boils. Let it simmer for a few minutes to blend well. This creates a creamy and smooth broth that enhances the dish. To deepen the flavors, consider adding spices. A pinch of chili flakes can bring heat. You might also try a dash of garlic powder or dried herbs. These small additions can elevate your ramen experience. Toppings make your ramen even better. I recommend fresh green onions for crunch. You can also add sesame seeds for a nutty flavor. Feel free to explore other toppings like sliced radishes or a soft-boiled egg for extra richness. If you want a vegan option, replace the vegetable broth with a homemade version. Use water and fresh veggies like carrots and celery. This keeps the dish light yet flavorful. For gluten-free ramen, look for rice noodles or gluten-free instant ramen. Always check labels to ensure they meet your needs. Pro Tips Use Fresh Ingredients: Fresh garlic, ginger, and spinach enhance the flavor significantly compared to dried alternatives. Adjust the Creaminess: For a richer taste, add more coconut milk or a splash of heavy cream if desired. Customize Your Veggies: Feel free to add other vegetables like bell peppers or bok choy to increase nutritional value and texture. Make it Spicy: Add more chili flakes or a dash of sriracha to bring some heat to the dish! {{image_2}} You can easily change up the protein in your ramen. Tofu, chicken, and shrimp all work well. If you choose tofu, use firm tofu for the best texture. Just cut it into cubes and add it when you add the mushrooms. For chicken, use cooked, shredded chicken. This saves time. If you prefer shrimp, add them in the last few minutes of cooking. They cook fast and will add a nice touch. If you want to change the flavor, try using different citrus. Lime or orange juice can add a unique twist. You can also boost the umami flavor. Miso paste or a splash of fish sauce works wonders. Adding these ingredients can make your dish even more exciting and rich in taste. Fresh vegetables can brighten your ramen. Use seasonal veggies like peas, carrots, or bok choy. You can add them with the mushrooms to cook them just right. For a crunchy texture, add bean sprouts right before serving. This makes the dish vibrant and full of life. Don’t be afraid to mix and match your favorites! To keep your creamy lemon garlic ramen fresh, store it in an airtight container. Place it in the fridge within two hours of cooking. This helps to prevent bacteria growth. Your ramen can last up to three days in the refrigerator. When reheating ramen, do it gently. Pour the ramen into a pot and add a splash of vegetable broth or coconut milk. Heat it over low to medium heat, stirring often. This keeps the creaminess intact. Avoid high heat, as it can make the broth too thick or separate. You can freeze creamy lemon garlic ramen, but with a few notes. The noodles may become mushy after freezing. If you want to freeze, store the broth and noodles separately. Use freezer-safe containers and label them. This way, you can enjoy your ramen later without losing its charm. Can I use regular ramen noodles instead of instant? Yes, you can use regular ramen noodles. Just cook them according to the package. Instant noodles cook faster, so adjust your timing for regular noodles. How can I make this dish spicier? To add heat, sprinkle chili flakes into the broth while cooking. You can also add sliced jalapeños or a dash of hot sauce before serving. Remember, start small and taste as you go! Is it possible to make this ramen in advance? You can prepare the broth and veggies ahead of time. Store them in the fridge. When ready to eat, just cook the noodles and heat the broth. This keeps everything fresh and flavorful. What is the calorie count per serving? This recipe has about 300-350 calories per serving. It varies based on your ingredients. Check the labels on your broth and coconut milk for precise counts. How does it fit into a balanced diet? This ramen offers a good mix of carbs, healthy fats, and veggies. The coconut milk adds creaminess without dairy. Pair it with a side salad for more nutrients and fiber. What to do if the broth is too thick? If your broth thickens too much, add more vegetable broth or water. Stir well and let it heat through. This will bring back the creamy texture. How to fix overcooked noodles? If your noodles are mushy, try adding them to the broth quickly. This can help them soak up flavors. In the future, keep an eye on the cooking time. Ramen noodles cook fast! This blog post covered how to make Creamy Lemon Garlic Ramen, from ingredients to cooking steps. You learned about essential and optional ingredients, plus substitutions for diets. I shared tips for perfect ramen, flavor enhancements, and storage advice. To make the best ramen, it’s crucial to follow the steps closely and adjust flavors as you like. Enjoy experimenting with different proteins and toppings. With these tips, you can create a delicious bowl of ramen that satisfies your cravings.

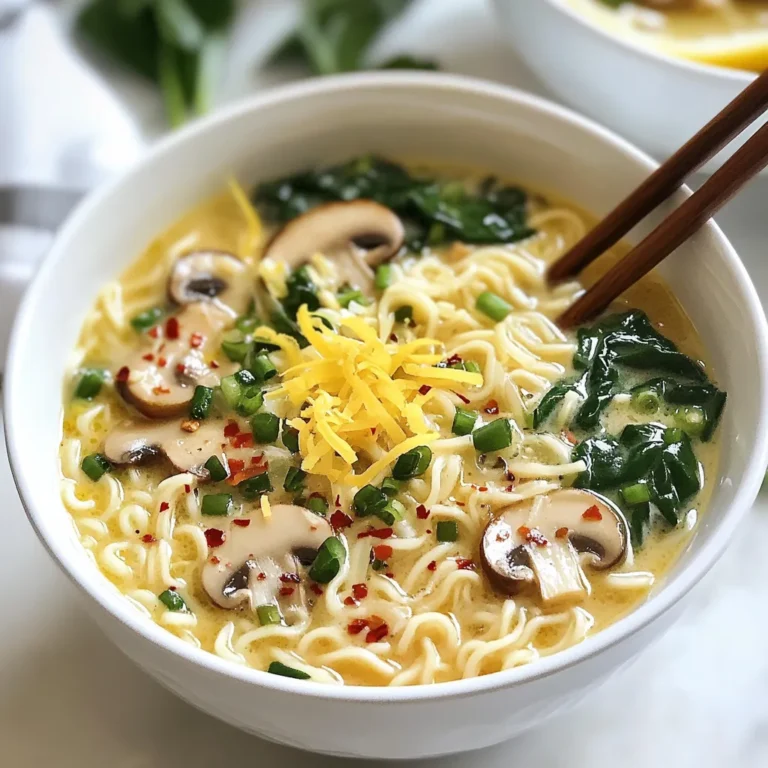
Creamy Lemon Garlic Ramen Simple and Flavorful Recipe

To make these tasty blondies, you need simple ingredients. Here’s what you will need: - 1 cup canned pumpkin puree - 1/2 cup brown sugar - 1/2 cup granulated sugar - 1/2 cup unsalted butter, melted - 2 large eggs - 1 teaspoon vanilla extract - 1 1/2 cups all-purpose flour - 1 teaspoon baking powder - 1/2 teaspoon baking soda - 1 teaspoon pumpkin pie spice - 1/4 teaspoon salt - 1 cup chocolate chips (semi-sweet or dark) These ingredients come together to create a sweet and rich treat. The pumpkin adds moisture and flavor, while the sugars help with sweetness and texture. You can make these blondies your own! Here are some optional ingredients and substitutions: - Use coconut sugar instead of brown sugar for a different taste. - Swap in almond flour for a gluten-free option. - Add nuts like walnuts or pecans for extra crunch. - Use white chocolate chips if you prefer a sweeter flavor. - Consider adding a pinch of cinnamon for a warm spice kick. These swaps can change the flavor without losing the essence of the blondies. You will need a few tools to bake these blondies: - 8x8 inch baking pan - Mixing bowls - Whisk or electric mixer - Rubber spatula - Measuring cups and spoons - Parchment paper (optional, for easy removal) - Wire rack for cooling Having the right tools makes baking easier and more fun. You can enjoy the process and create a delicious treat! {{ingredient_image_1}} Start by preheating your oven to 350°F (175°C). Grab an 8x8 inch baking pan. You can grease the pan with butter or oil. Alternatively, line it with parchment paper for easy removal. This helps the blondies come out perfectly. In a large mixing bowl, add 1 cup of canned pumpkin puree. Next, mix in 1/2 cup of brown sugar and 1/2 cup of granulated sugar. Stir these until they blend well. Then, pour in 1/2 cup of melted unsalted butter. Stir until everything is combined. Now add 2 large eggs and 1 teaspoon of vanilla extract. Whisk until the mixture is smooth and creamy. In another bowl, whisk together 1 1/2 cups of all-purpose flour, 1 teaspoon of baking powder, 1/2 teaspoon of baking soda, 1 teaspoon of pumpkin pie spice, and 1/4 teaspoon of salt. Make sure you mix these dry ingredients well. This step is key for the right texture. Now, gently fold the dry mixture into the wet ingredients. Be careful not to overmix. Next, fold in 1 cup of chocolate chips. Reserve a few for topping. Pour the batter into the prepared pan, smoothing it out. Sprinkle the reserved chocolate chips on top. Bake for 25-30 minutes. Check for doneness with a toothpick. If it comes out clean, your blondies are ready! Allow them to cool for about 15 minutes in the pan. Then, move them to a wire rack to cool completely before cutting into squares. To get soft and chewy blondies, mix just enough. Combine wet and dry ingredients until they are just blended. Overmixing can make your blondies tough. Keep an eye on baking time. You want a toothpick to come out clean, but not dry. One common mistake is using too much flour. Always spoon it into your measuring cup, then level it off. Another mistake is not cooling them long enough. If you cut them too soon, they may fall apart. Lastly, don’t skip greasing the pan or using parchment paper. This helps with easy removal. For extra flavor, try adding nuts or dried fruits. Chopped pecans or walnuts add crunch. You can also switch up the chocolate chips. Use dark chocolate for a richer taste or white chocolate for sweetness. For presentation, serve the blondies on a rustic wooden board. A dusting of powdered sugar can make them look fancy. Add a few mini chocolate chips on the plate for fun! Pro Tips Use Fresh Pumpkin Puree: While canned pumpkin puree works well, using fresh pumpkin can enhance the flavor and texture of your blondies. Roast and puree your own pumpkin for a more vibrant taste. Check Your Oven Temperature: Oven temperatures can vary, so it’s a good idea to use an oven thermometer to ensure your blondies bake perfectly. Adjust baking time accordingly for even results. Experiment with Mix-ins: Feel free to customize your blondies by adding nuts, dried fruits, or even white chocolate chips for a different flavor profile. Get creative! Store Properly: To keep your blondies fresh, store them in an airtight container at room temperature for up to 5 days or refrigerate them for a longer shelf life. You can also freeze them for up to 3 months. {{image_2}} You can make these blondies gluten-free easily. Swap the all-purpose flour for a gluten-free flour blend. Make sure it has a binding agent, like xanthan gum. This helps keep the texture light and chewy. Just measure the flour blend cup for cup. Follow the rest of the recipe as usual for delicious results. For a vegan twist, replace the eggs with flax eggs. Mix one tablespoon of flaxseed meal with three tablespoons of water. Let it sit for five minutes to thicken. Use a plant-based butter or coconut oil instead of unsalted butter. Make sure your chocolate chips are dairy-free. This way, you keep the flavor while making them vegan-friendly. You can add new flavors to your blondies for fun. Mix in nuts like walnuts or pecans for a crunchy texture. If you love spice, add a pinch of cayenne or ginger. This will give your blondies a warm kick. For a richer taste, try using dark chocolate chips instead of semi-sweet. Each change can create a new favorite twist! To keep your chocolate chip pumpkin blondies fresh, store them in an airtight container. This method helps the blondies stay moist and flavorful. You can keep them on the counter for up to three days. If you want to store them longer, the fridge is a great option. Just make sure to wrap them well to avoid drying out. Freezing blondies is easy and smart. Cut them into squares before freezing. Place the squares in a single layer on a baking sheet. Freeze them for about an hour, then transfer them to a freezer bag. They can last up to three months in the freezer. When you want to enjoy them, just pull out the number you need. To reheat your blondies, use the microwave for quick results. Heat them for about 10-15 seconds. You can also use the oven. Preheat it to 350°F (175°C). Place the blondies on a baking sheet and warm them for about 5-10 minutes. This method helps keep them soft and gooey. Enjoy them warm with a scoop of ice cream if you like! Yes, you can use fresh pumpkin. Just cook and puree it. Make sure it is smooth. This adds a fresh flavor. Fresh pumpkin may have more moisture, so you might need to adjust flour slightly. Check the edges for a light golden color. Insert a toothpick into the center. If it comes out clean, they are done. If it has wet batter, bake a few more minutes. You have many options! Try nuts, dried fruit, or butterscotch chips. Peanut butter chips add a fun flavor. You can also use white chocolate for a sweeter taste. Absolutely! These blondies are perfect for gifts. They look great and taste delicious. Pack them in a nice box or tin. Add a ribbon for a special touch. Your friends and family will love them! You learned how to make chocolate chip pumpkin blondies. We covered key ingredients, mixing steps, and baking tips. I provided fun variations and storage info to keep them fresh. Remember, slight tweaks can elevate your blondies' taste. Don’t shy away from experimenting! With practice, you’ll master this recipe. Enjoy baking and sharing your delicious blondies with friends and family. Happy baking!

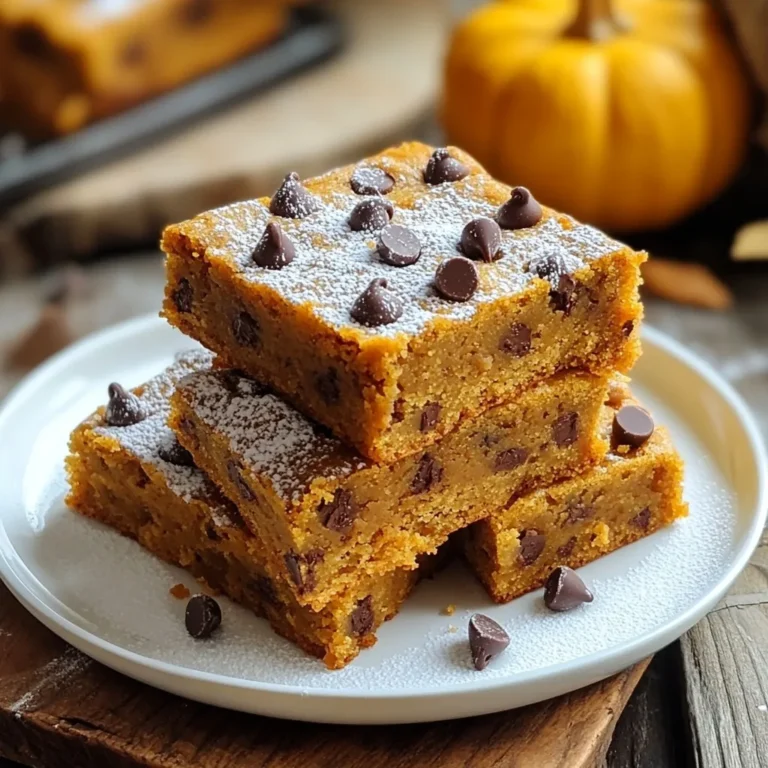
Chocolate Chip Pumpkin Blondies Irresistible Treat

- 4 boneless, skinless chicken breasts - 1/4 cup Dijon mustard - 1/4 cup honey - 2 tablespoons apple cider vinegar - 2 tablespoons olive oil - 1 teaspoon garlic powder - 1 teaspoon onion powder - 1 teaspoon paprika - Salt and pepper to taste - 1 cup baby carrots - 2 cups broccoli florets - Fresh thyme leaves (for garnish) This recipe needs simple ingredients that pack a punch. I love using boneless, skinless chicken breasts for a quick cook. The Dijon mustard and honey mix makes a tangy and sweet sauce. Apple cider vinegar adds a nice zing. Olive oil keeps everything moist. You can find garlic powder and onion powder in most kitchens. Paprika gives a slight warmth and color to the dish. Salt and pepper are key for taste. Baby carrots add sweetness, while broccoli gives a nice crunch. Fresh thyme leaves are essential for garnish. They make the dish look pretty and add freshness. Together, these ingredients create a flavorful meal that's easy to pull together on a busy weeknight. {{ingredient_image_1}} - Preheat the oven: Start by preheating your oven to 425°F (220°C). This step is key for crisp chicken and tender veggies. - Prepare the honey mustard mixture: In a small bowl, whisk together 1/4 cup Dijon mustard, 1/4 cup honey, 2 tablespoons apple cider vinegar, and 2 tablespoons olive oil. Add 1 teaspoon garlic powder, 1 teaspoon onion powder, 1 teaspoon paprika, and some salt and pepper. Mix well until everything is smooth. - Coat the chicken: Place 4 boneless, skinless chicken breasts on one side of a large sheet pan. Pour half of the honey mustard mixture over the chicken. Make sure to coat each breast evenly. - Arrange vegetables on the sheet pan: On the other side of the pan, add 1 cup baby carrots and 2 cups broccoli florets. Drizzle the remaining honey mustard mixture over the veggies. Toss them gently to coat. - Bake the dish: Place the sheet pan in your preheated oven. Bake for 20 to 25 minutes. The chicken is done when it reaches an internal temperature of 165°F (75°C). The veggies should be tender but still bright. - Check for doneness: If you have a meat thermometer, use it to check the chicken. If it’s not ready, give it a few more minutes in the oven. - Let the dish rest before serving: After baking, remove the pan from the oven. Let the dish rest for about 5 minutes. This helps the chicken stay juicy. - Garnish and presentation tips: When ready to serve, place the chicken and veggies on a platter. Drizzle any leftover pan juices over the top. Add a sprinkle of fresh thyme leaves for color and a hint of freshness. To get great flavor, coat the chicken well with the marinade. Place the chicken in a bowl. Pour half of the honey mustard mixture over the chicken. Use your hands to rub the sauce on every side. This step ensures all parts get the same tasty flavor. Always check the chicken's temperature for safety. Use a meat thermometer and aim for 165°F (75°C). This keeps you and your loved ones safe from foodborne illnesses. Picking the right vegetables makes a big difference. I love using baby carrots and broccoli for this dish. They cook well and add nice color. You can also try other veggies, like bell peppers or zucchini. Just remember to cut them into similar sizes for even cooking. To achieve perfect tenderness, place the veggies on the pan with the chicken. Drizzle the remaining honey mustard mix over them. This adds flavor while they bake. Roast for about 20-25 minutes or until they are tender but not mushy. For the best taste, I suggest marinating the chicken for at least 30 minutes. This allows the flavors to soak in deeply. If you have time, marinate it overnight in the fridge for even more flavor. Using fresh herbs can also enhance the dish. Fresh thyme leaves make a lovely garnish. They add a burst of flavor and color. You can toss some into the marinade, too, for an extra kick. Pro Tips Marinate for Extra Flavor: Allow the chicken to marinate in the honey mustard mixture for at least 30 minutes or overnight for enhanced flavor. Vegetable Variations: Feel free to substitute or add other vegetables like bell peppers, zucchini, or asparagus for a colorful mix. Check Chicken Temperature: Always use a meat thermometer to ensure your chicken is cooked to the safe internal temperature of 165°F (75°C). Leftover Storage: Store any leftovers in an airtight container in the fridge for up to 3 days, making sure to reheat thoroughly before serving. {{image_2}} You can easily swap Dijon mustard for yellow mustard or whole grain mustard. Each type adds a unique flavor twist. For vegetables, try using asparagus or bell peppers instead of carrots and broccoli. These changes keep your dish fresh and exciting. To spice things up, add a pinch of red pepper flakes for heat. You can also mix in some cayenne pepper for a stronger kick. Another great idea is to include lemon juice or lime juice. Their tangy taste brightens the honey mustard sauce, creating a delightful balance. Preparing this meal in advance saves time. You can marinate your chicken in the honey mustard mix the night before. Store it in the fridge for a stronger flavor. For leftovers, let the chicken and veggies cool, then place them in airtight containers. They can last up to four days in the fridge. When you want to reheat, use the oven for the best results. Preheat the oven to 350°F (175°C). Place the chicken and veggies on a baking sheet. Heat for about 15 minutes or until warm. This keeps the taste and texture just right. To store leftovers, let the chicken cool completely. Place it in an airtight container. Add the veggies too, if you like. This helps keep them fresh. Leftovers stay good in the fridge for up to three days. You can freeze this dish for later. First, let it cool like before. Wrap the chicken and veggies tightly in foil or plastic wrap. Then, place them in a freezer bag. Squeeze out all the air. This keeps the food safe and tasty. You can freeze it for up to three months. To use frozen leftovers, move them to the fridge. Let them thaw overnight. You can also use the microwave for quick defrosting. To reheat, use the oven for best results. Preheat the oven to 350°F (175°C). Place the chicken and veggies on a baking sheet. Cover them with foil to keep moisture in. Heat for about 15-20 minutes. You can also use a microwave. Just heat in short bursts. Check often to avoid drying out the food. Enjoy your meal! Can I use bone-in chicken for this recipe? Yes, you can use bone-in chicken. Just adjust the cooking time. Bone-in chicken takes longer to cook. Aim for an internal temperature of 165°F (75°C) to ensure it's safe. What other sides pair well with this dish? Many sides go great with this dish. Try roasted potatoes, rice, or a fresh salad. Quinoa also works well and adds a nutty flavor. How can I make this recipe gluten-free? To make this recipe gluten-free, use gluten-free Dijon mustard. Check the labels on all your ingredients to ensure they are gluten-free. Is it safe to eat undercooked chicken? No, it is not safe to eat undercooked chicken. Always cook chicken to an internal temperature of 165°F (75°C). This helps kill harmful bacteria. Can I adjust the sweetness in the sauce? Yes, you can adjust the sweetness. Add more honey for a sweeter taste or use less for a tangy flavor. Taste the sauce before pouring it on the chicken and veggies. How can I make a low-sugar version? For a low-sugar version, swap honey for a sugar-free syrup. You can also use mashed bananas or unsweetened applesauce as sweeteners. How to incorporate this dish into a weekly meal plan? This dish is great for meal planning. Cook a batch on the weekend. Store it in the fridge for quick meals during the week. Pair it with different sides each day. Can I double this recipe for larger families? Yes, you can double this recipe. Just use a larger sheet pan or two pans. Make sure to space the chicken and vegetables well for even cooking. This blog post showed how to make sheet pan honey mustard chicken with ease. I shared a clear ingredient list and step-by-step instructions for a tasty meal. You learned important tips for perfecting the dish and ideas for variations. I also covered storing and reheating leftovers effectively. Try this simple recipe for a flavorful family meal. With practice, you'll impress everyone with your cooking skills. Enjoy your meals, and remember, cooking should be fun and rewarding!

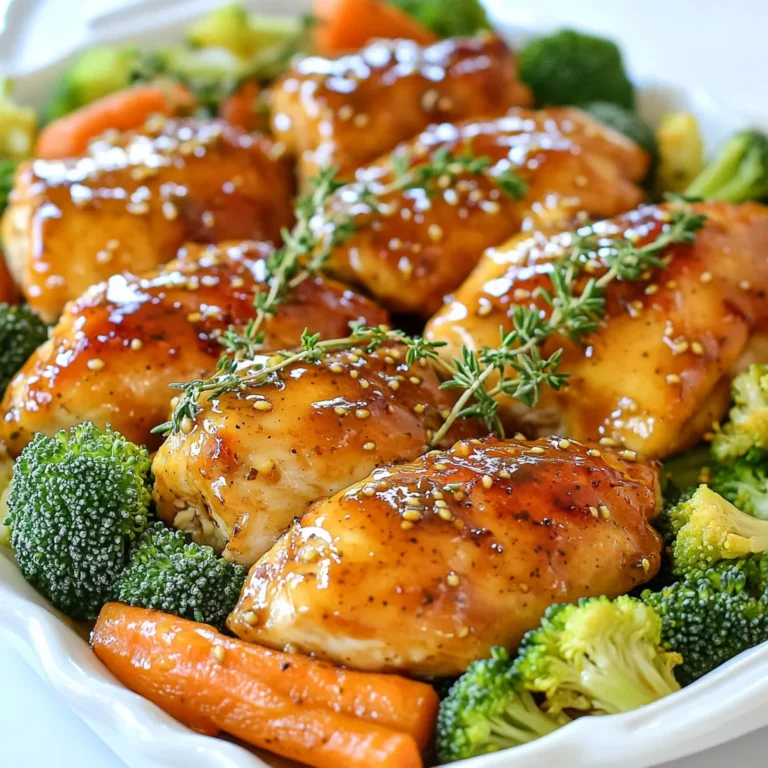
Sheet Pan Honey Mustard Chicken Flavorful Weeknight Meal

For this tasty dish, you need these main ingredients: - 1 pound large shrimp, peeled and deveined - 2 tablespoons olive oil - 2 tablespoons fresh lime juice - 2 teaspoons chili powder - 1 teaspoon garlic powder - 1 teaspoon smoked paprika - 1 teaspoon ground cumin - 1 teaspoon honey - Salt and pepper to taste - Fresh cilantro, chopped (for garnish) - Lime wedges (for serving) These ingredients work together to create a bright and zesty flavor. The lime juice adds a fresh twist, while the chili powder gives it a kick. You can mix it up with these optional ingredients: - Red pepper flakes for extra heat - Fresh herbs like parsley or basil - A dash of soy sauce for umami - Zest from lime for more citrus flavor Feel free to add or swap ingredients based on what you like. Cooking is all about having fun and trying new things! When choosing shrimp, look for these tips: - Choose shrimp that are firm and slightly shiny. - Fresh shrimp should smell like the ocean, not fishy. - Look for shrimp with a clean appearance, no black spots. - If buying frozen shrimp, ensure they are not stuck together. Selecting high-quality shrimp makes a big difference in taste. It gives your chili lime grilled shrimp a fresh and vibrant flavor that everyone will enjoy. {{ingredient_image_1}} To make the marinade, grab a large bowl. Add the olive oil and fresh lime juice. Then, sprinkle in the chili powder, garlic powder, smoked paprika, and ground cumin. Next, add the honey, salt, and pepper. Stir well until everything blends nicely. This marinade gives the shrimp a tasty kick. Now it's time to marinate the shrimp. Take your peeled and deveined shrimp and add them to the marinade. Make sure each piece gets coated well. Cover the bowl with plastic wrap. Place it in the refrigerator for at least 30 minutes. You can let it sit for up to 2 hours for even more flavor. Preheat your grill to medium-high heat. If you use wooden skewers, remember to soak them in water for 30 minutes. This helps stop them from burning. Thread about 4-5 shrimp onto each skewer. Discard any leftover marinade. Grill the shrimp for 2-3 minutes on each side. They will turn pink and opaque when done. Keep an eye on them; they cook quickly! After grilling, let the skewers rest for a minute. Serve with fresh cilantro and lime wedges. Enjoy your delicious meal! Grilling shrimp brings out their natural flavor. You can also use a skillet or broiler. Each method gives a nice char. For grilling, keep the heat at medium-high. This helps the shrimp cook evenly. If you use a skillet, add a bit of olive oil. The oil helps prevent sticking and gives great flavor. Shrimp cook fast. They can turn rubbery if you cook them too long. Aim for 2-3 minutes per side on the grill. The shrimp should turn pink and opaque. If you see them curling tightly, they are close to being done. Always watch them closely while they cook. You can boost the flavor of your shrimp in many ways. Try adding fresh herbs like parsley or basil. A splash of hot sauce can add heat. For a twist, add citrus zest from lime or lemon. Marinades like this one can also be changed. Add different spices or even fruits. Experiment and find what you love! Pro Tips Marinate for Flavor: The longer you marinate the shrimp, the more flavorful they will be. Aim for at least 1 hour if possible. Skewer Safely: If using wooden skewers, soak them in water for 30 minutes to prevent burning on the grill. Watch the Time: Shrimp cook quickly! Grill them for no more than 2-3 minutes per side to avoid overcooking. Garnish for Freshness: Always serve with fresh cilantro and lime wedges for added brightness and flavor. {{image_2}} You can switch up the spices to change the flavor. Try using cumin, garlic, or even curry powder. Each spice can give the shrimp a new taste. If you want a kick, add cayenne pepper. For a sweeter touch, use smoked paprika. Mix and match to find your favorite combo! If you don't have shrimp, you can use chicken or firm tofu. Chicken should be cut into bite-sized pieces. Marinate it just like the shrimp. Tofu works well too, but press it first to remove extra water. This helps it soak up the marinade better. Both options still taste great when grilled! Serve your shrimp with sides that complement their flavor. Rice or quinoa works well. You can also try a fresh salad with avocado and corn. For a crunchy touch, add tortilla chips. Don’t forget lime wedges for squeezing on top. These sides balance the dish and make it even more enjoyable! To store leftover grilled shrimp, let them cool first. Place them in an airtight container. They will stay fresh in the fridge for up to three days. If you want to keep them longer, freezing is a good option. Just remember to label the container with the date. When reheating grilled shrimp, use low heat. You can warm them in a skillet for about three minutes. This method keeps them tender. You can also use the microwave, but be careful. Heat them in short bursts to avoid overcooking. Check every 30 seconds to keep them juicy. To freeze grilled shrimp, first cool them completely. Then, place them in a freezer-safe bag. Try to get rid of any air. They can stay in the freezer for up to three months. When you're ready to eat, thaw them overnight in the fridge. Then, reheat as mentioned above for the best taste. Yes, you can make Chili Lime Grilled Shrimp ahead of time. Prepare the marinade and add the shrimp. Let them soak in the fridge for up to two hours. This lets the shrimp soak up all the flavors. If you want to save time, marinate them in the morning for dinner. Just grill them when you are ready to eat. Chili Lime Grilled Shrimp pairs well with many sides. Here are some great options: - Rice: Serve with white or brown rice for a filling meal. - Salad: A fresh green salad adds crunch and color. - Tacos: Use the shrimp to fill soft corn tortillas. - Vegetables: Grilled or roasted veggies add a nice touch. - Quinoa: This superfood is a great source of protein. You can mix and match these sides to suit your taste. To adjust the spice level in Chili Lime Grilled Shrimp, change the chili powder amount. For more heat, add extra chili powder or a dash of cayenne pepper. If you want it milder, use less chili powder. You can also use sweet paprika instead of smoked paprika. This keeps the flavor while reducing heat. Enjoy making it just right for you! Chili lime grilled shrimp is simple and delicious. We covered key ingredients and step-by-step instructions to make it easy. You learned tips for perfect shrimp and ways to switch it up. Remember to store leftovers correctly and know the best ways to reheat. Enjoy this dish with sides that enhance its flavors. With practice, you can impress everyone with your grilling skills. Now, go ahead and create your next delicious meal!

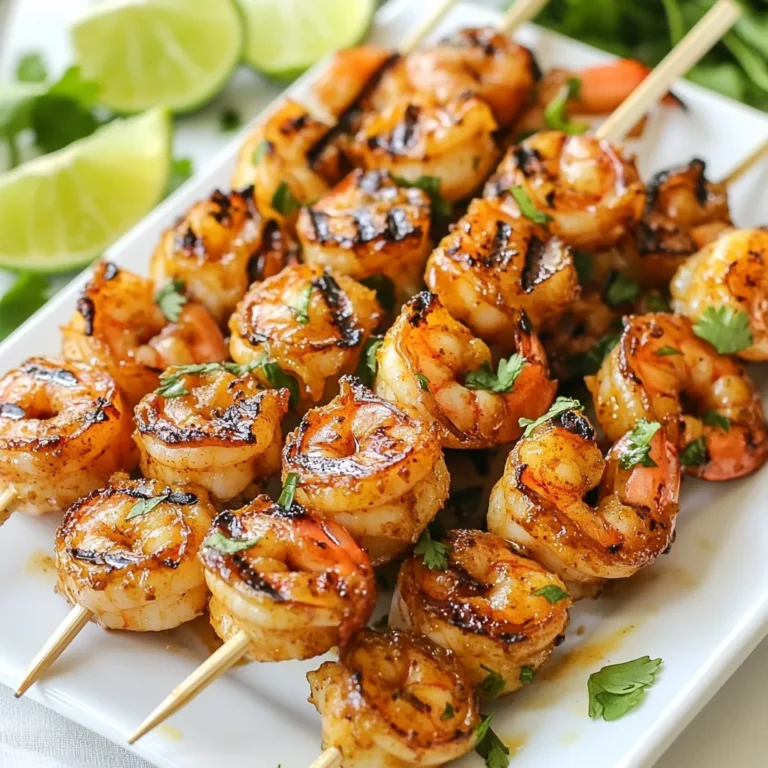
Chili Lime Grilled Shrimp Delightful Easy Recipe

To make tasty chimichurri chicken kabobs, you need the following main items: - 1 lb chicken breast, cut into 1-inch cubes - 1 bell pepper (any color), cut into 1-inch pieces - 1 red onion, cut into wedges - 1 zucchini, sliced into thick rounds - 2 tablespoons olive oil - Salt and pepper to taste These ingredients create a colorful and flavorful mix. The chicken provides protein, while the veggies add crunch and color. Chimichurri sauce is what makes these kabobs shine. Here’s what you need: - 1 cup fresh parsley, chopped - 1/2 cup fresh cilantro, chopped - 2 garlic cloves, minced - 1/4 teaspoon red pepper flakes (adjust to taste) - 1/4 cup red wine vinegar - 1/3 cup olive oil - Salt and pepper to taste This sauce packs a punch. It’s fresh, zesty, and full of flavor. The garlic and herbs blend well with the chicken. You can add some extra flavors if you want. Here are some ideas: - Lemon zest for brightness - Smoked paprika for a hint of smokiness - Cumin for an earthy taste These seasonings help customize the flavor. Experiment to find what you love best! {{ingredient_image_1}} To make the chimichurri sauce, start with a bowl. Add 1 cup of chopped parsley and 1/2 cup of chopped cilantro. Next, mince 2 garlic cloves and toss them in. If you like heat, add 1/4 teaspoon of red pepper flakes. Pour in 1/4 cup of red wine vinegar and 1/3 cup of olive oil. Finally, sprinkle in salt and pepper to taste. Mix everything well and let it sit. This allows the flavors to blend for a bright, zesty sauce. Now, take 1 pound of chicken breast and cut it into 1-inch cubes. Place the chicken in a bowl. Add 2 tablespoons of your chimichurri sauce, along with 2 tablespoons of olive oil, salt, and pepper. Toss it all together to coat the chicken evenly. Cover the bowl and let it marinate for at least 30 minutes. This step helps the chicken absorb the delicious chimichurri flavors. Grab some skewers for assembly. Start by threading the marinated chicken onto the skewer. Then, add pieces of bell pepper, onion wedges, and thick slices of zucchini. Alternate the ingredients to create a colorful display. Each kabob should have a nice mix of chicken and veggies. This not only looks great but adds different flavors and textures. Preheat your grill to medium-high heat. Once hot, place the skewers on the grill. Cook the kabobs for about 10 to 12 minutes. Turn the skewers occasionally to get those beautiful grill marks. You want the chicken to be cooked through and juicy. When done, remove the kabobs and brush them with more chimichurri sauce. This extra layer gives a fresh flavor boost that will impress everyone at your table. Marinating chicken is key for great flavor. I use chimichurri sauce to give it depth. Start by cutting chicken into 1-inch cubes. Place the chicken in a bowl. Add two tablespoons of chimichurri sauce, olive oil, salt, and pepper. Mix well and coat each piece. Let it marinate for at least 30 minutes. You can marinate for up to 2 hours for stronger flavor. Skewering your ingredients correctly makes a big difference. First, choose sturdy skewers. Wooden skewers need soaking in water for 30 minutes. This prevents them from burning on the grill. Alternate chicken cubes with bell pepper, onion, and zucchini. This not only looks great but also helps flavors blend. Make sure to leave space between the pieces. This allows heat to circulate and cook evenly. Getting those perfect grill marks is easy with a few tips. Preheat your grill to medium-high heat. Place the skewers on the grill at a 45-degree angle. Leave them alone for 3-4 minutes. Don’t move them too soon; this helps form nice marks. After flipping, cook for another 3-4 minutes. The chicken should be fully cooked and have a nice char. Pro Tips Marination Time: Allow the chicken to marinate for at least 30 minutes, but for even deeper flavor, try marinating it for a few hours or overnight in the refrigerator. Grill Temperature: Preheat your grill properly to ensure even cooking. A medium-high heat will give you those beautiful grill marks while keeping the chicken juicy. Vegetable Variations: Feel free to mix and match vegetables depending on seasonality. Cherry tomatoes, mushrooms, or even pineapple can add a delightful twist to your kabobs. Chimichurri Freshness: For the best flavor, use freshly chopped herbs in your chimichurri sauce. You can also add a squeeze of lemon juice for an extra zesty kick! {{image_2}} You can easily make a vegetarian version of chimichurri kabobs using tofu. Start with firm tofu. Cut it into 1-inch cubes, just like you would for chicken. Press the tofu for 30 minutes to remove excess water. This helps it absorb flavor better. Marinate the tofu in the chimichurri sauce, just like the chicken. Then skewer with veggies and grill. You’ll enjoy a tasty, plant-based dish! Feel free to add more veggies to your kabobs. Mushrooms, cherry tomatoes, or even eggplant work well. Cut them into similar sizes for even cooking. You can also use different colors of bell peppers for a vibrant look. These additions not only enhance flavor but also boost nutrition. They pair perfectly with the chimichurri sauce for a fresh taste. If you want to switch up your protein, chicken is not the only option. Shrimp, beef, and even salmon can work great. For shrimp, use large ones and marinate them like the chicken. For beef or salmon, adjust the cooking time as they cook faster. Each protein brings its own flavor, but they all pair well with chimichurri sauce. Experiment and find your favorite! To store leftover kabobs, let them cool down first. Place the kabobs in an airtight container. This keeps them fresh for up to three days. You can also wrap them tightly in plastic wrap. This method helps prevent drying out. To reheat kabobs, use your oven or microwave. For the oven, preheat it to 350°F. Place the kabobs on a baking sheet and cover them with foil. Heat for about 10-15 minutes until warm. If using a microwave, heat them in 30-second intervals. This way, they stay juicy and delicious. You can freeze kabobs for later. Wrap each kabob tightly in plastic wrap. Then, place them in a freezer bag. Be sure to remove as much air as possible. They will last up to three months in the freezer. When you’re ready to eat them, thaw in the fridge overnight before reheating. Yes, you can use frozen chicken for kabobs. However, it is best to thaw the chicken first. This helps it cook evenly on the grill. Thaw the chicken in the fridge overnight for safe results. If you use frozen chicken, it can take longer to cook. Always check that it reaches 165°F in the center. Chimichurri chicken kabobs pair well with many sides. Here are some great options: - Rice: Fluffy white rice or cilantro lime rice adds flavor. - Salad: A fresh green salad with cucumbers and tomatoes is refreshing. - Grilled Vegetables: Extra grilled veggies like asparagus or corn complement the kabobs. - Pita Bread: Warm pita bread is perfect for dipping in chimichurri sauce. You can marinate the chicken for at least 30 minutes. For more flavor, try marinating it for 2 to 4 hours. Avoid marinating for over 24 hours. The acid in the sauce can break down the chicken and make it mushy. Yes, chimichurri sauce is gluten-free. The main ingredients are herbs, garlic, vinegar, and olive oil. None of these contain gluten. Always check labels if you use store-bought sauces to ensure they remain gluten-free. Chimichurri chicken kabobs are simple and tasty. We covered the main ingredients, like chicken and herbs. Next, we made a flavorful chimichurri sauce. We talked about marinating and grilling tips for perfect kabobs. You can even try vegetarian options like tofu. Remember, proper storage keeps leftovers fresh. Enjoying this dish is easy and fun. Now, gather your ingredients and start making delicious chimichurri kabobs today!

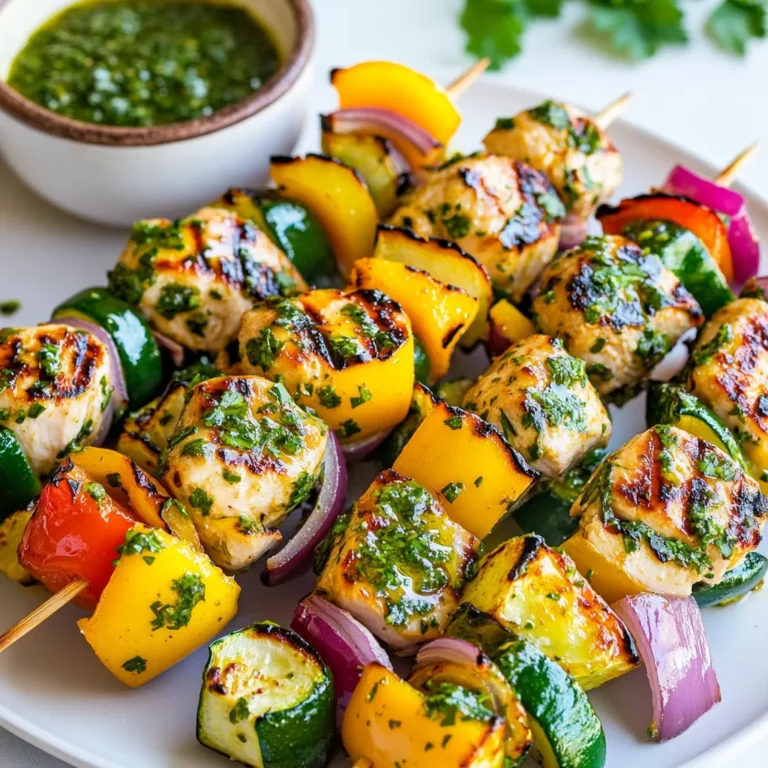
Chimichurri Chicken Kabobs Flavorful Grilled Delight

To create the Garlic Herb Butter Steak Skillet, gather these key ingredients: - 2 ribeye steaks (about 1-inch thick) - 4 tablespoons unsalted butter - 4 cloves garlic, minced - 1 tablespoon fresh rosemary, chopped - 1 tablespoon fresh thyme, chopped - Salt and freshly ground black pepper, to taste - 1 tablespoon olive oil - Optional: Fresh parsley, chopped (for garnish) Each ingredient plays a vital role in making this dish flavorful and satisfying. The ribeye steaks give a rich taste, while the garlic and herbs add depth. Unsalted butter brings a creamy texture that enhances the overall dish. Using fresh herbs like rosemary and thyme elevates the flavor profile. The olive oil creates a nice sear on the steak. You can also adjust seasonings to your taste. Fresh parsley makes a lovely garnish, adding a pop of color. Having these ingredients ready will set you up for a delicious meal. Enjoy the process of cooking and savor each bite! {{ingredient_image_1}} First, take your ribeye steaks out of the fridge. Let them sit at room temperature for 30 minutes. This step helps the steaks cook evenly. Next, season both sides of the steaks with salt and black pepper. Don’t be shy! A good amount of seasoning makes a big difference. For this recipe, I recommend using a cast-iron skillet. It retains heat well and gives a nice sear. Heat the skillet over medium-high heat. Add olive oil and wait until it shimmers but does not smoke. This means it is hot enough for cooking. Once the skillet is hot, add the seasoned steaks. Let them cook for about 4-5 minutes without moving them. This forms a great crust. After that, flip the steaks over. Now, add butter, minced garlic, rosemary, and thyme to the skillet. As the butter melts, use a spoon to baste the steaks with the garlic herb butter. Cook for another 4-5 minutes for medium-rare, or until your preferred doneness. After cooking, it’s important to let the steaks rest. Place them on a plate and let them sit for 5 minutes. This allows the juices to redistribute, making every bite juicy and tender. When you are ready to serve, slice the steaks against the grain. This makes the meat more tender to chew. Drizzle the leftover garlic herb butter from the skillet over the slices. If you like, garnish with fresh parsley for a pop of color. Enjoy your meal! To get the best steak, you need to know the right temperatures. Here are some guides for steak doneness: - Rare: 120-125°F - Medium Rare: 130-135°F - Medium: 140-145°F - Medium Well: 150-155°F - Well Done: 160°F and above You can check doneness by using a meat thermometer. Insert it into the thickest part of the steak. If you don’t have one, you can use the touch method. Press the steak with your finger. A rare steak feels soft, while well-done feels firm. To store leftovers safely, let the steak cool to room temperature. Place it in an airtight container. It can last in the fridge for up to three days. If you want to keep it longer, consider freezing it. Wrap it tightly in plastic wrap, then foil. When you want to reheat, avoid the microwave if possible. Instead, use a skillet on low heat. This keeps the steak juicy. Heat it for 5-10 minutes, turning often. You can also add a little butter for extra flavor. To make your steak even better, consider using other herbs. Here are some great options: - Oregano - Basil - Sage If you want to add more depth, try marinating the steak. A simple marinade can include: - Olive oil - Lemon juice - Soy sauce Let the steak soak in the marinade for at least 30 minutes before cooking. This adds great flavor and tenderness. Pro Tips Rest the Steaks: Always let your steaks rest after cooking. This allows the juices to redistribute, resulting in a more tender and flavorful bite. Use a Meat Thermometer: For perfectly cooked steaks, use a meat thermometer to check the internal temperature. Aim for 130°F (54°C) for medium-rare. Keep the Skillet Hot: Before adding the steak, ensure your skillet is very hot. This helps achieve a nice sear and locks in the juices. Don’t Overcrowd the Pan: Cook one or two steaks at a time to maintain the skillet's temperature. Overcrowding can lead to steaming instead of searing. {{image_2}} You can switch ribeye for other cuts. Sirloin, filet mignon, or flank steak work well. Each cut has a unique taste and texture. Adjust cooking times based on thickness. For sirloin, cook for about 3-4 minutes per side. For filet mignon, aim for 4-5 minutes each side. Flank steak will need only about 2-3 minutes per side. Always check for doneness. Feel free to mix herbs for new flavors. Try basil, oregano, or sage instead of rosemary and thyme. Each herb adds its own signature taste. You can also use dried herbs if fresh is not available. Adjust the amount, as dried herbs are more potent. A teaspoon of dried herbs is enough for every tablespoon of fresh herbs. Pair your steak with tasty sauces. A red wine sauce is rich and complements the dish well. You can also make a simple pan sauce. After cooking steak, remove it from the pan. Add a splash of broth or wine to the skillet. Scrape up the brown bits with a wooden spoon. Let it simmer until thick. This sauce adds extra flavor and richness to your meal. - Refrigeration tips: After cooking, let the steaks cool. Wrap them tightly in plastic wrap or foil. Place them in an airtight container to keep them fresh. Store in the fridge within two hours of cooking. This helps prevent bacteria growth. - Freezing options: For longer storage, freeze the steaks. Wrap each steak in plastic wrap, then in aluminum foil. Place them in a freezer-safe bag. They can last up to three months frozen. Be sure to label the bags with the date. - How long will it last in the fridge? Cooked steaks can stay fresh in the fridge for about three to four days. Always check for any off smells or changes in texture before eating. - Tips for quality maintenance: To keep your steaks tasty, store them away from strong-smelling foods. This prevents flavor absorption. Keep them in the coldest part of the fridge, usually at the back. - Best practices for reheating without drying out: Reheat your steaks gently. The oven works well for this. Preheat to 250°F (120°C). Place the steak on a baking sheet and cover it with foil. Heat for about 20-30 minutes. This keeps the meat moist. Alternatively, you can use a skillet over low heat. Add a little broth or water to the pan to create steam while reheating. The best steak for skillet cooking is ribeye. Its fat content makes it juicy and flavorful. Other great options are sirloin and New York strip. These cuts also sear well and stay tender. For a medium-rare steak, cook for 4-5 minutes on each side. For medium, extend the time to about 6-7 minutes per side. Always check the internal temperature; aim for 130°F for medium-rare and 140°F for medium. Yes, you can use chicken breast or pork chops. Adjust the cooking time. Chicken should reach 165°F, while pork needs to be at least 145°F. These meats absorb the garlic herb butter flavor well. Serve this steak with roasted veggies or mashed potatoes. A fresh salad or garlic bread pairs nicely too. For a complete meal, consider adding a glass of red wine to enhance the flavors. You now have all the tools to cook the perfect ribeye steak. We covered ingredients, from ribeye to herbs. The step-by-step instructions help you cook, baste, and rest the steaks. We also shared tips for doneness and safe storage. Variations let you explore different cuts and flavors. Enjoy your delicious steak, and impress your friends with your skills! Share this guide with others to spread the joy of cooking. Happy cooking!

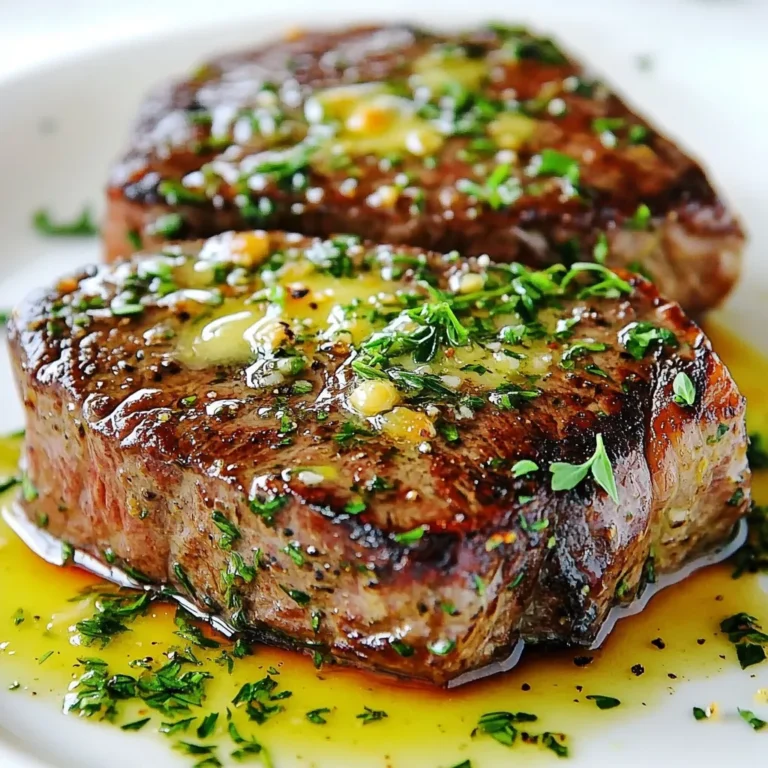
Garlic Herb Butter Steak Skillet Delight Recipe

PREV 1 … 43 44 45 … 52 NEXT
cozy citrus kitchen

explore

DessertsDinnerAppetizersDrinks

Our Policies

  • Cookie Policy
  • Copyright Policy
  • Disclaimer
  • GDPR Policy
  • Terms Of Use
Back to Top
  • About
  • Contact Us
  • Privacy Policy
© 2025 cozy citrus kitchen