FREE DINNER EBOOK! Get your copy!
  • Cookie Policy
  • GDPR Policy
  • Disclaimer
  • Terms Of Use
  • Visit my other site: Fun Cookie Recipes
cozy citrus kitchen
  • Home
  • Dinner
  • Desserts
  • Drinks
  • Appetizers
  • Contact
  • About
  • Privacy Policy
  • Home
  • Dinner
  • Desserts
  • Drinks
  • Appetizers
  • Contact
  • About
  • Privacy Policy
  • Cookie Policy
  • GDPR Policy
  • Disclaimer
  • Terms Of Use
Visit my other site: Fun Cookie Recipes

HOME / CATEGORIES /

Latest

- 2 cups fresh strawberries, hulled and sliced - 1/4 cup granulated sugar - 1 1/2 cups heavy cream - 1/2 cup powdered sugar - 1 teaspoon vanilla extract - 12-14 store-bought ladyfinger cookies - Fresh mint leaves for garnish (optional) To make Strawberry Shortcake Icebox Cake, you need fresh, tasty ingredients. Start with ripe strawberries. They add sweetness and color. You will also need granulated sugar to sweeten the berries. Heavy cream is key for a rich, creamy layer. Powdered sugar gives the whipped cream a touch of sweetness. Vanilla extract brings a nice flavor to the cream. Ladyfinger cookies serve as the cake's base. These cookies soak up the strawberry juices well. Lastly, fresh mint leaves are optional but add a bright touch when you serve. Gather these items before you start. Having everything ready helps the process go smoothly. This cake is not only easy to make but also a delight to eat. {{ingredient_image_1}} First, take 2 cups of fresh strawberries. Hull and slice them well. In a medium bowl, combine the sliced strawberries with 1/4 cup of granulated sugar. Mix them together. This helps to draw out the juices. Let them sit for about 15-20 minutes. You will see the juices form at the bottom of the bowl. This step is key for flavor. Next, you need to whip the cream. In a clean bowl, add 1 1/2 cups of heavy cream. Then add 1/2 cup of powdered sugar and 1 teaspoon of vanilla extract. Use a hand mixer to whip the cream. Mix until you see stiff peaks. Be careful not to over-whip; you want it light and fluffy. This creamy texture is what makes the cake so nice. Now, it's time to assemble the cake. Grab a 9x9 inch baking dish. Start by adding a layer of whipped cream at the bottom. Next, dip each ladyfinger cookie in the strawberry juices for just a second. Arrange them in a single layer over the cream. Don’t let them soak too long or they will get soggy! After the ladyfingers, spread a layer of sliced strawberries on top. Follow this with another layer of whipped cream. Keep repeating these layers until you use all the ingredients. Finish with a top layer of whipped cream. Cover the dish with plastic wrap. Refrigerate it for at least 4 hours or overnight. This lets all the flavors blend together and softens the cookies. To get the best whipped cream, start with cold heavy cream. Use a clean bowl and whisk. You want to mix until you see stiff peaks. This means the cream stands up on its own. Be careful not to over-whip. Over-whipped cream becomes grainy and loses its fluff. Keep an eye on it to avoid this mistake. To help your cream stay light and airy, use a hand mixer on low speed. Gradually increase the speed as it thickens. This method gives you better control. Also, adding powdered sugar and vanilla early helps the flavor blend well. When layering your cake, avoid soggy ladyfingers. Just dip each one in the strawberry juice for one second. If you soak them too long, they will fall apart. Place them side by side in a single layer. Even layering is key. Start with a layer of whipped cream at the bottom. Then add ladyfingers, followed by a layer of strawberries. Repeat this until you finish all the ingredients. Make sure the last layer is whipped cream. This keeps everything together and looks nice. For serving, slice the cake into squares. Use a sharp knife for clean edges. You can place each piece on individual plates to impress your guests. Drizzle some of the reserved strawberry juices over the top for extra flavor. For garnishing, use fresh mint leaves. They add a bright touch. You can also top with extra strawberry slices. This makes your cake look fresh and inviting. Pro Tips Use Fresh Strawberries: Fresh strawberries yield the best flavor and texture, enhancing the overall taste of the dessert. Whipping Cream Technique: Whip the cream until stiff peaks form but avoid over-whipping to maintain a light and airy texture. Layering Tips: Ensure each ladyfinger is dipped quickly in the strawberry juices to prevent sogginess while still absorbing flavor. Chill Time: Allow the cake to chill overnight for the best flavor melding and texture; this also helps the ladyfingers soften perfectly. {{image_2}} You can change the flavors of your cake easily. Try adding different berries like blueberries or raspberries. These can give your cake a fresh twist and new taste. You can also use flavored whipped cream. For example, adding lemon or almond extract can give a unique flavor. This makes the dessert fun and exciting! If you want to switch things up, you can change the base. Instead of ladyfinger cookies, use sponge cake or graham crackers. Both options work well and add their own taste. Sponge cake gives a light texture, while graham crackers add a nice crunch. This way, you can make the cake your own! You can also adapt the cake for different diets. For those who can't have dairy, use dairy-free whipped cream. Brands like coconut cream work great. If you need a gluten-free option, choose gluten-free ladyfingers or use gluten-free cake. These changes let everyone enjoy this tasty treat without worry. To store your leftovers, cover the cake tightly with plastic wrap. This helps keep the cake fresh and prevents it from absorbing other smells in the fridge. I recommend storing it in the fridge for up to three days. After that, the ladyfingers may become too soft. Yes, you can freeze Strawberry Shortcake Icebox Cake. To freeze, slice the cake into portions and wrap each piece in plastic wrap. Then place the wrapped pieces in a freezer-safe bag. This helps maintain their flavor and texture. When you are ready to enjoy them, take the slices out and let them thaw in the fridge overnight. Serve them cold for the best taste. A Strawberry Shortcake Icebox Cake is a no-bake dessert. It combines layers of whipped cream, strawberries, and ladyfinger cookies. This cake is easy to make and perfect for warm days. The dish has roots in classic American desserts. It captures summer flavors in a sweet, creamy treat. You can store this cake in the fridge for up to three days. The whipped cream stays fresh and the flavors deepen. To keep the cake at its best, cover it tightly with plastic wrap. This prevents it from absorbing other fridge smells. Yes, you can make this cake a day ahead. In fact, letting it sit overnight in the fridge improves the taste. The cookies soak up the strawberry juices and soften nicely. Just remember to cover it well to keep it fresh. If you need an alternative to ladyfinger cookies, try sponge cake or graham crackers. Both options work well and still taste great. For gluten-free needs, look for gluten-free ladyfingers or cookies. These swaps ensure everyone can enjoy this delightful dessert. This blog post walked you through creating a delicious Strawberry Shortcake Icebox Cake. You learned about the simple ingredients, step-by-step instructions, and tips for making perfect layers. I also shared fun variations to try and how to store your cake. In my view, everyone should give this cake a chance. It’s refreshing, easy to make, and perfect for any occasion. Don’t hesitate to experiment with your own flavors and toppings. Enjoy your delightful dessert!

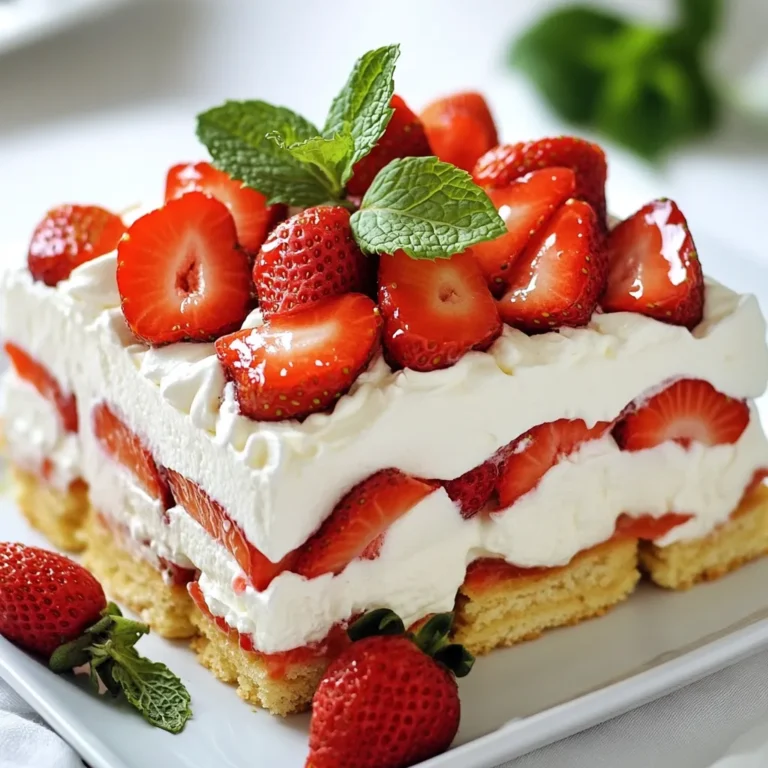
Strawberry Shortcake Icebox Cake Easy and Delicious

- 4 boneless, skinless chicken breasts - 1 cup heavy cream - 1/2 cup sun-dried tomatoes, chopped - 1 cup fresh spinach - 3 cloves garlic, minced - 1/2 teaspoon red pepper flakes (optional) - 1 tablespoon olive oil - 1 teaspoon Italian seasoning - Salt and pepper to taste - Fresh basil leaves for garnish (optional) To create this dish, you need simple, fresh items. The chicken gives a hearty base. Heavy cream adds that rich, creamy taste. Sun-dried tomatoes bring a burst of flavor. Spinach adds color and nutrients. Garlic gives a lovely aroma. The red pepper flakes can add a kick if you want. - Large skillet - Tongs - Measuring cups - Measuring spoons - Knife - Cutting board For this recipe, you will need a few basic tools. A large skillet helps sear the chicken and mix the sauce. Tongs make it easy to flip the chicken. You’ll also need measuring cups and spoons for accuracy. A knife and cutting board will help prep your ingredients. - Grated Parmesan cheese - Mushrooms, sliced - Bell peppers, diced - Fresh herbs like thyme or parsley Feel free to customize this dish! Adding grated Parmesan can enhance the creaminess. Mushrooms or bell peppers give extra texture and flavor. Fresh herbs can brighten the dish. Mix and match to fit your taste. Enjoy making this recipe your own! {{ingredient_image_1}} Start by preparing the chicken. Take the four chicken breasts and season them well. Use salt, pepper, and Italian seasoning on both sides. This step adds taste right from the start. Make sure to coat them evenly. Now, your chicken is ready to go! Next, it’s time to sear the chicken. Heat a large skillet over medium-high heat. Add one tablespoon of olive oil to the skillet. Wait until the oil shimmers, then carefully place the chicken in the pan. Cook each piece for 5 to 7 minutes. You want them golden brown and fully cooked. Once done, remove the chicken and set it aside on a plate. This step locks in the flavor and keeps the chicken juicy. Now, let’s make the creamy sauce! In the same skillet, lower the heat to medium. Add three cloves of minced garlic and sauté for about 30 seconds. You want it fragrant but not burnt. Then, pour in one cup of heavy cream and add half a cup of chopped sun-dried tomatoes. Stir the mix well, bringing it to a gentle simmer. After that, toss in one cup of fresh spinach. Stir until the spinach wilts, which takes about 2 to 3 minutes. If you enjoy some heat, add half a teaspoon of red pepper flakes now. Finally, return the chicken to the skillet, spooning the sauce over it. Let it simmer for an extra 2 to 3 minutes. This step ensures the chicken is hot and nicely coated. Now, you’re ready to plate! To cook chicken well, start with good seasoning. I use salt, pepper, and Italian seasoning. This adds great flavor. Searing the chicken gives it a nice brown crust. Heat the olive oil in your skillet. Cook each side for about 5-7 minutes. This locks in moisture and flavor. To make the sauce creamy, use heavy cream. It blends well with sun-dried tomatoes. After adding the cream, let it simmer gently. This helps thicken the sauce. Stir in the spinach and let it wilt. You want it to mix well with the sauce. If you want a bit of spice, add red pepper flakes. Fresh ingredients have bright flavors. I love using fresh spinach. It adds color and nutrients. For sun-dried tomatoes, you can use dried or packed in oil. Dried tomatoes are more intense in flavor. If you use fresh, cook them a bit longer to soften. Both options work well, but adjust cooking times as needed. Pro Tips Perfectly Cooked Chicken: Use a meat thermometer to ensure your chicken reaches an internal temperature of 165°F (75°C) for safe and perfectly cooked meat. Customize the Creaminess: For a lighter sauce, replace half of the heavy cream with chicken broth or use a reduced-fat cream alternative. Fresh Herbs for Flavor: Enhance the dish by adding fresh herbs like thyme or oregano along with the spinach for added depth of flavor. Make It Ahead: Prepare the sauce in advance and store it in the fridge. Simply reheat and add the chicken when you're ready to serve! {{image_2}} You can switch chicken for other meats. Try turkey or pork. Both work well with the creamy sauce. Shrimp is another great choice. Just cook it until pink. If you want a different taste, consider using fish like salmon. It pairs nicely with sun-dried tomatoes too. For a vegetarian dish, replace chicken with firm tofu. Press the tofu to remove water, then cut it into cubes. Sear it like chicken for the best texture. To make it vegan, use coconut cream instead of heavy cream. This gives a nice flavor and keeps it creamy. Add more veggies like bell peppers or mushrooms for extra nutrition. You can add more depth to the flavor. Try adding capers for a salty kick. Fresh herbs, such as thyme or parsley, brighten the dish. If you like heat, toss in more red pepper flakes. You can also squeeze fresh lemon juice for acidity. This cuts through the creaminess and adds freshness. Experiment with your favorite flavors to make this dish your own. After enjoying your creamy sun-dried tomato chicken, store any leftovers in an airtight container. Make sure the chicken cools to room temperature before sealing it. This helps keep the dish fresh. Place the container in the fridge. It can last up to three days. When you're ready to eat your leftovers, heat them gently. Use a skillet over low heat to warm the chicken. Add a splash of cream or water to keep it creamy. Stir often to avoid burning. You can also use the microwave. Heat in short bursts, stirring in between. This way, you keep the flavors intact. Want to save some for later? You can freeze this dish, but do it carefully. Let the chicken cool completely first. Then, place it in a freezer-safe container. It can last up to three months in the freezer. When you're ready to eat, thaw it overnight in the fridge. Reheat as mentioned above for best taste. Yes, you can use chicken thighs. They stay juicy and tender. Thighs have more fat, which adds flavor. They also cook well in the creamy sauce. Just be sure to adjust the cooking time. Thighs may need a few extra minutes. To make this dish low-carb, skip the heavy cream. Use full-fat coconut milk instead. It provides creaminess without extra carbs. You can also add more spinach and skip the pasta or rice. This will keep it filling and delicious. Great sides for this dish include: - Steamed broccoli - Garlic mashed cauliflower - Zucchini noodles - A simple green salad These sides complement the flavors well and keep the meal light. This blog post covered all you need to make Creamy Sun-Dried Tomato Chicken. We explored the ingredients, tools, and kitchen tips to ensure great results. I shared step-by-step instructions, so you feel confident cooking. We also looked at variations to fit your taste, as well as storage tips for leftovers. Now, you can make this dish your own. With just a few tweaks, you can create something special. Enjoy cooking and savor every bite!

Creamy Sun-Dried Tomato Chicken Flavorful Weeknight Meal

- Gnocchi (1 lb) - Chicken Breasts (1 lb) - Olive Oil (2 tbsp) - Garlic (4 cloves) - Cherry Tomatoes (1 cup) - Spinach (1 cup) - Heavy Cream (1 cup) - Parmesan Cheese (1/2 cup) - Italian Seasoning (1 tsp) - Salt and Pepper - Fresh Basil Leaves for Garnish Gather these ingredients for your Tuscan Chicken Gnocchi. You can use fresh or store-bought gnocchi, depending on what’s available. Chicken breasts give the dish a nice protein boost. Olive oil adds flavor and helps cook the chicken. Garlic brings a rich aroma and taste. Cherry tomatoes add sweetness and color. Spinach packs in nutrients and a pop of green. Heavy cream makes the sauce rich and velvety. Parmesan cheese adds a lovely salty flavor. Italian seasoning ties all the flavors together. Don’t forget to season with salt and pepper! You can top the dish with fresh basil for a bright finish. Each ingredient plays a role in making this dish a creamy, flavorful delight. {{ingredient_image_1}} To cook the gnocchi, start by boiling a large pot of salted water. Once it reaches a rolling boil, carefully add the gnocchi. Cook them according to the package instructions. You’ll know they’re done when they float to the top. This usually takes around 2-3 minutes. Drain the gnocchi and set them aside. - Tip: To ensure perfect texture, do not overcook the gnocchi. They should be soft yet firm. In a large skillet, heat 2 tablespoons of olive oil over medium-high heat. Add the sliced chicken breasts to the hot skillet. Season them with salt, pepper, and 1 teaspoon of Italian seasoning. Sauté for about 5-7 minutes. Cook until the chicken turns golden and is fully cooked. Remove the chicken from the skillet and set it aside. - Tip: Make sure the chicken is sliced evenly for consistent cooking. In the same skillet, add 4 minced garlic cloves and sauté for about 30 seconds. The garlic should smell fragrant but not brown. Next, add 1 cup of halved cherry tomatoes. Cook for about 2-3 minutes until they soften. Stir in 1 cup of chopped spinach and cook until it wilts. Then, pour in 1 cup of heavy cream. Stir to mix everything well and bring it to a gentle simmer. Add 1/2 cup of grated Parmesan cheese, stirring until it melts and becomes smooth. Taste and adjust salt and pepper as needed. - Tip: This sauce should be rich and creamy, so keep stirring to avoid lumps. Now, add the cooked chicken and gnocchi back into the skillet. Gently toss everything together to coat in the creamy sauce. Cook for an additional 2-3 minutes over low heat, just to warm everything through. To serve, dish out your creamy Tuscan chicken gnocchi onto plates. For a lovely finish, garnish with fresh basil leaves. This adds both color and flavor. - Tip: Use a large spoon to create a beautiful presentation on the plate. - Best practices for gnocchi preparation Start with a big pot of salted water. Bring it to a strong boil. Add the gnocchi when the water is ready. Cook until they float, then drain them well. This shows they are just right. Do not cook them too long, or they will be mushy. - Tips for perfect chicken cooking Use a hot skillet with olive oil for the chicken. Season it well with salt and pepper. Cook for about 5-7 minutes. Look for a golden color and no pink inside. This means the chicken is done. Set it aside to keep it juicy. - Ensuring smooth and creamy texture Stir the heavy cream into the skillet slowly. Let it simmer, but do not let it boil. Add the cheese after the cream is warm. Stir until it melts and blends smoothly. This makes the sauce rich and creamy. - Adjusting seasoning and flavor enhancements Taste the sauce before serving. You can add more salt or pepper if needed. Fresh herbs like basil can give extra flavor. A pinch of nutmeg can also enhance the creaminess. - Recommended side dishes A light salad pairs well with this dish. You might enjoy a simple arugula salad. It adds a fresh taste to balance the creaminess. Garlic bread or crusty rolls can also be nice. - Wine pairings to complement the meal A crisp white wine enhances the chicken and cream. Try a Pinot Grigio or Chardonnay. These wines go well with the flavors of the dish. Enjoying a glass will make your meal special. Pro Tips Perfecting the Gnocchi: Avoid overcooking the gnocchi; they should only be cooked until they float to the surface for the best texture. Flavorful Chicken: Let the chicken rest for a few minutes after cooking to retain its juices for a juicier bite. Fresh Spinach Substitute: If fresh spinach isn't available, you can use frozen spinach; just make sure to thaw and drain it well before adding it to the skillet. Garnishing Tips: For an extra touch of flavor, try adding a squeeze of lemon juice or a sprinkle of red pepper flakes just before serving. {{image_2}} You can easily change the protein in this dish. Shrimp works great if you want seafood. Tofu is a perfect swap for a vegetarian option. You can also add a mix of vegetables like zucchini or bell peppers for more color and flavor. To spice things up, add herbs like thyme or red pepper flakes. They can brighten the taste. You can also try different cheeses. Mozzarella adds a nice stretch, while feta gives a tangy kick. Gnocchi is delicious, but you can use other pasta types. Penne or farfalle work well in this dish. If you need gluten-free options, look for gluten-free gnocchi or pasta made from chickpeas or lentils. These swaps keep the meal tasty and fun. To keep your creamy Tuscan chicken gnocchi fresh, store it in an airtight container. Place it in the fridge for up to three days. Make sure it cools down before sealing. For longer storage, you can freeze it. Use a freezer-safe container or a zip-top bag. This will keep it good for up to three months. Remember to label the container with the date. When you're ready to enjoy your leftovers, you can reheat them in a few ways. The best method is to use a skillet. Heat over medium-low heat and add a splash of cream or broth. Stir gently until warmed through. You can also use the microwave. Place the gnocchi in a bowl and cover it with a damp paper towel. Heat in short bursts of 30 seconds. Stir between intervals to keep it creamy. Avoid high heat to prevent the sauce from breaking. You can use fresh or store-bought gnocchi. Fresh gnocchi has a soft, fluffy texture. It cooks quickly and tastes great. Store-bought gnocchi is easy and convenient. It often comes in a variety of flavors. The main difference is in texture and taste. I prefer fresh gnocchi for a homemade feel, but store-bought works well too. Yes, you can prepare this dish ahead of time. Cook the gnocchi and chicken separately. Store them in airtight containers in the fridge. You can make the creamy sauce and keep it in another container. When you are ready to eat, combine everything in a pan. Heat it until warm. This way, you save time on busy days. To lighten this dish, you can swap heavy cream for half-and-half or Greek yogurt. Use less cheese or a lighter cheese option. You can also add more vegetables, like zucchini or bell peppers. This adds flavor without many extra calories. Finally, consider using less olive oil when cooking. These changes keep the taste but cut back on fat. This article covered a delicious recipe featuring gnocchi and chicken. We explored each ingredient, from savory garlic to rich cream. I shared step-by-step instructions to ensure perfect cooking. You now have tips for variations and storing leftovers. Focus on ingredient quality for the best taste. Cooking can be simple and fun with the right approach. Enjoy making this meal, and don’t hesitate to experiment with new flavors. Happy cooking!

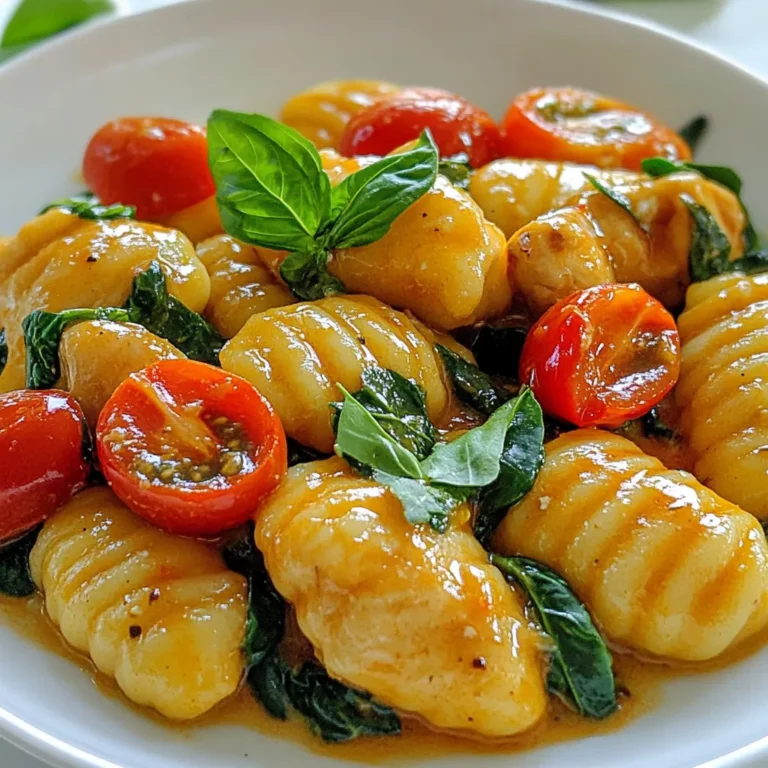
Tuscan Chicken Gnocchi Creamy Flavorful Delight

To make these tasty cranberry orange scones, gather the following: - 2 cups all-purpose flour - 1/2 cup granulated sugar - 1 tablespoon baking powder - 1/2 teaspoon salt - 1/2 cup cold unsalted butter, cubed - 1/2 cup dried cranberries - Zest of 1 large orange - 1/2 cup buttermilk (or whole milk) - 1 large egg, beaten - 1 teaspoon vanilla extract - 1 tablespoon orange juice - 1/4 cup powdered sugar (for glaze) - 1-2 tablespoons fresh orange juice (for glaze) Each ingredient brings something special: - Dried cranberries add fiber and antioxidants. They help with digestion and boost immunity. - Orange zest gives you vitamin C. This vitamin helps fight colds and supports healthy skin. - Buttermilk adds calcium and probiotics. It supports bone health and good digestion. These ingredients make scones not just a treat but also a smart choice. You can swap some ingredients if needed: - Gluten-free flour works well instead of all-purpose flour. This is great for gluten-free diets. - Maple syrup can replace granulated sugar. It adds a nice flavor and is less processed. - Coconut oil can substitute unsalted butter. This option is dairy-free and adds a unique taste. Feel free to get creative with your scones! {{ingredient_image_1}} 1. First, preheat your oven to 400°F (200°C). Line a baking sheet with parchment paper. 2. In a large bowl, whisk together the flour, sugar, baking powder, and salt. 3. Next, add the cubed cold butter to the flour mix. Use a pastry cutter or your fingers to blend it until the mix looks like coarse crumbs. 4. Then, stir in the dried cranberries and the orange zest. Make sure they are evenly mixed. 5. In another bowl, whisk the buttermilk, beaten egg, vanilla extract, and orange juice until blended. 6. Pour this wet mix into the dry ingredients. Gently stir until just combined. Be careful not to overmix; the dough should be slightly sticky. 7. Turn the dough onto a floured surface. Pat it down to about 1 inch thick. Cut it into squares or triangles with a sharp knife. 8. Place the scones on the prepared baking sheet. Leave space between each one to allow for rising. - Bake the scones for about 15-20 minutes. Keep an eye on them as they bake. - If you want a golden top, look for a nice brown color. - A toothpick inserted in the center should come out clean when they are done. - The tops should look golden brown. - The edges will be firm but soft in the center. - If you tap the bottom, it should sound hollow. - Allow them to cool for a few minutes after baking. This helps with the glaze later. These steps will guide you to make delicious cranberry orange scones. Enjoy the process and the lovely smells that fill your kitchen! To make your scones light and fluffy, use cold butter. Cold butter creates steam while baking. This steam helps the scones rise. Cut the butter into small cubes before mixing it with the flour. Avoid overmixing the dough. Just combine it until you see no dry flour. The dough should feel a bit sticky. One mistake is using warm butter. Warm butter will not create the right texture. Another common error is overmixing the dough. This can lead to tough scones. Also, make sure to measure your flour correctly. Too much flour can make them dry. Lastly, don't skip the glaze; it adds flavor and shine. You need a few simple tools to bake perfect scones. A large mixing bowl is essential for combining ingredients. A pastry cutter helps to cut in the butter. Use a sharp knife or pizza cutter for cutting the dough. A baking sheet lined with parchment paper prevents sticking. Finally, an oven thermometer ensures your oven is at the right temperature. Pro Tips Use Cold Ingredients: Ensure your butter and buttermilk are cold to help create a flaky texture in the scones. Don't Overmix: Gently combine the wet and dry ingredients to avoid tough scones. A little stickiness is normal! Cut Evenly: For uniform baking, cut your scones into equal sizes. This ensures they bake evenly and look great. Glaze While Warm: Drizzle the glaze over the scones while they are still warm for better absorption and a delightful finish. {{image_2}} You can change the flavors in your cranberry orange scones. Try adding nuts like walnuts or pecans. They add a nice crunch. You can also use different dried fruits. Try cherries or blueberries for a twist. For a spicier kick, add some chopped ginger or cinnamon. Each change gives a new taste while keeping the original charm. If you need gluten-free scones, use a gluten-free flour blend. This keeps the texture similar. For a vegan option, swap out the butter for coconut oil. Use almond milk or oat milk instead of buttermilk. Replace the egg with a flax egg by mixing one tablespoon of flaxseed meal with three tablespoons of water. These swaps make the scones friendly for various diets. In winter, try adding chopped apples or pears for warmth. In spring, use fresh herbs like rosemary or thyme for a fresh taste. In summer, add lemon zest for a bright flavor. In fall, pumpkin spice can change the whole vibe. These seasonal tweaks keep your scones exciting all year. To keep your scones fresh, place them in an airtight container. This keeps moisture in and prevents them from drying out. Store at room temperature for up to two days. If you want to keep them longer, refrigeration is a good option. They can last for up to one week in the fridge. Just make sure to wrap them tightly. When you're ready to enjoy a scone again, reheating is easy. Preheat your oven to 350°F (175°C). Place the scones on a baking sheet. Heat for about 5 to 10 minutes. This warms them and refreshes their texture. You can also microwave them for about 15 to 20 seconds. Just be careful not to overheat them! Freezing scones is a great way to save some for later. Once they cool completely, wrap each scone in plastic wrap. Place them in a freezer-safe bag or container. They will stay fresh for up to three months. To enjoy, remove a scone from the freezer. Thaw it in the fridge overnight, then reheat as mentioned above. Enjoy your delicious scones any time! Yes, you can use fresh cranberries. They add a tart flavor. However, they have more moisture than dried ones. This can change the texture of your scones. If you use fresh cranberries, cut back on the liquid in your recipe. You can also add a bit more sugar to balance the tartness. To make the scones less sweet, reduce the sugar. You can cut the granulated sugar down to 1/4 cup. You can also skip the glaze if you want. The scones will still taste great with less sweetness. Try adding more orange zest for extra flavor instead. Cranberry orange scones pair well with many things. You can serve them with clotted cream or butter. Jam or orange marmalade works too. A nice cup of tea or coffee also complements them well. For a festive touch, serve with fresh fruit or a light salad. In this article, we explored the ingredients for scones, their health benefits, and substitutions. I shared step-by-step instructions and key baking tips to ensure your success. We discussed ways to get the fluffiest scones and common mistakes to avoid. Plus, I provided fun variations and storage tips. Now you have all the tools to bake delicious scones. Enjoy the tasty rewards of your hard work!

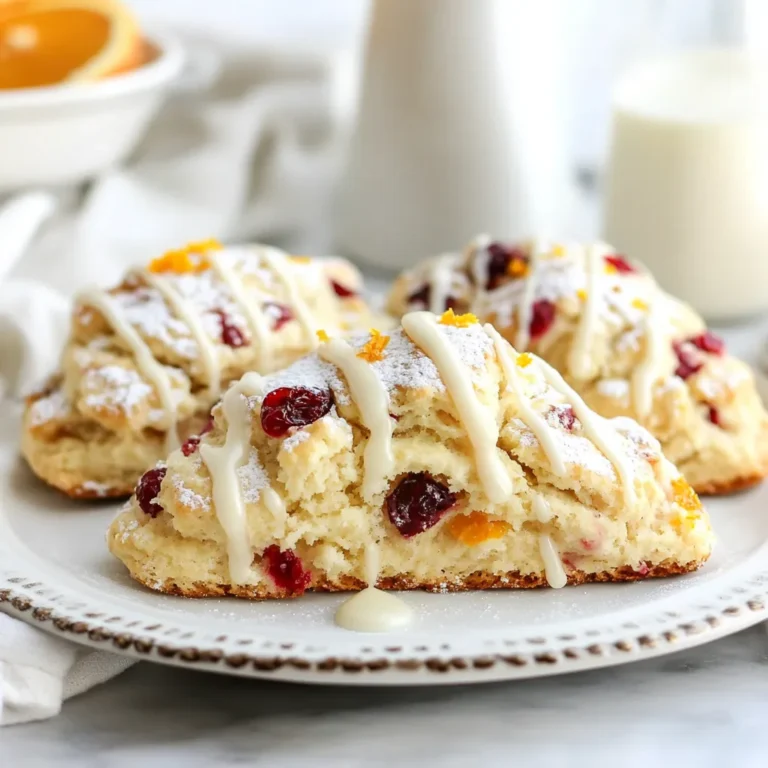
Cranberry Orange Scones Tasty and Simple Recipe

For creamy tomato basil orzo, you will need: - 1 cup orzo pasta - 2 cups vegetable broth - 1 cup cherry tomatoes, halved - 1 cup heavy cream or coconut cream - ½ cup grated Parmesan cheese (or nutritional yeast for a vegan option) - 2 cloves garlic, minced - 1 tablespoon olive oil - 1 teaspoon dried Italian herbs (basil, oregano) - Salt and pepper to taste - Fresh basil leaves for garnish Each ingredient plays a key role. If you need substitutes: - For orzo pasta, you can use any small pasta. - Vegetable broth can swap with chicken broth. - Use coconut cream for a dairy-free option. - Nutritional yeast works well instead of Parmesan cheese. Using fresh ingredients often gives better taste. For this dish: - Fresh basil adds bright flavor. - Fresh garlic has a stronger, sweeter taste. - Dried herbs are fine but use less, as they are more potent. Fresh tomatoes bring sweetness and juiciness. If you use canned tomatoes, choose whole or diced. Always drain excess liquid to prevent a watery dish. {{ingredient_image_1}} First, gather all your ingredients. You will need: - 1 cup orzo pasta - 2 cups vegetable broth - 1 cup cherry tomatoes, halved - 1 cup heavy cream or coconut cream - ½ cup grated Parmesan cheese (or nutritional yeast for a vegan option) - 2 cloves garlic, minced - 1 tablespoon olive oil - 1 teaspoon dried Italian herbs (basil, oregano) - Salt and pepper to taste - Fresh basil leaves for garnish Make sure to wash the cherry tomatoes and chop them. Mince the garlic well. This step helps in releasing the garlic's strong flavor. Begin by heating the olive oil in a medium saucepan over medium heat. Add the minced garlic and let it cook for about 1-2 minutes. You want it fragrant, not browned. Next, add the halved cherry tomatoes. Cook these for 3-4 minutes until they soften. Now, stir in the orzo pasta. Coat it well with the oil and garlic for about 1 minute. This adds flavor to the pasta. Then, pour in the vegetable broth and bring it to a boil. Once it boils, lower the heat and let it simmer. Stir occasionally for about 10-12 minutes. You want the orzo to be tender and absorb most of the liquid. Once the orzo is cooked, reduce the heat to low. Stir in the heavy cream and grated Parmesan cheese. Mix until the cheese melts and the sauce turns creamy. Season with dried herbs, salt, and pepper. If you want a creamier dish, add a bit more broth or cream. After mixing, remove the pan from the heat. Let the dish sit for a few minutes to thicken slightly. To make your orzo extra creamy, use high-quality heavy cream or coconut cream. These will blend well and give you that rich texture. Stir the mixture gently to avoid lumps. If you notice it’s too thick, add a splash of broth. This keeps the sauce smooth and helps it coat the pasta. Another tip is to use freshly grated Parmesan instead of pre-grated cheese. Fresh cheese melts better and creates a silkier sauce. Lastly, let the dish rest after cooking. It will thicken and develop its flavors, making every bite delightful. To boost flavor and creaminess, use fresh ingredients. Fresh basil adds a bright taste. Try using garlic and onion for more depth. A squeeze of lemon juice can brighten the dish. If you want it richer, add more cream or cheese. You can also try adding a bit of butter just before serving. This will give it a nice shine. One common mistake is overcooking the orzo. Keep an eye on the time. Orzo should be tender but not mushy. Another mistake is not seasoning enough. Taste the dish as you cook and adjust the salt and pepper. Also, don’t forget to let the dish sit for a few minutes after cooking. This helps it thicken and allows the flavors to blend. Serve the creamy tomato basil orzo in deep bowls. Top with fresh basil and a sprinkle of Parmesan cheese. This makes it look nice and inviting. For a side, pair it with a crisp green salad. A light vinaigrette goes well. You can also serve garlic bread or crusty rolls on the side. They are great for soaking up the creamy sauce. Pro Tips Use Fresh Herbs: Fresh basil will enhance the flavor profile of the dish significantly compared to dried herbs. Add them just before serving for maximum freshness. Adjust Creaminess: For a richer sauce, feel free to add more heavy cream or coconut cream. For a lighter version, simply increase the vegetable broth. Perfect Pasta Texture: Make sure to stir the orzo occasionally while it cooks to prevent it from sticking together and ensure an even texture. Garnish Wisely: A sprinkle of additional Parmesan cheese and a drizzle of high-quality olive oil can elevate the dish, making it look and taste gourmet. {{image_2}} You can easily make this creamy tomato basil orzo vegan. Just swap heavy cream for coconut cream. This gives a rich taste without dairy. Use nutritional yeast instead of Parmesan cheese. It adds a nice cheesy flavor. Both of these changes keep the dish creamy and delicious. Want to add more veggies? Try bell peppers, zucchini, or spinach. These add color and nutrients. Chop them small so they cook fast. You can mix them in while sautéing the garlic and tomatoes. This keeps everything fresh and bright. Herbs and spices can change the whole dish. You can use fresh basil for a strong flavor. If you like heat, add red pepper flakes. For a twist, try thyme or rosemary. These add depth and make the dish unique. Adjust herbs to match your taste. To keep your creamy tomato basil orzo fresh, store it in an airtight container. Let the orzo cool down before sealing it. This helps prevent extra moisture and keeps it from getting soggy. You can keep it in the fridge for up to three days. If you want to enjoy the dish later, make sure to label the container with the date. Reheating your leftover orzo is easy. You can use the microwave or the stove. For the microwave, place the orzo in a bowl and cover it with a damp paper towel. Heat it in short bursts, stirring in between, until it’s warm. On the stove, add a splash of broth or cream to a pan. Heat the orzo over low heat, stirring often until it’s hot. If you want to freeze your creamy tomato basil orzo, it works well! Use a freezer-safe container to store it. Make sure to leave some room for the orzo to expand. It can stay frozen for about two months. When you're ready to enjoy it, thaw it overnight in the fridge before reheating. Yes, you can use other pasta types. Try small shapes like penne or shells. These hold sauce well. Just adjust cooking time based on the pasta you pick. Follow package instructions to cook it right. You have tasty options for heavy cream. Coconut cream works well for a dairy-free choice. You can also use cashew cream for a rich flavor. If you want a lighter option, use whole milk or half-and-half. To add heat, include red pepper flakes. Start with a pinch and taste. You can also add diced jalapeños or a splash of hot sauce. Just remember, start small and add more as needed. Enjoy your spicy twist! In this blog post, we covered key ingredients and measurements for a creamy tomato basil orzo. You learned how to prepare ingredients, follow detailed cooking steps, and achieve a rich texture. We shared tips to enhance flavor and avoid common mistakes. You also discovered variations like vegan options and vegetable add-ins. Finally, we discussed how to store leftovers and reheat them properly. Now you’re ready to try this delicious dish yourself. Enjoy the cooking process and personalize it to make it your own!

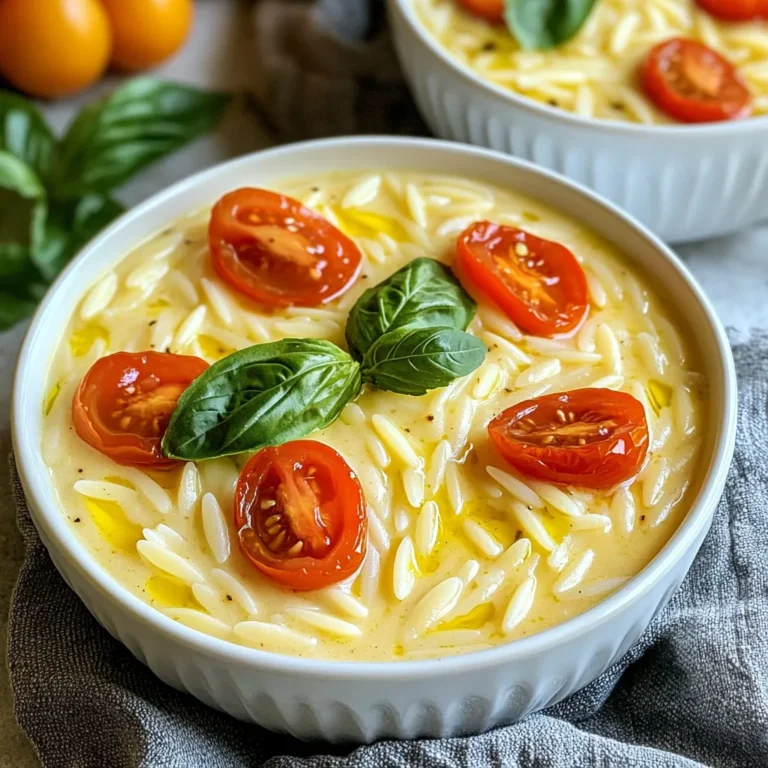
Creamy Tomato Basil Orzo Delightful Recipe Idea

To make creamy garlic parmesan quinoa, you need a few key ingredients. Each one adds flavor and texture. Here’s what you will need: - 1 cup quinoa, rinsed - 2 cups vegetable broth - 4 cloves garlic, minced - 1 cup heavy cream or coconut milk (for a dairy-free option) - ½ cup grated Parmesan cheese (or nutritional yeast for a vegan option) - 1 teaspoon garlic powder - 1 teaspoon onion powder - Salt and pepper to taste - 2 tablespoons fresh parsley, chopped (for garnish) Quinoa is the star of this dish. It brings a nutty flavor and a nice bite. Rinsing it removes any bitterness. The vegetable broth adds depth and richness. Garlic gives a strong, savory punch. You can use heavy cream for a rich taste or coconut milk for a light option. Parmesan cheese melts beautifully into the quinoa. If you want a vegan dish, nutritional yeast works well. Garlic powder and onion powder enhance the flavor without extra fuss. Finally, salt and pepper balance everything out. Garnish with fresh parsley for a bright touch. It adds color and freshness to each bite. With these ingredients, you are ready to create a creamy and delicious dish. {{ingredient_image_1}} Start with a medium saucepan. Pour in 2 cups of vegetable broth. Bring it to a boil. Add 1 cup of rinsed quinoa. Then, reduce the heat to low. Cover the saucepan and let it simmer. Cook for about 15 minutes. The quinoa should be fluffy and all the liquid absorbed. While the quinoa cooks, grab a skillet. Heat 1 tablespoon of olive oil over medium heat. Add 4 cloves of minced garlic. Sauté for 1-2 minutes until fragrant. Make sure the garlic does not brown. This step brings out its rich flavor. Pour in 1 cup of heavy cream or coconut milk into the skillet. Stir well to mix with the garlic. Next, add the cooked quinoa from the saucepan. Stir in ½ cup of grated Parmesan cheese or nutritional yeast. Add 1 teaspoon of garlic powder and 1 teaspoon of onion powder. Mix everything until the cheese melts and all ingredients combine well. Season the mixture with salt and pepper to taste. Let it simmer for an extra 2-3 minutes. This helps all the flavors meld together. Once done, remove the skillet from heat. Garnish with 2 tablespoons of chopped fresh parsley. Serve hot for a rich, creamy dish. To make quinoa fluffy, rinse it well under cold water. This helps remove bitter saponins. Use two parts liquid to one part quinoa. Bring the broth to a boil before adding the quinoa. Once you add the quinoa, reduce the heat and cover it. Cook for about 15 minutes. Let it rest for five minutes after cooking. Fluff it gently with a fork for the best texture. You can easily adjust this recipe to fit your needs. For a dairy-free dish, use coconut milk instead of heavy cream. Nutritional yeast can replace Parmesan cheese for vegan diets. If you're gluten-free, this recipe is perfect as quinoa is gluten-free. You can also use low-sodium broth to reduce salt. For extra flavor, add sautéed mushrooms or spinach to the dish. Fresh herbs like basil or thyme can brighten the taste. A squeeze of lemon juice adds a nice zing. You can also mix in roasted red peppers for a sweet touch. Experiment with spices like smoked paprika or cayenne for a kick. Each addition can make this dish unique and delicious. Pro Tips Use Fresh Garlic: Freshly minced garlic provides a more vibrant flavor compared to pre-minced options. Don't skip this step for maximum aroma and taste! Customize the Creaminess: Adjust the amount of heavy cream or coconut milk based on your preference for creaminess. For a lighter dish, reduce the cream slightly. Herb Variations: Experiment with different herbs like thyme or basil. Adding fresh herbs can elevate the flavor profile and add a pop of color. Leftover Storage: Store any leftovers in an airtight container in the fridge for up to 3 days. Reheat gently on the stove with a splash of broth or water to loosen it up. {{image_2}} You can make this dish even better by adding vegetables. Spinach, broccoli, or peas work great. Cook them with the garlic for extra flavor. You can also stir in roasted bell peppers or zucchini for a colorful touch. These veggies not only boost nutrition but also add texture to your meal. Want to make this dish heartier? Add protein! Cooked chicken, shrimp, or beef pairs well with quinoa. If you prefer plant-based options, try tofu or chickpeas. Just sauté them with the garlic for a few minutes. This will help the flavors blend nicely. Each protein adds its own taste, making your dish unique each time. Adjusting herbs and spices can change the whole flavor. For a fresh kick, try adding basil or thyme. A pinch of red pepper flakes gives a nice heat. You could also sprinkle in some Italian seasoning for a classic twist. Experimenting with different flavors can make this dish fun and exciting. To store Creamy Garlic Parmesan Quinoa, let it cool first. Then, place it in an airtight container. It stays fresh in the fridge for about 3 to 5 days. Make sure to label your container with the date you made it. You can freeze this dish for later use. Allow it to cool completely before transferring it to freezer-safe bags. Remove as much air as possible before sealing. The quinoa can last up to 3 months in the freezer. When ready to enjoy, thaw it in the fridge overnight. To reheat, use a stovetop or microwave. If using the stovetop, add a splash of broth or water. This keeps it creamy. Heat over low to medium heat, stirring often. For the microwave, heat in short bursts and stir in between. This helps keep the texture nice and smooth. Yes, you can make this dish vegan. Use coconut milk instead of heavy cream. For cheese, swap Parmesan with nutritional yeast. This gives a cheesy flavor without dairy. Leftovers can last up to four days in the fridge. Store them in an airtight container. Reheat gently on the stove or in the microwave. This dish pairs well with roasted vegetables or a fresh salad. You can also serve it with grilled chicken or fish for a complete meal. Sure! You can use rice, farro, or bulgur. Each grain will change the texture slightly, but the flavors will still shine through. Adjust cooking times based on the grain you choose. This post covered the key ingredients and steps for making Creamy Garlic Parmesan Quinoa. You learned how to cook quinoa, create a creamy mixture, and combine flavors. Remember, you can add veggies, proteins, or spices to make it your own. Store leftovers properly to keep them fresh. This dish is simple yet tasty, fitting a variety of diets. Enjoy exploring all the ways to personalize it!

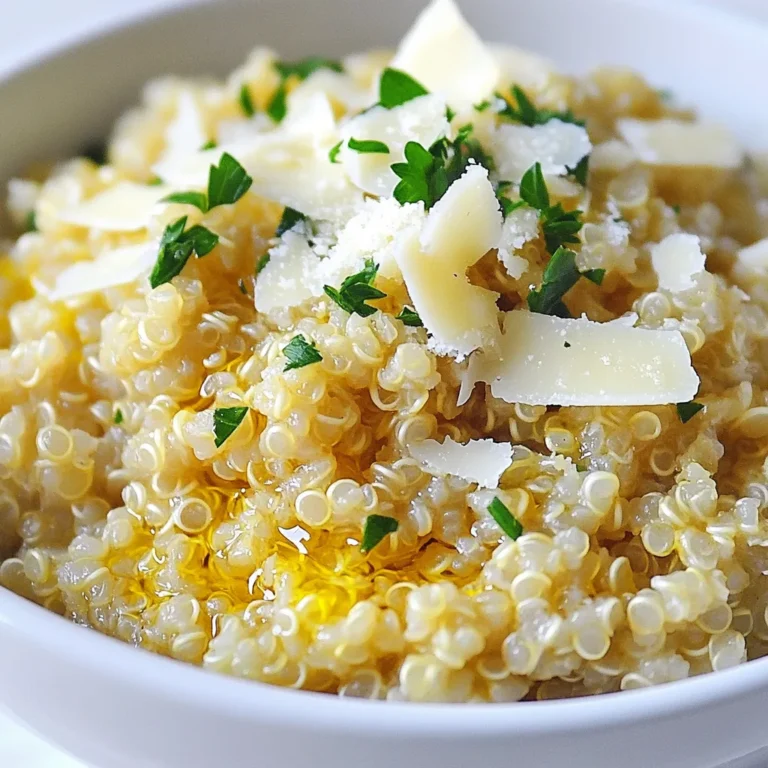
Creamy Garlic Parmesan Quinoa Flavorful and Rich Dish

- 4 large russet potatoes - 4 tablespoons olive oil - 4 cloves garlic, minced - 1 teaspoon dried oregano - 1 teaspoon smoked paprika - ½ teaspoon sea salt - ½ teaspoon black pepper - ½ cup grated Parmesan cheese - Fresh parsley, chopped (for garnish) - Additional spices (e.g., cayenne pepper) - Different cheese variety (e.g., Asiago or Pecorino) - Dipping sauces (e.g., garlic aioli, ranch) Gathering your ingredients is key to making these crispy garlic Parmesan fries. Start with russet potatoes. They have a great texture and hold up well. I use four large ones for this recipe. Olive oil adds that lovely richness. Four tablespoons will do the trick. Next, garlic is a must. I use four cloves, minced fine. For flavor, I add dried oregano and smoked paprika. One teaspoon of each gives depth. Sea salt and black pepper are key, too. I add half a teaspoon of each for balance. Now, let’s not forget the star of the show: Parmesan cheese. Half a cup, grated, goes on top to melt into the fries. For a fresh touch, I like to garnish with chopped parsley. If you want to jazz things up, consider optional ingredients. You can add cayenne pepper for heat or switch to a different cheese like Asiago. Dipping sauces can also enhance the experience. Garlic aioli or ranch are great choices. {{ingredient_image_1}} - Preheat your oven to 425°F (220°C). - Line a large baking sheet with parchment paper. - Wash and peel four large russet potatoes. - Cut the potatoes into even-sized fries, about 1/4 inch thick. Starting with the right prep makes all the difference. Preheating the oven ensures that your fries cook evenly. Lining the baking sheet with parchment helps them crisp without sticking. - Soak the cut fries in cold water for 30 minutes. - Remove excess moisture with a kitchen towel. Soaking the fries in cold water helps wash away excess starch. This key step makes your fries extra crispy. After soaking, remember to dry them well. Moist fries won’t crisp up as nicely. - Create the garlic-oil mixture by combining olive oil, minced garlic, oregano, smoked paprika, sea salt, and black pepper in a bowl. - Toss the dried fries in the garlic-oil mixture until well coated. - Arrange the fries in a single layer on the baking sheet. - Bake for about 25-30 minutes, turning halfway through. Mixing oil with garlic and spices gives your fries great flavor. Tossing them ensures every fry gets coated evenly. When baking, spacing the fries allows them to crisp up better. Turning them halfway helps achieve that golden color on all sides. Soaking the fries is key to getting them crispy. The cold water removes extra starch. This starch can make fries soggy. Soak the cut fries for 30 minutes. After soaking, drain them and dry them well. Use a clean kitchen towel to pat them dry. For even baking, spread the fries in a single layer. Make sure they have space between them. This helps hot air circulate around each fry. Turn the fries halfway through baking. This ensures both sides get nice and crispy. You can add more flavor to your fries. Try spices like cayenne pepper for heat. Another great option is garlic powder for extra garlic flavor. You can also mix in some fresh herbs, like rosemary or thyme. For cheese, Parmesan is classic, but you can switch it up. Try Asiago for a sharper taste or Pecorino for something unique. These variations keep your fries exciting and fun! Garnishing with fresh parsley makes a big difference. It adds a pop of color and freshness. Chop the parsley finely and sprinkle it on top before serving. To serve, use a nice dish or a big bowl. You can even add some dipping sauces on the side. Garlic aioli or ranch dressing pair well. This makes your fries look as good as they taste! Pro Tips Soak for Crispiness: Soaking the cut fries in cold water for 30 minutes helps remove excess starch, resulting in a crispier texture when baked. Uniform Cutting: Cut your fries into even-sized pieces to ensure they cook uniformly and achieve the same crispness throughout. Don’t Overcrowd: When placing fries on the baking sheet, make sure they are in a single layer and not overcrowded. This allows hot air to circulate around them for better crisping. Freshly Grated Cheese: For the best flavor and melt, use freshly grated Parmesan cheese instead of pre-grated, as it contains anti-caking agents that can affect melting. {{image_2}} You can take these fries to a new level with toppings. Adding crispy bacon gives a savory crunch. Jalapeños bring a spicy kick that many love. Drizzle ranch or cheese sauce over the top for extra flavor. This mix makes the fries fun and tasty for everyone. If you want a healthier option, try sweet potatoes. They add a different flavor and are packed with nutrients. You can also choose to bake instead of fry. Baking keeps the fries crunchy while using less oil. This way, you can enjoy your snack guilt-free. Want to change the taste? Use herbs like rosemary or thyme. These add a fresh, fragrant twist to your fries. If you like a sweet and spicy mix, try adding chili powder. This gives your fries a fun kick. Experimenting with flavors makes cooking exciting! To keep your fries fresh, let them cool down first. Once cooled, transfer them to airtight containers. This keeps them from getting soggy. Store the container in the fridge. Leftover fries stay good for up to three days. To reheat, your oven is the best choice. Preheat it to 400°F (200°C). Place the fries on a baking sheet. Heat for about 10-15 minutes. Check them often to avoid burning. This method helps keep them crispy. You can also use a skillet for a quicker option. Heat some oil, add fries, and stir until warm. You can freeze uncooked fries or cooked ones. If you freeze uncooked fries, soak and dry them first. Spread them on a tray and freeze until solid. Once frozen, move them to a bag. Cook from frozen when you're ready. For cooked fries, let them cool, then store in bags. They can last up to three months in the freezer. When you're ready to eat, thaw overnight in the fridge before reheating. Yes, you can make these fries in an air fryer. Set your air fryer to 400°F (200°C). Cook the fries for about 15-20 minutes. Shake the basket halfway through. This will help them crisp up well. Russet potatoes are the best choice for crispy fries. They are starchy and create a nice texture. Yukon Gold potatoes also work well. They have a buttery flavor. Avoid waxy potatoes like red potatoes. They tend to be too moist for frying. To keep fries crispy, soak them in cold water. This removes excess starch. After soaking, dry them well with a towel. Make sure to space them out on the baking sheet. Overcrowding can trap moisture and cause sogginess. Cooking at a high temperature also helps them stay crisp. In this post, we explored the world of delicious garlic Parmesan fries. I covered the key ingredients needed, both essential and optional, for maximum flavor. The step-by-step instructions guide you through preparation, soaking, and baking for that perfect crisp. We shared tips to enhance flavor and presentation, along with variations for a creative twist. Lastly, I included storage and reheating tips to enjoy your fries later. Follow these steps, and you’ll create fries that impress every time. Get ready to savor your tasty creation!

Crispy Garlic Parmesan Fries Irresistible Snack Treat

To make a Mixed Berry Yogurt Parfait, you need simple and fresh ingredients. Here is what you will need: - 2 cups Greek yogurt (plain or vanilla) - 1 cup mixed berries (strawberries, blueberries, raspberries, blackberries) - 1/2 cup granola (your favorite brand or homemade) - 2 tablespoons honey or maple syrup (optional for sweetness) - 1 teaspoon vanilla extract (optional) - Fresh mint leaves for garnish These ingredients work together to create a treat that is both tasty and healthy. Greek yogurt is thick and creamy, which gives the parfait a rich texture. The mixed berries offer bright colors and bursts of flavor. Granola adds a nice crunch, making every bite exciting. You can adjust the sweetness with honey or maple syrup if you like. Fresh mint leaves at the end make the parfait look pretty and fresh. Choosing high-quality ingredients is key. Look for ripe berries at the store. They should be firm and vibrant. For yogurt, plain Greek yogurt gives you the most control over flavor. If you want a sweet kick, use vanilla yogurt instead. Make sure to pick granola that has whole ingredients. You can also use homemade granola for a personal touch. With these ingredients, you can create a delicious parfait that is easy to make and fun to eat. {{ingredient_image_1}} First, rinse the mixed berries under cold water. This step removes any dirt or chemicals. Next, if you are using strawberries, hull them by removing the green tops. Then, slice the strawberries into small pieces. After rinsing, pat the berries dry with a paper towel. This keeps the parfait from getting soggy. Set the berries aside for later use. In a medium bowl, combine the Greek yogurt with your choice of sweetener. You can use honey or maple syrup for a touch of sweetness. If you like, add a teaspoon of vanilla extract for flavor. Stir the mixture until it is smooth. This will give the yogurt a nice taste and creamy texture. Adjust the sweetness to your liking by adding more sweetener if needed. Grab your favorite serving glasses or bowls. Start with a layer of the sweetened yogurt, about one-third of a cup. On top of the yogurt, add a spoonful of mixed berries. Then, sprinkle a layer of granola. Repeat these layers until the glasses are filled to the top. Finish with a final layer of berries on top. Aim for nice, even layers to make the parfait look appealing. Now, it’s time to add some garnishes. Top each parfait with a few extra berries and a sprig of fresh mint. This adds color and a fresh touch. To let the flavors blend, chill the parfaits in the refrigerator for about 10 to 15 minutes. This step enhances the taste and makes the parfaits even more enjoyable when served. To get creamy yogurt layers, start with high-quality Greek yogurt. Mix your yogurt with honey or maple syrup for sweetness. This helps the yogurt become smooth and tasty. Chilling the yogurt is important too. It makes the parfait refreshing and improves the flavors. After you layer the parfait, let it chill for about 10-15 minutes in the fridge. This allows the ingredients to blend well. Serve your parfaits in clear glassware. This way, people can see the beautiful layers of yogurt, berries, and granola. You can use mason jars, wine glasses, or even dessert bowls. For garnishing, try adding fresh mint leaves on top. You can also sprinkle some extra granola or berries for color. This makes your parfait eye-catching and fun to eat. If you want a lighter option, use low-fat yogurt. It still tastes great and keeps the parfait creamy. You can also switch up the granola. Try using nuts, seeds, or oats instead of regular granola. This adds different textures and flavors. These small changes can make your parfait even healthier while keeping it delicious. Pro Tips Berry Selection: Choose a mix of ripe and seasonal berries for the best flavor and freshness. Yogurt Consistency: For a creamier parfait, use full-fat Greek yogurt, or try blending it with a bit of milk. Granola Crunch: Add granola just before serving to maintain its crunchiness and avoid sogginess. Make Ahead: Prepare the yogurt and berries in advance, but layer them just before serving for the best texture. {{image_2}} You can switch up the fruit in your parfait for fun. Instead of just mixed berries, try other berries like cranberries or gooseberries. You can also add tropical fruits like mango or kiwi. These fruits bring a bright taste and make your parfait colorful. If you want a dairy-free option, try coconut or soy yogurt. Both have a creamy texture and great taste. You can also use flavored yogurt for a twist. Think of options like strawberry or peach yogurt to add extra flavor. If you want to make your granola at home, it's easy! Mix oats, nuts, and honey. Bake until golden for a crunchy treat. If you don’t want granola, try nuts or seeds instead. They add crunch and healthy fats, boosting nutrition without the grains. To keep your mixed berry yogurt parfait fresh, store it in the refrigerator. Use airtight containers to prevent air from getting in. Glass jars or plastic containers work well. If you are using glasses, cover them with plastic wrap. This way, your parfait stays tasty and looks nice. You can keep parfaits fresh for about two days in the fridge. After this time, they may not taste as good. Watch for signs of spoilage, like off smells or mold. If the berries look mushy, it's best to toss them. Always trust your senses! If you have leftover yogurt, berries, or granola, store them separately. This keeps each part fresh longer. You can make a new parfait later or add the yogurt to smoothies. Use leftover granola as a topping for oatmeal or yogurt. This way, nothing goes to waste! You can keep your Mixed Berry Yogurt Parfaits in the fridge for up to three days. After that, the berries may lose their freshness. I recommend covering them well to keep air out. This will help maintain the taste and texture. Yes, you can use frozen berries! Just thaw them first and drain any excess water. Frozen berries work well and can be a great option when fresh ones are not in season. They still pack a lot of flavor and nutrients. The best granola for your parfait is one that you enjoy. Look for options with whole grains and low added sugar. You can also choose nutty or fruity granola for extra flavor. Homemade granola is a fun choice too! To make a vegan parfait, use plant-based yogurt. Almond, coconut, or soy yogurt are great choices. You can sweeten with maple syrup instead of honey. This keeps your parfait tasty and friendly for all diets. You can add many toppings to your parfait! Some great ideas include nuts, seeds, or coconut flakes. You can also drizzle nut butter or add chocolate chips for a special touch. Get creative and make it your own! You learned how to make delicious mixed berry yogurt parfaits. We covered easy steps, from preparing berries to layering ingredients. You can switch fruits or use different yogurt types and granola options. Remember to store your parfaits correctly to keep them fresh. With these tips, you can enjoy joyful, healthy snacks any time. Experiment with flavors and enjoy the fun of creating your parfait masterpiece!

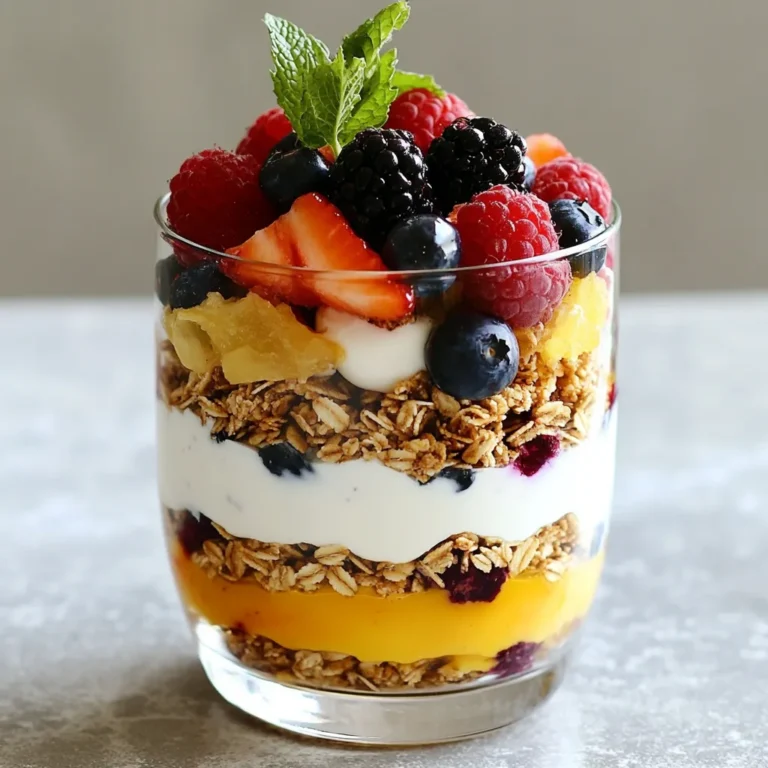
Mixed Berry Yogurt Parfait Easy and Nutritious Treat

To make creamy Parmesan spinach gnocchi, gather these simple items: - 1 pound potato gnocchi - 2 cups fresh spinach, chopped - 1 cup heavy cream - 1 cup grated Parmesan cheese - 2 tablespoons unsalted butter - 2 cloves garlic, minced - 1 teaspoon onion powder - ½ teaspoon nutmeg - Salt and pepper to taste - Fresh basil leaves for garnish Choosing the right ingredients is key to a great dish. Here are some tips: - Potato Gnocchi: Look for gnocchi made from real potatoes. Check the label for quality. - Fresh Spinach: Select vibrant green spinach. Avoid any wilting or browning leaves. - Heavy Cream: Use pure heavy cream for the best richness and texture. - Parmesan Cheese: Grate fresh Parmesan instead of using pre-grated options. It tastes better! - Garlic: Choose firm, fresh garlic for a strong flavor. Avoid any that feels soft. This recipe serves about four people. Each serving is rich and filling. You can adjust the amount based on your needs. If you want leftovers, it’s great for lunch the next day! {{ingredient_image_1}} First, fill a large pot with water. Make sure to add salt to the water. Bring it to a boil over high heat. Once boiling, add 1 pound of potato gnocchi. Cook the gnocchi until they float to the top. This takes about 2 to 3 minutes. When they float, they are done! Drain the gnocchi in a colander and set them aside. Next, grab a large skillet and melt 2 tablespoons of unsalted butter over medium heat. Once the butter is melted, add 2 cloves of minced garlic. Sauté the garlic for about 1 minute. Keep an eye on it, so it doesn’t brown. After that, toss in 2 cups of chopped fresh spinach. Cook the spinach for 2 to 3 minutes until it wilts. Now, pour in 1 cup of heavy cream and stir to mix. Add 1 teaspoon of onion powder, ½ teaspoon of nutmeg, and salt and pepper to taste. Let this simmer for another 2 to 3 minutes until the sauce thickens a bit. Finally, stir in 1 cup of grated Parmesan cheese. Keep stirring until the cheese fully melts into the sauce. Now, it’s time to bring it all together! Add the cooked gnocchi into the creamy spinach sauce. Toss gently to coat each piece of gnocchi. Let everything cook together for an extra 2 minutes. This helps the flavors blend well. Once done, remove from heat. Serve the dish right away. Don’t forget to garnish with fresh basil leaves for a pop of color and flavor! To make perfect gnocchi, choose the right type. Use potato gnocchi, as it gives a soft texture. Cook them in boiling water until they float. This usually takes 2-3 minutes. Don't overcook them; they should be tender but not mushy. Drain them well to avoid a watery dish. Tossing them gently in the creamy sauce helps keep their shape. To boost the taste, use fresh ingredients. Mince garlic finely for a strong flavor. Sauté it in butter until fragrant, but avoid browning it. Add chopped spinach next, letting it wilt. This brings out its natural sweetness. Nutmeg adds warmth, while onion powder enhances depth. Always taste and adjust salt and pepper to your liking. Pairing is key for a great meal. A crisp white wine, like Sauvignon Blanc, works well with this dish. Its acidity cuts through the creaminess. For side dishes, a fresh salad with lemon dressing complements the meal. Garlic bread also makes a tasty addition. These options balance the rich flavors of the creamy gnocchi. Pro Tips Use Fresh Ingredients: Fresh spinach and high-quality Parmesan cheese make a significant difference in flavor and creaminess, enhancing the overall dish. Don’t Overcook the Gnocchi: Since gnocchi cooks quickly, keep an eye on them. They are ready when they float to the top, usually in 2-3 minutes. Customize the Sauce: Feel free to add other ingredients such as sun-dried tomatoes, mushrooms, or chicken for added flavor and texture. Garnish for Presentation: Fresh basil not only adds color but also a burst of freshness. Consider adding a drizzle of olive oil for an extra touch. {{image_2}} You can make this dish heartier by adding protein. Chicken, shrimp, or tofu work well. For chicken, cook diced pieces in the skillet until golden. For shrimp, add them after the garlic and cook until pink. If you prefer tofu, use firm tofu and sauté it until crisp. Each option adds great flavor and texture. If you need a dairy-free option, swap heavy cream with coconut milk or a nut milk. Use nutritional yeast instead of Parmesan for that cheesy taste. You can also find dairy-free cheese that melts well. These swaps keep the dish creamy and delicious without dairy. Adding veggies boosts nutrition and taste. Mushrooms add a nice earthiness. Sauté sliced mushrooms with garlic until soft before adding spinach. Peas add a sweet pop of color and flavor. Toss them in when you add the cream. Feel free to experiment with other veggies, like bell peppers or zucchini. Each adds its own unique twist. Store your creamy Parmesan spinach gnocchi in an airtight container. This keeps moisture in and prevents it from drying out. Place it in the fridge within two hours of cooking. It will last for about three days. When you're ready to enjoy it again, check for any changes in smell or texture before reheating. To freeze this dish, let it cool completely. Then, scoop it into freezer bags. Remove as much air as possible to avoid freezer burn. Label the bags with the date. It can stay good for up to three months. When you want to eat it, thaw it overnight in the fridge. This method keeps the flavors fresh. For reheating, the stovetop is best. Place the gnocchi in a skillet over medium heat. Add a splash of cream or water to help it heat evenly. Stir gently until it warms through. This keeps the sauce creamy and delicious. You can also use a microwave, but stir every minute to avoid hot spots. It takes about 20 minutes to make this dish. The prep time is 10 minutes. Cooking the gnocchi and sauce only takes another 10 minutes. This recipe is quick and easy, perfect for a busy night. Yes, you can use frozen gnocchi. Just cook them according to the package directions. Frozen gnocchi works well and saves time. They taste great in the creamy sauce, too. You can use milk or a dairy-free cream. If you want a lighter option, use half-and-half. For a vegan choice, try coconut cream or cashew cream. These options still give a rich flavor and creamy texture. This blog post covered key points for making Creamy Parmesan Spinach Gnocchi. We explored the right ingredients and how to pick the best ones. I shared step-by-step instructions to help you cook and serve this dish. Tips on perfecting texture and adding flavors will elevate your meal. You can also try variations with proteins and veggies. Finally, I provided storage and reheating advice for your leftovers. Enjoy your cooking journey and savor the tasty results!

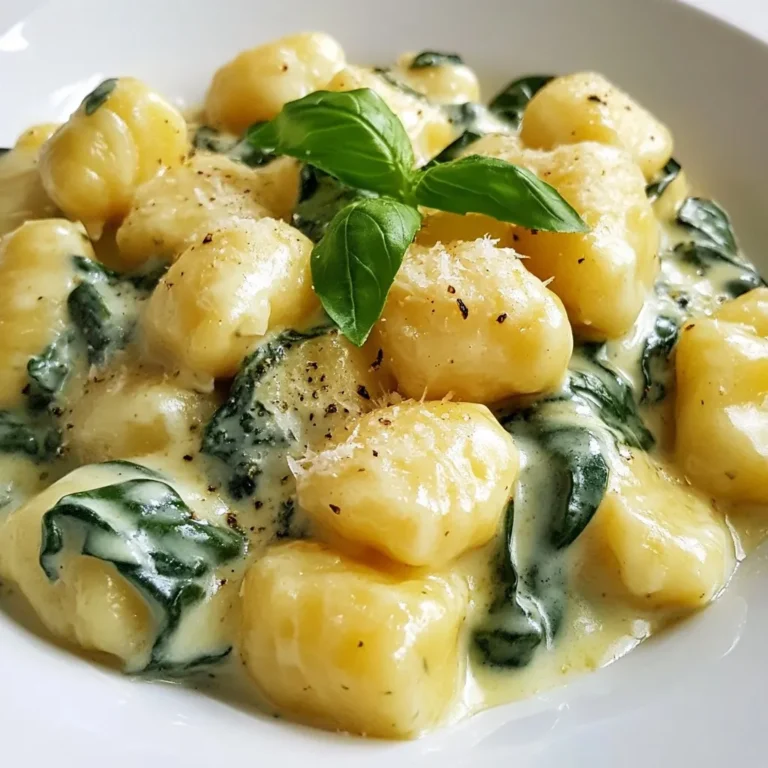
Creamy Parmesan Spinach Gnocchi Simple and Tasty Meal

To make mango coconut chia pudding, gather these key items: - 1 cup coconut milk - 1/2 cup almond milk - 1/4 cup chia seeds - 2 tablespoons maple syrup - 1 ripe mango, peeled and diced - 1/2 teaspoon vanilla extract - A pinch of salt These ingredients combine to create a creamy and tasty treat. The coconut milk adds richness, while almond milk keeps it light. Chia seeds are the star, giving the pudding its unique texture. Maple syrup adds the perfect touch of sweetness. You can enhance the flavor with these optional ingredients: - A dash of cinnamon - A splash of lime juice - Other fruit, like pineapple or banana These ingredients bring exciting new tastes. A dash of cinnamon offers warmth, while lime juice adds zing. Extra fruit can bring more color and flavor. For a beautiful finish, consider these garnishes: - Fresh mint leaves - Extra diced mango - A drizzle of coconut milk Adding garnishes makes your pudding look appealing. Mint leaves add a pop of green, while extra mango gives sweetness. A drizzle of coconut milk can make it extra special. {{ingredient_image_1}} In a medium bowl, mix the coconut milk and almond milk. Add the chia seeds, maple syrup, vanilla extract, and a pinch of salt. Stir well to combine everything. This step is key. You want the chia seeds to be evenly distributed in the liquid. Leave no clumps behind. Now, cover the bowl with plastic wrap or a lid. Place it in the refrigerator. Let it sit for at least four hours or overnight. This gives the chia seeds time to soak up the liquid. They will swell and form a pudding-like texture. The longer you leave it, the creamier it gets. Once the chia pudding is ready, take it out of the fridge. Stir it gently to break any clumps. Grab your serving glasses and start layering. Spoon in a layer of chia pudding first. Then, add a layer of diced mango. Repeat these layers until the glass is full. Top with extra mango and a mint leaf for garnish. This makes it look extra special! You can change the sweetness of your mango coconut chia pudding. Start with two tablespoons of maple syrup. After mixing, taste it. If you want it sweeter, add more syrup. Adjust to your liking for a personal touch. You can also use honey or agave syrup instead. To get the right texture, mix the chia seeds well. Stir them into the liquids right after adding. This helps prevent clumps. Let the mixture rest in the fridge for at least four hours. If you want a thicker pudding, let it sit overnight. Stir gently before serving to break up any lumps. How you serve your chia pudding matters. Use clear glasses or jars to show off the layers. Start with a layer of pudding, then add mango, and repeat. Top with more mango and a mint sprig for color. Drizzle a bit of coconut milk on top for a nice finish. This makes your dish look fancy and inviting. Pro Tips Use Ripe Mango: Ensure that the mango is perfectly ripe for the best flavor and sweetness in your pudding. Chill for Best Results: Let the pudding sit overnight for a thicker and creamier texture; the longer it sits, the better it gets! Layering Technique: For a stunning presentation, use clear glasses and layer the pudding and mango carefully to showcase the beautiful colors. Adjust Sweetness: Feel free to adjust the maple syrup according to your taste; you can also substitute it with honey or agave if desired. {{image_2}} You can easily change the milk types in this recipe. Instead of coconut milk, try oat or soy milk. These options give a different taste and texture. Almond milk works well too, adding a nutty flavor. Mix and match to find your favorite combo! Feel free to add extra fruits or nuts for more flavor. Berries, bananas, or even kiwi can brighten up your pudding. You can also sprinkle some nuts like almonds or walnuts on top. They add a nice crunch and boost nutrition. Want to spice things up? Add a pinch of cinnamon or nutmeg for warmth. You can also try different extracts, like almond or coconut. These little changes can make a big difference in taste. Have fun experimenting with your favorite flavors! You can store your mango coconut chia pudding in an airtight container. Glass jars work great for this. Make sure to keep it in the fridge. This helps the pudding stay fresh and tasty. When you want to reuse your chia pudding, just give it a good stir. This breaks up any clumps. If it looks thick, add a splash of milk. This helps get back the creamy texture. You can also layer it with fresh fruit again for a fun twist. Your chia pudding will stay fresh for up to five days in the fridge. To keep it at its best, avoid adding toppings until you're ready to eat. This keeps the fruit from getting soggy. If you notice any off smells or changes in texture, it’s best to throw it out. Enjoy your delicious treat while it’s fresh! Yes, you can use various types of milk. Almond milk, oat milk, or soy milk work well. Each milk adds its own flavor. Experiment to find your favorite. Just keep the same amounts. Chia pudding lasts about five days in the fridge. Store it in an airtight container. This keeps it fresh and tasty. Check for any signs of spoilage before eating. Yes, chia pudding is very healthy. Chia seeds are full of fiber and omega-3 fatty acids. They help with digestion and heart health. Coconut milk adds healthy fats, making this a nutritious treat. Yes, this recipe is already vegan-friendly. Use coconut milk and almond milk as your base. Maple syrup adds sweetness without any animal products. Enjoy this healthy delight without worry. If you want a substitute for maple syrup, try agave syrup or honey. You can also use stevia or coconut sugar. Adjust the amount to taste. Each option gives a unique sweetness. Chia pudding is easy to make and fun to enjoy. You can mix flavors and toppings to suit your taste. Remember, the key steps are preparing the chia mixture, layering with mango, and letting it chill. Don't forget to tweak the sweetness and texture for the best result. Store it properly to keep it fresh, and feel free to explore different variations. With these tips, you can create the perfect chia pudding every time! Dive in and enjoy your delicious creation.

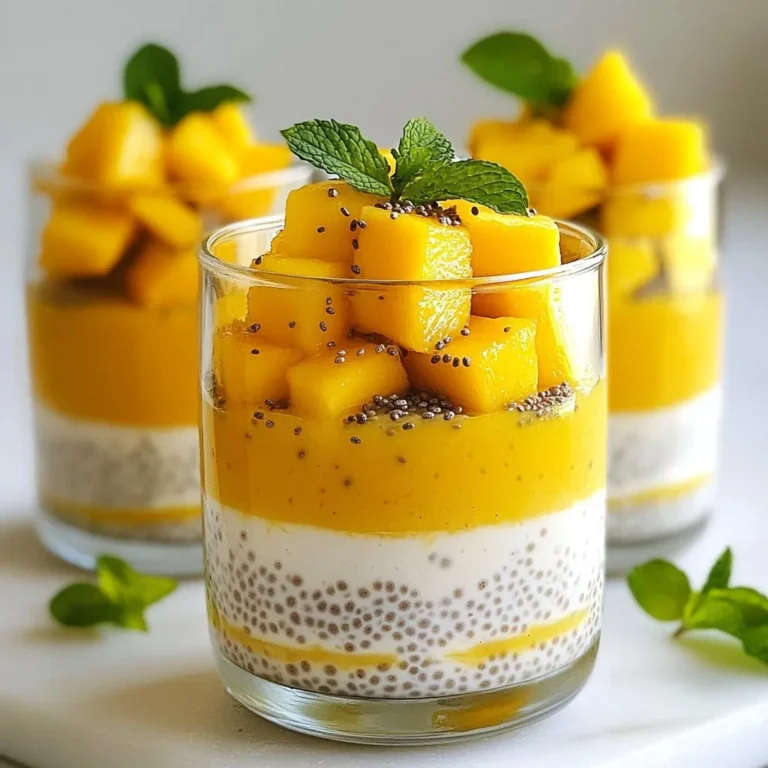
Mango Coconut Chia Pudding Easy Healthy Delight

PREV 1 … 41 42 43 … 52 NEXT
cozy citrus kitchen

explore

DessertsDinnerAppetizersDrinks

Our Policies

  • Cookie Policy
  • Copyright Policy
  • Disclaimer
  • GDPR Policy
  • Terms Of Use
Back to Top
  • About
  • Contact Us
  • Privacy Policy
© 2025 cozy citrus kitchen