FREE DINNER EBOOK! Get your copy!
  • Cookie Policy
  • GDPR Policy
  • Disclaimer
  • Terms Of Use
  • Visit my other site: Fun Cookie Recipes
cozy citrus kitchen
  • Home
  • Dinner
  • Desserts
  • Drinks
  • Appetizers
  • Contact
  • About
  • Privacy Policy
  • Home
  • Dinner
  • Desserts
  • Drinks
  • Appetizers
  • Contact
  • About
  • Privacy Policy
  • Cookie Policy
  • GDPR Policy
  • Disclaimer
  • Terms Of Use
Visit my other site: Fun Cookie Recipes

HOME / CATEGORIES /

Latest

To make the delightful cranberry orange cheesecake bars, you will need the following: - 1 ½ cups graham cracker crumbs - ¾ cup unsalted butter, melted - 2 tablespoons sugar - 16 oz cream cheese, softened - ½ cup granulated sugar - 2 large eggs - 1 teaspoon vanilla extract - Zest of 1 large orange - 1 cup fresh or frozen cranberries - ½ cup cranberry sauce (homemade or store-bought) - 1 tablespoon cornstarch - 2 tablespoons orange juice - Pinch of salt These ingredients create a perfect balance of sweet and tart flavors. You can enhance the flavor with a few optional ingredients: - A sprinkle of cinnamon adds a warm spice. - A few drops of almond extract can deepen the flavor. - Adding a touch of nutmeg can also work wonders. Feel free to experiment with your favorite flavors. If you need substitutes, here are some great options: - Use gluten-free graham crackers for a gluten-free crust. - Swap cream cheese with a plant-based alternative for a vegan version. - Instead of granulated sugar, try coconut sugar for a different taste. - If you don't have fresh cranberries, dried cranberries can work, but they will change the texture. These substitutions can help fit special diets without losing taste. {{ingredient_image_1}} 1. Preheat Oven: Set your oven to 325°F (160°C). Line a 9x13 inch baking dish with parchment paper. Leave some paper overhanging for easy removal. 2. Make the Crust: In a medium bowl, mix together 1 ½ cups of graham cracker crumbs, ¾ cup of melted unsalted butter, and 2 tablespoons of sugar. Stir until the crumbs absorb the butter. Press this mix firmly into the bottom of the dish. 3. Bake Crust: Place the crust in the oven for 10 minutes. Once done, let it cool slightly. 4. Create the Filling: In a large bowl, beat 16 oz of softened cream cheese with ½ cup of granulated sugar until smooth. Add in 2 large eggs, one at a time. Mix well after each egg. Stir in 1 teaspoon of vanilla extract and the zest of 1 large orange. 1. Add Cranberries: In another bowl, toss 1 cup of fresh or frozen cranberries with 1 tablespoon of cornstarch and 2 tablespoons of orange juice. This prevents them from sinking. Carefully fold the cranberries into the cream cheese mix. 2. Assemble: Pour the cream cheese mixture over the cooled crust. Spread evenly. Drop spoonfuls of ½ cup of cranberry sauce on top. Use a knife to swirl it for a pretty marbled look. 3. Bake: Place the pan back in the oven. Bake for 30-35 minutes. The center should look set but still jiggle slightly. 4. Cool: After baking, let the bars cool at room temperature for 1 hour. Then, refrigerate for at least 2 hours. This helps the cheesecake set properly. 5. Slice and Serve: Once chilled, lift the bars out using the parchment paper. Cut them into squares. These bars are great served cold or at room temperature. - Optimal Baking Times: Bake the bars at 325°F. Check them after 30 minutes. They should jiggle slightly in the center. - Common Pitfalls: Avoid overbeating the cream cheese. This can make the cheesecake too airy. Also, don’t skip cooling the crust; it helps the layers stick together. - Tools and Equipment: Use a 9x13 inch baking dish for the right size. A handheld mixer works best for the filling. Have a sharp knife ready for slicing. - Best Ways to Slice: Use a sharp knife and wipe it clean between slices. This keeps the edges neat. - Pairing Ideas: Enjoy these bars with hot tea or coffee. A dollop of whipped cream on top adds a nice touch too. Fresh orange slices or mint leaves make great garnishes. - Storage and Reheating: Store the bars in the fridge for up to five days. If you have leftovers, cover them tightly. To enjoy later, serve them cold or let them sit at room temp for about 30 minutes. Pro Tips Use Room Temperature Ingredients: Ensure your cream cheese is at room temperature for a smooth filling. This helps prevent lumps and creates a creamy texture. Don’t Overmix: Once you add the eggs to the cream cheese mixture, mix just until combined. Overmixing can lead to cracks in the cheesecake bars. Chill Completely: Allow the cheesecake bars to cool at room temperature before refrigerating. Chilling helps the flavors meld and ensures a firmer texture when sliced. Fresh Cranberries for Tartness: If using fresh cranberries, be prepared for a tart punch. If you prefer a sweeter flavor, you can substitute dried cranberries or increase the sugar slightly in the filling. {{image_2}} You can add a fun twist to your cranberry orange cheesecake bars with spices. Try adding 1/2 teaspoon of cinnamon or a pinch of nutmeg to the filling. These spices enhance the warm flavors and make each bite delightful. You may also swap fruits in the recipe. Consider using raspberries or blueberries instead of cranberries. These fruits add a different tartness and color to your bars. You could even mix fruits for a fun flavor burst. If you want a vegan option, replace the cream cheese with a plant-based cream cheese. Use flax eggs in place of regular eggs. This keeps the bars creamy and ensures everyone can enjoy them. For a gluten-free version, choose gluten-free graham crackers for the crust. You can present these bars in unique ways. Serve them in individual cups for a fun touch. Just layer the crust, filling, and sauce in small cups. This makes them easy to grab at parties. You can also add chocolate or nuts to the recipe. Drizzle melted chocolate over the top after baking. Chopped nuts can add a nice crunch. Try pecans or walnuts for extra flavor. For seasonal variations, change the topping based on the holiday. In winter, sprinkle with crushed peppermint. During fall, add a layer of spiced apple compote. This keeps your cranberry orange cheesecake bars fresh and exciting for any celebration. You can store your cranberry orange cheesecake bars in the fridge. They stay fresh for about five days. To keep them from drying out, cover them tightly with plastic wrap or place them in an airtight container. This helps retain their creamy texture and bright flavor. If you want to keep the bars longer, freezing is a great option. First, let them cool completely. Then, cut them into squares. Wrap each square in plastic wrap, then place them in a freezer-safe bag or container. This method helps prevent freezer burn. To thaw your bars, take them out and place them in the fridge overnight. For a quick serve, you can let them sit at room temperature for about 30 minutes. They taste just as good as when you first made them! How do I know when the cheesecake bars are done baking? You will know the bars are done when the edges look set. The center should still jiggle a bit. This slight jiggle means they will firm up as they cool. Can I use frozen cranberries? Yes, you can use frozen cranberries. Just toss them with cornstarch and orange juice, just like fresh ones. This helps keep them from sinking. What’s the best way to cut the bars for clean slices? To cut clean slices, use a sharp knife. Dip it in warm water and wipe it dry. This helps the knife glide through the bars smoothly. How to prevent the cheesecake from cracking? To prevent cracks, avoid overmixing the batter. Mix just until combined. Also, bake at a lower temperature and let the bars cool slowly in the oven. Can I make this recipe ahead of time? Yes, these bars are great to make ahead. You can prepare them a day or two before serving. Just keep them stored in the fridge. What should I serve with cranberry orange cheesecake bars? These bars pair well with whipped cream or vanilla ice cream. A hot cup of tea or coffee is also a great choice. This blog post covered every step to make delicious cranberry orange cheesecake bars. You learned about the key ingredients, step-by-step instructions, and useful baking tips. We explored variations and serving ideas to make your bars unique. Plus, I shared storage info to keep them fresh. Baking these bars can be fun and rewarding. With practice, you'll impress your friends and family with your skills. Enjoy this tasty treat, and don't be afraid to tweak it your way!

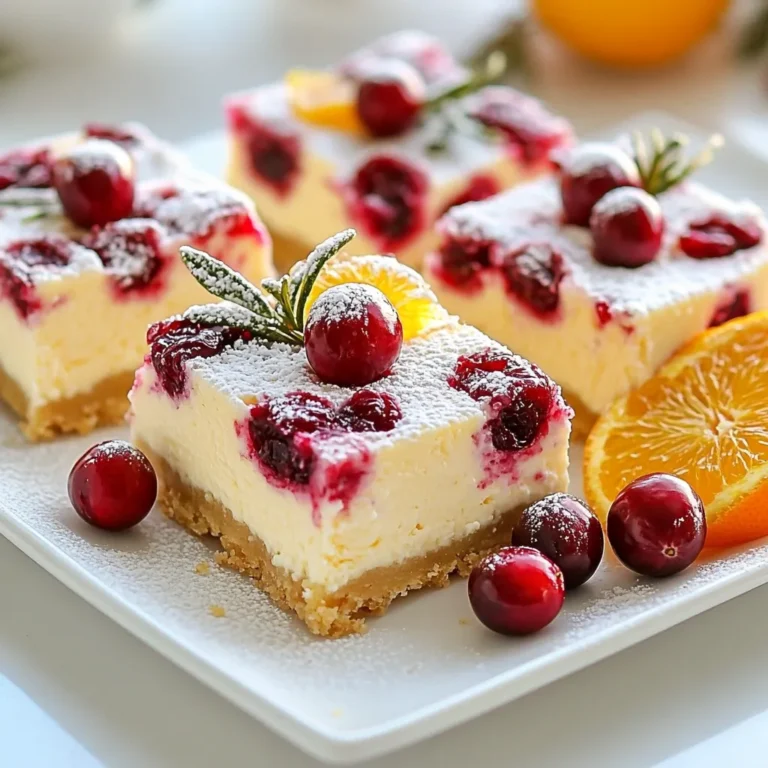
Cranberry Orange Cheesecake Bars Delightful Holiday Treat

- 4 cups broccoli florets - 1 cup carrots, diced - 1 small onion, chopped - 3 cloves garlic, minced - 4 cups vegetable broth - 1 cup heavy cream - 2 cups sharp cheddar cheese, shredded - 2 tablespoons olive oil - 1 teaspoon salt - ½ teaspoon black pepper - ½ teaspoon smoked paprika (optional) - ½ teaspoon nutmeg (optional) You need four cups of broccoli florets. Fresh broccoli gives the best taste. One cup of diced carrots adds color and sweetness. A small onion, chopped, gives depth to the flavor. Use three cloves of minced garlic for a nice kick. Four cups of vegetable broth forms the soup's base. One cup of heavy cream makes it creamy and rich. Two cups of shredded sharp cheddar cheese bring the cheesy goodness. You will also need two tablespoons of olive oil to sauté the veggies. One teaspoon of salt is essential for taste. Add half a teaspoon of black pepper for warmth. Smoked paprika and nutmeg are optional but can add great flavor. For the best flavor, I recommend sharp cheddar cheese. It has a strong taste that pairs well with broccoli. You can also try extra sharp cheddar for an even bolder flavor. If you prefer something milder, mild cheddar works too. Just remember, using good quality cheese really makes a difference in this soup! {{ingredient_image_1}} To make creamy broccoli cheddar soup, start by gathering your ingredients. You need fresh broccoli, carrots, onion, garlic, vegetable broth, heavy cream, cheddar cheese, and a few seasonings. This soup takes about 35 minutes to make, and it serves 4 to 6 people, perfect for a cozy meal. 1. Heat the olive oil: Pour olive oil into a large pot over medium heat. 2. Sauté the onion: Add chopped onion and cook for 3 to 4 minutes until it turns translucent. 3. Add garlic and carrots: Stir in minced garlic and diced carrots. Cook for 3 more minutes until they smell great. 4. Mix in broccoli and broth: Toss in the broccoli florets and vegetable broth. Bring the pot to a boil. 5. Simmer: Once boiling, turn the heat down to low, cover the pot, and let it cook for 10 to 15 minutes. The broccoli and carrots should be tender. 6. Blend the soup: Use an immersion blender to mix the soup until it is creamy but still has some chunks. If you don’t have one, carefully pour it into a regular blender in batches. 7. Add cream and cheese: Pour in the heavy cream and shredded cheddar cheese. Stir in salt, pepper, and smoked paprika if you like. 8. Heat through: Cook on low heat, stirring often, until the cheese melts and the soup is hot. 9. Finish with nutmeg: If you want, add nutmeg for extra flavor and taste to adjust the seasoning. Using an immersion blender is easy. You can blend the soup right in the pot. This saves time and cuts down on dishes. Just be careful not to splash. If you use a regular blender, let the soup cool for a few minutes. Blend it in small amounts. Be careful when blending hot liquids, as they can splash and cause burns. Always hold the lid down tightly. To make your soup creamy, the trick is blending. Use an immersion blender for easy mixing. Blend until smooth but leave some chunks for texture. If you prefer, you can blend in batches using a regular blender. Just be careful when transferring hot soup. Spices make your soup pop. I like to add smoked paprika for a hint of smokiness. Nutmeg also gives a warm touch. Salt and pepper are must-haves too. Adjust them to your taste as you cook. Serve your soup hot in bowls. For extra flavor, top it with more cheese. A sprinkle of black pepper adds a nice touch, too. Pair the soup with crusty bread for a complete meal. It’s cozy and filling! Pro Tips Chop Uniformly: Make sure all vegetables are cut into similar sizes for even cooking and a consistent texture. Use Fresh Broccoli: Fresh broccoli not only enhances flavor but also retains its vibrant color and nutrients better than frozen. Blend to Preference: Adjust the blending to your liking—blend completely for a smooth soup or just partially for a chunkier texture. Garnish Creatively: Add a sprinkle of croutons or a drizzle of olive oil on top for added texture and visual appeal before serving. {{image_2}} You can make this soup vegan by swapping a few key ingredients. Use coconut cream or cashew cream instead of heavy cream. For cheese, try a vegan cheddar or nutritional yeast. Use vegetable broth to keep it gluten-free. Always check labels to ensure all ingredients meet your diet needs. Want to boost the flavor? Add some fresh herbs like thyme or parsley. A squeeze of lemon juice can brighten the soup. You might also include a pinch of red pepper flakes for heat. Consider adding a diced potato for creaminess and extra texture. If you like a thicker soup, blend more of the broccoli and carrots. If it’s too thick, stir in more vegetable broth or cream. Remember, you can always adjust it while cooking. Taste as you go, and get it just right for your liking. After you make the soup, let it cool down. Then, pour it into an airtight container. This will keep it fresh. Store it in the fridge for up to five days. When you want to eat it, check for any signs of spoilage first. If it smells good and tastes fine, you’re good to go! You can freeze the soup if you have leftovers. Use a freezer-safe container and leave some space at the top for the soup to expand. It will stay fresh for about three months. When you're ready to eat it, take it out and place it in the fridge overnight to thaw. You can also thaw it in the microwave if you're in a hurry. To reheat, pour the soup into a pot. Heat it over low to medium heat. Stir it often to prevent burning. If the soup seems too thick, add a splash of vegetable broth or water. This keeps the flavor strong and the texture creamy. Enjoy your warm bowl of soup! Yes, you can make this soup ahead of time. Just cool it down and store it in the fridge. It stays good for about three days. When you are ready to eat, reheat it on low heat. Stir it often to keep it smooth. To thicken your soup, you have a few options. You can add more heavy cream or cheese. Another way is to mix in a bit of cornstarch. Just mix cornstarch with cold water first. Then, stir it into the soup as it simmers. This soup pairs well with many things. Here are some ideas: - Crusty bread - Grilled cheese sandwiches - Salad with a light dressing - Crackers or breadsticks These sides make your meal more filling and tasty. Yes, frozen broccoli works well in this soup. It saves you prep time and cooks quickly. Just add it to the pot with the broth. Keep in mind that frozen broccoli may cook a bit faster. Check it to avoid overcooking. This article covered all you need to make creamy broccoli cheddar soup. We explored key ingredients, cooking steps, and tips for a perfect texture. You learned how to adjust flavors and accommodate dietary needs. We also shared storage techniques to keep your soup fresh. Remember, the right cheese and seasonings make all the difference. With these insights, you’ll create a delicious soup that delights everyone. Enjoy your cooking journey and experiment with your own twists!

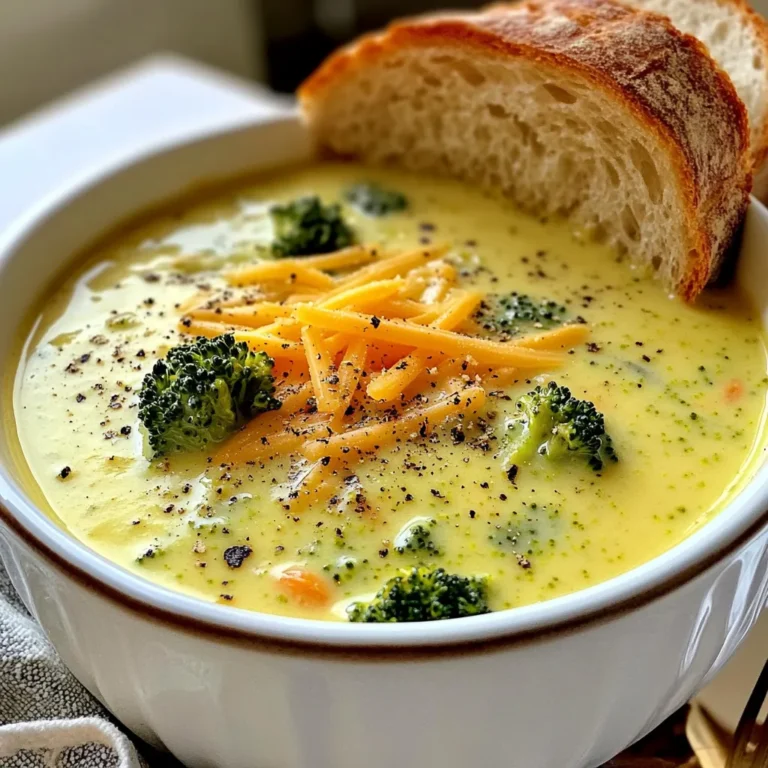
Creamy Broccoli Cheddar Soup Simple and Tasty Recipe

- 1 cup rolled oats - 1 cup milk (dairy or non-dairy) - 1/2 cup Greek yogurt - 1/4 cup cream cheese, softened - 2 tablespoons honey or maple syrup - 1 teaspoon vanilla extract - 1/2 teaspoon cinnamon - 1/2 cup fresh blueberries (plus extra for topping) - 2 tablespoons crushed graham crackers - A pinch of salt You can add different fruits like bananas or strawberries for variety. For extra crunch, try nuts or seeds. If you want a sweeter taste, use more honey or maple syrup. Adjust the spices too! A dash of nutmeg can add warmth, while more cinnamon can enhance the flavor. Greek yogurt is a star in this recipe. It adds creaminess and protein. This makes your oats more filling and nutritious. Fresh blueberries are not just tasty; they are also packed with antioxidants. They support heart health and provide vitamins. Cream cheese gives a rich cheesecake flavor. It balances well with the sweetness from honey or maple syrup. Each ingredient plays a role in making these oats a delicious and healthy breakfast option. {{ingredient_image_1}} First, gather your ingredients. You will need rolled oats, milk, Greek yogurt, cream cheese, honey, vanilla extract, cinnamon, fresh blueberries, crushed graham crackers, and a pinch of salt. Start by taking a large bowl. Combine the rolled oats and milk in this bowl. Stir well to make sure the oats are soaked. Let them sit for a moment while you prepare the next mixture. In a separate bowl, mix the softened cream cheese with Greek yogurt. Add honey, vanilla extract, cinnamon, and a pinch of salt. Use a whisk to blend the mixture until it is smooth and creamy. This step is key for getting that cheesecake flavor. Once smooth, gently fold this cream cheese mixture into the oat mixture. Make sure to combine them well. Then, fold in the fresh blueberries. This ensures they are spread evenly in your oats. Now, it’s time to divide the mixture. Use two jars or containers to portion out the oats. Top each jar with crushed graham crackers and a few extra blueberries. This adds a nice crunch and a pop of color. Seal the jars tightly and place them in the fridge. Let them chill overnight, or for at least four hours. This helps the oats soak up all the flavors. Before serving, give the oats a good stir. If you want it a bit sweeter, add more honey or maple syrup to taste. Enjoy your tasty treat! When making blueberry cheesecake overnight oats, avoid using quick oats. They can become mushy. Stick to rolled oats for the best texture. Also, don’t skip the soaking time. The oats need time to absorb the milk. If you add too many blueberries, the mix may become too runny. Balance is key for that creamy cheesecake feel. To boost flavor, consider adding a splash of lemon juice. It brightens the taste and pairs well with blueberries. You can also switch honey for maple syrup for a different sweetness. Adding a bit more cinnamon can deepen the flavor, making it richer. Try mixing in some vanilla bean for extra depth. These small changes can create a delightful twist on your oats. Serve your overnight oats in clear glass jars. It shows off the pretty layers of blueberries and graham crackers. For a special touch, add a sprig of mint on top. This adds color and freshness. You can also drizzle a bit of honey over the top. This simple step makes your dish look extra appealing. Don't forget to sprinkle a few whole blueberries for charm! Pro Tips Use Overnight Soaking for Best Texture: Allow the oats to soak for at least 4 hours or overnight for a creamier consistency. Customize Your Sweetness: Adjust the sweetness level to your liking by adding more honey or maple syrup before serving. Experiment with Flavors: Try adding a splash of lemon juice or zest for a bright flavor that complements the blueberries. Layer for Visual Appeal: When serving, layer the ingredients in your jars to create a beautiful presentation that highlights the blueberries and graham crackers. {{image_2}} You can change up your Blueberry Cheesecake Overnight Oats with fun toppings. Here are some ideas: - Chopped nuts like almonds or walnuts add crunch. - Slices of banana bring a sweet, creamy note. - A dollop of almond or peanut butter adds richness. - Chia seeds boost nutrients and offer a nice texture. - Shredded coconut gives a tropical twist. Feel free to mix and match these toppings to fit your taste! Want to switch things up? Try different flavor combos. Here are a few to consider: - Chocolate Chip Cheesecake: Add chocolate chips to the oat mix for a rich taste. - Banana Cream: Swap some blueberries for ripe banana slices for a creamy twist. - Strawberry Delight: Use fresh strawberries instead of blueberries for a fruity change. - Peanut Butter Bliss: Mix in a spoonful of peanut butter for a nutty flavor. These combinations keep breakfast exciting! You can make this recipe dairy-free or vegan with a few easy swaps. - Use almond milk or oat milk instead of regular milk. - Replace Greek yogurt with coconut yogurt or almond yogurt. - Choose a vegan cream cheese to keep the cheesecake flavor. - Sweeten with maple syrup instead of honey for a vegan-friendly option. These substitutions maintain the creamy texture while fitting your dietary needs! To keep your blueberry cheesecake overnight oats fresh, store them in airtight jars. I like to use glass jars because they show off the layers. Make sure the lids fit well to prevent spills. Place the jars on a shelf in the fridge, not the door. The door can get warm from opening and closing. Your overnight oats can last up to five days in the fridge. After three days, check the oats for freshness. If they smell off or look strange, it’s best to toss them. If you want to enjoy them longer, consider freezing them. You can freeze blueberry cheesecake overnight oats for up to three months. To freeze, use freezer-safe containers. Leave a little space at the top for expansion. When you’re ready to eat, move a jar to the fridge overnight to thaw. If you want to eat them warm, you can microwave them. Remove the lid and heat for about 30 seconds. Stir and check the temperature. If needed, heat for another 15 seconds. You can add a splash of milk if they seem too thick. Yes, you can use quick oats. They will soak up liquid faster. This change may make your overnight oats creamier. However, the texture will be softer compared to rolled oats. If you prefer a firmer bite, stick with rolled oats. To make vegan Blueberry Cheesecake Overnight Oats, use plant-based milk. Almond, coconut, or oat milk works well. Replace Greek yogurt with a dairy-free yogurt option. For cream cheese, opt for a vegan cream cheese. Lastly, ensure the sweetener is vegan, like maple syrup. Serve these oats in clear jars for a pretty look. Layer the oats with blueberries and sprinkle crushed graham crackers on top. You can also add a sprig of mint for color. Give the oats a stir before eating to mix the flavors. This blog post covered all you need to make Blueberry Cheesecake Overnight Oats. You learned the main ingredients and some great options to add your touch. I shared tips to avoid common mistakes and how to make them look nice for serving. You also found variations to try, including vegan options. In conclusion, these oats are easy, tasty, and versatile. Enjoy them any time of day!

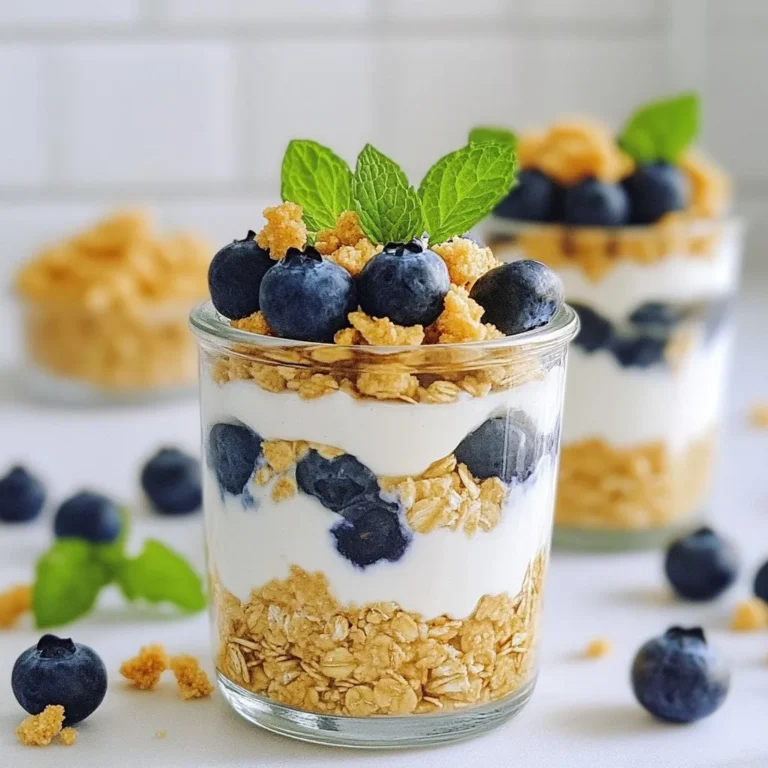
Blueberry Cheesecake Overnight Oats Flavorful Delight

- 2 packs of instant ramen noodles (discard seasoning packets) - 1 cup shredded cabbage (green or purple) - 1 cup shredded carrots - 1 bell pepper, thinly sliced (any color) - 1/4 cup green onions, chopped - 1/4 cup sliced almonds - 1/4 cup sunflower seeds - 1/4 cup fresh cilantro, chopped (optional) This salad bursts with color and crunch. The instant ramen noodles give a fun texture. Shredded cabbage adds crispness. Shredded carrots bring sweetness. Thinly sliced bell peppers offer flavor and color. Green onions give a nice bite. Almonds and sunflower seeds add a nutty crunch. - 1/3 cup sesame oil - 1/4 cup soy sauce - 2 tablespoons rice vinegar - 1 tablespoon honey - 1 teaspoon grated ginger - Salt and pepper to taste The dressing ties the salad together. Sesame oil gives a rich flavor. Soy sauce adds saltiness. Rice vinegar provides a touch of tang. Honey balances the flavors with sweetness. Grated ginger brings warmth and spice. - Extra chopped cilantro - Sesame seeds - Lime wedges These toppings enhance the salad. Chopped cilantro adds freshness. Sesame seeds give a lovely finish. Lime wedges add a zesty kick. You can mix and match these as you like! Enjoy customizing your salad to your taste. {{ingredient_image_1}} First, get two packs of instant ramen noodles. Do not use the seasoning packets. Boil water in a pot. Add the noodles and cook them for three minutes. Drain the noodles and rinse them under cold water to cool them down. Set them aside in a bowl. Now, grab a large mixing bowl. Add one cup of shredded cabbage. You can use green or purple cabbage. Next, add one cup of shredded carrots. Then, slice one bell pepper thinly and add it to the bowl. Don’t forget to chop a quarter cup of green onions. Mix all these veggies together well. In a smaller bowl, whisk together the dressing. Start with one-third cup of sesame oil. Then add a quarter cup of soy sauce. Pour in two tablespoons of rice vinegar. Next, add one tablespoon of honey and one teaspoon of grated ginger. Season it with salt and pepper to taste. Mix until everything is combined. Now it’s time to put everything together. Add the cooled ramen noodles to the bowl of veggies. Toss them gently to mix. Pour the dressing over the salad and toss again until all ingredients are well coated. Finally, fold in a quarter cup of sliced almonds and sunflower seeds. If you like, add fresh cilantro for an extra touch. Be gentle to keep the crunch. Refrigerate for at least 30 minutes before serving. Enjoy your salad! To cook ramen noodles well, add them to boiling water. Follow the package instructions for timing. Usually, it takes only a few minutes. I like to stir them gently as they cook. This helps keep them from sticking together. Once they are soft, drain them and rinse under cold water. This stops the cooking. It also cools them down quickly. Herbs can add great flavor to your salad. Fresh cilantro is a nice touch. It brings a bright taste. You can also use green onions for a mild onion flavor. If you want something different, try adding mint or basil. These herbs can give your salad a fresh twist. A little goes a long way, so add them to your taste. To keep your salad crunchy, add the nuts and seeds last. Sliced almonds and sunflower seeds give a nice crunch. Make sure to fold them in gently. Don’t toss too hard, or they might break. Also, try to serve the salad soon after mixing. If you let it sit too long, it might get soggy. To avoid this, refrigerate the salad for a bit before serving. This helps the flavors mix without losing crunch. Pro Tips Fresh Ingredients: Use the freshest vegetables you can find for the best flavor and crunch in your salad. Chill Before Serving: Allow the salad to chill in the refrigerator for at least 30 minutes to let the flavors meld together beautifully. Customizable Add-Ins: Feel free to add other ingredients like edamame, cucumber, or even protein like grilled chicken or tofu for a more filling salad. Dressing on the Side: If serving to a crowd, consider keeping the dressing on the side to prevent the salad from becoming soggy too quickly. {{image_2}} You can change the ingredients to fit your diet. If you need to go gluten-free, use gluten-free ramen noodles. Instead of soy sauce, try tamari or coconut aminos. For a low-carb option, substitute the noodles with spiralized zucchini. If you want a vegan dish, skip the honey and use maple syrup instead. You can also swap out the cabbage for kale or spinach for a different taste. Want to make your salad heartier? Add protein! Grilled chicken is a great choice. You can also use shrimp or tofu for a plant-based option. Sliced beef or pork works well too. For a quick boost, toss in canned chickpeas or edamame. These options will make your salad filling and tasty. Try different dressings to switch up the flavor. A peanut dressing can add a creamy texture. You can make it by mixing peanut butter, soy sauce, and lime juice. If you like spicy, add sriracha to your sesame dressing. For a citrus twist, use orange juice and zest in the mix. Experiment with different dressings to find your favorite! To store leftover salad, place it in an airtight container. Keep it in the fridge. The salad will last for about three days. Make sure to keep the dressing separate if you plan to store it. This helps the salad stay crunchy. If the salad wilts, it may lose its texture. For meal prep, make the salad but don’t add the dressing yet. Store the salad and dressing in separate containers. This keeps the noodles and veggies fresh. You can prep the salad up to three days ahead. When you’re ready to eat, just add the dressing and mix. This salad is best served cold, so no need to reheat. If you want to enjoy it warm, you can lightly heat the ramen noodles. Just be careful not to warm the veggies. Serve the salad with lime wedges for a zesty touch. Garnishing with extra cilantro or sesame seeds adds a nice look. Yes, you can use whole wheat ramen noodles. They add a nutty flavor and extra fiber. Just follow the same cooking steps. Enjoy the same crunch with added nutrition. If you don't have sesame oil, try using olive oil or canola oil. Both oils work well in salad dressings. They will change the flavor slightly but still taste great. Yes, this salad is perfect for meal prepping. You can make it ahead of time and store it in the fridge. Just keep the dressing separate until you are ready to eat. The salad stays fresh for about 3 days in the fridge. Make sure to store it in an airtight container. The veggies will stay crunchy if you add the dressing right before serving. Absolutely! Adding fruits can enhance the flavor. Try adding diced apples, mandarin oranges, or grapes. They bring sweetness and a nice contrast to the crunchy veggies. This salad is packed with vitamins and minerals. It offers good protein from the almonds and seeds. The veggies provide fiber, while the dressing adds healthy fats. To wrap it up, we covered how to make a crunchy ramen noodle salad. You learned about the main ingredients, dressing, and toppings. I shared step-by-step instructions for cooking the noodles and preparing the salad. Tips for keeping noodles crunchy and flavor-rich were also included. Experiment with variations based on your taste and dietary needs. Remember to store leftovers properly for best results. Enjoy creating your salad that fits your style and preferences!

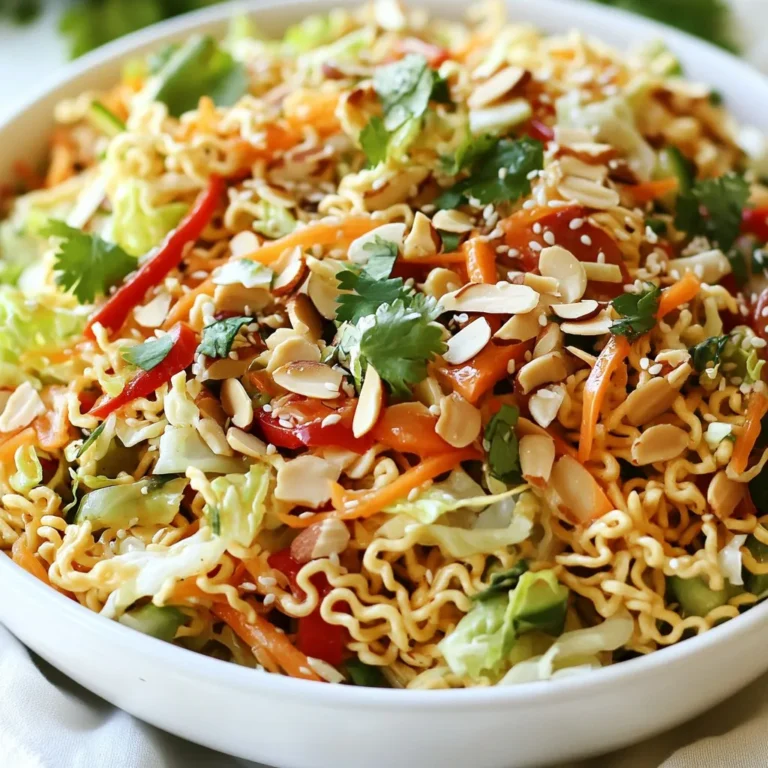
Crunchy Ramen Noodle Salad Fresh and Flavorful Dish

To make a flavorful Mediterranean lentil soup, you need: - 1 cup green or brown lentils, rinsed - 1 tablespoon olive oil - 1 onion, diced - 2 carrots, diced - 2 celery stalks, diced - 3 cloves garlic, minced - 1 teaspoon ground cumin - 1 teaspoon smoked paprika - 1 teaspoon dried oregano - 6 cups vegetable broth - 1 can (14 oz) diced tomatoes, with juices - 1 zucchini, diced - 2 cups spinach or kale, chopped - Juice of 1 lemon - Salt and pepper, to taste - Fresh parsley, chopped (for garnish) These ingredients come together to create a rich and hearty soup. You can swap green lentils for brown ones if you prefer. Both types work well and add protein and fiber. To dress up your soup, consider these garnishes: - Chopped fresh parsley - A dollop of yogurt These add fresh flavors and a creamy texture. You can serve the soup with warm bread like crusty baguette or pita. A simple side salad also pairs well. It adds crunch and freshness to the meal. Enjoy the blend of flavors and textures! {{ingredient_image_1}} To make this Mediterranean lentil soup, start by cooking the base. First, heat one tablespoon of olive oil in a large pot over medium heat. Once hot, add the diced onion, carrots, and celery. Sauté these veggies for about 5 to 7 minutes. You want them soft but not brown. Next, stir in three cloves of minced garlic, one teaspoon of ground cumin, one teaspoon of smoked paprika, and one teaspoon of dried oregano. Cook this mix for one more minute. You will smell a wonderful aroma fill your kitchen. Now, rinse one cup of green or brown lentils under cold water. This step is key as it removes any dust. Add the rinsed lentils to the pot along with six cups of vegetable broth and one can of diced tomatoes, including their juices. Bring everything to a boil. Once boiling, reduce the heat to low. Let the soup simmer gently for 25 to 30 minutes. Keep an eye on the lentils. You want them to be tender but not mushy. If they are too firm, give them a few more minutes. In the last ten minutes of cooking, add one diced zucchini and two cups of chopped spinach or kale. Stir well and allow them to cook until just tender. After cooking, stir in the juice of one lemon. Taste the soup and add salt and pepper as needed. Your Mediterranean lentil soup is now ready to serve hot. Don’t forget to garnish with fresh parsley for a bright touch. Enjoy! To make your lentil soup extra tasty, focus on a few key steps. First, sauté your veggies well. Cook the onion, carrots, and celery for about 5-7 minutes. This makes them soft and brings out their sweet flavor. Next, add garlic and spices like cumin and smoked paprika. This will fill your kitchen with a warm, inviting aroma. Avoid common mistakes to ensure success. Do not skip rinsing your lentils. This step removes dirt and small stones. Also, don’t overcook the soup. Keep an eye on your lentils; they should be tender but not mushy. Lastly, stir in lemon juice at the end. This brightens the flavors and makes the soup lively. When serving your lentil soup, consider using deep bowls. This helps keep the soup warm longer. Pair it with crusty bread, such as a baguette or sourdough. The bread is perfect for dipping and adds a nice texture. For drinks, a crisp white wine works great. A Sauvignon Blanc or a light Pinot Grigio enhances the meal. If you prefer non-alcoholic options, try sparkling water with a lemon slice. It refreshes the palate and balances the soup's richness. Pro Tips Rinse Your Lentils: Always rinse your lentils before cooking to remove any dust or debris, ensuring a cleaner flavor in your soup. Customize Your Greens: Feel free to swap spinach for kale or other greens based on what you have on hand. Each will add a unique flavor and texture. Add More Veggies: Don't hesitate to add more vegetables like bell peppers or sweet potatoes for extra nutrients and flavor. Enhance the Flavor: Adding a dash of red wine vinegar or balsamic vinegar just before serving can elevate the soup's flavors significantly. {{image_2}} You can change this soup in many ways! Adding new veggies can make it fun. Try sweet potatoes, bell peppers, or corn for a twist. You can also mix in proteins like cooked chicken or chickpeas. They add heartiness and flavor. Spices and herbs can change the taste, too. If you want a kick, add a pinch of cayenne pepper. For a fresh note, try fresh basil or thyme. Each option gives your soup a new vibe. Making this soup vegan is easy. Just skip the chicken and use vegetable broth. It’s still rich and tasty! If you need it gluten-free, you're in luck; lentils are naturally gluten-free. Just check the broth label to ensure it's gluten-free, too. For a low-sodium version, use low-sodium broth and skip added salt. You can still enjoy a flavorful soup without the extra salt. After making Mediterranean lentil soup, you may want to save some for later. The best way to store leftovers is in airtight containers. You can refrigerate the soup for up to five days. If you want to keep it longer, freeze it. Use freezer-safe containers or bags. This way, your soup stays fresh for up to three months. To keep the soup flavorful, let it cool before sealing. Avoid adding any garnishes until you reheat the soup. This helps keep the taste bright and fresh. When you are ready to enjoy leftovers, you can safely reheat the soup. The best methods are on the stove or in the microwave. If you use the stove, pour the soup into a pot. Heat it over medium heat, stirring often. For the microwave, place the soup in a microwave-safe bowl. Heat it for 2-3 minutes, stirring halfway through. To restore texture and flavor, add a splash of vegetable broth or water if needed. This helps bring back the soup's original creaminess. Stir well before serving to mix everything together. Enjoy your comforting dish again! How long can you store lentil soup? You can store lentil soup in the fridge for up to five days. Keep it in an airtight container. If you want to keep it longer, freeze it. It can last up to three months in the freezer. Can you make lentil soup in advance? Yes, you can make lentil soup in advance. It tastes even better the next day! Just let it cool and store it in the fridge or freezer. Reheat it gently when you are ready to enjoy. Health benefits of lentils Lentils are great for your health. They are high in protein and fiber. This helps you feel full and satisfied. Lentils also have many vitamins and minerals. They can help lower cholesterol and support heart health. Caloric and nutrient breakdown per serving One serving of Mediterranean lentil soup has about 200 calories. It provides 12 grams of protein, 4 grams of fat, and 30 grams of carbs. Each bowl is packed with nutrients from the veggies and lentils, making it a wholesome meal. Mediterranean lentil soup is simple to make and full of flavor. We covered the main ingredients, from lentils to spices. You can customize it with garnishes like parsley or yogurt. I shared key tips for cooking, ensuring your lentils are tender. Experiment with different veggies and adjust for dietary needs. Store leftovers properly to enjoy later. Finally, dive into FAQs to clear any doubts. Enjoy this healthy recipe and make it your own!

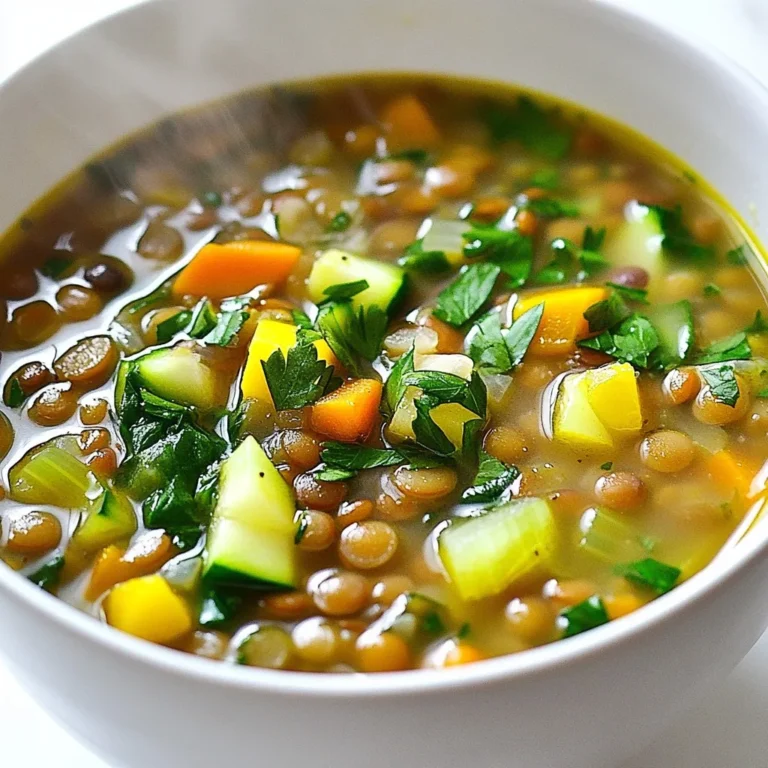
Mediterranean Lentil Soup Comforting and Nourishing Meal

- 1 cup unsalted butter, softened - 1 cup granulated sugar - 1 cup brown sugar, packed - 2 large eggs - 2 teaspoons vanilla extract - 3 cups all-purpose flour - 1 teaspoon baking soda - 1 teaspoon salt - 1 cup freeze-dried strawberries, crushed - 1 cup chocolate chips (dark or milk) - 1 teaspoon coconut oil (for chocolate melting) These ingredients create a fantastic flavor. The mix of freeze-dried strawberries gives a fruity touch. The chocolate adds a rich, sweet layer to each cookie. These cookies are a treat, but they do have some calories. Each cookie has around 150 calories. You also get about 7 grams of fat and 22 grams of carbs. The sugar content is about 10 grams per cookie. Enjoy in moderation to keep a balance in your diet. If you need to swap ingredients, here are some good options: - Use margarine instead of butter for a dairy-free option. - Coconut sugar can replace brown sugar for a different flavor. - Flax eggs work well as an egg substitute for vegan cookies. - Almond flour can be used instead of all-purpose flour for a gluten-free option. These substitutes still give you great cookies. Adjust baking time if needed, as some may cook faster. {{ingredient_image_1}} First, gather all your ingredients. You need unsalted butter, sugar, brown sugar, eggs, vanilla, flour, baking soda, salt, and freeze-dried strawberries. Start by preheating your oven to 350°F (175°C). Line your baking sheets with parchment paper. In a big bowl, cream the softened butter with granulated and brown sugars. Mix until it looks light and fluffy. Add the eggs one at a time, mixing well after each. Now, stir in the vanilla extract. In another bowl, whisk flour, baking soda, and salt together. Gradually add this to your wet mixture. Mix just until combined. Now, gently fold in the crushed strawberries. Scoop tablespoon-sized portions of dough onto the prepared sheets. Make sure to leave space between them. Bake for 10 to 12 minutes. You want the edges golden, but the centers should look soft. Once done, remove them from the oven. Let them cool on the sheet for 5 minutes. After that, transfer the cookies to a wire rack to cool completely. While the cookies cool, prepare the chocolate. In a microwave-safe bowl, combine chocolate chips and coconut oil. Microwave this mix in 30-second bursts. Stir in between until the chocolate is smooth and melted. Now, dip half of each cookie into the melted chocolate. Let the excess drip off. Place the dipped cookies on parchment paper to set. Once the chocolate hardens, enjoy your delightful cookies! To get the best cookie texture, start with softened butter. This helps mix well with sugars. Cream the butter and sugars until light and fluffy. This step adds air, making cookies soft. When you add flour, mix just enough. Overmixing makes cookies tough, and we don’t want that! Make your cookies look great by dipping them halfway in melted chocolate. You can use dark or milk chocolate. For a fun touch, sprinkle crushed freeze-dried strawberries on top while the chocolate is still wet. This adds color and flavor. Arrange cookies on a pretty platter to impress guests! To keep your cookies fresh, store them in an airtight container. This helps them stay soft. If you want to keep them for longer, freeze them! Just make sure they are in a freezer-safe bag. When you want to eat them, let them thaw for a bit, and they will taste fresh again! Pro Tips Use Room Temperature Ingredients: Ensure your butter and eggs are at room temperature for a smoother and creamier cookie dough. Don’t Overmix the Dough: Mix until just combined to keep your cookies tender and prevent them from becoming tough. Chill the Dough: If time allows, chill the cookie dough for 30 minutes before baking to enhance flavor and control spreading. Garnish for Presentation: Add additional freeze-dried strawberries on top after dipping in chocolate for an eye-catching finish. {{image_2}} You can change up the flavor of your cookies with fun mix-ins. Try adding chopped nuts, like walnuts or pecans, for a crunchy bite. You can also toss in some colorful sprinkles for a festive touch. These additions can make your cookies unique and exciting. Just remember to keep the total amount of mix-ins around one cup to stay balanced. Switching the type of chocolate can give your cookies a new twist. Use dark chocolate for a rich, bold flavor. If you prefer sweetness, milk chocolate is a great choice. For a fun and creamy option, consider using white chocolate. Each type brings its own taste and makes the cookies even more enjoyable. You can even mix two types of chocolate for a delightful combination. You can easily adapt this recipe to fit dietary needs. For vegan cookies, swap out the butter for coconut oil and use flax eggs instead of regular eggs. To make them gluten-free, replace all-purpose flour with a gluten-free blend. These changes keep the cookies tasty and satisfying for everyone. Cooking should always be fun and inclusive, so feel free to experiment! To keep your chocolate dipped strawberry cookies fresh, store them in an airtight container. This keeps moisture out and helps them last longer. Place parchment paper between layers to avoid sticking. Store them at room temperature for up to one week. If you want to keep them longer, consider freezing them. To freeze your cookies, let them cool completely first. Then, arrange the cookies in a single layer on a baking sheet. Freeze them for about an hour. This keeps their shape. Once frozen, transfer the cookies to a freezer-safe bag or container. You can keep them frozen for up to three months. Remember to label the container with the date. If your cookies become stale, don’t worry! You can easily bring back their softness. Place a slice of bread in the container with the cookies. The bread adds moisture and softens the cookies. Leave it there for a few hours. Another option is to warm the cookies in the microwave for about 10 seconds. This makes them soft and tasty again! No, fresh strawberries do not work well in this cookie recipe. They add too much moisture. Freeze-dried strawberries provide the right flavor and texture. They are light and crunchy, making them perfect for cookies. You get the sweet strawberry taste without changing the dough. These cookies can last up to one week. Store them in an airtight container at room temperature. If you want them to last longer, you can freeze them. Just remember to separate layers with parchment paper. This prevents them from sticking together. Yes, you can make the dough ahead of time. Wrap it tightly in plastic wrap. Then, store it in the fridge for up to three days. You can also freeze the dough for up to three months. Just thaw it overnight before baking. This makes it easy to enjoy fresh cookies anytime. In this post, we explored how to make chocolate dipped strawberry cookies. We covered essential ingredients, from common substitutes to nutritional facts, to help you choose wisely. I shared step-by-step instructions for prepping the dough and baking. You learned tips for perfecting cookie texture and creative decorating ideas. We also discussed storage methods and answered key questions. These cookies are fun to make and taste great. Enjoy experimenting with variations to suit your tastes. Happy baking!

Chocolate Dipped Strawberry Cookies Delightful Treat

- 1 pound large shrimp, peeled and deveined - 1/3 cup fresh cilantro, chopped - Additional spices and seasonings The star of this dish is the shrimp. I like to use large shrimp for a nice bite. They soak up the flavors well. Fresh cilantro adds a bright taste. You can adjust the amount based on your love for cilantro. - 2 tablespoons olive oil - 2 tablespoons lime juice - 2 cloves garlic, minced - 1 teaspoon chili powder - 1/2 teaspoon cumin - Salt and pepper to taste The marinade is key for great flavor. I use olive oil to help the spices stick. Lime juice gives a zesty kick. The garlic adds depth. Chili powder and cumin bring warmth. Don’t forget salt and pepper to enhance all the flavors. - Lime wedges for serving - Skewer options: wooden or metal Lime wedges are a must. They add a fresh burst when squeezed over the shrimp. For skewers, you can use wooden or metal. If using wooden skewers, soak them in water first. This helps prevent burning on the grill. {{ingredient_image_1}} To make the marinade, start by mixing the olive oil, lime juice, minced garlic, and chopped cilantro in a bowl. Add chili powder, cumin, salt, and pepper. Stir everything well until it combines into a smooth mixture. This marinade gives the shrimp a fresh and zesty flavor. Next, add the peeled and deveined shrimp to the bowl. Make sure each shrimp gets coated in the marinade. This step is vital. A good coating means more flavor. Once coated, cover the bowl with plastic wrap or a lid. You should marinate the shrimp for at least 30 minutes. This time allows the shrimp to soak up all the flavors. If you can wait longer, one to two hours is even better. The longer they sit, the more flavor they absorb. For the best results, place the bowl in the fridge. Cold temperatures help the shrimp stay fresh. If you want a bit more taste, consider adding extra lime juice or garlic to the marinade. Before grilling, preheat your grill to medium-high heat. This step ensures even cooking. If you use wooden skewers, soak them in water for 30 minutes. This helps prevent burning on the grill. Now, thread the marinated shrimp onto the skewers. Leave a little space between each piece. This space allows heat to circulate and cook the shrimp evenly. Place the skewers on the grill. Cook for about 2-3 minutes on each side. The shrimp will turn pink and opaque when done. Be careful not to overcook them. Overcooked shrimp can become tough and rubbery. Once ready, take them off the grill and serve immediately with lime wedges. How to avoid overcooking shrimp? To keep shrimp tender, watch the cooking time closely. Cook them for 2-3 minutes on each side. They turn pink when done. If you leave them too long, they get tough and chewy. Ideal grill temperature for skewers? Set your grill to medium-high heat. This helps cook the shrimp evenly and quickly. A hot grill gives you a nice char and keeps the shrimp juicy. Best practices for marinating shrimp? Mix the marinade well, so all flavors blend. Coat the shrimp fully to grab the taste. Let them soak in the fridge for at least 30 minutes. This time helps the shrimp absorb the flavors. Experimenting with additional flavors? Feel free to switch up the marinade! Try adding honey for sweetness or sriracha for heat. You can also use different herbs, like parsley or dill, for a fresh twist. How to space shrimp for even cooking? When threading shrimp onto skewers, leave a small gap between each one. This space allows heat to circulate and cooks them evenly. If they are too close, they may steam instead of grill. Choosing the right skewer type? You can use wooden or metal skewers. If you pick wooden, soak them in water for 30 minutes. This step keeps them from burning on the grill. Metal skewers are easier to reuse and can handle high heat. Pro Tips Marinate for Maximum Flavor: Allow the shrimp to marinate for at least 30 minutes, but no more than 2 hours. This enhances the flavor without compromising the shrimp's texture. Perfect Grill Temperature: Preheat your grill to medium-high heat. This ensures the shrimp cook quickly, preventing them from becoming tough. Use a Timer: Set a timer for 2-3 minutes per side. Shrimp cook quickly, and timing is crucial to avoid overcooking. Fresh Herbs Matter: Fresh cilantro makes a significant difference in flavor. Avoid dried herbs for this recipe to get the best taste. {{image_2}} You can change the taste of your cilantro lime shrimp skewers by using different herbs or spices. Instead of cilantro, try parsley or basil for a fresh twist. You can also use fresh oregano for an earthy flavor. If you want to swap shrimp, you can use chicken or tofu. Both options soak up flavors well. Just cut them into similar sizes for even cooking. To add some heat, consider adding jalapeños to your skewers. You can also use a spicy marinade with chili paste or hot sauce. This way, you can create a kick that balances well with the lime. Adding vegetables on skewers can enhance the meal's color and texture. Bell peppers, zucchini, or cherry tomatoes work great. They add flavor and nutrition, making your dish more vibrant. If you don't have a grill, oven-broiling is a great option. Preheat your oven to a high temperature. Place the skewers on a baking sheet and broil for about 3-4 minutes on each side. This method gives you that grilled flavor without the grill. For stovetop grilling, you can use a grill pan. Heat it over medium-high heat, and cook the skewers for about 2-3 minutes on each side. This method is fast and easy, perfect for a busy weeknight. To store cooked shrimp skewers, place them in an airtight container. This keeps the shrimp fresh and prevents drying. You can store them in the fridge for up to three days. When reheating, do it gently. The microwave works, but use low power. This helps keep the shrimp from becoming rubbery. If possible, reheat on the stovetop. Heat a pan over low heat and add a splash of water. Cover the pan to steam the shrimp back to life. For uncooked marinated shrimp, use a sealed container. This keeps the flavors locked in. Store them in the fridge for no more than 24 hours. If you need to prepare ahead, consider freezing the marinated shrimp. They can last up to three months in the freezer. Just make sure to defrost them in the fridge overnight before cooking. This keeps them safe and tasty. You should marinate the shrimp for at least 30 minutes. This time allows the shrimp to soak in all the flavors. If you have more time, you can marinate them for up to 2 hours. Just remember not to go overboard! Too long can make the shrimp mushy. To enhance the flavor, cover the bowl and place it in the fridge. This keeps the shrimp cold while they soak up the marinade. Cilantro lime shrimp skewers pair well with many side dishes. Here are some tasty options: - Rice: A side of fluffy jasmine or cilantro lime rice works great. - Salad: A fresh green salad with tomatoes and avocado adds crunch. - Grilled veggies: Bell peppers and zucchini complement the shrimp perfectly. - Tacos: Use the shrimp in corn tortillas with your favorite toppings. These sides add balance to the meal and enhance the shrimp's bright flavors. Yes, you can use frozen shrimp! Just make sure to thaw them properly. The best way to thaw shrimp is to place them in the fridge overnight. If you're short on time, you can run cold water over the shrimp in a bowl for about 10-15 minutes. Once thawed, pat the shrimp dry with paper towels. This helps the marinade stick better. Then, follow the recipe as usual for juicy, flavorful skewers. In this blog post, we covered how to make delicious cilantro lime shrimp skewers. We discussed the main ingredients and marinade components that boost flavor. I shared tips for preparing, marinating, and grilling shrimp perfectly. You learned about variations to spice things up and how to store leftovers. With these tips, you'll make great skewers every time. Enjoying your meals will be easy and fun!

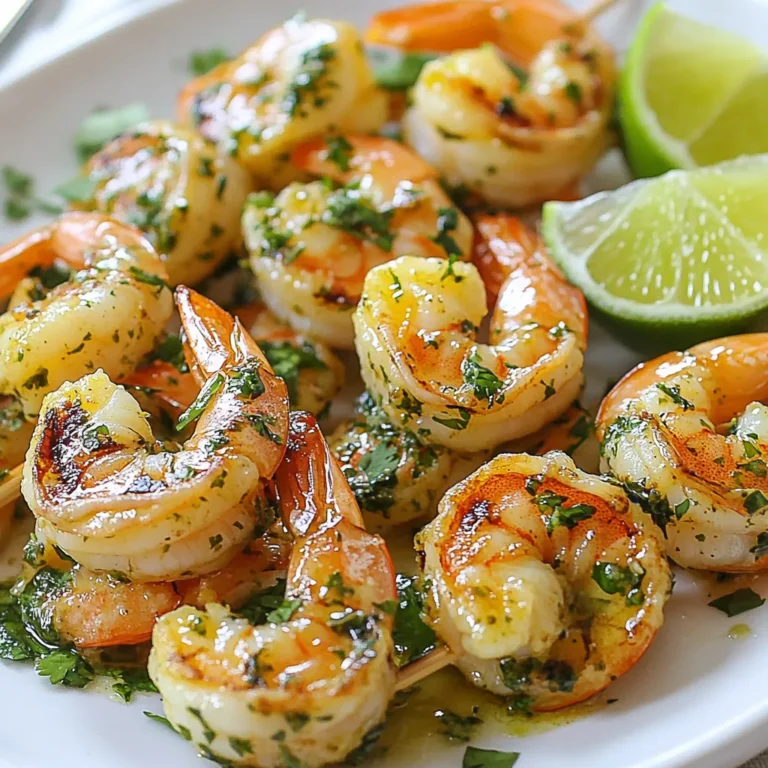
Cilantro Lime Shrimp Skewers Easy Grilled Delight

To make Honey Mustard Chicken Thighs, you will need the following items: - 4 bone-in, skin-on chicken thighs - 1/4 cup honey - 1/4 cup Dijon mustard - 2 tablespoons apple cider vinegar - 3 cloves garlic, minced - 1 teaspoon dried thyme - 1 teaspoon paprika - Salt and pepper to taste - 2 tablespoons olive oil - Fresh parsley, chopped (for garnish) Each serving of this dish is full of flavor and nutrition. It provides protein from the chicken thighs. The honey and mustard add natural sweetness and tang. Garlic and herbs give extra taste. On average, one serving includes: - Calories: 350 - Protein: 25g - Carbohydrates: 15g - Fat: 20g - Fiber: 1g To prepare this dish, you will need a few key tools: - A large oven-safe skillet - A whisk for mixing - A small bowl for the sauce - A meat thermometer to check doneness - Paper towels for drying the chicken These tools help you cook the chicken thighs perfectly. The skillet allows for easy searing and baking. A meat thermometer ensures your chicken is safe to eat. {{ingredient_image_1}} First, you need to preheat your oven to 400°F (200°C). This step is key for even cooking. While it heats, grab a small bowl. In this bowl, whisk together the honey, Dijon mustard, apple cider vinegar, minced garlic, dried thyme, paprika, salt, and pepper. Mix until it is smooth and well combined. Next, take the chicken thighs and pat them dry with paper towels. This helps the skin crisp up nicely. Season both sides with salt and pepper for extra flavor. Now, let’s get cooking! Heat two tablespoons of olive oil in a large oven-safe skillet over medium-high heat. Once the oil is hot, place the chicken thighs in the skillet, skin-side down. Sear them for about 5-7 minutes. Look for golden brown skin. This step adds a lot of flavor. When the skin is crispy, flip the chicken thighs so the skin side is up. Pour the honey mustard sauce over the chicken. Make sure to coat it well. Now, it’s time to bake! Carefully transfer the skillet to your preheated oven. Bake the chicken for 25-30 minutes. You want the internal temperature to reach 165°F (75°C) for safe eating. Use a meat thermometer for accuracy. Once done, take the skillet from the oven and let the chicken rest for a few minutes. This helps keep it juicy. Finally, garnish with freshly chopped parsley for a nice touch and added flavor. Enjoy your delicious Honey Mustard Chicken Thighs! To get crispy skin on chicken thighs, start with dry skin. Pat the thighs dry with paper towels. This helps the skin crisp up nicely. Heat olive oil in your skillet. Add the chicken skin-side down to sear it. Cook for 5-7 minutes until golden brown. Don't rush this step; it's key for crispiness. You can boost flavors with simple tweaks. Add fresh herbs like rosemary or thyme. They bring out the taste in the honey mustard sauce. For a spicy kick, mix in some hot sauce or cayenne pepper. This makes the dish more exciting. Experiment and find what you enjoy most. One mistake is not searing the chicken long enough. This can lead to soggy skin. Another is not checking the temperature. Use a meat thermometer to ensure it reaches 165°F (75°C). Lastly, don't skip letting the chicken rest. This keeps it juicy and flavorful before serving. Pro Tips Pat the Chicken Dry: Ensuring the chicken skin is dry before searing helps achieve that perfect crispy texture. Use a Meat Thermometer: To avoid overcooking, check the internal temperature of the chicken; it should reach 165°F (75°C) for safety. Let it Rest: Allow the chicken to rest for a few minutes after baking; this helps retain its juices for a more flavorful bite. Adjust the Sauce: Feel free to tweak the sweetness or tanginess of the honey mustard sauce by adding more honey or vinegar to suit your taste. {{image_2}} You can add herbs for extra flavor. Try using fresh rosemary or thyme. Just chop them finely and mix into your honey mustard sauce. This adds a fresh taste and makes the dish smell great while cooking. You can also sprinkle some herbs on top before serving for a lovely look. If you like heat, add some spice! Mix in cayenne pepper or hot sauce into your honey mustard sauce. Start with a small amount, taste it, and add more if you want more heat. This variation gives a nice kick that pairs well with the sweet honey. For grilling, make a honey mustard marinade. Use the same ingredients, but let the chicken marinate for at least an hour. This helps the flavors soak into the meat. Grill the thighs over medium heat until they reach 165°F (75°C). You get a smoky flavor that is perfect for summer cookouts! After enjoying Honey Mustard Chicken Thighs, you may have some leftovers. The best way to store them is in an airtight container. Allow the chicken to cool to room temperature first. Then, place it in the fridge. It will stay fresh for up to three days. Make sure to keep the sauce with the chicken for extra flavor. When you are ready to eat your leftovers, reheating is easy. You can use the oven or microwave. For the oven, preheat it to 350°F (175°C). Place the chicken in a dish and cover it with foil. Heat for about 15-20 minutes. If using a microwave, place the chicken on a plate. Cover it with a damp paper towel. Heat for about 2-3 minutes, checking to ensure it warms evenly. If you want to save the chicken for later, freezing works well. Wrap each piece tightly in plastic wrap. Then, place them in a freezer-safe bag. Make sure to remove as much air as possible. You can freeze the chicken for up to three months. When you're ready to eat, thaw it in the fridge overnight before reheating. This keeps the chicken juicy and tasty. Yes, you can use boneless chicken thighs. They will cook faster than bone-in thighs. Adjust the cooking time to about 20-25 minutes. Check for an internal temperature of 165°F (75°C) to ensure they are safe to eat. Boneless thighs may be a bit juicier since they have less fat. To know if your chicken is done, use a meat thermometer. Insert it into the thickest part of the thigh. The chicken should reach an internal temperature of 165°F (75°C). You can also cut into the thigh. If the juices run clear and the meat is no longer pink, it is cooked fully. You can serve Honey Mustard Chicken Thighs with a variety of sides. Here are some great options: - Steamed broccoli or green beans - Creamy mashed potatoes - Mixed green salad with vinaigrette - Rice or quinoa for a hearty base - Roasted vegetables for added flavor These sides will balance the sweet and tangy flavors of the chicken. Enjoy your meal! In this post, I covered everything you need for Honey Mustard Chicken Thighs. We talked about the best ingredients, cooking steps, and handy tips. You learned how to achieve crispy skin and avoid common mistakes. I also shared delicious variations to try and storage tips for leftovers. In closing, enjoy cooking this dish. It’s easy, tasty, and perfect for sharing.

Honey Mustard Chicken Thighs Simple and Flavorful Dish

To make sweet chili garlic noodles, you need fresh and simple ingredients. Here’s a list to guide you: - Noodles: 8 oz of egg noodles or rice noodles - Sauces: 3 tablespoons sweet chili sauce, 2 tablespoons soy sauce, 1 tablespoon rice vinegar - Aromatics: 4 cloves garlic (minced), 1 tablespoon fresh ginger (grated) - Oil: 2 tablespoons sesame oil - Vegetables: 1 cup of mixed vegetables, such as bell peppers, carrots, and snap peas - Garnishes: 2 green onions (sliced), 1 tablespoon sesame seeds, fresh cilantro (optional) These ingredients come together to create a dish that is both flavorful and satisfying. The sweet and spicy sauce pairs well with the fresh vegetables, making every bite a delight. You can find these items at your local grocery store. The key is to use fresh produce for the best taste. {{ingredient_image_1}} - Boil water with salt. - Cook the noodles according to package instructions. - Drain and set aside. Cooking the noodles is easy. Use a large pot for boiling water. Adding salt helps bring out the noodles' flavor. Follow the package instructions carefully for the best results. Once cooked, drain the noodles and set them aside for now. - Mix sweet chili sauce, soy sauce, and rice vinegar. - Set the sauce aside for later use. Now we make the sauce. In a small bowl, combine sweet chili sauce, soy sauce, and rice vinegar. Stir well to mix. This sauce will add a burst of flavor to the noodles. Set it aside for when you need it. - Heat sesame oil in a pan or wok. - Sauté garlic and ginger until fragrant. - Add mixed vegetables and cook until slightly tender. Next, grab a large pan or wok. Heat sesame oil over medium heat. This oil gives a nice taste to the dish. Add minced garlic and grated ginger. Sauté these for about one minute. You want them to smell great! Then, toss in your mixed vegetables. Cook them for about three to four minutes. They should be tender but still crisp. - Add cooked noodles and sauce to the pan. - Toss everything together. Now it's time to combine! Add your cooked noodles to the pan. Pour the sauce over the top. Gently toss everything together. This helps the noodles and veggies soak up all that yummy flavor. - Allow the dish to heat through. - Ensure noodles absorb the sauce. Let the dish cook for another two to three minutes. This step helps the noodles absorb the sauce. Stir occasionally to make sure everything heats evenly. - Serve in deep bowls. - Garnish with green onions, sesame seeds, and cilantro. To serve, place the noodles in deep bowls. This keeps the sauce from spilling. Top with sliced green onions and a sprinkle of sesame seeds. If you like, add fresh cilantro for a pop of color and taste. Enjoy your sweet chili garlic noodles! To get the best noodles, avoid overcooking. This keeps the texture right. Follow the package directions carefully. Once they are done, drain them. Rinse with cold water to stop cooking. This helps keep them firm. You can make the dish your own. Add other spices like black pepper or chili flakes. If you want more sweetness, pour in extra sweet chili sauce. Taste as you go to get it just right. For crispy veggies, cook on high heat. This helps them stay bright and crunchy. Stir often to cook everything evenly. Keep an eye on them, so they don’t burn. This makes your dish look and taste great! Pro Tips Use Fresh Ingredients: Fresh vegetables and herbs will enhance the flavor and texture of your noodles, making the dish more vibrant and delicious. Adjust the Heat: If you prefer a spicier kick, add some red pepper flakes or a splash of sriracha to the sauce mixture before tossing it with the noodles. Customize Your Vegetables: Feel free to swap in your favorite seasonal vegetables or whatever you have on hand to make this dish your own. Make it a Meal: Add some protein like grilled chicken, shrimp, or tofu to turn this noodle dish into a hearty main course. {{image_2}} You can add protein to sweet chili garlic noodles in many ways. Chicken, shrimp, or tofu all work well. - Chicken: Use boneless, skinless chicken breasts. Cook them in bite-sized pieces for about 5-7 minutes. - Shrimp: Cook peeled shrimp for about 3-4 minutes. They turn pink when done. - Tofu: Use firm tofu, cut into cubes. Sauté for 5-6 minutes until golden brown. Mix and match these proteins to suit your taste. You can even use a mix of two or more! If you want a vegetarian meal, use only vegetables or plant-based proteins. Sweet chili garlic noodles can be just as tasty without meat. - Vegetable Focus: You can load up on bell peppers, carrots, and snap peas. Add mushrooms for more flavor. - Vegan Adaptation: For a vegan dish, stick to vegetables and use tofu as your protein. Make sure your sauces are vegan-friendly, too. These options keep the dish light and fresh while still being filling. Feel free to get creative with the sauce! You can use different chili sauces to change the flavor. - Chili Sauce Variety: Try sriracha or sambal oelek for a spicier kick. - Creamy Twist: Add a spoonful of peanut butter for a nutty taste. This makes the sauce rich and smooth. These modifications let you tailor the dish to your liking. Enjoy experimenting with flavors! To keep your sweet chili garlic noodles fresh, use airtight containers. Glass or plastic containers work well. Store your noodles in the refrigerator for up to three days. This will help keep them safe and tasty. To reheat, use a microwave or a pan. If using a microwave, cover the noodles. Heat in short bursts to avoid burning. If you use a pan, add a splash of water. This helps keep the noodles from getting mushy. Stir frequently to ensure even heating. If you want to freeze your noodles, first let them cool completely. Place them in freezer-safe bags or containers. Squeeze out as much air as you can. When ready to eat, defrost in the fridge overnight. Reheat in a pan for the best texture. Enjoy your noodles even after freezing! Sweet chili garlic noodles are a tasty dish made with soft noodles and a sweet sauce. They have bold flavors from garlic and ginger. The sweet chili sauce gives a nice kick with its heat and sweetness. You can use egg noodles or rice noodles, depending on your taste. To add spice, try these ideas: - Add red pepper flakes for heat. - Mix in sriracha or your favorite hot sauce. - Use a spicy chili paste in the sauce. These will make your dish exciting and fiery! Yes, you can prepare sweet chili garlic noodles in advance. Cook the noodles and store them in the fridge. Keep the sauce and veggies separate. This keeps them fresh. When you're ready to eat, just stir-fry everything together. It's an easy meal prep option! You can use many veggies for sweet chili garlic noodles. Here are some great options: - Bell peppers - Carrots - Snap peas - Broccoli - Zucchini Feel free to mix and match based on what you have at home! These noodles pair well with: - Grilled chicken or shrimp - A side of spring rolls - Steamed dumplings - A fresh salad These sides will make your meal complete and satisfying! You learned how to make sweet chili garlic noodles with simple ingredients and steps. Remember to cook the noodles just right and stir-fry your veggies on high heat for the best taste. You can add proteins or tweak the sauce to match your likes. Store your leftovers properly so they stay fresh. By following this guide, you can enjoy a delicious dish suited to your taste. Happy cooking!

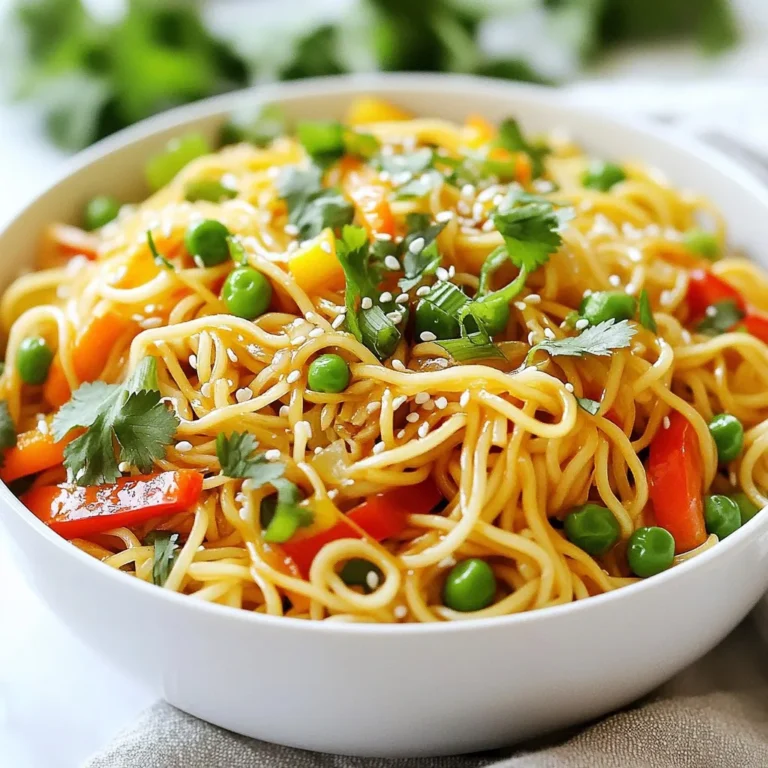
Sweet Chili Garlic Noodles Flavorful Comfort Dish

Here’s what you need for Creamy Garlic Parmesan Orzo: - 1 cup orzo pasta - 3 cups vegetable broth - 2 tablespoons olive oil - 4 cloves garlic, minced - 1 cup heavy cream - 1 cup grated Parmesan cheese - 1 teaspoon Italian seasoning - Salt and pepper, to taste - Fresh parsley, chopped (for garnish) Gathering these ingredients makes this dish simple and quick. The orzo pasta gives a nice bite, while the vegetable broth adds depth. Olive oil brings flavor, and garlic gives that lovely aroma. Heavy cream and Parmesan create the creamy goodness that you’ll love. Italian seasoning enhances everything, and salt and pepper bring it all together. Finally, fresh parsley adds a pop of color and taste. {{ingredient_image_1}} - First, take a medium saucepan. Pour in 3 cups of vegetable broth. - Bring the broth to a boil over medium heat. This step is key to flavor. - Add 1 cup of orzo pasta into the boiling broth. Cook it until it’s al dente. - Follow the package instructions for timing. It usually takes about 8-10 minutes. - Once done, drain the orzo in a colander. Set it aside for now. - In a large skillet, heat 2 tablespoons of olive oil over medium heat. - Add 4 cloves of minced garlic. Sauté for 1-2 minutes until it smells good. - Make sure the garlic does not brown. This keeps the flavor fresh. - Lower the heat, then stir in 1 cup of heavy cream and 1 teaspoon of Italian seasoning. - Let this cook for about 2 minutes. The mixture should heat through nicely. - Gradually add in 1 cup of grated Parmesan cheese. Stir as you add it in. - Keep stirring until the cheese melts and the sauce is creamy. - Now, add the cooked orzo to the creamy sauce in the skillet. - Gently toss the orzo with the sauce. Ensure every piece is coated well. - Taste and adjust the seasoning with salt and pepper if needed. - Let it sit for a couple of minutes to thicken slightly before serving. To cook orzo perfectly, use a large pot. This helps keep the pasta from sticking. Boil the vegetable broth first. This adds flavor to the orzo as it cooks. Stir the orzo often while it cooks. This keeps it from clumping together. You want the orzo to be al dente, firm but tender. To boost the taste, try adding a pinch of red pepper flakes. This gives a nice kick. You can also toss in some cooked spinach or peas for added nutrition. For a richer sauce, use half-and-half instead of cream. If you want it lighter, swap cream for low-fat milk. Always adjust salt and pepper to suit your taste. Pro Tips Use Fresh Garlic: Freshly minced garlic adds an aromatic punch to the dish. Avoid using pre-minced garlic for the best flavor. Adjust Cream for Thickness: If you prefer a thicker sauce, allow the cream to simmer a bit longer before adding the cheese. This will enhance the creaminess. Experiment with Cheese: Try mixing different types of cheese, like Pecorino Romano or Asiago, for a unique flavor twist. Just make sure they melt well. Garnish for Freshness: Fresh parsley not only adds color but also a fresh flavor. Consider adding lemon zest for an extra brightness. {{image_2}} You can change the cheese in this recipe. Try using mozzarella for a milder taste. Feta adds a salty kick. Goat cheese gives a creamy texture with tang. You can also mix cheeses for a richer flavor. If you want to switch up the pasta, go for whole wheat orzo. Rice or quinoa can work too. These options add different tastes and textures. Just adjust the cooking time based on what you choose. Adding vegetables makes this dish more colorful and nutritious. Spinach wilts down nicely and adds a fresh taste. Mushrooms give an earthy flavor and a nice bite. You can mix in frozen peas or sun-dried tomatoes for extra color. Protein can make this dish more filling. Chicken is a great choice. Cook it in the skillet before adding the sauce. Shrimp cooks quickly, so add it at the end. Both options work well and make the meal heartier. To keep your creamy garlic Parmesan orzo fresh, use an airtight container. Make sure the container seals well. This helps keep moisture in and air out. Store in the fridge for up to three days. If you want to keep it longer, you can freeze it. Use freezer-safe containers or bags. This will help prevent freezer burn. When it's time to enjoy your leftovers, reheat gently. You can use the microwave or a skillet. If you choose the microwave, heat in short bursts. Stir in between to ensure even warmth. If using a skillet, add a splash of broth or cream while reheating. This will keep the orzo creamy and smooth. Stir frequently to maintain that delicious texture. Enjoy your meal just as much as the first time! Orzo is a small, rice-shaped pasta. It is made from wheat. You can use orzo in many dishes, like soups and salads. Its shape makes it great for creamy dishes too. Orzo cooks quickly and can absorb flavors well. This is why it works perfectly in Creamy Garlic Parmesan Orzo. Yes, you can prepare this dish in advance. Cook the orzo and make the sauce separately. Combine them just before serving. This helps keep the pasta creamy. Store each part in an airtight container. When you are ready to eat, heat them together. Add a splash of broth or cream if needed. Absolutely! Creamy Garlic Parmesan Orzo is great for meal prep. You can make a big batch and portion it out. This dish tastes good even after a few days in the fridge. It is a filling meal that you can enjoy for lunch or dinner. Plus, it is easy to reheat. You will love having this tasty option ready to go! This blog post gave you a clear guide to making Creamy Garlic Parmesan Orzo. We covered ingredients, step-by-step instructions, and helpful tips. You learned how to perfect the orzo and enhance its flavor. We also explored variations and storage tips to keep leftovers fresh. Try out these ideas and make the dish your own. Cooking should be fun and tasty. Enjoy your creamy creation!

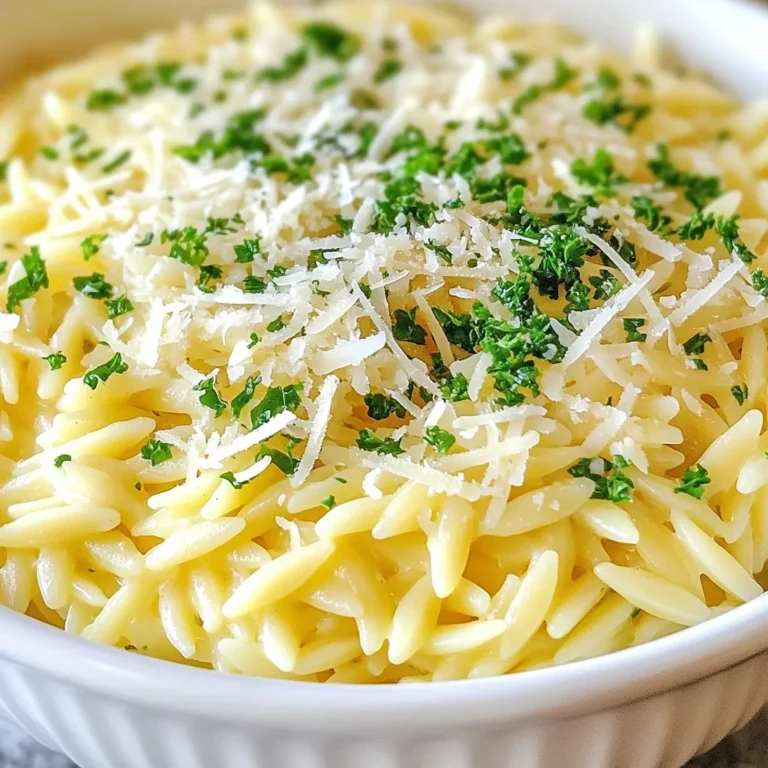
Creamy Garlic Parmesan Orzo Simple and Quick Recipe

PREV 1 … 40 41 42 … 52 NEXT
cozy citrus kitchen

explore

DessertsDinnerAppetizersDrinks

Our Policies

  • Cookie Policy
  • Copyright Policy
  • Disclaimer
  • GDPR Policy
  • Terms Of Use
Back to Top
  • About
  • Contact Us
  • Privacy Policy
© 2025 cozy citrus kitchen