FREE DINNER EBOOK! Get your copy!
  • Cookie Policy
  • GDPR Policy
  • Disclaimer
  • Terms Of Use
  • Visit my other site: Fun Cookie Recipes
cozy citrus kitchen
  • Home
  • Dinner
  • Desserts
  • Drinks
  • Appetizers
  • Contact
  • About
  • Privacy Policy
  • Home
  • Dinner
  • Desserts
  • Drinks
  • Appetizers
  • Contact
  • About
  • Privacy Policy
  • Cookie Policy
  • GDPR Policy
  • Disclaimer
  • Terms Of Use
Visit my other site: Fun Cookie Recipes

HOME / CATEGORIES /

Latest

- 1 cup orzo pasta - 1 cup cherry tomatoes, halved - 1 cucumber, diced - 1 bell pepper (red or yellow), diced - 1/2 red onion, finely chopped - 1/2 cup Kalamata olives, pitted and sliced - 1/2 cup feta cheese, crumbled - 1/4 cup fresh parsley, chopped - 2 tablespoons olive oil - 2 tablespoons lemon juice - 1 teaspoon dried oregano - Salt and pepper to taste The main ingredients make this dish fresh and bright. Orzo pasta gives a nice base. I love using cherry tomatoes for their sweetness. Diced cucumber adds crunch. A colorful bell pepper brings a sweet taste. The red onion gives a little bite. Kalamata olives add a salty, rich flavor. Feta cheese makes it creamy and tangy. Fresh parsley adds a pop of color and taste. For the dressing, I keep it simple yet flavorful. Olive oil brings richness. Lemon juice adds a zesty kick. Dried oregano gives an earthy note. I always taste and adjust salt and pepper to make it perfect. This mix ties all the flavors together. With these ingredients, you can make a delicious Greek Orzo Salad that everyone will love. {{ingredient_image_1}} 1. First, cook the orzo pasta. Bring water to a boil in a pot. Add one cup of orzo pasta. Boil it for about 8-10 minutes, until it is al dente. This means it should be firm but not hard. 2. After cooking, drain the orzo in a colander. Rinse it under cold water. This stops the cooking process and cools it down quickly. 1. In a large bowl, combine the cooled orzo with the veggies and olives. Add one cup of halved cherry tomatoes, one diced cucumber, one diced bell pepper, and half a finely chopped red onion. Toss them together. 2. Now it’s time to prepare the dressing. In a small bowl, whisk together two tablespoons of olive oil, two tablespoons of lemon juice, one teaspoon of dried oregano, and a pinch of salt and pepper. This dressing will add a fresh taste to the salad. 1. Pour the dressing over the orzo mixture. Gently toss everything together. Make sure the orzo and veggies are evenly coated. 2. Next, add half a cup of crumbled feta cheese and a quarter cup of chopped fresh parsley. Fold them into the salad carefully. 3. Finally, cover the salad and chill it in the fridge for at least 30 minutes. Chilling helps the flavors blend and makes the dish refreshing and tasty. To achieve al dente orzo, boil the pasta in salted water. Start checking it a minute or two before the package's time. It should be firm yet tender. Chilling the salad is key for flavor. After mixing, cover the salad and chill it for at least 30 minutes. This helps all the flavors blend well together. For serving, I love using a large bowl. It allows everyone to help themselves. You can also serve in individual bowls for a more personal touch. Garnish each serving with extra feta and parsley. Drizzle a bit more olive oil and lemon juice just before serving. This adds a fresh look and taste. Store leftovers in an airtight container. This keeps the salad fresh for up to three days in the fridge. When reheating, be careful. Use a low heat to avoid making the orzo mushy. If it's cold, enjoy it straight from the fridge. It still tastes great! Pro Tips Use Fresh Ingredients: For the best flavor, opt for fresh vegetables and herbs. They will elevate the dish and add vibrant colors. Customize Your Dressing: Feel free to adjust the olive oil and lemon juice ratio based on your taste preference. A bit more lemon can brighten the dish! Let It Chill: Allowing the salad to chill for at least 30 minutes helps the flavors meld together, making each bite more delicious. Make It Ahead: This salad can be made a day in advance. Just keep the feta separate until serving to maintain its texture. {{image_2}} If you want to switch up the orzo, try using quinoa or rice. Both are gluten-free and add great texture. For a different cheese, you can use goat cheese or even ricotta. Each cheese gives a unique taste and blends well with the salad. Seasonal veggies make great additions. Try adding zucchini, asparagus, or spinach for color and crunch. You can also toss in proteins like grilled chicken or chickpeas for a heartier meal. These options make the salad more filling and satisfying. Change the herbs in your dressing for a new flavor. Use fresh basil or dill for a twist. You can also try different vinegars like red wine or balsamic for a richer taste. If you prefer creamy, mix in yogurt or sour cream. These changes will make the dressing even more delicious. A serving of Greek Orzo Salad with Feta has about 250 calories. It packs around 8 grams of protein, 12 grams of fat, and 30 grams of carbohydrates. This balance makes it a great choice for a light meal or side dish. This salad is rich in healthy fats from olive oil and feta cheese. Feta provides calcium and protein, which are key for strong bones and muscles. Kalamata olives add antioxidants, which help fight cell damage. The fresh veggies, like cucumbers and tomatoes, offer vitamins and hydration. This dish aligns well with Mediterranean diet principles, which focus on whole foods, healthy fats, and plenty of fruits and veggies. I suggest a portion size of about 1 cup for a main dish or a side. This way, you can enjoy it without overdoing it. If you're planning a meal, consider making enough for at least 4 servings. You can adjust the recipe easily to suit your crowd. Just double the ingredients if you have more guests. You can store Greek Orzo Salad with Feta in the fridge for about three to five days. To keep it fresh, place it in an airtight container. This helps to prevent any odors from the fridge from getting in. If you notice any excess moisture, use a paper towel to absorb it before sealing the container. Yes, you can make Greek Orzo Salad with Feta ahead of time. I often prepare it the night before a gathering. This gives the flavors time to blend. Just remember to keep the salad chilled in the fridge. For best results, add the feta cheese right before serving. This keeps it fresh and crumbly. Greek Orzo Salad pairs well with many dishes. You can serve it alongside grilled chicken or fish for protein. It also works great with pita bread and hummus for a light meal. For a vegetarian option, try it with stuffed bell peppers or roasted vegetables. These pairings create a balanced and tasty meal. This blog post covered how to make a delicious Greek Orzo Salad with Feta. We explored the main ingredients, detailed steps for preparation, and offered tips for cooking and storage. You can also get creative with ingredient variations and learn about its health benefits. Enjoy your tasty salad, knowing it's simple to make and packed with flavor. This dish is great for meals and can be customized to fit your taste. Try it out and find your favorite twist!

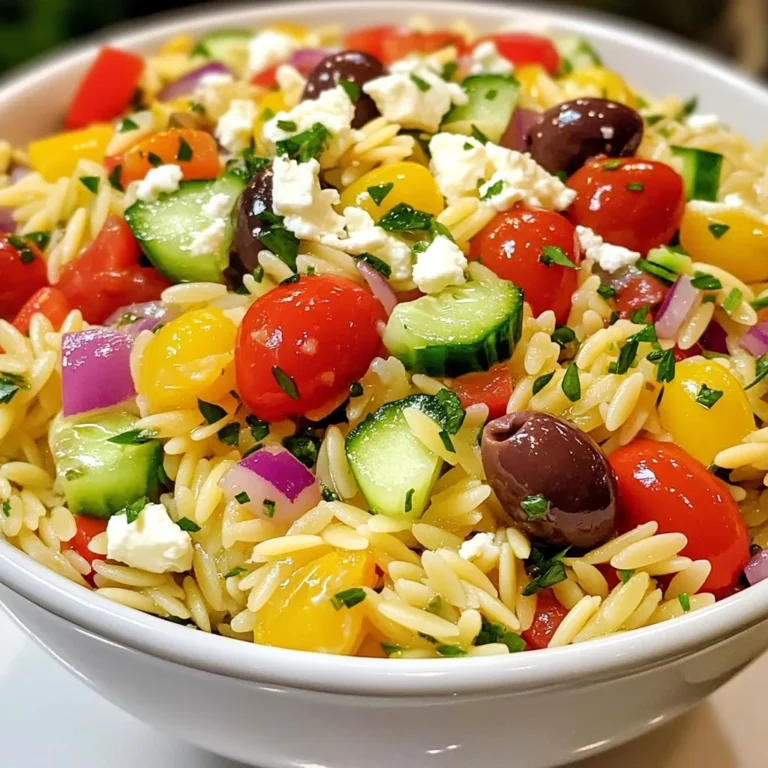
Greek Orzo Salad with Feta Refreshing Summer Dish

To make delicious roasted garlic Parmesan Brussels sprouts, gather the following items: - 1 pound Brussels sprouts, trimmed and halved - 4 cloves garlic, minced - 3 tablespoons olive oil - 1 teaspoon salt - 1 teaspoon black pepper - 1/4 teaspoon red pepper flakes (optional) - 1/2 cup grated Parmesan cheese - 2 tablespoons balsamic vinegar (for drizzling) - Fresh parsley, chopped (for garnish) These ingredients come together to create a flavorful dish. The Brussels sprouts give a nutty taste, while garlic adds a rich aroma. Olive oil helps them roast nicely. Salt and pepper bring out the best flavors. If you like heat, add red pepper flakes. Parmesan cheese adds creaminess and depth. Finally, balsamic vinegar gives a sweet, tangy finish, while fresh parsley brightens the dish. {{ingredient_image_1}} - Preheat your oven to 400°F (200°C). - Trim and halve 1 pound of Brussels sprouts. - In a large bowl, mix the halved sprouts with: - 4 cloves garlic, minced - 3 tablespoons olive oil - 1 teaspoon salt - 1 teaspoon black pepper - 1/4 teaspoon red pepper flakes (optional) - Toss until all sprouts get coated well. - Spread the Brussels sprouts on a baking sheet, cut side down. - Roast them for about 20 minutes. Look for crispy leaves and tender centers. - After 20 minutes, take them out and sprinkle: - 1/2 cup grated Parmesan cheese - Return to the oven for 5-7 minutes. Wait until the cheese melts and turns golden. - Once done, drizzle 2 tablespoons of balsamic vinegar over the sprouts. - Garnish with fresh chopped parsley before serving. - Cut size and arrangement: Halve the Brussels sprouts for even cooking. This helps them roast well. Keep the cut side down to get that nice caramelization. - Importance of single layer: Spread the sprouts in one layer on your baking sheet. This allows hot air to circulate. If they overlap, they will steam instead of roast. - Garlic preparation advice: Mince the garlic finely to release its flavor. This gives a strong garlic taste. You can also roast whole cloves for a milder flavor. - Adjusting seasoning levels: Start with the basic salt and pepper. Taste the sprouts after roasting. If needed, add more salt or pepper later. - Pairing ideas with mains: Roasted garlic Parmesan Brussels sprouts go well with chicken or steak. They add a nice crunch to your meal. - Best side dishes to accompany: Try pairing them with mashed potatoes or a light salad. They balance well with creamy or fresh sides. Pro Tips Choose Fresh Sprouts: Look for Brussels sprouts that are firm and bright green. Avoid any that are yellowing or have brown spots for the best flavor and texture. Cut for Even Cooking: Halving the Brussels sprouts ensures they cook evenly and allows for more surface area to caramelize, enhancing their flavor. Experiment with Cheese: While Parmesan is delicious, feel free to experiment with other cheeses like Pecorino Romano or even a sprinkle of feta for a different flavor profile. Don’t Skip the Balsamic: A drizzle of balsamic vinegar at the end adds a sweet and tangy flavor that perfectly complements the roasted sprouts and cheese. {{image_2}} For a dairy-free option, you can skip the Parmesan cheese. Use nutritional yeast instead. It gives a similar cheesy flavor without dairy. If you want to try a different cheese, consider using feta or goat cheese. These cheeses add a tangy twist to your Brussels sprouts. You can enhance the flavor by adding nuts or seeds. Toasted pine nuts or slivered almonds work well. They add a nice crunch and depth to the dish. If you like more spice, add extra red pepper flakes. A pinch of cayenne pepper also works for heat. If you want to try cooking in an air fryer, set it to 375°F (190°C). Cook for about 15 minutes. Shake the basket halfway through for even cooking. For a grilling option, toss the Brussels sprouts in a grill basket. Grill them over medium heat for about 10-15 minutes. This method gives a smoky flavor that pairs well with the garlic and cheese. To keep your Roasted Garlic Parmesan Brussels sprouts fresh, refrigerate leftovers. Place them in an airtight container. This helps lock in moisture and flavor. You can enjoy them for up to four days. If you want to save them longer, consider freezing. Spread your cooled sprouts on a baking sheet. Freeze them for about one hour before transferring to a freezer-safe bag. They can last for up to three months in the freezer. When it's time to enjoy your leftovers, reheating them correctly makes a big difference. The oven is the best way to bring back the crispiness. Preheat your oven to 350°F (175°C). Place the sprouts on a baking sheet and heat for about 10-15 minutes. This will make them warm and crispy again. If you’re in a hurry, you can use the microwave. Place them in a microwave-safe dish and cover with a lid. Heat in short bursts of 30 seconds, stirring in between. This helps avoid soggy sprouts. How long will your Brussels sprouts last? In the fridge, they stay fresh for about four days. In the freezer, they can last up to three months. Always check your sprouts for signs of spoilage. If they look mushy or have a strong odor, it's best to toss them. Fresh sprouts should feel firm and look bright green. Enjoy your delicious Brussels sprouts while they're at their best! Yes, you can use frozen Brussels sprouts. They are handy when fresh ones are not available. To use frozen sprouts, thaw them first. Pat them dry to remove excess moisture. This helps prevent sogginess. Frozen sprouts may cook faster than fresh ones. Keep an eye on them while roasting. Aim for a crisp texture. You might need to adjust the cooking time. If they look soft, take them out early. Brussels sprouts can have a strong, bitter taste. To reduce this, try these tips. Cut them in half to help them cook evenly. Roasting at a high heat brings out their natural sweetness. Adding a bit of balsamic vinegar boosts flavor and cuts bitterness. You can also mix in some honey or maple syrup. These sweetness-boosters make the dish more enjoyable. Remember, always taste as you go, and adjust as needed. Yes, you can prep Brussels sprouts ahead of time. Trim and halve them a day before. Store them in a sealed container in the fridge. You can also mix the olive oil, garlic, and spices in a bowl. This makes it easier when you are ready to cook. Just toss the sprouts in the mix and roast them when you want. Roasted Brussels sprouts taste best fresh but can be reheated. They last up to three days in the fridge. Brussels sprouts are simple and tasty. We covered all you need: ingredients, steps, and tips. Whether you roast, grill, or use an air fryer, these sprouts shine. Remember storage tips to enjoy leftovers later. You can customize flavors and pair well with many dishes. Experiment with variations to make this recipe your own. Try cooking them soon for a healthy meal. Enjoy making and sharing. You'll love how easy it is to bring this dish to life!

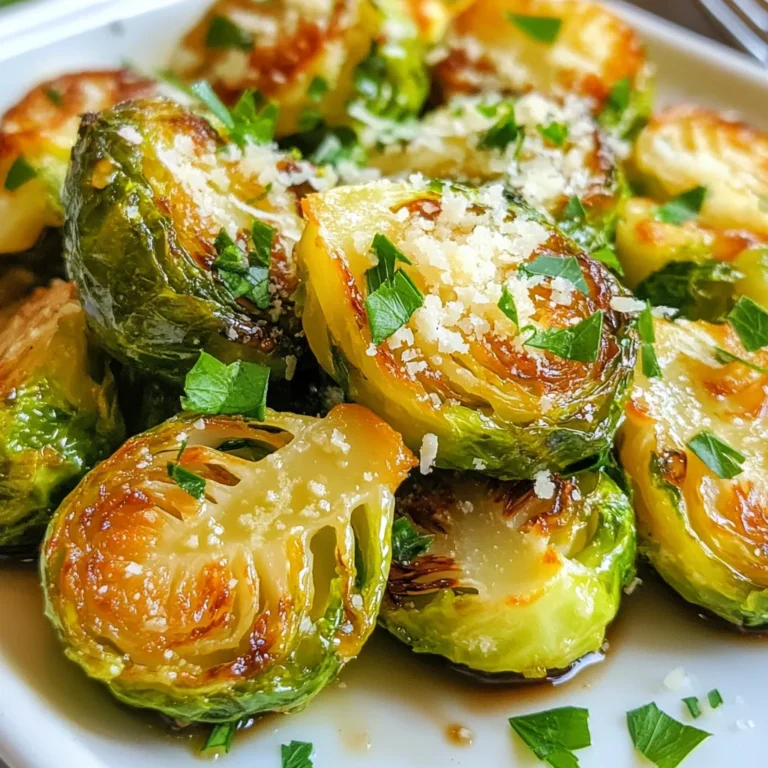
Roasted Garlic Parmesan Brussels Sprouts Delight

- 2 chicken breasts, diced - 1 tablespoon chipotle powder - 1 teaspoon smoked paprika - 1 teaspoon garlic powder - 1 teaspoon onion powder - Salt and pepper to taste - 1 tablespoon olive oil - 1 cup cooked brown rice - 1 cup black beans, drained and rinsed - 1 cup corn (fresh or frozen) - 1 avocado, sliced - 1 cup pico de gallo (or diced tomatoes with onion and cilantro) - ½ cup shredded cheese (cheddar or a Mexican blend) - Fresh cilantro, for garnish - Lime wedges, for serving To make a great Chipotle Chicken Burrito Bowl, you need fresh, quality ingredients. Start with chicken breasts; they provide protein and flavor. The spices include chipotle powder, smoked paprika, garlic powder, and onion powder. They add that smoky and spicy kick we love. Don’t forget salt and pepper for taste. Brown rice serves as a hearty base. Black beans and corn add fiber and sweetness. Fresh produce like avocado and pico de gallo brings brightness. Lastly, shredded cheese and cilantro enhance the dish. When picking ingredients, use fresh ones for the best taste and texture. Store any extras in the fridge to keep them fresh for your next meal. - Different cheeses for personalization - Additional vegetables and toppings - Sauces and dressings for extra flavor Feel free to get creative with toppings! Different cheeses like pepper jack or feta can change the flavor. You might add veggies like bell peppers or lettuce for crunch. Sauces like salsa or sour cream can bring more taste. Customize your bowl to match your mood or dietary needs. The options are endless! - Accompaniments to enhance the meal - Pairings with drinks - Common side dishes at Chipotle To elevate your burrito bowl experience, think about sides. Chips and guacamole always pair well. A fresh salad can lighten the meal. Drinks like iced tea or sparkling water match nicely too. Many people enjoy corn salsa or tortilla soup as sides at Chipotle. These can add variety and make your meal more fun! {{ingredient_image_1}} How do I season the chicken? Mix the diced chicken with chipotle powder, smoked paprika, garlic powder, onion powder, salt, and pepper. Ensure all pieces are coated well. This mix adds a great kick! What is the cooking process in the skillet? Heat olive oil in a large skillet over medium heat. Add the seasoned chicken. Cook for about 8-10 minutes, stirring often. Look for a golden brown color. The chicken should be cooked through and juicy. What tips help achieve the right texture? Cook the chicken evenly by stirring often. Avoid overcrowding the skillet. If needed, work in batches. This keeps the heat consistent and promotes browning. How do I layer the base with rice and beans? Start with cooked brown rice at the bottom of the bowl. Spread it evenly. Next, add black beans. Rinse them first to remove excess salt. This step adds protein and fiber. What is the best way to arrange toppings for presentation? Once the base is ready, add corn evenly on top. Then layer the cooked chicken. This creates a colorful and inviting look. How should I garnish the bowl? Top the bowl with sliced avocado, pico de gallo, and shredded cheese. Finish with fresh cilantro sprinkled on top. This adds flavor and visual appeal. Serve with lime wedges on the side for extra zest. What is the prep time breakdown? Prep time is about 15 minutes. This includes seasoning the chicken and cooking the rice. What is the total cooking time? The total time for this dish is around 25 minutes. This is quick for a tasty meal. What are some serving suggestions for optimal enjoyment? Serve this burrito bowl warm. Pair it with chips or a refreshing drink. Enjoy it with friends or family for the best experience. To get juicy chicken, use fresh chicken breasts. Cut them into small pieces. This helps them cook evenly. Cook the chicken until it is golden brown. This takes about 8-10 minutes in a hot skillet. Managing spice levels is key. If you like heat, add more chipotle powder. For less spice, reduce it. You can also mix in some lime juice. This adds flavor without extra heat. For seasoning, you can swap out spices. Try using fresh herbs like cilantro or parsley. You can also use lemon zest for a bright taste. Layering is important for a great bowl. Start with brown rice as the base. Then, add black beans and corn evenly. This makes each bite balanced and tasty. Adjust the amounts of each ingredient. If you love cheese, add more! If you prefer less, cut back. This helps you make it just how you like. Meal prep can save you time. Cook a large batch of chicken and rice. Store them in separate containers. You can assemble bowls quickly during the week. Making your own pico de gallo is easy. Mix diced tomatoes, onions, and fresh cilantro. Add lime juice for a fresh kick. This topping makes your bowl more exciting. For added depth, try spices like cumin or oregano. A pinch of cayenne can bring heat too. These small changes can make a big difference in flavor. Feel free to experiment with flavors. Try adding grilled peppers or black olives. Mixing in different toppings keeps your meals fresh and fun. Pro Tips Marinate for More Flavor: If time allows, marinate the chicken in the spice mixture for at least 30 minutes or overnight in the fridge to enhance the flavor. Customize Your Heat: Adjust the amount of chipotle powder based on your spice preference; you can add more for an extra kick or reduce it for a milder taste. Fresh Ingredients Matter: Use fresh pico de gallo or make your own with ripe tomatoes, onion, cilantro, and lime juice for a vibrant topping. Layering Technique: For the best texture and flavor, layer the ingredients in the bowl starting with rice, then beans, corn, and finally the chicken on top. {{image_2}} You can easily change up your Chipotle chicken burrito bowl. If you prefer a vegetarian or vegan option, swap the chicken for grilled veggies or tofu. Use black beans or lentils for protein. For a gluten-free bowl, make sure to use certified gluten-free grains and sauces. If you want to lower the carbs, skip the rice and add more veggies instead. Try mixing different spices to create new flavors. Add cumin or chili powder for extra heat. You can also try regional cuisines by using spices like curry or harissa. Seasonal ingredients can make a big difference too. In summer, add fresh corn or bell peppers. In winter, roasted sweet potatoes or squash work great. If you want to change the base, you have options. Instead of rice, use quinoa or cauliflower rice for a lighter dish. Lettuce wraps are also fun and low-carb. You can also mix different grains for added texture. Try brown rice with quinoa for a nutty flavor, or use farro for a chewy bite. To keep your Chipotle chicken burrito bowl fresh, use these tips: - Store leftovers in airtight containers. - Glass or BPA-free plastic containers work best. - Keep the bowl in the fridge for 3-4 days. When reheating, you have options. Here’s how: - In the microwave, cover the bowl with a damp paper towel. - For the oven, place it in a dish and cover with foil. - Heat in the microwave for 2-3 minutes. - In the oven, reheat at 350°F for about 15 minutes. - Check to ensure the chicken stays moist and warm. Preparing ahead saves time. Here are some ideas: - Cook chicken and rice in bulk on the weekend. - Portion out ingredients into separate containers. - Assemble bowls quickly for easy lunches during the week. - Mix and match toppings for variety each day. - Enjoy a tasty meal without the fuss! A Chipotle Chicken Burrito Bowl is a delicious meal. It features seasoned chicken, rice, beans, and fresh toppings. This dish combines flavors and textures that everyone loves. The bowl is popular for its freshness and customizability. You can add ingredients based on your taste. Yes, you can make this burrito bowl gluten-free. Many ingredients are naturally gluten-free, but some need care. The main ingredient to check is the seasoning. Ensure your spices do not contain gluten. You can also use gluten-free tortillas if you want a wrap-style bowl. Opt for corn or brown rice as a base instead of flour-based options. Preparing this dish takes about 25 minutes. You need 15 minutes for prep and 10 minutes for cooking. To save time, you can cook the rice ahead. Also, chop your veggies in advance. This way, you can assemble the bowl quickly when you're ready to eat. In this post, we explored how to make a Chipotle Chicken Burrito Bowl. We detailed key ingredients, optional toppings, and suggested sides that complete the meal. I provided step-by-step instructions for preparing the chicken and assembling the bowl, along with helpful tips to enhance flavor and customize your dish. Whether you want a quick meal or something special, these ideas can fit your needs. Enjoy creating your bowl, and make it your own with just a few changes. You now have the tools to make this tasty dish whenever you want!

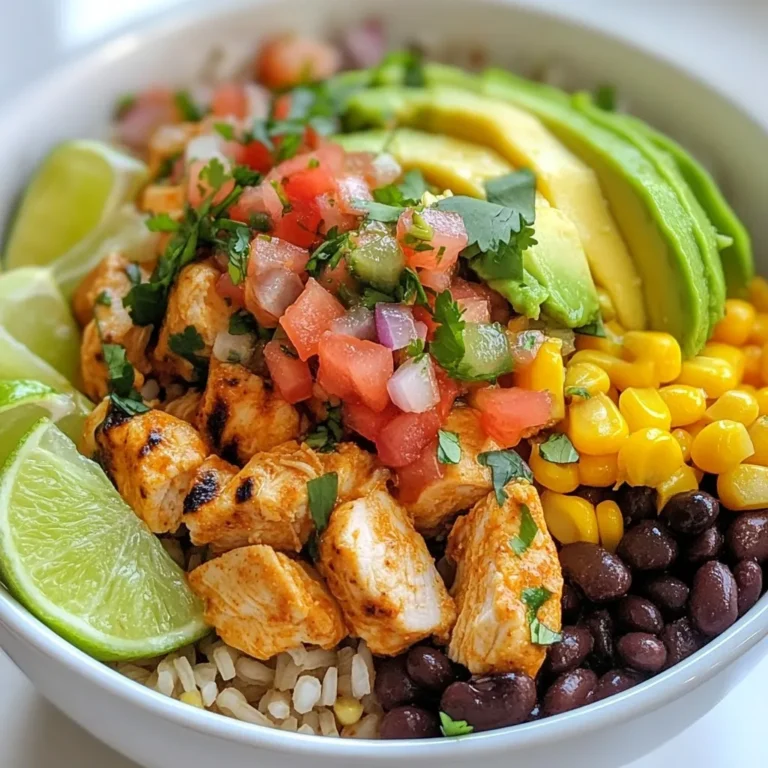
Chipotle Chicken Burrito Bowl Tasty Meal Guide

To make this creamy taco soup, gather these simple ingredients: - 1 lb ground turkey or chicken - 1 medium onion, diced - 3 cloves garlic, minced - 1 bell pepper, diced (any color) - 1 can (15 oz) black beans, drained and rinsed - 1 can (15 oz) corn kernels, drained - 1 can (10 oz) diced tomatoes with green chilies - 2 cups chicken broth - 1 packet taco seasoning - 1 cup cream cheese, cut into cubes - 1 cup shredded cheddar cheese - Salt and pepper to taste You can add fun toppings to your soup for extra flavor. Here are some great options: - Avocado slices - Chopped cilantro - Lime wedges - Additional cheese If you have special dietary needs, here are some easy swaps: - Use ground beef instead of turkey or chicken. - For a vegetarian option, try using lentils or mushrooms. - Replace chicken broth with vegetable broth for a vegan version. - Use dairy-free cream cheese to make it dairy-free. These simple ingredients and options make this Instant Pot creamy taco soup a versatile and tasty dish! {{ingredient_image_1}} First, I set my Instant Pot to sauté mode. I add one pound of ground turkey or chicken. I cook it for about five minutes. I break the meat apart with a spoon as it cooks. Once it is browned, I add one diced medium onion, three minced garlic cloves, and one diced bell pepper. I sauté these for another three to four minutes until the veggies soften. Next, I stir in one can of drained black beans and one can of drained corn. I also add one can of diced tomatoes with green chilies. Then, I pour in two cups of chicken broth and add one packet of taco seasoning. I mix everything well to combine. I close the lid and set the Instant Pot to manual mode. I cook on high pressure for ten minutes. After cooking, I let the pressure release naturally for five minutes. Finally, I switch to quick release for any remaining pressure. When I open the lid, I stir in one cup of cream cheese cut into cubes. I mix until it melts and blends well. Next, I add one cup of shredded cheddar cheese. I stir until it is fully melted. I taste the soup and season with salt and pepper if needed. Now, it's ready to serve! I love adding toppings like avocado, cilantro, lime wedges, or more cheese for extra flavor. To make the best creamy taco soup, use fresh ingredients. Fresh onions and peppers give great flavor. Make sure to brown the meat well. This adds depth to your soup. Don't skip the sauté step; it makes a big difference. When you add cream cheese, let it melt fully. This creates a smooth texture. Stir well to combine all the flavors. If you want a thicker soup, add less broth. Play around until you find your favorite texture. One common mistake is not draining the beans and corn. This can make your soup too watery. Another mistake is skipping the sauté step. It may seem faster but will lose flavor. Be careful with the taco seasoning. Adding too much can overpower the dish. Always taste and adjust salt and pepper at the end. Lastly, don't rush the pressure release. Letting it sit for a few minutes helps the flavors meld. To boost flavor, try adding lime juice right before serving. Fresh lime gives a nice zing. You can also mix in some chopped cilantro. This adds a fresh taste and color. If you like heat, add sliced jalapeños or hot sauce. Consider using smoked paprika for a different twist. Finally, top your soup with crushed tortilla chips. They add crunch and enhance the taco flavor. Pro Tips Use Fresh Ingredients: For the best flavor, use fresh vegetables and herbs. Fresh ingredients elevate the soup's taste and nutrition. Customize the Spice Level: Adjust the amount of taco seasoning or add some jalapeños for extra heat, depending on your family’s preference. Make it Ahead: This soup can be made ahead of time and stored in the fridge for up to 3 days or frozen for later use. Just reheat before serving! Add More Protein: Consider adding cooked beans or lentils for a heartier soup, making it even more filling and nutritious. {{image_2}} You can make a vegan version of this soup. Swap the ground turkey or chicken for a can of lentils or 1 lb of crumbled tofu. Use vegetable broth instead of chicken broth. For creaminess, replace cream cheese with cashew cream or coconut cream. This keeps the soup rich and tasty while being plant-based. To change the spice level, add more or less taco seasoning. If you like heat, use a spicy taco seasoning mix. You can also add jalapeños or crushed red pepper flakes for extra kick. For less heat, choose a mild seasoning and skip the spicy add-ins. You can easily swap ingredients based on what you have. Use any color bell pepper or add more veggies like zucchini or corn. Instead of black beans, try pinto beans or kidney beans. This soup is flexible. Play with flavors to make it your own! To store your creamy taco soup, let it cool first. Use an airtight container. This keeps the soup fresh. You can store it in the fridge for up to three days. Make sure to label the container with the date. If you want it to last longer, consider freezing it. Reheat your soup on the stove or in the microwave. For the stove, pour it into a pot. Heat over medium until warm, stirring often. In the microwave, use a microwave-safe bowl. Heat for one minute, then stir. Keep heating in thirty-second bursts until hot. Add a splash of broth if it seems thick. If you want to freeze the soup, it’s easy! Pour the cooled soup into a freezer-safe bag. Lay it flat in the freezer. This saves space and makes thawing simple. It can last for up to three months. When ready to eat, thaw it in the fridge overnight before reheating. Yes, you can use ground beef. It adds a rich flavor to the soup. Brown the beef just like you would with turkey or chicken. The rest of the steps stay the same. Ground beef gives a heartier taste. Try it if you prefer its flavor! To spice up your soup, add jalapeños or hot sauce. You can mix in diced jalapeños when cooking the veggies. For hot sauce, start with a small amount. Taste and add more if you like it hotter. You can also use spicy taco seasoning for more heat. Yes, you can use regular cheese. However, cream cheese makes the soup creamy and rich. If you use regular cheese, add it at the end. Stir it in until it melts. This will give your soup a nice cheesy flavor, but it won’t be as creamy. To make creamy taco soup, we covered the needed ingredients, preparation steps, and helpful tips. You learned about toppings, substitutions, and ways to store leftovers. I shared options for vegan or spicier variations. Remember, avoiding common mistakes ensures success. Enjoy experimenting with flavors to find your perfect bowl! This soup adapts easily to your tastes and goals. Now, it’s time to make it your own and savor every bite!

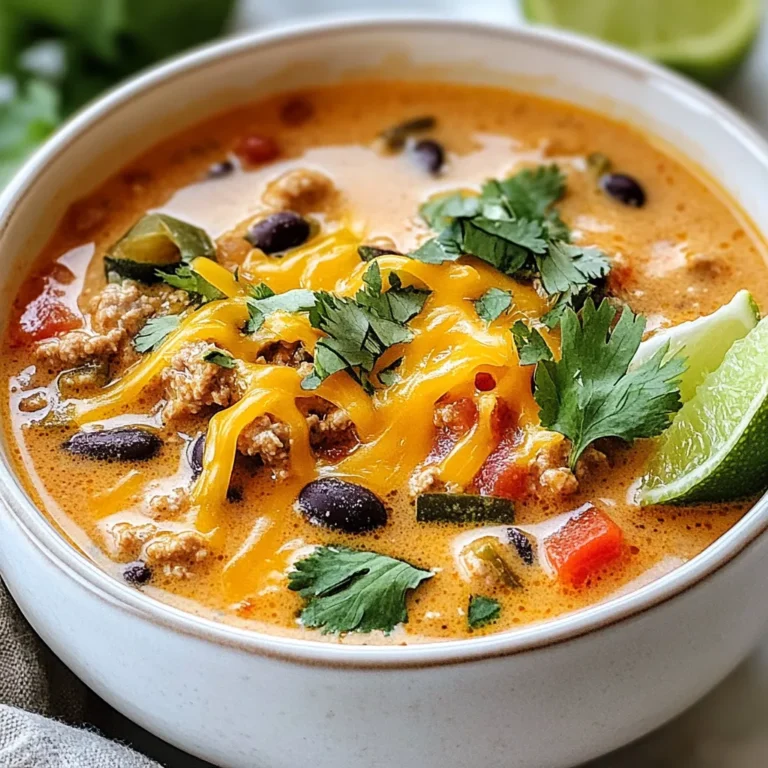
Instant Pot Creamy Taco Soup Simple and Tasty Dish

- 1 lb large shrimp, peeled and deveined The star of the dish! Fresh shrimp brings a sweet flavor and tender texture. - 8 oz linguine or spaghetti This pasta creates a great base for the sauce. It absorbs the garlic butter well. - 4 tablespoons unsalted butter Butter adds richness and depth. It helps create a smooth sauce. - 4 tablespoons olive oil Olive oil keeps the butter from burning. It adds healthy fats and flavor. - 6 cloves garlic, minced Fresh garlic gives a strong, bold flavor. It is the key to this dish. - 1 teaspoon red pepper flakes (adjust to taste) This adds a nice heat. You can use less or more based on your spice level. - 1 lemon, zested and juiced The lemon brightens the dish. The zest adds a fragrant note. - 1/4 cup fresh parsley, chopped Fresh parsley adds color and freshness. It balances the rich flavors. - Salt and pepper to taste Essential for seasoning. Adjust these to enhance the flavors. - Grated Parmesan cheese for serving (optional) This adds a salty, creamy finish. It’s not needed but is a great touch. - Vegetables like spinach or cherry tomatoes You can add veggies for more color and nutrients. They also add a nice texture. - Different herbs like basil or thyme Fresh herbs can change the flavor profile. Try them to keep it interesting. - Using whole wheat or gluten-free pasta These options suit different diets. They work well with the same cooking method. {{ingredient_image_1}} Start by cooking the pasta. Follow the package directions until it is al dente. This means it should be firm but not hard. Once done, save about 1 cup of pasta water before draining. This water is key for the sauce. It helps bind the sauce and pasta together. Set the pasta aside in a bowl. Next, grab a large skillet. Over medium heat, melt the butter and olive oil together. This mix adds flavor and richness to the dish. Now, add the minced garlic and red pepper flakes. Sauté these for 1-2 minutes. The garlic should smell nice and turn a light golden color. Be careful not to burn it. If garlic burns, it tastes bitter and ruins the dish. When it’s time to add the shrimp, make sure they are peeled and deveined. Season them with salt and pepper. Cook the shrimp for about 2-3 minutes. Flip them halfway through. You want them pink and opaque, which means they are done. After the shrimp is cooked, pour in the lemon juice and stir in the zest. This adds a bright flavor. Let it all cook together for one more minute. Then, add the drained pasta to the skillet. Toss everything well. If it looks too dry, add a little reserved pasta water. This helps keep the dish creamy and smooth. Finally, mix in the fresh parsley. Taste your dish and adjust the seasoning if needed. You can add more salt, pepper, or lemon juice. Serve it hot, with grated Parmesan on top if you like. Enjoy your meal! - Overcooking shrimp: Shrimp cook fast. They need only 2-3 minutes in the pan. If you cook them too long, they turn tough and chewy. Watch for the pink color and opaque look. That's when they are ready! - Improper seasoning techniques: Salt and pepper are your friends. Add them at the right time. Season the shrimp when you add them to the pan. Taste your dish before serving. You can always add more, but you can't take it out! - Suggestions for additional herbs and spices: Want to spice it up? Add fresh basil or thyme for more flavor. You can also try a pinch of smoked paprika for a twist. These herbs bring a fresh taste to your dish! - Recommendations for balancing acidity: Lemon juice brightens the dish, but be careful! Too much can overpower the flavors. Start with half the juice, then taste. If you want more zing, add a little more. This balance makes every bite delicious! Pro Tips Perfect Pasta: Always cook your pasta until al dente. This ensures it remains firm and holds up well in the sauce. Flavor Boost: For extra flavor, consider adding a splash of white wine after sautéing the garlic before adding the shrimp. Fresh Ingredients: Using fresh garlic and parsley can significantly enhance the dish's flavor profile compared to dried alternatives. Serving Suggestion: Pair this dish with a light salad or garlic bread for a complete meal experience. {{image_2}} You can change the protein in this dish. Try using scallops or chicken instead of shrimp. Both options will still taste great with garlic butter. If you choose chicken, cut it into bite-sized pieces. Cook it until it's golden and fully cooked through. For scallops, sauté them for just a couple of minutes until they are opaque. If you want a vegetarian meal, consider using mushrooms or firm tofu. Both will soak up the flavors well. You can sauté mushrooms until they are golden. Tofu can be cooked until crispy. This way, you keep the dish tasty without meat. Adding vegetables is a smart way to enhance your Garlic Butter Shrimp Scampi. You can toss in spinach or cherry tomatoes. Spinach adds a nice green color and nutrients. Add it just before serving, so it wilts but stays bright. Cherry tomatoes bring sweetness. Add them along with the shrimp, so they soften. If you need to adapt the dish for specific diets, consider these options. For gluten-free needs, swap the pasta for zucchini noodles or gluten-free pasta. Low-carb eaters can enjoy spaghetti squash. Make sure to adjust cooking times for these alternatives to keep everything tender and delicious. To store leftovers, first let the dish cool down. Use an airtight container for best results. This keeps the shrimp fresh and tasty. You can keep it in the fridge for up to three days. When reheating, use a skillet over low heat. Add a splash of water or broth to keep the shrimp moist. Stir often to heat evenly. Avoid using the microwave, as it can overcook the shrimp. If you want to save some for later, freezing is a great option. First, cool the dish completely. Once cooled, place it in a freezer-safe container. Make sure to leave some space at the top for expansion. You can freeze it for up to three months. When you're ready to eat it, move the container to the fridge overnight. Once thawed, reheat it gently in a skillet. Add a little water or broth to help with moisture. Enjoy your delicious Garlic Butter Shrimp Scampi even after a long day! To make Garlic Butter Shrimp Scampi from scratch, follow these steps: 1. Cook the Pasta: Boil water and add linguine or spaghetti. Cook until al dente. Save one cup of pasta water. 2. Melt Butter and Oil: In a large skillet, heat butter and olive oil over medium heat. 3. Sauté Garlic: Add minced garlic and red pepper flakes. Cook for 1-2 minutes until the garlic smells great. 4. Add Shrimp: Toss in the shrimp. Season with salt and pepper. Cook for 2-3 minutes until they turn pink. 5. Add Lemon: Pour in lemon juice and zest. Stir for a minute to mix flavors. 6. Combine Pasta: Add the drained pasta to the skillet. Toss everything well. If it’s dry, add reserved pasta water bit by bit. 7. Finish It Off: Mix in chopped parsley and adjust seasoning to taste. Serve hot, with optional Parmesan cheese. This process is simple and quick, making it great for busy nights. Yes, you can use frozen shrimp! Here’s what you need to know: - Thawing: Always thaw shrimp before cooking for best results. Place them in cold water for about 15-20 minutes. - Fresh vs. Frozen: Fresh shrimp often taste better, but frozen shrimp work well too. They are usually frozen right after being caught. - Cooking Time: If using frozen shrimp, cooking time may be slightly longer. Ensure they are fully cooked and pink before serving. Using frozen shrimp can save time and make this dish more accessible. Garlic Butter Shrimp Scampi pairs well with various side dishes. Here are some great options: - Salads: A fresh green salad with lemon vinaigrette complements the dish nicely. - Bread: Serve with crusty bread to soak up the delicious garlic butter sauce. - Vegetables: Steamed asparagus or roasted broccoli adds color and nutrition. - Wine Pairing: A crisp white wine, like Sauvignon Blanc, works well with the flavors. These sides enhance the meal and create a delightful dining experience. This blog post covered how to make a delicious Garlic Butter Shrimp Scampi. We explored the key ingredients and their roles. You learned the cooking techniques to avoid mistakes. We also discussed variations like proteins and vegetables to customize the dish. Don’t forget how to store and reheat leftovers for later enjoyment. This recipe is simple, versatile, and full of flavor. With these tips, you can create a meal that impresses anyone at your table. Enjoy cooking and experimenting with your own twist on this classic dish!

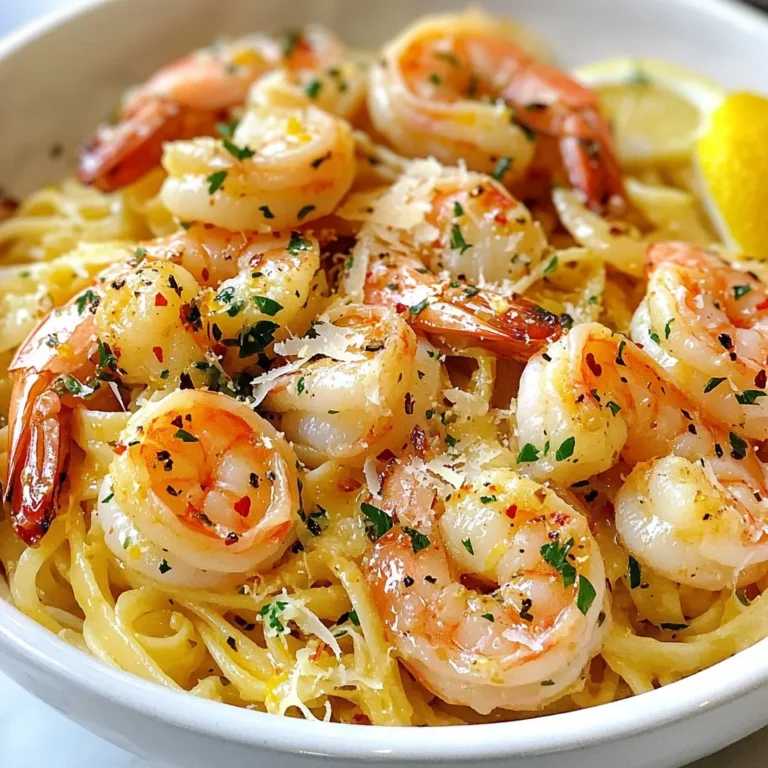
Garlic Butter Shrimp Scampi Easy Dinner Delight

- 1 large cucumber, julienned - 1 ripe mango, diced - 1 red bell pepper, thinly sliced - 1 small red onion, finely chopped - 1 jalapeño, deseeded and minced - 2 tablespoons fresh lime juice - 1 tablespoon honey - 1 tablespoon sesame oil - Salt and pepper to taste - Crushed peanuts - Fresh cilantro To make this salad, start with fresh ingredients. You want crisp cucumbers and ripe mangoes. The cucumber adds crunch while the mango gives sweetness. The red bell pepper adds color and a mild taste. The red onion brings a bit of bite, and the jalapeño gives it heat. For the dressing, fresh lime juice brightens the flavors. Honey adds a hint of sweetness. Sesame oil enriches the salad, making it taste unique. Don’t forget salt and pepper to tie everything together. Optional toppings like crushed peanuts and fresh cilantro add extra flavor. Peanuts give a nice crunch, and cilantro adds freshness. These ingredients come together to create a vibrant and tasty dish. {{ingredient_image_1}} Start by julienning the cucumber. Cut the cucumber lengthwise into thin strips. This shape gives the salad a nice crunch. Next, dice the ripe mango into small cubes. Choose a mango that feels slightly soft for the best flavor. Now, slice the red bell pepper into thin pieces. Finally, finely chop the red onion. Place all these prepared ingredients into a large mixing bowl. In a smaller bowl, whisk together the fresh lime juice, honey, and sesame oil. This mixture creates a bright and sweet dressing. Add a pinch of salt and pepper to enhance the flavor. Taste the dressing and adjust it as needed. You want it to be tangy and sweet. Pour the dressing over the salad ingredients in the mixing bowl. Add the minced jalapeño for a spicy kick and the chopped cilantro for freshness. Toss everything gently until all the ingredients are coated in the dressing. Let the salad sit for about 10 to 15 minutes. This resting time helps the flavors meld together nicely. Before serving, taste the salad again. Adjust the seasoning with more salt, pepper, or lime juice if needed. You can also sprinkle crushed peanuts on top for that extra crunch just before serving. To make your Spicy Cucumber Mango Salad shine, start with seasoning. I suggest adding salt, pepper, or lime juice. Taste as you go. You want the flavors to pop. If you crave more heat, adjust the jalapeño. Use more for a spicy kick, or leave it out for a milder salad. For a beautiful display, serve the salad in shallow bowls. This makes it easy for guests to enjoy. Top with fresh cilantro for a bright touch. Crushed peanuts add crunch and flavor. Offer those on the side for guests to sprinkle on as they wish. If you need a honey alternative, maple syrup works great. It adds sweetness without changing the flavor too much. For the heat, try different peppers like serrano or habanero. Each type brings its own unique spice level. This gives you options to customize your salad. Pro Tips Fresh Ingredients: Use the ripest mango and freshest cucumber for the best flavor and texture in your salad. Adjusting Spice Level: If you prefer a milder salad, reduce the amount of jalapeño or remove the seeds before mincing. Chill Before Serving: Refrigerate the salad for 15-30 minutes before serving to enhance the flavors and provide a refreshing taste. Garnish for Presentation: For an attractive finish, sprinkle additional fresh cilantro and crushed peanuts just before serving. {{image_2}} You can make this salad heartier by adding protein. Grilled chicken or shrimp pairs well with the fresh flavors. Just cook them simply with salt and pepper. Slice them into bite-sized pieces and toss them into the salad. If you prefer a vegetarian option, try tofu. Cube the tofu and pan-fry it until golden. This adds a nice texture and protein boost. Toss it in just like the chicken or shrimp. Mixing in different fruits can make this salad even more exciting. Pineapple or papaya can add a sweet twist. Chop them into small pieces and blend them in. You can also try other seasonal fruits. Berries or citrus fruits can brighten the dish. Just choose what you love and experiment! If you enjoy heat, you can amp it up with more spices. Add chili flakes to the dressing for extra kick. Just a pinch can change the whole vibe of the salad. You can also experiment with different hot peppers. Try serrano or habanero for a bolder flavor. Adjust the amount to fit your spice level! To store leftovers, place the salad in an airtight container. This keeps it fresh. Use glass or plastic containers with tight lids. Make sure to transfer the salad as soon as you finish eating. The salad stays fresh for about 2 days in the fridge. After that, it may lose its crunch. Look for signs of spoilage, like a slimy texture or off smell. If you see these signs, it’s best to toss it. I do not recommend freezing this salad. Freezing can change the texture of the cucumber and mango. If you must freeze, chop the veggies and fruits smaller. Use a freezer-safe bag, and remove as much air as possible. It takes about 30 minutes in total. You need 15 minutes to prep. The rest of the time allows the flavors to blend. Yes, you can prepare this salad ahead. Chop the veggies and make the dressing. Keep them separate in the fridge. Mix them when you are ready to serve. This keeps the salad crisp and fresh. Yes, this salad is healthy. Cucumbers are low in calories and hydrating. Mango adds vitamins and fiber. Bell peppers are full of antioxidants. Jalapeños can boost your metabolism. This salad gives you a tasty way to enjoy good nutrition. In this blog post, I shared how to make a delicious Spicy Cucumber Mango Salad. We examined the main ingredients like cucumber, mango, and jalapeño. I explained making the dressing with lime juice and honey. You learned tips for flavor and presentation, as well as variations to fit your taste. Lastly, I discussed storage tips to keep it fresh. This salad is easy, tasty, and perfect for any meal. Enjoy your salad adventure!

Spicy Cucumber Mango Salad Fresh and Flavorful Delight

For your garlic butter steak, you will need: - 2 ribeye steaks (about 1 inch thick) - 4 tablespoons unsalted butter - 4 cloves garlic, minced - 1 tablespoon fresh rosemary, chopped - 1 tablespoon fresh thyme, chopped - Salt and black pepper, to taste Ribeye steaks are best for this dish. They have a nice balance of fat. This fat gives the steak great flavor and juiciness. Use fresh herbs for the best taste. They add a lovely aroma and depth to the dish. I recommend using Yukon Gold potatoes for this recipe. They have a creamy texture and hold their shape well when cooked. Look for potatoes that are firm and smooth. Avoid any with dark spots or wrinkles. Dicing them evenly ensures they cook at the same rate. Salt and black pepper are essential. They enhance the natural flavors of the steak and potatoes. Olive oil helps the potatoes crisp up nicely in the oven. Garlic brings a rich, savory taste that pairs well with both steak and potatoes. Fresh rosemary and thyme add bright, earthy notes. These herbs elevate the dish and make it feel special. {{ingredient_image_1}} Start by washing the Yukon Gold potatoes. Dice them into small cubes for even cooking. In a large bowl, mix the potatoes with olive oil, salt, and black pepper. Toss them well to coat every piece. Preheat your oven to 425°F (220°C). Spread the potatoes on a baking sheet in a single layer. Roast them for 20-25 minutes until they turn golden and tender. Remember to stir halfway to ensure even cooking. While the potatoes roast, take your ribeye steaks and season them with salt and black pepper. Let them sit for about 15 minutes at room temperature. This helps the steaks cook evenly. Heat a large skillet or cast-iron pan over medium-high heat. Melt 2 tablespoons of butter in the pan until it bubbles. Place the steaks in the pan and sear them for 4-5 minutes on each side for medium-rare. In the last minute, add minced garlic, remaining butter, rosemary, and thyme. Baste the steaks with the garlic butter using a spoon for rich flavor. Once the steaks are cooked, remove them from the pan. Let them rest on a cutting board for at least 5 minutes. This step is key to keeping the meat juicy. While the steaks rest, return the roasted potatoes to the oven for an extra 5-10 minutes to make them crispy. Slice the steaks against the grain. Plate them with the crispy potatoes. Drizzle the garlic butter over the steak for a beautiful finish. Enjoy your meal! To cook the perfect steak, you need to know your times. For medium-rare, aim for about 4-5 minutes per side. Use a meat thermometer for accuracy. The internal temperature should hit 130°F (54°C). For medium, go for 140°F (60°C). If you like it well-done, cook until it reaches 160°F (71°C). Always let your steak rest for 5 minutes after cooking. This keeps the juices inside, making each bite juicy and tender. Garlic butter enhances your steak and potatoes immensely. Start by adding minced garlic and herbs in the last minute of cooking. This prevents the garlic from burning and makes it sweet. To make it even better, use fresh herbs like rosemary and thyme. They add a lovely aroma and depth of flavor. Baste the steak with the garlic butter while it’s cooking. This coats the meat and infuses it with rich flavor. Choosing the right ingredients is key to a great meal. Select ribeye steaks for their rich marbling and flavor. Yukon Gold potatoes are perfect for roasting; they are creamy and hold their shape well. Use unsalted butter so you can control the salt level in your dish. Fresh herbs make a huge difference, so don’t skip them. Finally, always season generously with salt and pepper; it brings out the natural flavors in your food. Pro Tips Resting is Key: Allowing the steaks to rest after cooking helps redistribute the juices, ensuring a more tender and flavorful bite. Season Generously: Don’t be shy with the salt and pepper when seasoning your steaks. A good amount enhances the natural flavors of the meat. Perfect Sear: Make sure your skillet is hot enough before adding the steaks. A good sear locks in the juices and creates a delicious crust. Herb Infusion: For extra flavor, let the garlic and herbs cook slowly with the butter before basting; this infuses the butter with aromatic goodness. {{image_2}} If you want to try different cuts of steak, go for sirloin or flank steak. These cuts have great flavor and are more budget-friendly. You can still achieve that juicy, tender result. Just remember to adjust your cooking time. Thinner cuts cook faster than ribeye. Herbs can really change the taste of your dish. If you want a fresh twist, use oregano or parsley. These herbs add a bright flavor that pairs well with steak. You could also try adding some spicy chili flakes for heat. Just a pinch can make a big difference. Not all potatoes are the same. Yukon Golds are creamy and sweet, but you could use russets for a fluffier texture. Red potatoes hold their shape well and add color to your plate. For preparation, consider making mashed potatoes or even potato wedges. Each method adds its own charm to the meal. After you enjoy your meal, you may have leftovers. To store leftover steak and potatoes, let them cool down first. Place them in an airtight container. This helps keep them fresh. You can store them in the fridge for up to three days. Make sure the lid is tight to avoid any smells mixing. If you want to keep them longer, consider freezing. When you’re ready to eat your leftovers, reheat them right. The best way to warm steak is in a skillet. Heat the skillet over low to medium heat. Add a little butter or olive oil. Warm the steak for about five minutes on each side. This keeps it juicy. For potatoes, you can use the oven. Preheat to 350°F (175°C). Place the potatoes on a baking sheet. Bake for about 10-15 minutes until hot and crispy. Freezing is great for meal prep. To freeze steak and potatoes, first cut the steak into slices. This helps it thaw faster later. Wrap each slice in plastic wrap, then put them in a freezer bag. Make sure to remove as much air as possible. For the potatoes, you can freeze them too. Spread them on a baking sheet to freeze first. Once frozen, transfer them to a bag. Label the bags with dates. You can freeze them for up to three months. The best steak for this recipe is ribeye. Ribeye has great marbling, which keeps it juicy. It also has a rich flavor that pairs well with garlic butter. If you want, you can also use sirloin or filet mignon. Both cuts are tasty, but ribeye offers the most flavor. Making garlic butter at home is easy. You need just a few ingredients: - 4 tablespoons unsalted butter - 4 cloves garlic, minced - 1 tablespoon fresh herbs (like rosemary or thyme) 1. Soften the butter at room temperature. 2. Mix in the minced garlic and herbs. 3. Stir well until combined. 4. You can use it right away or store it in the fridge for later. Yes, you can use other vegetables! Some good choices are: - Carrots - Brussels sprouts - Sweet potatoes - Broccoli Just make sure to cut them into similar sizes. This way, they cook evenly. Adjust the cooking time based on the vegetable you choose. You should rest the steak for at least 5 minutes after cooking. Resting lets the juices spread throughout the meat. This keeps it tender and flavorful. If you cut it too soon, the juices will run out, and the steak will be dry. In this article, we explored how to make a tasty garlic butter steak and some delicious sides. I covered key ingredients, like potatoes and seasonings, along with easy step-by-step cooking tips. We also discussed variations to try, storage methods, and common questions. Remember, cooking lets you be creative. Use quality ingredients and have fun while preparing your meal. Enjoy the rich flavors and share this recipe with friends or family!

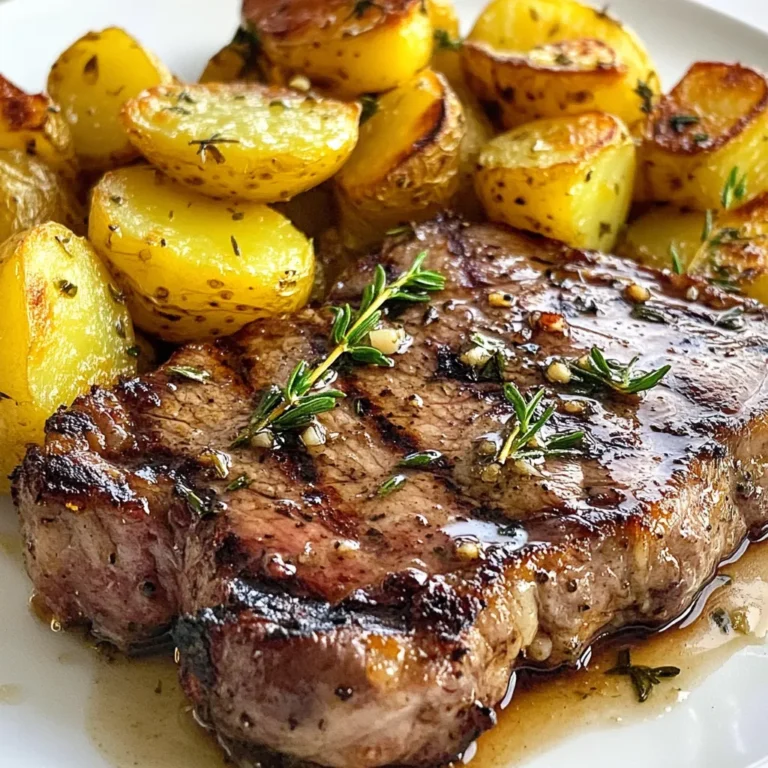
Savory Garlic Butter Steak and Potatoes Recipe

For this dish, you need one whole chicken. Aim for a weight of about 4-5 pounds. A good size ensures even cooking and juicy meat. Fresh chicken tastes best, so choose one from a trusted source. Fresh herbs make the flavors pop. You will need: - 1 tablespoon fresh rosemary, chopped - 1 tablespoon fresh thyme leaves - 1 tablespoon fresh parsley, chopped These herbs add depth and brightness to the chicken. They work well together, giving it a fresh taste. A few extra ingredients boost the flavor: - 1 head of garlic, cloves separated and peeled - 1 lemon, halved - 1 onion, quartered - 2 tablespoons olive oil - Salt and pepper to taste - 1 teaspoon paprika Garlic provides a rich, savory note. Lemon adds brightness, while onion enhances sweetness. Olive oil helps the herbs stick and adds moisture. Salt and pepper bring all the flavors together. Paprika offers a hint of warmth and color. These simple ingredients create an incredibly tasty dish. {{ingredient_image_1}} First, preheat your oven to 425°F (220°C). This high heat helps the chicken brown nicely. Next, take your whole chicken and pat it dry with paper towels. This step is key. A dry chicken skin crisps up better when cooking. Season the cavity with salt and pepper. This adds flavor inside the chicken. In a small bowl, mix together the olive oil, chopped rosemary, thyme leaves, parsley, paprika, salt, and pepper. This blend gives your chicken a burst of flavor. Make sure to blend it well to form a smooth paste. You want this mixture to coat the chicken evenly. Take the herb paste and rub it all over the outside of the chicken. Be sure to cover every part. Then, stuff the cavity with lemon halves, quartered onion, and peeled garlic cloves. These ingredients add moisture and flavor as the chicken roasts. Place the chicken in a roasting pan, breast side up. If you have a rack, use it. This allows heat to circulate around the chicken. Roast it in the oven for about 1 hour and 15 minutes. To check if it's done, the internal temperature should reach 165°F (75°C). Halfway through, baste the chicken with its own juices. This keeps the meat juicy and flavorful. When it's done, let the chicken rest for 10-15 minutes before carving. This helps the juices settle, making every bite tender. To get juicy chicken, start with a good rub. Use the herb paste made with olive oil and fresh herbs. This paste helps lock in the moisture. It also adds a lot of flavor. Make sure to rub it under the skin, too. This step makes the meat tender and tasty. Roasting at 425°F (220°C) helps create a crispy skin while keeping the inside moist. Let the chicken rest after cooking for at least 10 minutes. This allows the juices to spread evenly throughout the meat. Basting is key to keeping your chicken juicy. Halfway through roasting, open the oven carefully. Use a spoon or baster to scoop up the pan juices. Pour these juices over the chicken. This adds flavor and moisture. Do not open the oven too often. Each time you do, heat escapes. Aim to baste once to keep cooking time steady. If you want to make it easy, baste the chicken every 30 minutes. Carving the chicken right makes a big difference. Start by placing the chicken on a cutting board. Use a sharp knife. First, remove the legs by cutting through the joint. Then, take off the wings in the same way. Slice the breast meat from the bone. Cut against the grain for tender pieces. Serve the chicken on a large platter. You can add extra herbs and roasted garlic for a nice touch. This makes your meal look great and taste even better. Pro Tips Resting is Key: Let the chicken rest after roasting; this allows the juices to redistribute, ensuring a moist and flavorful result. Use Fresh Herbs: Fresh herbs like rosemary, thyme, and parsley enhance the flavor profile; dried herbs can be used in a pinch but may not provide the same depth. Check the Temperature: Always use a meat thermometer to check the internal temperature; the chicken is safe to eat at 165°F (75°C). Spice It Up: Feel free to experiment with different spices or add a touch of cayenne for some heat; customize the herb paste to suit your taste! {{image_2}} You can switch up the herbs in Garlic Herb Roasted Chicken. Use sage or oregano for a different taste. Try basil for a fresh twist. You can even mix dried herbs if you don’t have fresh ones. Just remember to keep the amounts similar for great flavor. While lemon and onion are classic, you can get creative. Consider using apples or oranges for a sweet touch. Add some fresh herbs like dill or cilantro for a unique flavor. You can even try mushrooms for an earthy taste. Get inspired and use what you love! You don’t have to roast the chicken in the oven. An air fryer works well too. Cook it at 360°F for about 60 minutes. Check the chicken’s temperature to ensure it’s done. Grilling adds a smoky flavor. Cook it over indirect heat for about 1.5 hours. Experiment with different methods to find your favorite! After cooking your garlic herb roasted chicken, let it cool. Place any leftovers in an airtight container. You can keep it in the fridge for up to four days. Make sure to label the container with the date. This helps you keep track of freshness. If you want to save some for later, freezing is a great option. Cut the chicken into pieces for easier storage. Wrap each piece tightly in plastic wrap or foil. Then, place them in a freezer-safe bag. Roasted chicken can stay good in the freezer for about three months. Remember to label the bags with the date. This way, you will know when to use them. When you are ready to enjoy the chicken again, reheating is simple. Preheat your oven to 350°F (175°C). Place the chicken pieces in an oven-safe dish. Add a splash of chicken broth or water to keep it moist. Cover the dish with foil to trap steam. Heat for about 20-25 minutes, or until warm. You can also use a microwave, but it may not keep the skin crispy. Enjoy your meal with ease! You should roast a chicken for about 18-20 minutes per pound. For a 4-5 pound chicken, this means 1 hour and 15 minutes to 1 hour and 40 minutes. Always check the internal temperature. It should be 165°F (75°C) in the thickest part of the breast. Yes, you can make the herb paste ahead of time. Simply mix the olive oil, fresh herbs, and spices. Store it in the fridge for up to 24 hours. This saves time on cooking day and lets the flavors develop. Some great side dishes include: - Roasted vegetables, like carrots and potatoes - Creamy mashed potatoes - Fresh garden salad - Garlic bread - Rice pilaf These sides complement the rich flavors of garlic herb roasted chicken well. Enjoy your meal! Roasting a whole chicken is simple and rewarding. You’ve learned about choosing the right chicken, prepping it with fresh herbs, and using various techniques to achieve juicy meat. Tips on basting and carving help make serving easier. Exploring variations and storage tips adds flexibility to your cooking. With this guide, you can create a delicious meal your family will love. Enjoy your cooking journey and the tasty results!

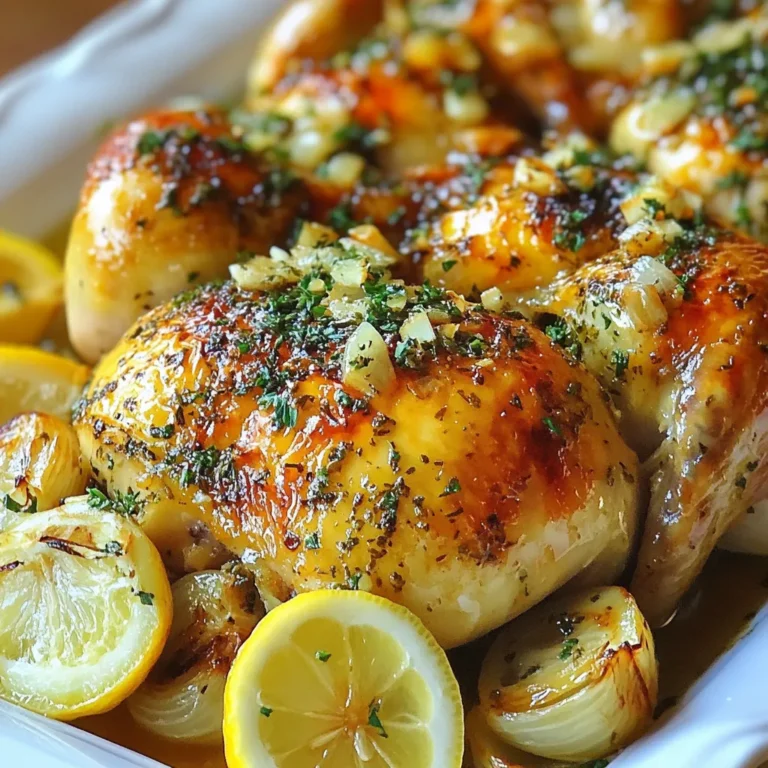
Garlic Herb Roasted Chicken Flavors that Impress

- 1 pound ground turkey - 1 cup fresh spinach, finely chopped - 1/2 cup feta cheese, crumbled - 1/4 cup breadcrumbs - 1/4 cup chopped onion - 2 cloves garlic, minced - 1 teaspoon dried oregano - 1 teaspoon salt - 1/2 teaspoon black pepper - 1 tablespoon olive oil (for grilling) - 4 whole wheat burger buns I love using ground turkey for these burgers. It is lean and tasty. The spinach adds a vibrant color and fresh flavor. Feta cheese gives a nice salty bite. Breadcrumbs help bind the mixture and keep the burgers moist. Onion and garlic bring extra depth to the flavor. Oregano, salt, and pepper finish it off with a classic taste. - Sliced tomatoes - Lettuce - Tzatziki sauce Toppings can make a burger special. I enjoy adding sliced tomatoes for freshness. Crisp lettuce adds a nice crunch. Tzatziki sauce brings a cool and creamy element. You can mix and match based on your taste! - Mixing bowl - Grill or grill pan - Cooking utensils You need a mixing bowl to combine all the ingredients. A grill or grill pan is necessary for cooking the burgers. Cooking utensils like spatulas will help flip the patties easily. Having the right tools makes the process smoother and more fun! {{ingredient_image_1}} - In a large bowl, mix together: - 1 pound ground turkey - 1 cup finely chopped fresh spinach - 1/2 cup crumbled feta cheese - 1/4 cup breadcrumbs - 1/4 cup chopped onion - 2 cloves minced garlic - 1 teaspoon dried oregano - 1 teaspoon salt - 1/2 teaspoon black pepper - Use your hands to mix all the ingredients. Make sure to combine well, but avoid overmixing. - Divide the mixture into four equal portions. Shape each portion into a patty about ¾ inch thick. - Preheat your grill or grill pan over medium-high heat. Drizzle the grill with 1 tablespoon olive oil to prevent sticking. - When the grill is hot, place the patties on it. Cook the patties for about 5-6 minutes on each side. The turkey burgers are done when they reach an internal temperature of 165°F (74°C) and are golden brown. - During the last minute of cooking, toast the whole wheat burger buns on the grill. - To assemble your burgers, place one turkey patty on the bottom half of each bun. - Top each patty with sliced tomatoes, lettuce, and optional tzatziki sauce. - Place the top half of the bun on each burger and serve hot. - Avoid overmixing: Mix the turkey and other ingredients gently. This keeps the burgers tender. Too much mixing makes them tough. - Maintaining moisture: Add breadcrumbs to help hold moisture. Also, use fresh spinach for extra juiciness. - Checking doneness temperature: Use a meat thermometer. Cook the burgers until they reach 165°F (74°C). This ensures they are safe to eat. - Adjusting cooking time for thickness: Make thicker patties? Cook them longer. Thinner patties cook faster. Always check the center for doneness. - Pairing with sides: Fresh salads or sweet potato fries pair well. They add crunch and balance. - Best condiments: Tzatziki sauce adds great flavor. You can also use sliced tomatoes and crisp lettuce for freshness. Pro Tips Keep It Moist: Adding breadcrumbs helps bind the patties and keeps them moist while cooking. You can also add a little Greek yogurt for extra moisture. Don’t Overmix: When combining the ingredients, mix just until everything is incorporated. Overmixing can lead to tough burgers. Use a Meat Thermometer: To ensure safety and perfect doneness, use a meat thermometer to check that the internal temperature reaches 165°F (74°C). Customize Your Toppings: Feel free to experiment with toppings like avocado, red onion, or your favorite sauce to enhance the flavor profile of your burgers. {{image_2}} You can swap ground turkey for ground chicken or beef. Both options work great. Chicken gives a lighter taste, while beef adds richness. If you want a dairy-free burger, try vegan feta or omit cheese. Use mashed avocado for creaminess. To elevate the taste, add spices like cumin or paprika. Fresh herbs like parsley or dill can also boost flavor. Instead of feta, try goat cheese or cheddar. Each cheese adds a unique twist to your burger. You can bake or grill your burgers. Baking requires less oil and is easy. Grill gives that smoky flavor many love. If you have an air fryer, use it! It cooks quickly and keeps burgers juicy. After enjoying your spinach feta turkey burgers, let them cool down. Wrap each burger tightly in plastic wrap. This keeps them fresh and tasty. Use airtight containers for extra protection. Glass or plastic containers work well. Label the containers with the date. Store them in the fridge for up to three days. To freeze the burgers, follow these steps. First, let them cool completely. Then, wrap each burger in plastic wrap. Place the wrapped burgers in a freezer bag. Squeeze out any air before sealing. This helps prevent freezer burn. You can freeze the burgers for up to three months. When you’re ready to eat, take one out and thaw it in the fridge overnight. To reheat your burgers, the best method is to use a skillet. Heat the skillet over medium heat. Place the burger in the skillet for about 4-5 minutes on each side. This keeps them juicy and flavorful. You can also use an oven. Preheat it to 350°F (175°C). Place the burgers on a baking sheet for about 10-15 minutes. This method maintains their texture well. Enjoy your tasty leftovers! How do I know when the turkey burgers are done? You can check the internal temperature. It should reach 165°F (74°C). Use a meat thermometer for best results. The burgers will also turn golden brown on the outside. Can I make the patties ahead of time? Yes, you can make the patties ahead. Shape them and store in the fridge for up to 24 hours. This saves time when you are ready to cook. What can I serve with turkey burgers? You can serve your burgers with a side of sweet potato fries or a fresh salad. Other great options include roasted vegetables or a simple coleslaw. How many calories are in a spinach feta turkey burger? Each burger has about 300 calories. This makes them a healthy option for a filling meal. Are these burgers suitable for meal prep? Absolutely! These burgers hold up well in the fridge. You can easily prepare them in advance for quick meals later. Can I use frozen spinach instead? Yes, you can use frozen spinach. Just be sure to thaw and drain it well. This prevents excess moisture in your patties. Is it possible to make these burgers vegetarian? Yes, you can make a vegetarian version. Use black beans or chickpeas instead of turkey. Add spices and bind with breadcrumbs for texture. This blog post covered how to make delicious spinach feta turkey burgers. We went over main ingredients like ground turkey and feta cheese, cooking steps, and helpful tips. You now have the steps to prepare, cook, and store these burgers. Remember, you can swap ingredients and try different flavors. Enjoy your tasty meal, and don’t hesitate to share your burger creations! Keep experimenting to find your perfect mix.

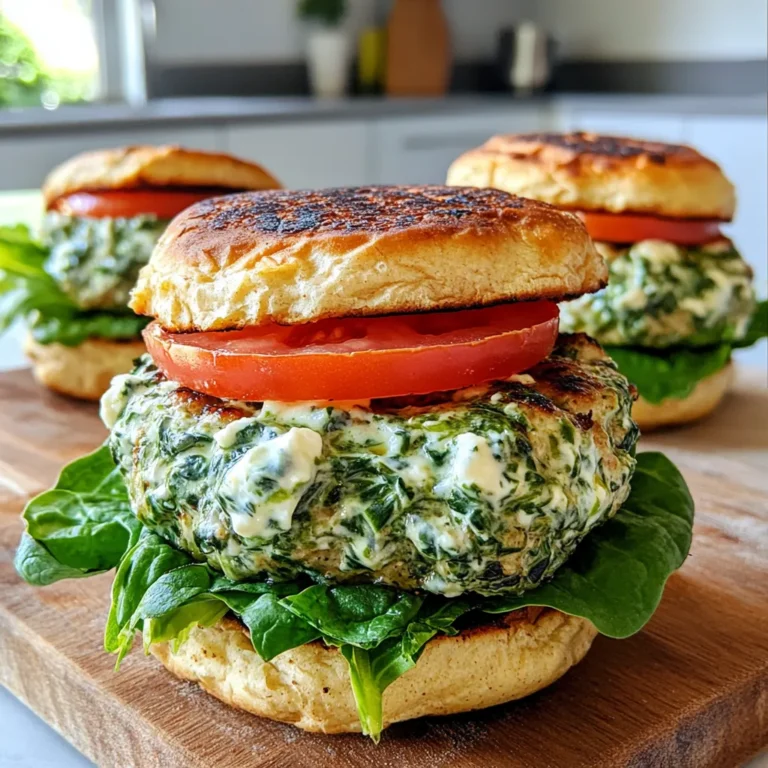
Spinach Feta Turkey Burgers Tasty and Healthy Recipe

- 2 boneless, skinless chicken breasts - 1 ripe mango, diced - 1 red bell pepper, thinly sliced - 1 small red onion, thinly sliced - 2 tablespoons olive oil - 2 teaspoons ground cumin - 1 teaspoon chili powder - 1 teaspoon garlic powder - Salt and pepper to taste - 8 small corn tortillas To make mango chicken tacos, start with the main ingredients. The chicken is the star of the dish, bringing protein and heartiness. I prefer boneless, skinless breasts because they cook evenly and are easy to slice. The mango adds a sweet touch that pairs well with chicken. Next, the vegetables bring color and crunch. I like using red bell peppers for their sweetness and red onion for sharpness. These veggies add flavor and nutrition. I season the chicken with olive oil, ground cumin, chili powder, garlic powder, salt, and pepper. This blend creates a warm and savory taste. Finally, small corn tortillas make the perfect vessel for our delicious filling. They hold everything together and add a lovely corn flavor. - Fresh cilantro - Lime wedges - Hot sauce For topping your tacos, I recommend fresh cilantro. It adds a burst of freshness. Lime wedges are also great for squeezing over the tacos. They bring brightness to each bite. If you like heat, add some hot sauce to kick things up a notch. These simple toppings make each taco even better! {{ingredient_image_1}} To start, combine these ingredients for the marinade: - 2 tablespoons olive oil - 2 teaspoons ground cumin - 1 teaspoon chili powder - 1 teaspoon garlic powder - Salt and pepper to taste. Mix well in a bowl. Next, take the two boneless, skinless chicken breasts. Coat them evenly with the marinade. Make sure every part is covered. Let the chicken sit for at least 15 minutes. This helps the flavors soak in. Now, heat a grill pan or skillet over medium-high heat. Place the marinated chicken in the pan. Cook for about 6-7 minutes on each side. You want the chicken to be fully cooked. It should look golden, and the juices should run clear. After cooking, remove the chicken from heat. Let it rest for 5 minutes. This step keeps it juicy. Slice the chicken into thin strips. In the same skillet, add the sliced red bell pepper and onion. Sauté them for about 3-4 minutes. You want them tender but still crisp. Season the vegetables with salt and pepper to taste. This adds a nice kick. Now it’s time to prepare the corn tortillas. Warm them in a dry skillet for about 30 seconds on each side. This makes them pliable and easy to fold. Soft tortillas make the best tacos. To assemble, take a warm tortilla. Layer it with the sautéed bell peppers and onions. Next, add the sliced chicken. Top it off with diced mango for sweetness. For a fresh touch, sprinkle cilantro over the top. Serve your tacos with lime wedges on the side for squeezing. Enjoy every bite! To keep chicken juicy, marinate it well. The olive oil helps lock in moisture. Use ground cumin, chili powder, and garlic powder for flavor. Let the chicken sit in the marinade for at least 15 minutes. Cooking the chicken at medium-high heat is key. Grill or pan-cook for 6-7 minutes on each side. Check that the juices run clear before removing it from heat. Rest the chicken for 5 minutes before slicing. This keeps it tender. For side dishes, consider fresh corn salad or black bean salsa. These pair nicely with the tacos. You can also serve tortilla chips and guacamole for a crunchy touch. As for drinks, try a light beer or a fruity margarita. These options balance the flavors of the tacos well. For creative plating, stack the tacos on a colorful platter. This makes them look more inviting. You can also arrange lime wedges around the plate. Sprinkle fresh cilantro on top for a pop of color. A drizzle of hot sauce adds flair and excitement. Pro Tips Marinate for Flavor: Let the chicken marinate for at least 30 minutes to allow the flavors to penetrate deeply, enhancing the overall taste of the tacos. Use Fresh Ingredients: Opt for a fresh ripe mango and seasonal vegetables to bring vibrant flavors and textures to your tacos. Warm Tortillas Properly: Warming the tortillas in a dry skillet adds a subtle char and makes them more pliable, preventing them from tearing when filled. Experiment with Toppings: Feel free to add additional toppings like avocado, jalapeños, or a drizzle of sour cream to elevate your taco experience. {{image_2}} You can switch up the proteins in these tacos. Shrimp or tofu work great. They add a new twist to the dish. For fruit, try pineapple or peach instead of mango. Each choice brings a fresh taste. Want some heat? Add diced jalapeños or serrano peppers. They give your tacos a spicy kick. You can also use spicy marinades. Just mix in some cayenne or hot sauce into your marinade. This adds depth and flavor. For a plant-based version, use chickpeas or beans. They provide protein and texture. Swap chicken with grilled mushrooms for a hearty bite. You can also use avocado or more fruit for creaminess. These changes keep the dish vibrant and tasty. To keep your mango chicken tacos fresh, store them in an airtight container. This prevents moisture loss and keeps flavors intact. Make sure to refrigerate within two hours of cooking. Leftovers are best consumed within three days for optimal taste. When reheating, I recommend using the oven or a skillet. Preheat the oven to 350°F (175°C). Place the tacos on a baking sheet and heat for about 10 minutes. If using a skillet, warm them on medium heat for about 5 minutes, flipping halfway. This method keeps the tortillas crisp. If you want to save your assembled tacos for later, you can freeze them. Wrap each taco tightly in plastic wrap, then place them in a freezer bag. This helps prevent freezer burn. Be sure to squeeze out as much air as possible. You can freeze the tacos for up to three months. When ready to eat, let them thaw in the fridge overnight. Then, reheat as described above. Enjoy the fresh taste of mango chicken tacos even after freezing! Mango chicken tacos are a fun twist on classic tacos. They combine juicy chicken, sweet mango, and colorful veggies. The chicken marinates in spices like cumin and chili powder. This adds rich flavor. You grill the chicken, slice it, and mix it with fresh mango, bell pepper, and onion. All of this goes into warm corn tortillas. The result is a tasty meal that bursts with flavor and freshness. Yes, you can make mango chicken tacos ahead of time! Here are some tips: - Marinate the chicken: You can marinate the chicken a few hours early. This lets the flavors soak in. - Cook the chicken: Grill or pan-cook the chicken and let it cool. Store it in the fridge. - Prepare veggies: Slice the bell peppers and onion early. Keep them in an airtight container. - Warm tortillas: You can warm the tortillas just before serving. This keeps them soft and pliable. This way, you can enjoy quick and easy tacos when you're ready to eat! Several side dishes pair great with mango chicken tacos. Try these: - Mexican rice: It adds a nice flavor and makes the meal heartier. - Black beans: They provide protein and fiber, making the meal balanced. - Corn salad: A fresh corn salad brightens up the plate. - Guacamole: This adds a creamy texture and extra flavor. For drinks, consider serving limeade or a light beer. These complement the tacos well! We covered how to make tasty mango chicken tacos. You learned about the key ingredients and step-by-step cooking methods. I shared helpful tips for juicy chicken and great sides. You can also try fun variations and know how to store your leftovers. Tacos are simple and fun to make at home. Try these ideas, and enjoy delicious meals with friends and family. Enjoy your cooking and experimenting in the kitchen!

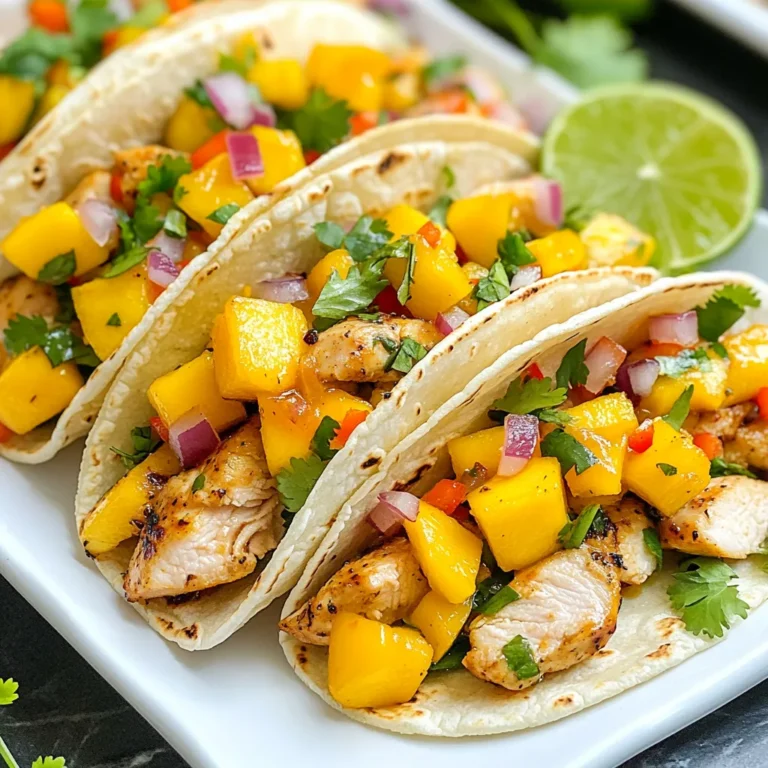
Mango Chicken Tacos Bursting with Flavor and Freshness

PREV 1 … 37 38 39 … 52 NEXT
cozy citrus kitchen

explore

DessertsDinnerAppetizersDrinks

Our Policies

  • Cookie Policy
  • Copyright Policy
  • Disclaimer
  • GDPR Policy
  • Terms Of Use
Back to Top
  • About
  • Contact Us
  • Privacy Policy
© 2025 cozy citrus kitchen