FREE DINNER EBOOK! Get your copy!
  • Cookie Policy
  • GDPR Policy
  • Disclaimer
  • Terms Of Use
  • Visit my other site: Fun Cookie Recipes
cozy citrus kitchen
  • Home
  • Dinner
  • Desserts
  • Drinks
  • Appetizers
  • Contact
  • About
  • Privacy Policy
  • Home
  • Dinner
  • Desserts
  • Drinks
  • Appetizers
  • Contact
  • About
  • Privacy Policy
  • Cookie Policy
  • GDPR Policy
  • Disclaimer
  • Terms Of Use
Visit my other site: Fun Cookie Recipes

HOME / CATEGORIES /

Latest

- 4 boneless, skinless chicken breasts - 2 ripe peaches, diced - 1/3 cup peach preserves - 2 tablespoons soy sauce - 1 tablespoon olive oil The main ingredients for this dish are simple but full of flavor. The chicken breasts are key. They soak up the peach glaze well. The ripe peaches add sweetness and a fresh taste. Peach preserves help create a thick, sticky sauce. Soy sauce gives a savory touch, while olive oil keeps the chicken moist. - 1 teaspoon garlic powder - 1 teaspoon onion powder - Salt and pepper to taste - Fresh basil leaves for garnish (optional) For seasoning, I use garlic powder and onion powder. They mix well and add depth. Salt and pepper help bring out the flavors. Fresh basil leaves make a nice garnish. They add color and a hint of freshness to your plate. - Skillet - Small saucepan - Chef's knife You need a few tools to make this dish. A skillet is great for cooking the chicken. A small saucepan helps you make the glaze. A chef's knife is key for dicing the peaches. Having these tools ready makes cooking easier and more fun! {{ingredient_image_1}} First, take your chicken breasts. Season them with garlic powder, onion powder, salt, and pepper. Make sure to coat each piece well. Once seasoned, set the chicken aside. This helps the flavors soak in while you prepare the glaze. Now, let’s make the peach glaze. In a small saucepan, add the diced peaches and peach preserves. Cook these on medium heat. Stir as they bubble and break down, which takes about 5 to 7 minutes. After that, pour in the soy sauce. This gives the glaze a nice balance. If it seems too thick, add a bit of water and stir until smooth. Next, heat olive oil in a large skillet over medium-high heat. Add the seasoned chicken breasts. Cook them for about 6 to 7 minutes on each side. They should turn golden brown and be fully cooked. To check, cut into one; the juices should run clear. Once cooked, pour the peach glaze over the chicken in the skillet. Let the chicken simmer in the glaze for about 2 to 3 minutes. This step allows the flavors to meld together. Make sure to turn the chicken to coat it evenly. After simmering, remove the skillet from heat. Let the chicken rest for a few minutes. This helps keep it juicy. Slice the chicken and drizzle any remaining glaze on top. If you like, add fresh basil leaves for a pop of color and flavor. Enjoy your peach glazed chicken! - To balance sweetness and tang, use ripe peaches and a touch of soy sauce. This combo brings a nice layer of flavor. - A thicker glaze coats the chicken better, while a thinner glaze soaks in more. Decide what you like best! - Ensure proper doneness by cooking chicken until it reaches 165°F. Use a meat thermometer for accuracy. - To avoid dry chicken breasts, do not overcook them. Searing at medium-high heat helps keep them juicy. - Pair peach glazed chicken with rice or a fresh salad. These sides add great texture and flavor. - For a festive table, slice the chicken and arrange it on a platter. Drizzle the glaze on top and add fresh basil leaves for color. Pro Tips Choose Ripe Peaches: Select peaches that are slightly soft to the touch and fragrant for the best flavor in your glaze. Marinate for More Flavor: If time allows, marinate the seasoned chicken breasts in the soy sauce and peach preserves mixture for an hour before cooking. Adjust Sweetness: Depending on your taste, you can add more peach preserves or a splash of vinegar to balance sweetness with acidity. Rest the Chicken: Let the chicken rest for a few minutes after cooking to allow the juices to redistribute, ensuring a moist and tender result. {{image_2}} You can swap peaches for other fruits. Mango-glazed chicken offers a bright twist. The sweet mango pairs well with the chicken. You can also try pineapple or apricot. Both fruits add a unique flavor and sweetness. Each option brings a new taste to your plate. You can choose how to cook your chicken. Baking gives it an even cook and is simple. Grilling adds a smoky flavor that many love. If you want ease, try a slow cooker. This method allows the chicken to soak in the glaze while it cooks. You’ll get tender meat with great flavor. For gluten-free options, use gluten-free soy sauce. This keeps the dish safe for those with gluten issues. If you're cutting back on sugar, look for low-sugar peach preserves. You can also make your own glaze with fresh peaches and a hint of honey. These options keep your meal tasty and healthy. To keep your peach glazed chicken fresh, store leftovers in the fridge. Use an airtight container. Ensure the chicken cools before sealing it. This way, it stays juicy and tasty. It will stay good for about 3 to 4 days. When you are ready to eat, just take it out! You can freeze peach glazed chicken for later. First, let it cool completely. Then, wrap it well in plastic wrap and foil. You can also use a freezer-safe bag. This helps keep the flavor. When you want to enjoy it again, thaw it in the fridge overnight. To reheat your chicken, use the stovetop or microwave. On the stovetop, place it in a skillet over low heat. Add a splash of water or broth to keep it moist. If you use the microwave, cover it to trap steam. Always check the glaze. It should stay sweet and flavorful. Enjoy the same delicious taste! If you do not have peach preserves, here are some great alternatives: - Apricot jam: This gives a sweet and slightly tart flavor. - Mango chutney: A zesty option that adds a tropical twist. - Honey: Perfect for natural sweetness, but add a little fruit puree for flavor. These options still create a delicious glaze and keep the dish exciting. Yes, you can prepare peach glazed chicken ahead of time. Here’s how: - Marinate the chicken: Season the chicken breasts and let them sit in the fridge for a few hours. - Make the glaze: Prepare the peach glaze a day before and store it in the fridge. - Cook before serving: Just cook the chicken and glaze before serving. This keeps the flavors fresh and tasty. To check if chicken is cooked through, use a meat thermometer. The chicken should reach an internal temperature of 165°F (75°C). Here are some tips: - Check the thickest part: Insert the thermometer into the thickest part of the breast. - Look for clear juices: If the juices run clear, it's likely done. Using these methods ensures you serve safe and juicy chicken. This blog post walked you through making delicious peach glazed chicken. You learned about key ingredients like ripe peaches, soy sauce, and seasonings. I shared step-by-step instructions to prepare, cook, and serve this flavorful dish. Tips helped ensure your glaze is just right and your chicken stays tender. Try different fruits or cooking methods to keep it fresh. Remember, meal prep can save you time and enhance your flavor. Enjoy every bite of your peach glazed chicken with friends or family! Your kitchen is now ready for fun and tasty meals.

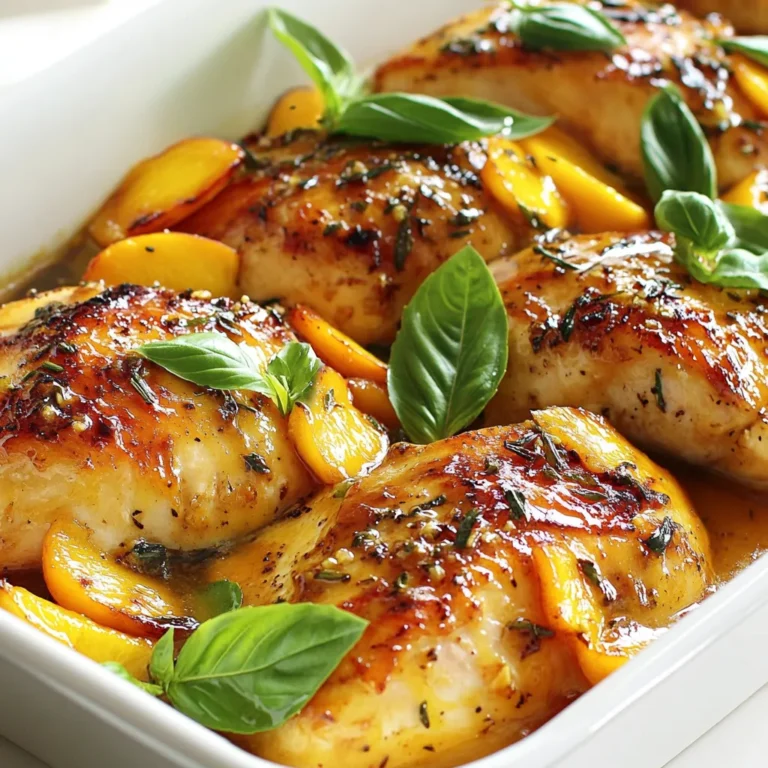
Peach Glazed Chicken Juicy and Flavorful Dish

- 1/2 cup popcorn kernels - 2 tablespoons vegetable oil - 1 teaspoon garlic powder - 1 teaspoon onion powder - 1 teaspoon dried dill - 1 teaspoon smoked paprika - 1 teaspoon ranch seasoning mix - 1/4 cup buffalo sauce - 2 tablespoons melted butter - Salt to taste - Optional: chopped green onions for garnish To make Buffalo Ranch Popcorn, gather these simple ingredients. First, you need popcorn kernels. This is the base of your snack. Next, vegetable oil helps the kernels pop. Garlic and onion powders add great flavor. Dried dill and smoked paprika bring unique tastes to the mix. Ranch seasoning mix gives that classic ranch flavor. Buffalo sauce is key for the heat and tang. Don’t forget melted butter; it helps the spices stick. Lastly, add salt to taste. You can even use chopped green onions for a fresh touch. Having these ingredients ready makes cooking easy and fun. This snack is great for movie nights or parties. You can adjust the spice to fit your taste. Try it out, and enjoy every crunchy bite! {{ingredient_image_1}} 1. Heat 2 tablespoons of vegetable oil in a large pot over medium-high heat. 2. Add 1/2 cup of popcorn kernels to the hot oil. 3. Cover the pot, leaving it slightly open. This lets steam escape. 4. Shake the pot every few seconds. This helps prevent burning. 5. Listen carefully. When the popping slows to about 2 seconds between pops, remove it from heat. 1. In a small bowl, mix together: - 1 teaspoon garlic powder - 1 teaspoon onion powder - 1 teaspoon dried dill - 1 teaspoon smoked paprika - 1 teaspoon ranch seasoning mix - Salt to taste 2. Stir well to combine all the spices evenly. 1. In another small bowl, combine: - 2 tablespoons melted butter - 1/4 cup buffalo sauce 2. Mix until the butter and sauce blend smoothly. 1. Once the popcorn is done, transfer it to a large mixing bowl. 2. Drizzle the buffalo sauce mixture over the popcorn. 3. Sprinkle the seasoning mix over the popcorn too. 4. Gently toss everything together. This helps coat each piece evenly. 1. For a fun snack, serve the popcorn in colorful paper cones or a big popcorn bucket. 2. You can also put small bowls of extra buffalo sauce on the side for dipping. 3. If you like, garnish with chopped green onions for a fresh touch. To make your Buffalo Ranch Popcorn even tastier, you can add more spices. Try adding cayenne pepper for heat. A pinch of smoked salt gives a nice touch too. You can also switch ranch seasoning for a taco mix for a new twist. Adjust the spice levels to fit your taste. If you love heat, try more buffalo sauce. For a milder flavor, use less. Remember, you can always start small and add more as you mix. For great popcorn, you have two main methods: stovetop and microwave. On the stovetop, heat the oil and add kernels. Cover the pot but leave a small crack for steam. Shake the pot to keep the kernels moving. This way, they pop evenly. If you prefer the microwave, use a microwave-safe bowl with a vented lid. Add kernels and cook them according to the package instructions. Just watch closely, so you don't burn them. To lighten up your Buffalo Ranch Popcorn, consider a few swaps. Use air-popped popcorn instead of oil-popped. You can skip the butter or use olive oil for a healthier fat. For a lower-calorie sauce, try a yogurt-based ranch mix mixed with buffalo sauce. These changes keep the flavor while cutting some calories. You still enjoy a tasty snack, but feel better about it! Pro Tips Fresh Kernels: Always use fresh popcorn kernels for the best popping results. Old kernels may not pop well and can lead to a disappointing batch. Customize Your Spice: Feel free to adjust the amount of buffalo sauce and seasoning mix based on your personal heat preference. Start with less and add more if needed! Garnish for Color: Add chopped green onions or even crumbled blue cheese on top for added flavor and a pop of color to your popcorn. Storage Tips: If you have leftovers, store the popcorn in an airtight container to keep it fresh and crunchy. Avoid moisture, which can make it soggy. {{image_2}} To make your popcorn spicier, add more hot sauce. You can also sprinkle in cayenne pepper or chili powder. These extra spices give your popcorn a bold kick. Just mix them in with the seasoning before tossing. Taste as you go to find your perfect heat level. For a cheesy twist, use cheese seasoning or cheese powder. You can find these in most grocery stores. Just add about two tablespoons to the seasoning mix. The cheese will melt into the warm popcorn and create a savory flavor. This combo of cheese and buffalo sauce is a crowd-pleaser. If you want a sweet flavor, try adding caramel or honey. Drizzle a little over the popcorn after tossing it with buffalo sauce. The sweetness balances out the heat nicely. You can choose how much you like based on your taste. This fun twist makes your snack even more exciting! To keep your Buffalo Ranch Popcorn fresh, use an airtight container. This helps keep moisture out. I recommend glass jars or plastic containers with tight lids. You can also use resealable bags. Just make sure to squeeze as much air out as you can. Store it in a cool, dry place away from sunlight. When stored correctly, your popcorn can stay fresh for up to two weeks. If you notice it getting stale, it’s time to eat it! The flavors will fade, and the crunchiness will disappear. Always check for any signs of spoilage before enjoying your snack. If your popcorn loses its crunch, don’t worry. You can easily bring it back to life. Preheat your oven to 250°F (120°C). Spread the popcorn on a baking sheet in a single layer. Bake for about 5 to 10 minutes. Keep an eye on it to avoid burning. Let it cool before serving again. Enjoy that crispy goodness! Buffalo Ranch Popcorn is a spicy and flavorful snack. It combines the heat of buffalo sauce with the coolness of ranch dressing. This mix of tastes makes each bite exciting. The popcorn is crunchy and bursting with flavor. It is perfect for movie nights or game days. Yes, you can use microwave popcorn. Just skip the popping step. Choose plain popcorn without butter for the best results. Once popped, drizzle the buffalo sauce and sprinkle the seasoning mix. Adjust the buffalo sauce to your taste, as microwave popcorn can be saltier. Making buffalo ranch seasoning is easy! Here’s a simple recipe: - 1 teaspoon garlic powder - 1 teaspoon onion powder - 1 teaspoon dried dill - 1 teaspoon smoked paprika - 1 teaspoon ranch seasoning mix - Salt to taste Mix all the spices in a bowl. You can store it in an airtight container for later use. This homemade seasoning adds great flavor to your popcorn! Yes, Buffalo Ranch Popcorn can be gluten-free. Just ensure the buffalo sauce and ranch seasoning mix are gluten-free. Many brands offer gluten-free options. Always check the labels to be safe. This makes it a tasty snack for those with gluten sensitivities! We explored how to make Buffalo Ranch Popcorn step-by-step. You learned the right ingredients, popping methods, and flavor tips. We shared ways to store it and answered common questions. This snack is not just tasty; it’s fun to make. You can modify the recipe to suit your taste. Enjoy sharing this treat with friends or family. Whether you want it spicy, cheesy, or sweet, the possibilities are endless. Grab your ingredients and start popping!

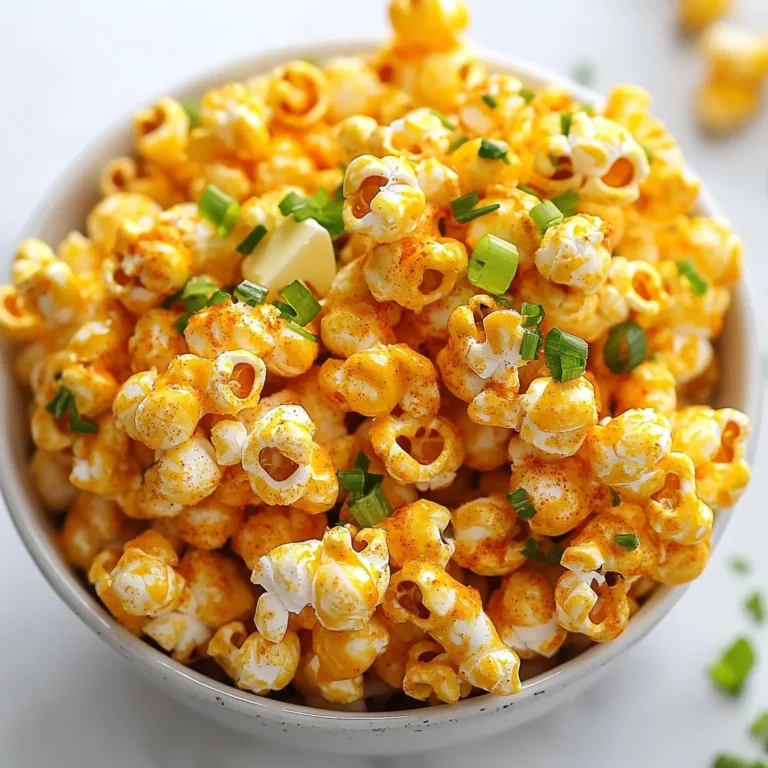
Buffalo Ranch Popcorn Tasty Snack for Everyone

- 1 cup pumpkin puree: You can use canned puree or make your own. Choose organic for a rich flavor. - 1 frozen banana: A ripe banana adds natural sweetness. Freeze it for a creamy texture. - 1 cup almond milk: This is great for a nutty taste. You can also use oat or coconut milk if you prefer. - 1 tablespoon maple syrup: This sweetens the smoothie naturally. You can swap it for honey or agave if needed. - 1 teaspoon ground cinnamon: This spice gives warmth and depth. Freshly ground is best for flavor. - 1/2 teaspoon ground nutmeg: Nutmeg adds a cozy touch. Use whole nutmeg and grate it for a stronger taste. - 1/4 teaspoon ground ginger: Ginger adds a hint of spice and warmth. - 1 tablespoon chia seeds: These boost nutrition with fiber and omega-3s. They are optional but recommended. - Ice cubes: Add these if you want a thicker smoothie. They make it cold and refreshing. For common allergens, you can replace almond milk with soy or oat milk for nut-free options. Maple syrup can be swapped for a sugar-free sweetener for those cutting sugar. 1. Mixing ingredients in the blender Start by placing the following ingredients in your blender: - 1 cup pumpkin puree - 1 frozen banana - 1 cup almond milk - 1 tablespoon maple syrup - 1 teaspoon ground cinnamon - 1/2 teaspoon ground nutmeg - 1/4 teaspoon ground ginger - 1 tablespoon chia seeds (optional) Make sure to add the spices and chia seeds last. This order helps everything blend well. 2. Achieving desired consistency Blend these ingredients on high speed. Watch as they mix into a creamy blend. If you like a thicker smoothie, toss in a few ice cubes and blend again. Blend until you see no lumps. 3. Pouring and serving the smoothie Once it’s smooth, taste it. If you want more sweetness, add more maple syrup and blend briefly. Pour the smoothie into chilled glasses. Enjoy it right away for the best taste! - Adjusting sweetness If the smoothie isn’t sweet enough, maple syrup is a great choice. You can also try honey or agave syrup. Start with a small amount and taste as you go. - Adding toppings or garnishes Get creative with toppings! Consider adding: - A sprinkle of cinnamon - Chopped nuts - Whipped cream on top These little touches can make your smoothie look and taste even better. To make a great pumpkin pie smoothie, focus on your blending technique. Start by adding the pumpkin puree, frozen banana, almond milk, and maple syrup to the blender. Blend on high until everything is smooth. - If you want a creamier texture, add a few ice cubes. Blend again until you reach the thickness you like. - Prep your ingredients in advance. Measure out pumpkin puree, spices, and milk the night before. This saves time in the morning and makes it easier to blend. Pair your smoothie with a slice of whole grain toast or oatmeal. The flavors go well together and create a filling meal. For the best presentation, use chilled glasses. This keeps your smoothie cold and refreshing. You can also add a sprinkle of cinnamon on top for a nice touch. Serve it with a fun straw for extra flair! {{image_2}} You can change the taste of your pumpkin pie smoothie by adding fruits or veggies. Try adding a half cup of spinach for a green boost. It blends well and packs in nutrients. You could also toss in a few slices of apple or pear for extra sweetness and flavor. Spices can enhance the pumpkin flavor too. Besides cinnamon, nutmeg, and ginger, consider adding cloves or allspice. Just a pinch can make your smoothie taste like fall in a glass. You can also experiment with vanilla extract for a warm and sweet note. If you need vegan, gluten-free, or dairy-free options, this smoothie is easy to adapt. Use almond milk or coconut milk for a dairy-free option. Maple syrup is a great sweetener and is vegan, but you can swap in agave if you prefer. For a low-calorie version, skip the maple syrup or use a low-cal sweetener. If you want a protein boost, add a scoop of your favorite protein powder. Chia seeds also help with protein and fiber, making your smoothie more filling. To keep your leftover smoothie fresh, pour it into a sealed container. Glass jars work best. If you have extra smoothie, fill the jar only three-quarters full. This leaves room for expansion if you freeze it later. For freezing, pour the smoothie into ice cube trays. Once frozen, pop the cubes into a bag. This way, you can blend a few cubes later for a quick drink. Just add milk or water to the blender to reach your desired texture. The Pumpkin Pie Smoothie stays fresh for about one to two days in the fridge. After that, the taste and texture may change. If it smells sour or has changed color, it is best to toss it out. Signs of spoilage include a strange odor or separation of ingredients. If you see any mold or an off-putting smell, do not consume it. Always trust your senses when it comes to food! Is the Pumpkin Pie Smoothie healthy? Yes, this smoothie is healthy. It has pumpkin puree, banana, and chia seeds. These ingredients provide fiber, vitamins, and minerals. They help keep you full and satisfied. The almond milk adds a low-calorie, dairy-free option. Can I make it in advance? You can make this smoothie in advance. Blend it, then store it in the fridge. It tastes best when fresh, but it stays good for up to one day. Just give it a shake or stir before you drink. How can I make my smoothie thicker or thinner? To make it thicker, add ice cubes. You can also add more frozen banana or chia seeds. If you want it thinner, just add more almond milk. Blend again until you reach your desired texture. What can I substitute for pumpkin puree? If you don’t have pumpkin puree, you can use sweet potato puree. Another option is butternut squash puree. Both will give you a similar taste and texture. This smoothie has about 180 calories per serving. Here’s the breakdown: - Calories: 180 - Carbs: 30g - Fats: 5g - Protein: 3g Health benefits of the ingredients used: - Pumpkin puree: Full of vitamins A and C. Good for your eyes and skin. - Banana: Provides potassium and energy. - Chia seeds: Packed with omega-3 fatty acids and fiber. Good for digestion. - Almond milk: Lower in calories than regular milk. Great for a dairy-free diet. This post gave you a complete guide to making a delicious pumpkin pie smoothie. We covered the best ingredients, step-by-step instructions, and tips for great flavor. I shared various options for diets and fun ways to store leftovers. With these insights, you can customize your smoothie for any taste or need. Smoothies can be quick and tasty, perfect for any time of day. Enjoy experimenting and creating your own perfect version!

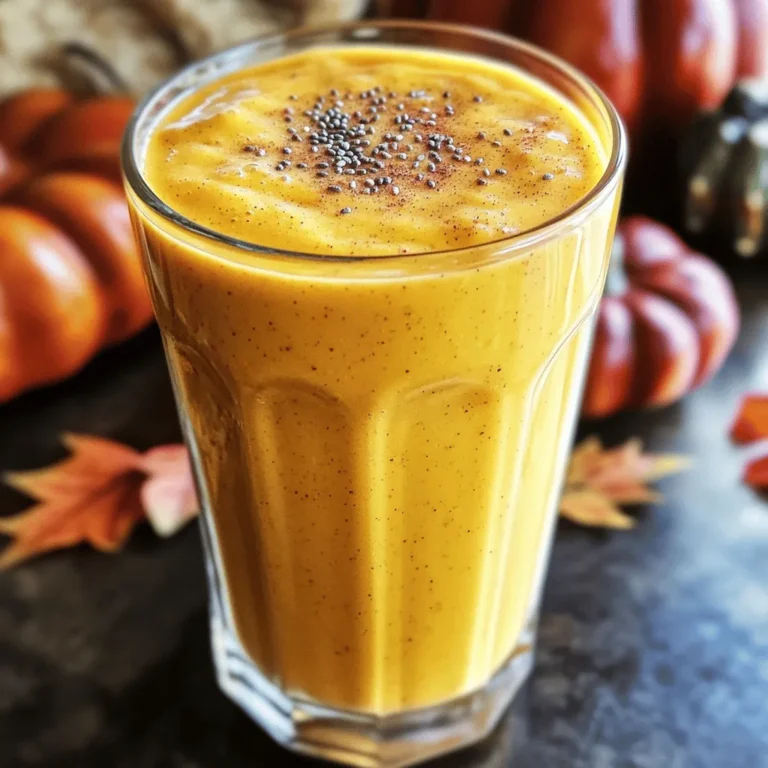
Savory Pumpkin Pie Smoothie Healthy Fall Delight

To make this tasty dip, gather these items: - 3 large yellow onions, thinly sliced - 2 tablespoons olive oil - 1 tablespoon butter - 1 teaspoon salt - 1 teaspoon sugar - 1 cup sour cream - 1 cup cream cheese, softened - 1 tablespoon Worcestershire sauce - Freshly ground black pepper, to taste - Chives, chopped (for garnish) - Tortilla chips or vegetable sticks (for serving) You can swap ingredients for your taste. Here are some ideas: - Use red onions for a sweeter taste. - Swap olive oil with avocado oil for a different flavor. - Replace sour cream with Greek yogurt for a healthier option. - Use any cream cheese alternative if you want a dairy-free dip. - Try adding hot sauce instead of Worcestershire sauce for a kick. Choosing fresh onions is key for great flavor. Here’s what to look for: - Select onions that feel firm and heavy. - Avoid onions with soft spots or sprouting. - Look for dry, smooth skin without any blemishes. - Check for a strong onion scent; this often means freshness. These tips will help you make a great dip that everyone will love! To start, gather your three large yellow onions. Slice them thinly. This helps them cook evenly. In a large skillet, heat two tablespoons of olive oil and one tablespoon of butter over medium heat. Once the butter melts, add the sliced onions. Sprinkle one teaspoon of salt and one teaspoon of sugar over them. The salt helps draw out moisture, while the sugar aids in caramelization. Stir to mix everything well. Cook the onions for about 30 to 40 minutes. Keep stirring occasionally. You want them to turn soft and a deep golden brown. When they look perfect, take them off the heat and let them cool for a few minutes. While the onions cool, grab a mixing bowl. Add one cup of sour cream and one cup of softened cream cheese. Stir these until smooth and creamy. Next, mix in one tablespoon of Worcestershire sauce. This adds depth to your dip. Don’t forget to add freshly ground black pepper to taste. Once your mixture is smooth, fold in the cooled caramelized onions. Make sure the onions are evenly mixed into the dip. Now, transfer the dip to a serving bowl. For a nice touch, sprinkle some chopped chives on top. This gives a fresh flavor and bright color. Serve your dip with tortilla chips or fresh vegetable sticks. This combination makes for a fun and tasty snack. Enjoy every bite of your homemade caramelized onion dip! To get the best caramelized onions, patience is key. Start by heating olive oil and butter in your skillet. Use a medium heat and add your sliced onions. Sprinkle salt and sugar on top. The salt helps draw out moisture, while sugar boosts the sweetness. Stir the onions often. This helps them cook evenly and prevents burning. Cook the onions for about 30 to 40 minutes. You want them soft and golden brown. If they start to stick, lower the heat. A little brown is good, but you don’t want blackened bits. The right color means rich flavor, so keep an eye on them! When serving caramelized onion dip at a party, presentation matters. Use a nice bowl for the dip. Top it with chopped chives for color. Serve with tortilla chips for crunch or fresh veggie sticks for a healthy option. Arrange these around the bowl for a beautiful display. I suggest you make a double batch; it goes fast! You can also set up a dipping station with various chips and veggies. This way, guests can choose their favorites. Caramelized onion dip pairs well with many snacks. For a classic combo, serve it with crispy tortilla chips. Their crunch balances the creamy dip. You can also try fresh vegetable sticks like carrots, celery, or bell peppers. They add a nice crunch and a fresh flavor. If you want something different, consider serving it with soft bread or crackers. The bread's texture complements the dip well. Feel free to explore other flavor profiles, too! Add some spicy salsa or tangy pickles on the side for extra fun. {{image_2}} To add some heat, try making a spicy version. You can mix in diced jalapeños or red pepper flakes. Start with one tablespoon of jalapeños for a mild kick. If you want more heat, add more as you stir. The spice will blend well with the sweet caramelized onions. This twist makes the dip exciting and full of flavor. For a cheesy treat, you can add different cheeses. Mix in one cup of shredded cheddar cheese or mozzarella. Stir until the cheese melts into the dip. You can also sprinkle some cheese on top before serving. This gives a nice, gooey finish. The cheese pairs perfectly with the rich onions. If you love herbs, this variation is for you. Add a tablespoon of fresh thyme or rosemary to your onions as they cook. The herbs will bring out even more flavor. You can also mix in fresh chives or parsley at the end. This version adds a fresh taste that brightens the dip. Each herb adds its own unique flavor, making your dip stand out. To keep your caramelized onion dip fresh, store it in an airtight container. Glass or plastic containers work great. Make sure to let the dip cool before sealing it up. This helps avoid moisture buildup. I recommend keeping it in the fridge right after serving. When stored properly, caramelized onion dip lasts about 3 to 5 days in the fridge. Always check for any change in smell or color before eating. If you notice anything off, it's best to throw it away. Reheating is simple! Just scoop out the amount you want and place it in a bowl. Microwave it in short bursts, about 20 seconds at a time, stirring in between. This helps get it warm without cooking it more. You can also heat it on the stove over low heat. Just stir often to keep it smooth. If it gets too thick, add a splash of sour cream or cream cheese to bring it back to life! Yes, you can make caramelized onion dip ahead of time. I often prepare it a day before a party. After making it, let it cool and store it in the fridge. This dip tastes even better after resting. The flavors mix well when it sits. Before serving, just stir it well. You can also add fresh chives for a pop of color. You can serve caramelized onion dip with many tasty options. Tortilla chips are a classic choice. They add a nice crunch. Fresh vegetable sticks also work well. Carrots, celery, and bell peppers are great for dipping. You can even serve it with pita bread or crackers. The dip's creamy texture pairs well with various dippers. Yes, caramelized onion dip is vegetarian-friendly. The ingredients, like onions, sour cream, and cream cheese, are all plant-based. Worcestershire sauce may contain anchovies, so check the label. Some brands offer vegetarian versions without fish. You can easily make this dip a hit at any gathering, even for vegetarians. Caramelized onion dip is simple to make and delicious. Our ingredient guide helps you pick fresh ingredients and offers swaps when needed. The step-by-step instructions ensure your onions caramelize perfectly. We explored serving tips and variations to please any crowd. Proper storage tips can keep your dip fresh and tasty. In the end, whether you prepare it spicy, cheesy, or herby, this dip will impress. Enjoy making and sharing it!

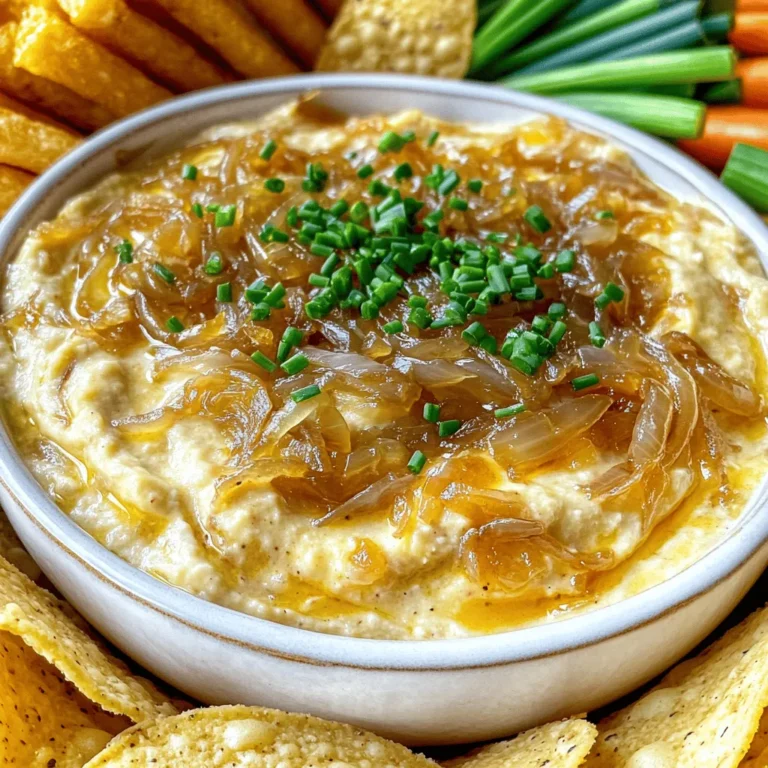
Caramelized Onion Dip Flavorful and Easy Recipe

- 8 oz rice noodles - 2 tablespoons sesame oil - 1 tablespoon fresh ginger, minced - 2 cloves garlic, minced - 1 bell pepper, thinly sliced - 1 carrot, julienned - 1 cup snap peas, trimmed - 3 green onions, chopped - Fresh cilantro for garnish - 1/4 cup soy sauce (or tamari for gluten-free) - 1 tablespoon maple syrup - 1 tablespoon rice vinegar - 1 tablespoon sesame seeds This dish starts with rice noodles. They provide a nice base for the meal. I love using them because they cook fast and absorb flavors well. You will need a bit of sesame oil. This gives a rich, nutty taste. Fresh ginger adds warmth and spice. Minced garlic brings another layer of flavor. For the veggies, I suggest a bell pepper, a carrot, and snap peas. They add crunch and color. Green onions bring a fresh zing, while cilantro gives a bright finish. The sauce is simple but packed with flavor. Soy sauce is salty and savory. Maple syrup adds a hint of sweetness. Rice vinegar gives a nice tang. Finally, sprinkle sesame seeds for a bit of crunch and extra flavor. With these ingredients, you can make a tasty and filling vegan meal that everyone will love! - Bring a large pot of water to a boil. - Add 8 oz rice noodles. - Cook noodles until al dente, about 4-5 minutes. - Drain the noodles and rinse with cold water. - In a small bowl, whisk together: - 1/4 cup soy sauce (or tamari for gluten-free) - 1 tablespoon maple syrup - 1 tablespoon rice vinegar - Heat 2 tablespoons of sesame oil in a large skillet over medium heat. - Add 1 tablespoon minced fresh ginger and 2 cloves minced garlic. - Cook for about 1 minute until fragrant. - Add: - 1 thinly sliced bell pepper - 1 julienned carrot - 1 cup trimmed snap peas - Sauté for 3-4 minutes until vegetables are tender-crisp. - Add the cooked noodles to the skillet with the sautéed vegetables. - Pour the prepared sauce over the noodles. - Toss everything together to coat evenly. - Cook for an additional 2-3 minutes to heat through. - Remove from heat and sprinkle with sesame seeds and chopped green onions. - Serve warm, garnished with fresh cilantro on top. To make your dish just right, adjust the sauce ingredients based on your taste. If you love a strong taste, add more ginger or garlic. This makes the dish pop with flavor. You can also reduce the soy sauce for a lighter taste. Feel free to experiment until you find what you love best. To stop the noodles from sticking together, rinse them with cold water after cooking. This cools them down and removes excess starch. When sautéing vegetables, heat your pan well before adding oil. This helps the veggies cook evenly and stay crisp. Stir them often to get the best results. For a tasty meal, serve the noodles with fresh cilantro on top. You can also add sesame seeds for extra crunch. If you want to make it a full meal, pair these noodles with a side of steamed broccoli or a simple salad. This adds color and nutrients to your dish. {{image_2}} If you need a gluten-free dish, no problem. You can swap rice noodles for gluten-free noodles. Look for options like quinoa or buckwheat noodles. These keep the dish tasty and light. Always check the package to ensure they are truly gluten-free. Want to boost the protein? Add tofu, tempeh, or chickpeas. Tofu works great when you cube it and sauté until golden. Tempeh adds a nutty flavor; just slice and cook until crispy. Chickpeas can be added directly from the can. They cook fast and add nice texture. Want to kick up the flavor? Try adding chili flakes for heat. A squeeze of lime juice brightens the dish, too. You can also toss in some chopped peanuts for crunch. These small tweaks make a big difference in taste. To store your Vegan Sesame Ginger Noodles, let them cool first. Place the noodles in an airtight container. This keeps them fresh for up to three days. Always keep the sauce separate if you can. It helps maintain the noodles' texture and flavor. When ready to eat, simply combine them again. If you want to freeze the noodles, it’s best to do so without the sauce. Place the cooled noodles in a freezer-safe bag. Squeeze out any air before sealing. They can stay in the freezer for up to a month. For best results, eat them within two weeks. This helps keep the taste fresh and yummy. To reheat your noodles, use a skillet for the best flavor. Add a splash of water or a little oil to the pan. Heat over medium until warm. You can also use a microwave. Heat in short intervals, stirring often. This keeps the noodles from getting dry. Enjoy them just like you made them! You can use other noodles if you don't have rice noodles. Here are some great options: - Soba noodles: These are made from buckwheat. They have a nutty taste. - Udon noodles: Thick and chewy, udon adds a different texture. - Zucchini noodles: For a low-carb choice, spiralized zucchini works well. - Whole wheat pasta: It can give a hearty flavor and is easy to find. These substitutes can change the dish's taste. Choose one that you like best! To add some heat to your noodles, try these ideas: - Red pepper flakes: Sprinkle in some flakes while cooking for a kick. - Sriracha or chili sauce: Mix a bit into the sauce for a nice heat level. - Fresh chili peppers: Slice them and add to the sautéed veggies for fresh heat. - Ginger: Adding more fresh ginger can also give a spicy zing. Feel free to adjust the spice to match your taste! Yes, you can prepare this dish in advance! Here’s how to do it: - Prep the noodles: Cook and rinse them. Store them in the fridge. - Store the veggies: Chop and keep them in a sealed container. - Make the sauce: Whisk together the sauce and keep it separate. You can combine everything when you're ready to eat. This dish stays good in the fridge for about 3 days. Just reheat it gently before serving! This blog post covered making delicious sesame ginger noodles. You learned about key ingredients like rice noodles, fresh veggies, and a flavorful sauce. We also discussed cooking steps, tips for flavor, and possible variations. You can even add proteins or adjust flavors to match your taste. With proper storage tips, you can enjoy this meal later. Now, it’s your turn to try this easy recipe. Enjoy making and sharing these tasty noodles with friends and family!

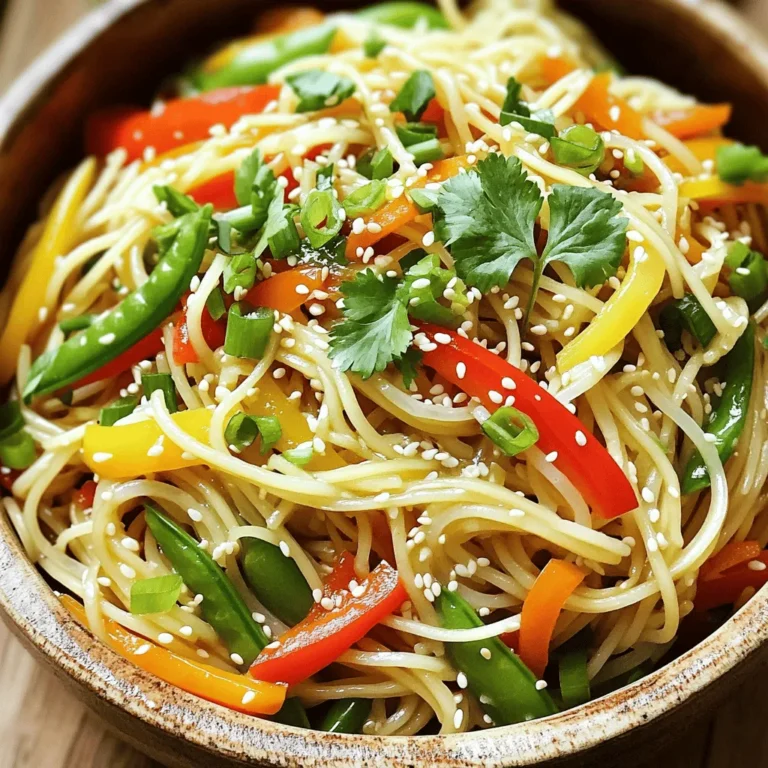
Vegan Sesame Ginger Noodles Simple and Tasty Dish

- 2 lbs chicken thighs, boneless and skinless, cut into cubes - 1 cup plain yogurt - 2 tablespoons garam masala - 1 tablespoon ground cumin - 1 tablespoon ground coriander - 1 teaspoon turmeric powder - 1 teaspoon paprika - 1 teaspoon cayenne pepper (adjust to taste) - 4 cloves garlic, minced - 1 inch ginger, grated - 1 large onion, finely chopped - 1 can (14 oz) diced tomatoes - 1 cup coconut milk - 3 tablespoons vegetable oil - Salt to taste - Fresh cilantro for garnish Each ingredient plays a key role in the flavor of Chicken Tikka Masala. - Chicken thighs provide juicy meat that stays tender during cooking. - Plain yogurt adds creaminess and helps to tenderize the chicken. - Garam masala gives a warm, spicy flavor that is essential to this dish. - Cumin and coriander add earthiness and depth to the sauce. - Turmeric gives a bright yellow color and a subtle taste. - Paprika adds mild heat and color. - Cayenne pepper allows you to control the spice level. - Garlic and ginger are aromatics that enhance the overall flavor. - Onion adds sweetness and richness when sautéed. - Diced tomatoes provide acidity and balance the creaminess. - Coconut milk makes the sauce rich and creamy. - Vegetable oil helps sauté the onions and adds flavor. - Fresh cilantro is a bright garnish that adds freshness. You can adjust some ingredients to fit your taste or what you have on hand: - Swap chicken thighs for chicken breasts for a leaner option, but they may dry out. - Use Greek yogurt instead of plain yogurt for a thicker texture. - Curry powder can replace garam masala if needed. - Almond milk or heavy cream can stand in for coconut milk, but they change the flavor. - If you lack fresh garlic or ginger, use powdered versions, but fresh is best. - Red bell pepper can replace onions for a sweeter touch. These substitutions can help you make this dish work for your kitchen and taste buds! {{ingredient_image_1}} Start by making the marinade. In a large bowl, mix the plain yogurt with garam masala, cumin, coriander, turmeric, paprika, cayenne pepper, minced garlic, and grated ginger. Stir well until all the spices blend smoothly with the yogurt. This mix is full of flavor and will coat the chicken nicely. Next, cut the chicken thighs into cubes. Add the chicken to the marinade and ensure every piece is covered. This step is key for juicy, tasty chicken. Cover the bowl and place it in the fridge. Let it sit for at least 1 hour, or overnight for even better flavor. After marinating, it’s time to cook. Begin by heating vegetable oil in a skillet over medium heat. Add the finely chopped onion and sauté until it's golden brown. This should take about 5 to 7 minutes. The onion adds sweetness to the dish. Once done, transfer the sautéed onion to your slow cooker. Now, add the marinated chicken, diced tomatoes, and coconut milk to the slow cooker. Stir everything well so that the chicken is fully covered in the sauce. Season with salt to taste. Cover the slow cooker and choose your cooking time. Cook on low for 6 to 8 hours or high for 3 to 4 hours. The chicken should be tender and cooked through by the end. When cooking is finished, give the dish a good stir. Taste it and adjust the seasoning if needed. This is where you can add a little more salt or spice if you want. Before serving, garnish with fresh cilantro. This adds a bright flavor and looks great. Serve your chicken tikka masala with fluffy basmati rice or warm naan bread. For a zesty twist, add a wedge of lime on the side. Enjoy your flavorful comfort dish! Marinating the chicken is key. It helps the meat soak up all those great spices. I like to mix yogurt with spices like garam masala and cumin. This blend gives the chicken a deep flavor. You should let the chicken marinate for at least one hour. For best results, marinate it overnight. This extra time makes a big difference. Don't forget to coat every piece well. Slow cookers can vary a lot. Some cook faster than others. If you have a newer model, check your dish after 6 hours on low. If it looks done, it might be ready. If you use an older model, it may take the full 8 hours. Always check the chicken. It should be tender and easy to shred. Adjust your cooking time based on your slow cooker. Serving your dish well can make it special. I love to add fresh cilantro on top. It adds color and a fresh taste. Serve the chicken tikka masala with fluffy basmati rice or warm naan. This makes a perfect meal. You can also add a lime wedge on the side. The lime gives a nice zesty kick. Remember, a great presentation makes your dish look even tastier! Pro Tips Marinate Longer: For deeper flavor, marinate the chicken overnight in the fridge. This allows the spices to penetrate the meat thoroughly. Adjust Spice Levels: Modify the amount of cayenne pepper based on your heat preference. Start with less if you're unsure, and increase gradually. Use Fresh Ingredients: Fresh garlic and ginger enhance the taste significantly. Whenever possible, opt for fresh over powdered versions. Serving Suggestions: Serve with fluffy basmati rice or warm naan. A squeeze of lime can add a refreshing zest to the dish. {{image_2}} If you want a meat-free version, try using chickpeas or paneer. Both options soak up the flavors well. For chickpeas, use about 2 cans, drained and rinsed. For paneer, cut it into cubes and add it during the last hour of cooking. This way, they stay soft and tasty. To make this dish lighter, swap the plain yogurt with low-fat yogurt. It keeps the creaminess but cuts calories. You can also use light coconut milk. It still adds flavor without the extra fat. Always adjust the salt to keep it just right. You can easily change the heat level. To make it mild, skip the cayenne pepper or use just a pinch. If you love heat, add more cayenne or even fresh chilies. Taste as you go to find your perfect balance. This way, everyone can enjoy their own version of chicken tikka masala. Storing leftovers is easy. First, let the chicken tikka masala cool down. Then, place it in an airtight container. You can keep it in the fridge for up to three days. Make sure to seal it well to keep the flavors fresh. You can freeze chicken tikka masala for longer storage. Use a freezer-safe container or a heavy-duty freezer bag. It will last up to three months in the freezer. To thaw, move it to the fridge overnight. You can also use the microwave for a quick thaw. When you are ready to eat, reheat the tikka masala. You can use the microwave or a pot on the stove. If using the microwave, heat it in short bursts, stirring in between. On the stove, heat it over low heat until hot. Add a splash of coconut milk for creaminess if it seems thick. Enjoy your comforting dish! You can serve Chicken Tikka Masala with several side dishes. I recommend fluffy basmati rice. It soaks up the sauce well. Warm naan bread is another great choice. You can use it to scoop up the chicken. For a fresh touch, add a wedge of lime. It adds a nice zing to each bite. Yes, you can use chicken breast instead of thighs. Chicken breast is leaner and cooks faster. Just be careful not to overcook it. Overcooked chicken can become dry. I suggest checking the chicken after about three hours on high. This way, it stays juicy and tender. To adjust the spice level, start with less cayenne pepper. You can always add more later. If you want a milder dish, skip the cayenne. You can also add some cream or extra coconut milk. This cools down the heat and adds richness. Taste as you go to find your perfect balance. In this blog post, we explored the rich world of Chicken Tikka Masala. We discussed essential ingredients, their importance, and substitutes. You learned step-by-step cooking instructions and how to elevate your dish with tips and tricks. We also covered fun variations to fit dietary needs. Lastly, I shared storage advice and answered your common questions. Enjoying this classic dish can be easy and rewarding. With these insights, you can cook delicious Chicken Tikka Masala at home!

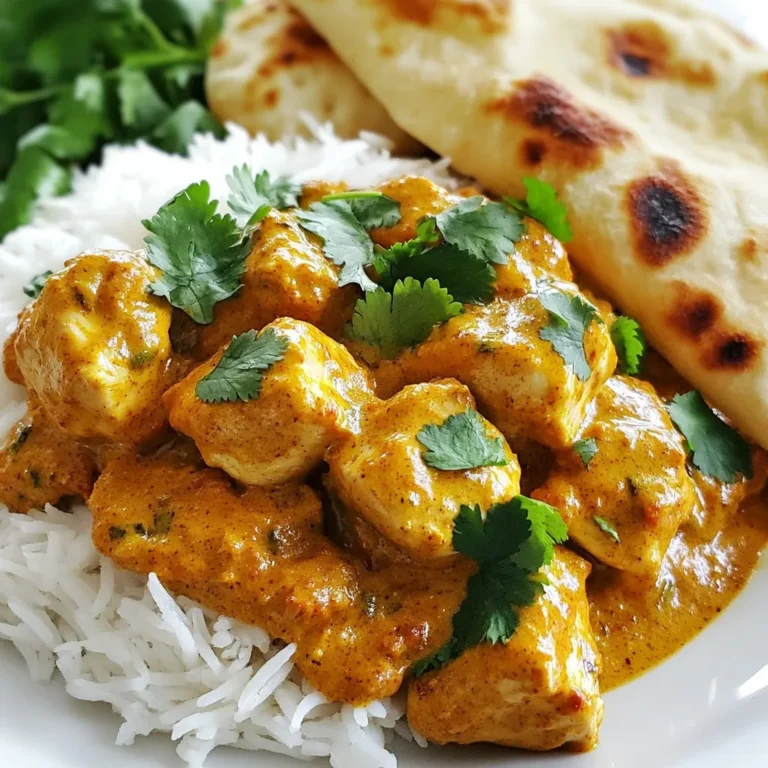
Slow Cooker Chicken Tikka Masala Flavorful Comfort Dish

To make Honey Garlic Sesame Noodles, gather these simple items. Each ingredient plays a vital role in building flavor. - 8 oz. whole wheat spaghetti or noodles of choice - 3 tablespoons honey - 4 tablespoons soy sauce - 2 tablespoons sesame oil - 3 cloves garlic, minced - 1 teaspoon fresh ginger, grated - 1 tablespoon rice vinegar - 1 tablespoon sesame seeds - 2 green onions, sliced - 1 cup snap peas or broccoli florets - Salt and pepper to taste Whole wheat spaghetti gives the dish a hearty base. Honey adds sweetness, while soy sauce brings umami. Sesame oil contributes a nutty flavor. Fresh garlic and ginger provide warmth and depth. Rice vinegar adds a hint of tang. Don’t forget the snap peas or broccoli! They add crunch and color. Green onions on top give a fresh kick. Season with salt and pepper to taste. With these ingredients, you’ll create a dish full of flavor and texture. {{ingredient_image_1}} To cook the noodles, bring a large pot of salted water to a boil. Add 8 oz. of whole wheat spaghetti or your favorite noodles. Cook them according to the package instructions until they are al dente, which means firm to the bite. This usually takes about 8 to 10 minutes. To check for doneness, taste a noodle. If it is too hard, give it a minute more. Once they are done, drain the noodles and set them aside. Next, we need to make the honey garlic sauce. In a mixing bowl, combine 3 tablespoons of honey, 4 tablespoons of soy sauce, and 2 tablespoons of sesame oil. Add 3 minced garlic cloves and 1 teaspoon of grated fresh ginger. Finally, pour in 1 tablespoon of rice vinegar. Whisk all the ingredients together until they mix well. A good whisking technique is to start slowly and then speed up. This helps blend the flavors nicely. Now, it’s time to sauté the vegetables. In a large skillet, heat a splash of water or a little sesame oil over medium heat. Add 1 cup of snap peas or broccoli florets. Cook them for about 3 to 4 minutes. You want the veggies to be tender-crisp, which means they should be soft but still have a little crunch. Once the vegetables are ready, it’s time to combine everything. Add the cooked noodles to the skillet with the vegetables. Pour the honey garlic sauce over them. Toss everything together gently. This step is important because you want the noodles to be evenly coated in the sauce. This ensures each bite is full of flavor. For the final touches, sprinkle 1 tablespoon of sesame seeds and 2 sliced green onions over the dish. Add salt and pepper to taste. Toss the noodles again to mix in these garnishes. For a nice presentation, serve the noodles in large, shallow bowls. Top with extra sesame seeds and green onions for a pop of color and texture. To make your honey garlic sesame noodles even better, you can add extra flavors. A pinch of chili flakes gives a spicy kick. If you like it sweeter, add more honey. For saltiness, use a bit more soy sauce. Taste your sauce as you mix it. Adjust it until it’s just right for you! Preventing noodles from sticking is key. After cooking, rinse them with cold water. This cools them down and stops the cooking. Toss them in a little sesame oil, too. When sautéing veggies, use a hot pan. Add a splash of water to help them cook. Stir them often, so they stay tender but crisp. Serving your noodles well makes them look great. Use large, shallow bowls for a nice touch. Sprinkle extra sesame seeds and green onions on top. This adds color and crunch. You can even serve with chopsticks for fun! Make sure to keep it simple but appealing. Pro Tips Choose Your Noodles Wisely: Whole wheat spaghetti adds a nutty flavor and more fiber compared to regular noodles, making your dish healthier. Customize Your Veggies: Feel free to substitute snap peas with other vegetables like bell peppers or carrots for added color and nutrition. Adjust Sweetness: Depending on your taste preference, you can reduce the honey for a less sweet dish or add extra for a sweeter flavor. Perfect Presentation: For an eye-catching plate, serve the noodles with a drizzle of sesame oil and a sprinkle of sesame seeds right before serving. {{image_2}} You can swap whole wheat spaghetti for other noodles. Try rice noodles for a gluten-free option. Shirataki noodles are low in carbs and calories. They add a unique texture and soak up the sauce well. You can also use zucchini noodles for a fresh twist. Just spiralize zucchini and sauté them lightly. Feel free to mix up the veggies. Bell peppers add sweetness and color. Carrots bring a nice crunch and bright flavor. You can use bok choy for a crunchy texture or kale for added nutrition. Spinach wilts nicely and adds a pop of green. Just remember to sauté them until they are tender-crisp for the best bite. For a heartier meal, add protein. Chicken is a classic choice. Cook it in the skillet before adding veggies. Shrimp cooks quickly and adds a nice flavor. Tofu is perfect for a vegetarian option. Just cube it and sauté until golden. Each protein will enhance the dish and make it more filling. To keep your honey garlic sesame noodles fresh, store them in airtight containers. This helps prevent drying out and keeps flavors intact. Divide the noodles and veggies into separate portions. This way, they stay fresh longer. Use glass or BPA-free plastic containers for best results. Label them with the date, so you know when to use them. When reheating, you want to keep the noodles tasty and soft. Use a skillet on low heat. Add a splash of water or sesame oil to help steam and warm the noodles. Stir gently to avoid sticking. Heat for about five minutes. Check if it’s warm throughout. If using a microwave, cover the bowl and heat for 1-2 minutes. Stir halfway to ensure even heating. You can use many kinds of noodles for this dish. I love whole wheat spaghetti because it adds a nice texture. You can also try rice noodles or soba noodles. Both of these options work well. If you want a gluten-free option, use rice noodles. They soak up the sauce nicely. Just make sure to follow the cooking time on the package for best results. Yes, you can. This dish is great for meal prep. You can cook the noodles and store them in the fridge for up to three days. Store the sauce separately in an airtight container. When you are ready to eat, just reheat the noodles and mix in the sauce. If you add veggies, do this right before serving for the best texture. This makes it easy to enjoy a quick meal during a busy week. To make this dish vegan, you can replace honey with maple syrup or agave nectar. Both options add sweetness. Ensure your soy sauce is gluten-free if needed. You can also skip the sesame oil and use olive oil instead. This will still give you a tasty dish without any animal products. Enjoy your vegan honey garlic sesame noodles without losing flavor! This blog post guided you through making tasty honey garlic sesame noodles. You learned about the key ingredients, like whole wheat noodles and fresh veggies. We covered cooking tips for perfect noodles and how to make a rich sauce. You can tweak flavors and add proteins to suit your taste. Remember to store leftovers properly and reheat them without losing their charm. Enjoy creating and sharing this dish with others! Your kitchen adventures just got a little sweeter.

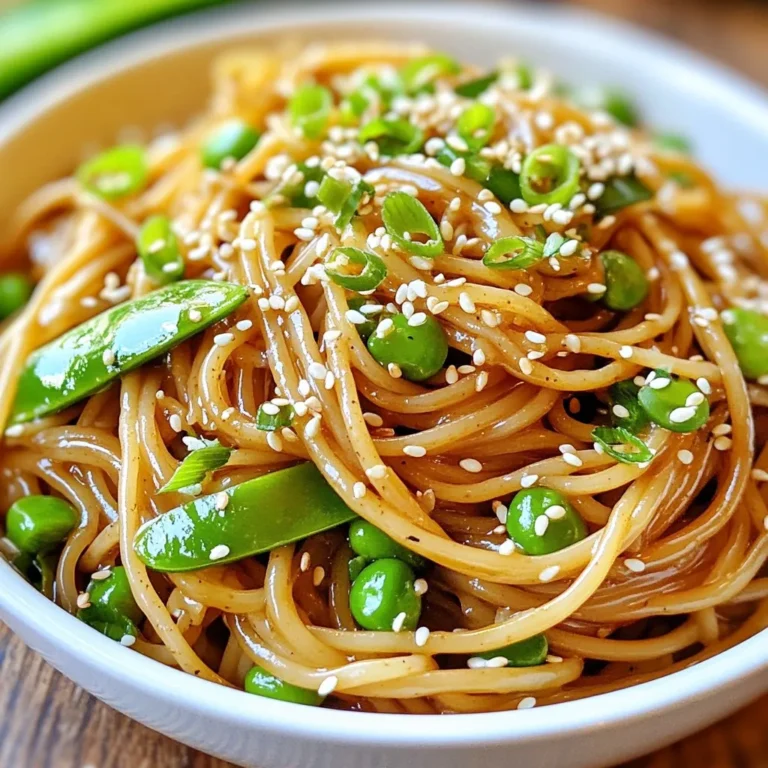
Honey Garlic Sesame Noodles Flavorful and Easy Meal

To make this tasty cornbread, gather these main ingredients: - 1 cup cornmeal - 1 cup all-purpose flour - 1 tablespoon baking powder - 1/2 teaspoon salt - 1/4 teaspoon black pepper - 1 cup buttermilk - 2 large eggs - 1/4 cup melted unsalted butter - 1 cup shredded sharp cheddar cheese - 2-3 fresh jalapeños, diced (remove seeds for less heat) Each ingredient plays a key role. The cornmeal gives it a nice texture. The flour helps it rise. Baking powder is essential for fluffiness. Buttermilk makes it moist and adds flavor. Eggs bind everything together, while butter adds richness. The cheese and jalapeños give it that kick and savory taste. You can add a few optional ingredients for some extra flair: - 1 tablespoon honey (for a hint of sweetness) - Corn kernels (for extra texture) - Chopped green onions (for more flavor) - Crumbled bacon (for a savory twist) These add-ins can make your cornbread even more special. You can mix and match based on what you like. If you don’t have certain ingredients, here are some easy swaps: - Use milk instead of buttermilk. Just add a splash of vinegar to it and let it sit for 5 minutes. - Swap all-purpose flour with a gluten-free blend if needed. - Use a different cheese like pepper jack for a spicier kick. - Substitute diced bell peppers for jalapeños if you prefer no heat. These substitutions can help you create a version that fits your taste or dietary needs. Don't hesitate to experiment! {{ingredient_image_1}} To make Jalapeño Cheddar Cornbread, start by gathering your ingredients. You will need: - 1 cup cornmeal - 1 cup all-purpose flour - 1 tablespoon baking powder - 1/2 teaspoon salt - 1/4 teaspoon black pepper - 1 cup buttermilk - 2 large eggs - 1/4 cup melted unsalted butter - 1 cup shredded sharp cheddar cheese - 2-3 fresh jalapeños, diced First, preheat your oven to 400°F (200°C). Grease an 8-inch square baking dish or a cast-iron skillet with butter. This helps the cornbread not stick. In a large bowl, mix the cornmeal, flour, baking powder, salt, and black pepper. Whisk them until they are well combined. In another bowl, whisk the buttermilk, eggs, and melted butter. If you want a touch of sweetness, add the honey. Then, mix it well. Pour your wet mixture into the dry ingredients. Stir gently until just combined. Small lumps are fine. Next, fold in the shredded cheddar cheese and diced jalapeños. Make sure they are spread out evenly. Pour the batter into your prepared dish or skillet. Spread it out evenly. Bake for 20-25 minutes. Check if it’s done by inserting a toothpick in the center. If it comes out clean, it’s ready. Let it cool for a few minutes before slicing. For the best cornbread, do not overmix the batter. Overmixing can make it tough. Also, let your butter cool slightly before adding it to the other wet ingredients. This keeps the eggs from cooking early. Use fresh jalapeños for better flavor. If you prefer less heat, remove the seeds before dicing. Serve your Jalapeño Cheddar Cornbread warm. You can garnish it with extra cheddar or sliced jalapeños. For a richer taste, add a pat of butter or a dollop of sour cream. This cornbread pairs well with chili, soups, or grilled meats. Enjoy this tasty treat at your next gathering! To keep your cornbread moist, use buttermilk. It adds moisture and tang. Another tip is to melt the butter instead of using it cold. This step helps mix the fat well into the batter. You can also add a little honey for extra sweetness and moisture. Lastly, avoid overmixing. A few lumps in the batter are okay and help keep it tender. To control the heat, remove the seeds from the jalapeños. This simple step will make the cornbread milder. If you like more heat, leave some seeds in. You can try using different chili peppers too. For a sweet and spicy twist, add a pinch of cayenne pepper. Taste the batter before baking to find your perfect heat level. For making cornbread, you need a few basic tools. A large mixing bowl is a must for combining ingredients. A whisk helps blend the wet and dry items smoothly. Use a spatula for folding in the cheese and jalapeños. A baking dish or cast-iron skillet works best for baking. Don't forget an oven mitt to protect your hands when taking the cornbread out of the oven. Pro Tips Use Fresh Jalapeños: For the best flavor, opt for fresh jalapeños rather than canned. Adjust the amount based on your spice preference. Experiment with Cheese: While sharp cheddar is delicious, try mixing in different cheeses like pepper jack or gouda for a unique twist. Don't Overmix: When combining wet and dry ingredients, mix just until incorporated. Overmixing can lead to a dense cornbread. Let it Cool: Allow the cornbread to cool slightly before slicing. This helps it set and makes for cleaner cuts. {{image_2}} You can switch up the cheddar cheese for a different taste. Try pepper jack for spice or mozzarella for a milder flavor. If you want a sharp kick, use aged gouda. Each cheese brings its own fun twist to the cornbread. Feel free to get creative with mix-ins. You can add cooked bacon bits for savory goodness. Corn kernels give a sweet crunch. Chopped herbs like cilantro or chives add freshness. If you love a little sweetness, toss in some corn or diced bell peppers. Each of these adds a new depth to your cornbread. To make this dish gluten-free, swap all-purpose flour for a gluten-free mix. Look for one that contains xanthan gum for better texture. You can use almond flour or coconut flour, but note that the texture may change. Adjust the liquid in your recipe as needed to keep it moist. To keep your Jalapeño Cheddar Cornbread fresh, store it properly. Let it cool completely first. Wrap it in plastic wrap or place it in an airtight container. This keeps out moisture and air, which can make it go stale. You can store it at room temperature for up to two days. If you want to keep it longer, move it to the fridge. It will stay good for about a week in the fridge. When you're ready to enjoy leftovers, reheating is simple. Preheat your oven to 350°F (175°C). Place the cornbread on a baking sheet. Cover it with foil to prevent drying. Heat for about 10-15 minutes, or until warm. You can also use a microwave. Just heat a slice for 20-30 seconds. If you like, add a pat of butter on top for extra flavor. Freezing is a great option if you have extra cornbread. Wrap each piece in plastic wrap. Then, place them in a freezer bag. Squeeze out as much air as possible. This helps prevent freezer burn. You can freeze the cornbread for up to three months. When you’re ready to eat it, thaw it in the fridge overnight. Then, reheat as described above for the best taste. Yes, you can make cornbread without buttermilk. You can use milk instead. Add a splash of vinegar or lemon juice to sour it. This will mimic buttermilk's tangy taste. The texture may be slightly different, but it will still be delicious. Homemade cornbread lasts about 2 to 3 days at room temperature. Store it in an airtight container. If you want to keep it longer, you can refrigerate it. In the fridge, it will last about a week. You can also freeze it for up to three months. Jalapeño Cheddar Cornbread goes well with many dishes. It pairs nicely with chili and soups. Try it with barbecue or grilled meats. You can also serve it with salads or as a side for breakfast with eggs. Yes, frozen jalapeños work well in this recipe. Just thaw and drain them before use. This helps keep the cornbread from getting too wet. Frozen jalapeños will still add great flavor to your cornbread. Making Jalapeño Cheddar Cornbread is fun and easy. We covered key ingredients, from jalapeños to optional mix-ins. Step-by-step instructions guide you in preparing and baking the perfect dish. Don’t forget tips for added moisture and spice. Explore different variations to suit your taste. Store it properly and enjoy leftovers later. This cornbread pairs well with many meals. Experiment and have fun in your kitchen. You'll find this recipe a tasty favorite!

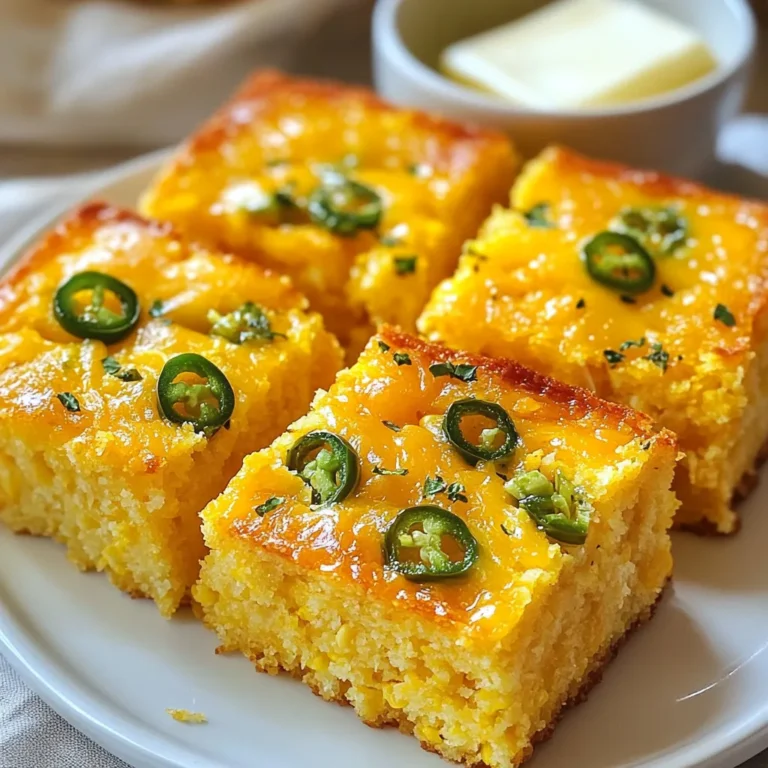
Jalapeño Cheddar Cornbread Flavorful and Easy Recipe

To craft the perfect honey garlic butter salmon, you will need a few simple yet tasty ingredients. Here’s what you should gather: - 4 salmon fillets (6 oz each) - 1/4 cup honey - 4 tablespoons unsalted butter - 4 cloves garlic, minced - 2 tablespoons soy sauce - 1 tablespoon Dijon mustard - 1 teaspoon fresh ginger, grated - Salt and pepper to taste - Fresh parsley, chopped (for garnish) - Lemon wedges (for serving) Each ingredient plays a key role in making this dish juicy and flavorful. The salmon fillets form the base, offering rich and flaky meat. Honey gives sweetness, while the butter adds a creamy texture. Garlic brings a punch of flavor, complemented by soy sauce and Dijon mustard for depth. Fresh ginger adds warmth, and salt and pepper balance it all. Don’t forget the parsley and lemon! They add freshness and brightness to every bite. Gather these ingredients, and you’re on your way to a delicious meal that’s sure to impress. {{ingredient_image_1}} First, prepare your salmon fillets. Make sure they are thawed if frozen. Pat them dry with a paper towel. This helps the skin crisp up. Next, mince the garlic. Use a sharp knife for this task. Chop it finely until it’s almost a paste. This releases its strong flavor into the dish. Now, grate the fresh ginger. Use a microplane for best results. This adds a nice zing to the sauce. Let’s start cooking! Melt the butter in a small saucepan over medium heat. Watch it closely so it doesn’t burn. Once melted, add the minced garlic. Sauté it for about a minute. You want it fragrant but not browned. Stir in the honey, soy sauce, Dijon mustard, and grated ginger. Cook this mixture for 2-3 minutes. You want it to thicken slightly. Remove it from heat and set it aside. Preheat your oven to 400°F (200°C). Line a baking sheet with parchment paper. This makes cleanup easy later. Place the salmon fillets on the baking sheet, skin-side down. Season them with salt and pepper. Brush the honey garlic butter mixture over each fillet. Be generous, but save some sauce for later. Bake the salmon for 12-15 minutes. It should flake easily with a fork when done. For a nice finish, broil the salmon for 1-2 minutes. This caramelizes the top and adds flavor. Once out of the oven, brush on more honey garlic butter sauce if you like. Garnish with fresh parsley for color and taste. Serve with lemon wedges on the side. The lemon adds brightness to the dish, making it extra tasty. How do I check doneness? To check if salmon is done, look for a few signs. The fish should be opaque and firm. Use a fork to see if it flakes easily. If it does, it’s ready. A food thermometer is great too. Aim for an internal temp of 145°F (63°C). How do I avoid dry salmon? To keep salmon juicy, don’t overcook it. Baking for 12-15 minutes usually works well. Brush it with honey garlic butter before cooking. Adding some butter on top helps lock in moisture. What other ingredients can I use? You can add flavors like red pepper flakes for a kick. Fresh herbs like dill or thyme work nicely too. For a tangy touch, try adding lemon zest. How do I adjust sweetness and seasoning? If you want it sweeter, add more honey. For a salty punch, use extra soy sauce. Always taste the sauce before you pour it on the salmon. You can tweak it to your liking. What are some alternative cooking methods? You can grill the salmon for a smoky flavor. Just preheat the grill and cook for about 6-8 minutes per side. You can also pan-sear it on the stove for a crispy skin. What’s the difference between grilling and baking? Baking gives you a soft, tender fish. Grilling adds a nice char and flavor. Both methods work well. Choose based on your taste or the equipment you have available. Pro Tips Choose Fresh Salmon: Select salmon fillets that have a bright color and smell fresh to ensure the best flavor and texture. Don’t Overcook: Salmon is best when cooked to a medium doneness; it should flake easily but still be moist. Use a meat thermometer for precision. Customize the Sauce: Feel free to adjust the sweetness or tanginess of the honey garlic butter by adding more honey or soy sauce to suit your taste. Broil for Extra Flavor: Broiling the salmon for the last few minutes adds a delicious caramelized finish. Keep an eye on it to avoid burning. {{image_2}} You can choose between wild-caught and farmed salmon. Wild-caught salmon has a richer taste and firmer texture. It is often preferred for its health benefits. Farmed salmon is usually milder and more affordable. It is easier to find in stores. You can also decide on skin-on or skinless salmon. Skin-on salmon has a nice crispy texture when cooked. It helps keep the fish moist during baking. Skinless salmon cooks faster, making it a great choice for quick meals. You can spice up your honey garlic butter salmon. Add red pepper flakes for a spicy kick. This adds heat and depth to the dish. You can also try a citrus-infused version. Squeeze fresh lemon or orange juice into the sauce. This adds freshness and brightens the flavors. Pair your salmon with tasty side dishes. Steamed vegetables, rice, or a fresh salad work well. These sides add color and nutrition to your plate. For meal prep ideas, cook extra salmon for later. You can store it in the fridge for quick lunches. A salmon salad or wrap makes a great next-day meal. To keep your honey garlic butter salmon fresh, store leftovers in the fridge. Place the salmon in an airtight container. This helps to keep moisture in and flavors intact. It’s best to eat the salmon within three days. If you want to store it longer, freeze the salmon. Wrap each piece tightly in plastic wrap. Then place them in a freezer bag. This way, you can enjoy your dish for up to three months. When you are ready to eat leftovers, reheating correctly makes a big difference. The best way to reheat salmon is in the oven. Preheat your oven to 275°F (135°C). Place the salmon on a baking sheet and cover it with foil. Heat for about 15 minutes. This method keeps the salmon moist. You can also use a microwave, but be careful. Heat it in short bursts to avoid drying it out. Honey garlic salmon lasts in the fridge for about three days. If you freeze it, it can last up to three months. To tell if the salmon has gone bad, look for color changes or a sour smell. If it smells off or looks dull, it's best to throw it away. Always trust your senses when it comes to food safety. If you need a substitute for honey, maple syrup works well. You can also try agave nectar. Both options give a sweet flavor. They match nicely with the butter and garlic. Adjust the amount to your taste. Yes, you can use frozen salmon. Just make sure to thaw it first. Place it in the fridge overnight or use cold water. This helps the salmon cook evenly. Cooking time may change slightly, so keep an eye on it. Eating undercooked salmon can be risky. It might contain harmful bacteria or parasites. I recommend cooking salmon to an internal temperature of 145°F (63°C). This ensures it is safe and flaky. To make honey garlic butter salmon gluten-free, swap soy sauce for tamari. Tamari is a great gluten-free choice. You can also find gluten-free soy sauce at stores. Just check the label for safety. Honey garlic butter salmon tastes great with many sides. Here are a few ideas: - Steamed vegetables like broccoli or green beans - Rice or quinoa for a hearty base - A fresh salad with lemon vinaigrette - Mashed potatoes for a comfort food feel These sides complement the salmon's sweet and savory flavors. This blog post covered how to cook a delicious honey garlic salmon. You learned about the key ingredients, step-by-step cooking, and tips to get it just right. Remember, freshness matters, and storing leftovers properly keeps them tasty. Feel free to try variations and enjoy different flavors. Cooking can be fun and easy! Experiment with side dishes to make meals unique. Enjoy your cooking adventure with honey garlic salmon!

Honey Garlic Butter Salmon Juicy and Flavorful Dish

To make tasty Caribbean jerk chicken tacos, you need the following main ingredients: - 2 chicken breasts, boneless and skinless - 2 tablespoons jerk seasoning (store-bought or homemade) - 1 tablespoon olive oil - 8 small corn or flour tortillas These ingredients form the base of your tacos. The chicken gives protein, while jerk seasoning adds that famous spicy and smoky flavor. You can enhance your tacos with these fresh ingredients: - 1 cup red cabbage, finely shredded - 1 cup mango, diced - 1 avocado, sliced - 1/2 cup cilantro, chopped - 1/4 cup lime juice (about 2 limes) - Salt and pepper to taste - Optional: Hot sauce for serving Red cabbage adds crunch, while mango gives sweetness. Avocado brings creaminess, and lime juice adds zing. You can skip hot sauce if you prefer mild flavors. If you can't find any items, here are some substitutions: - Use chicken thighs instead of breasts for more flavor. - Try other fruits like pineapple or papaya in place of mango. - Swap red cabbage for green cabbage or lettuce if needed. - Use lemon juice instead of lime juice for a different citrus kick. These swaps keep the essence of the dish, ensuring you still enjoy a delightful meal. Don't hesitate to get creative! {{ingredient_image_1}} To start, you need to marinate the chicken. In a large bowl, mix jerk seasoning, olive oil, salt, and pepper. Add the chicken breasts to the bowl. Make sure the chicken is fully coated with the marinade. Cover the bowl with plastic wrap. Let it sit for at least 30 minutes. For a stronger flavor, let it marinate for up to 2 hours in the fridge. Now it’s time to cook the chicken. Preheat your grill or grill pan to medium-high heat. When it’s hot, add the marinated chicken breasts. Cook them for about 5 to 7 minutes on each side. You want the internal temperature to reach 165°F (75°C). Once cooked, take the chicken off the heat. Let it rest for a few minutes. Then slice it into thin strips. While the chicken rests, prepare the tortillas. Warm them on the grill or in a skillet for about 30 seconds on each side. This makes them soft and easy to fold. Now, build your tacos! Take each tortilla and layer in some sliced jerk chicken. Add shredded red cabbage, diced mango, and avocado slices. Drizzle lime juice on top. Sprinkle with fresh cilantro. If you like heat, add some hot sauce. Serve the tacos right away with lime wedges on the side. To get the best jerk flavor, use fresh spices. Jerk seasoning usually has allspice, thyme, and pepper. If you want to make your own, blend these spices with garlic, onion, and Scotch bonnet pepper for heat. Marinate the chicken for at least 30 minutes. Longer marination gives a deeper flavor. If you can, let it sit in the fridge for up to 2 hours. This makes a big difference. Corn tortillas are classic for tacos. They have a nice texture and flavor. If you prefer flour, go for small ones to hold the filling well. Warm the tortillas before adding the chicken. This makes them soft and easier to fold. You can heat them on a grill or in a skillet for about 30 seconds on each side. This simple step enhances the taste. Presentation is key to making your tacos look inviting. Arrange the tacos on a colorful platter. Garnish with extra cilantro and lime wedges for a pop of color. You can also drizzle more lime juice over the tacos just before serving. This adds freshness and zesty flavor. Serve with hot sauce on the side for those who love some spice. Enjoy the vibrant look and taste of your Caribbean Jerk Chicken Tacos! Pro Tips Marinate for Flavor: Allow the chicken to marinate for at least 2 hours to enhance the jerk flavor. Overnight marination is even better! Grilling Technique: Make sure your grill is preheated before adding the chicken to ensure a nice sear and to prevent sticking. Fresh Ingredients: Use fresh cilantro and ripe mango for the best flavor and texture in your tacos. Tortilla Choice: Experiment with both corn and flour tortillas to find your favorite combination for these tacos. {{image_2}} You can switch the chicken for other proteins. Try shrimp or pork. Grilled shrimp gives a nice seafood taste. Pork shoulder works well with jerk seasoning too. It has a rich flavor that blends nicely. Use the same marinating and cooking steps as chicken for best results. For a vegetarian meal, use grilled tofu or tempeh. They soak up flavors well. You can also use black beans or chickpeas. These options add protein and stay filling. For a vegan twist, skip the chicken and add more veggies. Grilled peppers or zucchini can be great choices. You can add fun flavors to your tacos. Try pineapple instead of mango for a sweet twist. Pickled red onions add a tangy crunch. Spicy slaw made with cabbage and jalapeños can give extra heat. You can also mix in fresh herbs like mint for a bright touch. Each twist makes the tacos special! To store leftover tacos, first, separate the chicken from the toppings. Place the chicken in an airtight container. Store it in the fridge for up to three days. Keep the tortillas and toppings, like cabbage and mango, in separate containers. This keeps everything fresh and tasty. To reheat the chicken, use a skillet over medium heat. Add a splash of water to keep it moist. Heat for about 5-7 minutes until warm. For the tortillas, warm them in a dry skillet for 30 seconds on each side. This helps them regain their softness. You can prepare the chicken ahead. Marinate it and store it in the fridge for up to two hours. You can also cook the chicken beforehand and store it in the fridge. Just reheat it before serving. Cut your veggies and store them in containers too. This makes taco night quick and easy! Jerk seasoning is a mix of spices from Jamaica. It includes ingredients like allspice, thyme, and cayenne pepper. This mix gives food a spicy, smoky taste. You can buy it in stores or make your own at home. If you want to make your own, blend spices like garlic powder, onion powder, and black pepper. This seasoning works great on chicken, pork, and fish. Yes, you can add more heat! Here are some easy ways to spice up your tacos: - Use more jerk seasoning when marinating the chicken. - Add sliced jalapeños or diced hot peppers to the filling. - Drizzle a spicy hot sauce over the top. - Serve with a side of spicy salsa or chutney. You can adjust the spice level to fit your taste. Just remember, a little heat goes a long way! These tacos are fun to make your own! Here are some ideas: - Swap the Protein: Use shrimp, pork, or tofu instead of chicken. - Change the Veggies: Add bell peppers, red onions, or corn for extra crunch. - Try Different Fruits: Use pineapple or kiwi instead of mango for a sweet twist. - Add Cheese: Crumbled feta or shredded cheddar can add creaminess. - Use Different Tortillas: Try whole wheat, spinach, or even lettuce leaves for a low-carb option. Mix and match to create your perfect taco! In this blog post, we explored how to make Caribbean jerk chicken tacos. We covered the key ingredients, step-by-step cooking, and tips to enhance flavor. You learned about storage and popular variations. These tacos are easy to customize. Use what you love and enjoy the taste. Experiment with spices or vegetables to make each batch unique. So dive in, get your hands messy, and savor these delicious flavors today!

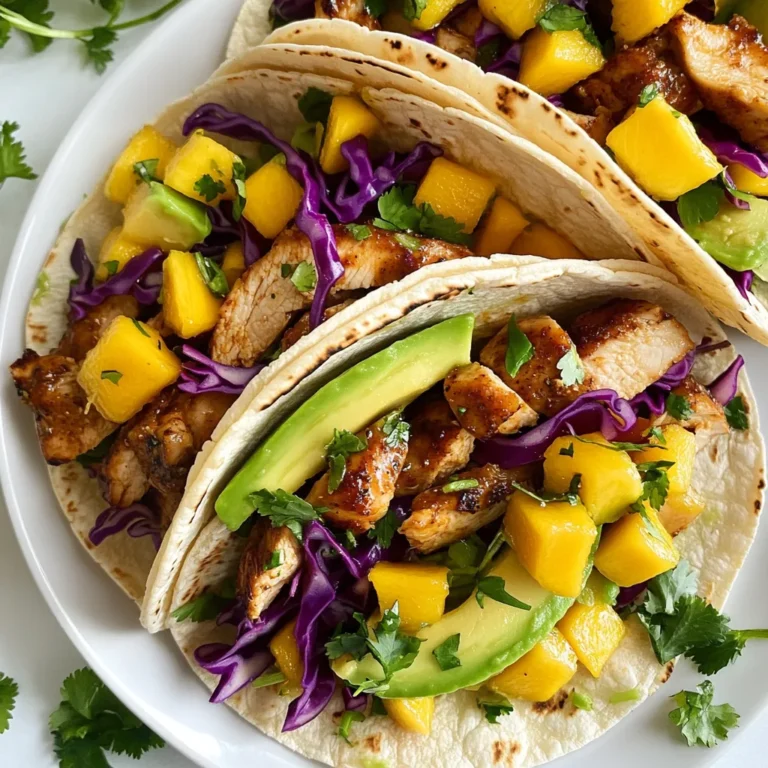
Caribbean Jerk Chicken Tacos Flavorful and Easy Meal

PREV 1 … 33 34 35 … 53 NEXT
cozy citrus kitchen

explore

DessertsDinnerAppetizersDrinks

Our Policies

  • Cookie Policy
  • Copyright Policy
  • Disclaimer
  • GDPR Policy
  • Terms Of Use
Back to Top
  • About
  • Contact Us
  • Privacy Policy
© 2025 cozy citrus kitchen