FREE DINNER EBOOK! Get your copy!
  • Cookie Policy
  • GDPR Policy
  • Disclaimer
  • Terms Of Use
  • Visit my other site: Fun Cookie Recipes
cozy citrus kitchen
  • Home
  • Dinner
  • Desserts
  • Drinks
  • Appetizers
  • Contact
  • About
  • Privacy Policy
  • Home
  • Dinner
  • Desserts
  • Drinks
  • Appetizers
  • Contact
  • About
  • Privacy Policy
  • Cookie Policy
  • GDPR Policy
  • Disclaimer
  • Terms Of Use
Visit my other site: Fun Cookie Recipes

HOME / CATEGORIES /

Latest

To make this delightful treat, you need a few key items. Here’s what you will need: - 2 cups heavy cream - 1 cup whole milk - 3/4 cup granulated sugar - 1 tablespoon vanilla extract - 1 tablespoon instant espresso powder - 1/2 teaspoon salt - 1/2 cup caramel sauce (store-bought or homemade) - 1/3 cup chocolate-covered espresso beans, coarsely chopped (optional) These ingredients blend together to create a creamy, coffee-flavored ice cream with a sweet caramel twist. If you want to boost the flavor even more, consider adding these fun extras: - A splash of almond extract for a nutty taste - A pinch of cinnamon for warmth - A few tablespoons of cocoa powder for a chocolate kick These additions can enhance your ice cream and make it unique. To make the ice cream, you will need some basic kitchen tools: - Medium saucepan - Whisk - Ice cream maker - Airtight container for storage Having the right tools makes the process smooth and fun. Enjoy creating this tasty dessert! Start by gathering your ingredients. You need heavy cream, whole milk, sugar, vanilla, espresso powder, and salt. 1. In a medium saucepan, mix the heavy cream, whole milk, and granulated sugar. 2. Heat this over medium heat. Stir often until the sugar dissolves. This takes about 3-4 minutes. 3. Remove the pan from heat. Add the vanilla extract, instant espresso powder, and salt. Whisk until smooth and well mixed. 4. Let the mixture cool to room temperature. Cover it and refrigerate for at least 2 hours. After chilling, it’s time to churn. 1. Pour the cold mixture into your ice cream maker. 2. Churn according to the manufacturer’s instructions. This usually takes 20-25 minutes. 3. The ice cream will reach a soft-serve texture when ready. Now for the fun part: adding caramel! 1. In the last few minutes of churning, drizzle in the caramel sauce. 2. This creates beautiful streaks in your ice cream. 3. If you want extra crunch, add chopped chocolate-covered espresso beans. 4. Transfer the ice cream to an airtight container. Freeze it for at least 4 hours to firm up. Enjoy your homemade caramel macchiato ice cream whenever you want a tasty treat! To get smooth and creamy ice cream, use heavy cream and whole milk. They give a rich base. Mixing them well helps the sugar dissolve faster. Heat the mix gently, but don’t boil it. Stir often to keep it from sticking. After cooking, let it cool before chilling. Chill the mix well for at least two hours. This step makes a big difference. When serving, use a scoop to create perfect balls. Place them in bowls or cones. Drizzle more caramel sauce on top for a sweet touch. You can also sprinkle chopped chocolate-covered espresso beans for crunch. Pair it with a cup of coffee if you like. This combo enhances the coffee flavor. If your ice cream is too hard, let it sit out for a few minutes. This makes it easier to scoop. If it’s too soft, the base might not have chilled enough. Always chill for at least two hours. If your ice cream is icy, it may have been frozen too fast. Churn it until it’s soft-serve before freezing. This step adds air and makes it creamy. {{image_2}} If you want a dairy-free version, use coconut cream or almond milk. These options give you a rich flavor without dairy. Look for unsweetened versions to control sugar. You can also use dairy-free caramel sauce for sweetness. Feel free to change up the flavors! Swap vanilla for almond extract for a nutty taste. You can even add a splash of hazelnut syrup for a twist. If you love chocolate, mix in cocoa powder for a mocha macchiato ice cream. Mix-ins can add fun textures to your ice cream. Try adding chopped nuts for a crunchy bite. You can also use chocolate chips or crushed cookies. For toppings, drizzle more caramel sauce or sprinkle cocoa powder. Fresh fruits like berries add a fresh touch too! To store your caramel macchiato ice cream, first, use an airtight container. This helps keep out air and prevents ice crystals. Make sure to press a piece of parchment paper on top of the ice cream before sealing the lid. This extra layer keeps it fresh longer. Freeze your ice cream at a steady temperature of 0°F (-18°C) or below. Avoid opening the freezer too often. This helps maintain the cold and keeps your ice cream creamy. When stored properly, caramel macchiato ice cream lasts about 2 to 3 weeks in the freezer. After this time, it may lose flavor and texture. If you notice ice crystals forming, it’s still safe to eat, but not as tasty. Always check for changes in smell or color before enjoying your treat. A good rule is to enjoy it within two weeks for the best flavor. If you have leftover ice cream that's a bit hard, let it sit out for 5-10 minutes. This softens it and makes it easier to scoop. If it has freezer burn or ice crystals, you can blend it into a milkshake or smoothie. Just add a splash of milk or coffee to create a delicious drink. You can also fold it into batters for cakes or brownies for a sweet twist. Yes, you can! To make caramel macchiato ice cream without an ice cream maker, follow these steps: - Mix heavy cream, whole milk, and sugar in a bowl. - Add vanilla, espresso powder, and salt, then mix well. - Pour the mixture into a shallow dish. - Freeze it for 30 minutes, then stir it with a fork. - Repeat this process every 30 minutes for about 3-4 hours. This method gives you a creamy ice cream texture, even without a machine. Many brands offer caramel macchiato ice cream. Some popular choices include: - Haagen-Dazs - Ben & Jerry's - Baskin-Robbins - Talenti Check your local grocery store for these brands. Each one has a unique twist on the classic flavor. You can easily swap espresso for coffee in your recipe. Here’s how: - Use 2 tablespoons of instant coffee instead of 1 tablespoon of instant espresso powder. - Mix it into the warm cream mixture as you would with espresso. This change keeps the rich coffee flavor while making it more accessible for everyone. Enjoy your ice cream! You now know how to make delicious Caramel Macchiato Ice Cream. We explored key ingredients, tools, and options for extra flavor. I shared step-by-step advice to help you prepare, chill, and churn your ice cream perfectly. Remember, you can customize the recipe with dairy-free options or fun mix-ins. Follow storage tips for the best experience. Whether you’re enjoying it solo or serving friends, this ice cream is sure to delight. Get ready to impress with your homemade treat!

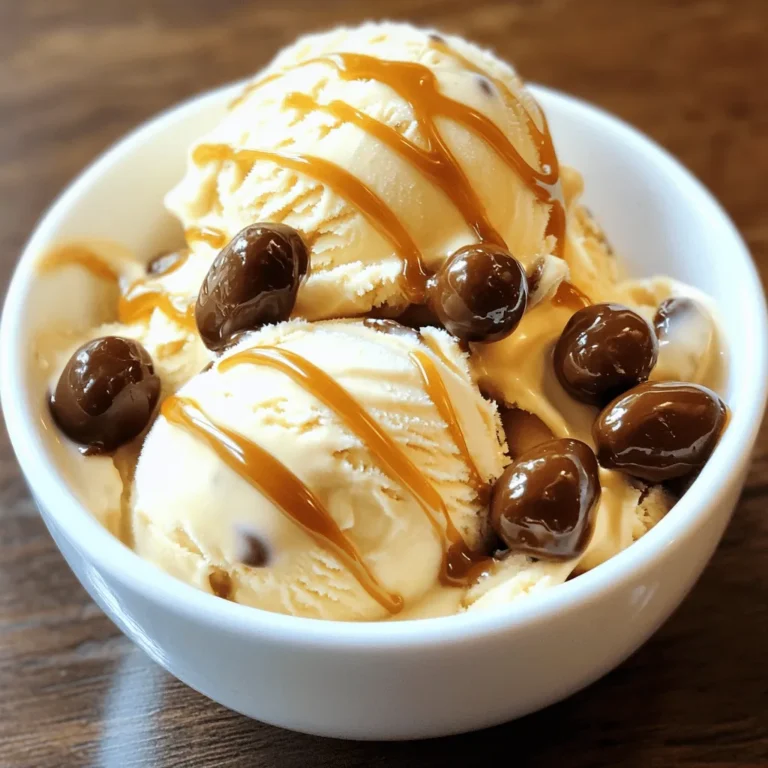
Irresistible Caramel Macchiato Ice Cream Delight

To make Buffalo Chicken Stuffed Sweet Potatoes, gather these key items: - 4 medium-sized sweet potatoes - 2 cups cooked chicken, shredded - 1/2 cup buffalo sauce (adjust to taste) - 1/4 cup Greek yogurt or sour cream - 1/2 cup shredded cheddar cheese - 1/4 cup green onions, chopped - 1/4 cup celery, finely diced - Salt and pepper to taste - Olive oil for drizzling - Fresh cilantro or parsley for garnish (optional) These ingredients blend well to create a tasty meal. The sweet potatoes give a nice, sweet flavor. The buffalo chicken filling adds spice and richness. You can swap some ingredients if needed. Try these options: - Use rotisserie chicken instead of cooking your own. - Replace Greek yogurt with sour cream or cream cheese for a different creaminess. - If you want less spice, pick a milder hot sauce. - For a dairy-free option, try nutritional yeast instead of cheese. These substitutions help you customize the dish to your taste or dietary needs. Toppings take this dish to the next level. Here are some tasty ideas: - Extra chopped green onions for a fresh bite. - Crumbled blue cheese for that classic buffalo flavor. - Avocado slices for creaminess and healthy fats. - A drizzle of ranch or blue cheese dressing for added flavor. Feel free to get creative with your toppings. Each one adds a unique twist to your stuffed sweet potatoes! {{ingredient_image_1}} First, you need to set your oven to 400°F (200°C). Wash the sweet potatoes well and dry them. Use a fork to poke several holes in each potato. This helps steam escape while they bake. Drizzle a bit of olive oil over them and sprinkle some salt. Place the potatoes on a baking sheet. Bake them for 45 to 60 minutes. They are done when a fork goes in easily. While the sweet potatoes bake, it’s time to make the filling. In a big bowl, mix the shredded chicken with buffalo sauce. You can adjust the amount based on how spicy you want it. Add Greek yogurt or sour cream for creaminess. Then, toss in the diced celery and half of the green onions. Mix everything well and season with salt and pepper. This filling is packed with flavor! Once the sweet potatoes are cool enough to handle, cut them in half lengthwise. Scoop out some flesh to make room for the filling. Combine the scooped sweet potato with the buffalo chicken mixture. Stir it until it’s blended well. Now, stuff each potato half with the chicken mix. Top each one with shredded cheddar cheese. Put the stuffed potatoes back in the oven for another 10 to 15 minutes. Bake until the cheese is melted and bubbly. Finally, remove them and let them cool slightly. Garnish with the rest of the green onions and some fresh herbs if you like. Enjoy your tasty meal! To get sweet potatoes just right, start by washing them well. Dry them off and poke holes all over with a fork. This lets steam escape. Drizzle olive oil on each potato and sprinkle salt. Bake them at 400°F for 45-60 minutes. Check if they’re done by poking with a fork; it should slide in easily. If they feel firm, give them more time. Buffalo sauce can be spicy! If you want less heat, mix in more Greek yogurt or sour cream. You can also add honey to make it sweet. For extra kick, add more buffalo sauce. Taste your filling as you mix, and adjust until it’s perfect for you. Using the right tools makes cooking easier. Here’s what I recommend: - Baking sheet for the sweet potatoes - Fork for poking holes - Mixing bowl for the chicken filling - Sharp knife for cutting the sweet potatoes - Measuring cups for precise ingredients - Oven mitts for safe handling These simple tools help you make the best buffalo chicken stuffed sweet potatoes! Pro Tips Choose the Right Sweet Potatoes: Look for sweet potatoes that are firm and free from blemishes. Medium-sized potatoes work best for stuffing. Adjust the Spice Level: Customize the amount of buffalo sauce based on your heat preference. Start with less and add more if you like it spicy! Make Ahead: Prepare the buffalo chicken mixture in advance and store it in the fridge. You can stuff the sweet potatoes just before baking for a quick meal. Garnish for Flavor: Fresh herbs like cilantro or parsley add a burst of flavor and color. Don't skip this step for the best presentation! {{image_2}} You can easily make this dish vegetarian. Instead of chicken, use shredded jackfruit or chickpeas. Both options soak up buffalo sauce well. You can also add some black beans for extra protein. Try mixing in sautéed mushrooms or zucchini for added flavor and texture. These swaps keep the dish hearty and satisfying. Adjust the heat according to your taste. For a milder dish, use less buffalo sauce. You can also mix in some ranch seasoning to tone down the spice. If you like it spicy, add extra buffalo sauce or include diced jalapeños. A sprinkle of cayenne pepper can also bring heat to the mix. Cheese makes this dish creamy and rich. Cheddar is classic, but feel free to switch it up. Try using blue cheese for a tangy kick. Mozzarella gives a nice stretch and mild flavor. If you want a dairy-free option, use vegan cheese. Nutritional yeast is another great choice for a cheesy taste without dairy. After you enjoy your buffalo chicken stuffed sweet potatoes, store the extras right. Place them in an airtight container. This keeps them fresh and tasty. You can store them in the fridge for up to three days. If you have more than one day’s worth, separate the chicken filling from the sweet potatoes. This helps keep the potatoes from getting too soggy. To reheat, you can use the oven or microwave. If you use the oven, preheat it to 350°F (175°C). Place the stuffed sweet potatoes on a baking sheet. Heat them for about 15-20 minutes, or until hot. If you prefer the microwave, put one half on a plate. Heat it for about 1-2 minutes. Check if it's hot enough, and add more time if needed. Freezing is a great option if you want to save some for later. First, let the stuffed sweet potatoes cool completely. Wrap each potato tightly in plastic wrap. Then, place them in a freezer-safe bag or container. You can freeze them for up to three months. When you’re ready to eat, thaw them in the fridge overnight. Reheat as mentioned above. This way, you can enjoy your delicious meal anytime! Bake sweet potatoes for 45 to 60 minutes at 400°F (200°C). Check their softness by poking them with a fork. If the fork goes in easily, they are ready. Yes, rotisserie chicken is great for this recipe. It saves time and adds flavor. Just shred the chicken and mix it with the buffalo sauce and other ingredients. You can serve a simple salad or some steamed veggies. A side of ranch dressing pairs well too. Fresh fruit or chips can add a nice crunch. In this article, we explored how to make tasty buffalo chicken stuffed sweet potatoes. We covered essential ingredients, easy steps, and clever tips to help you succeed. You can adjust flavors and toppings to match your taste. Don't forget storage tips for leftovers, too. This dish is great for meal prep or a fun dinner. Enjoy creating this delicious meal that everyone will love. Make it your own with unique twists.

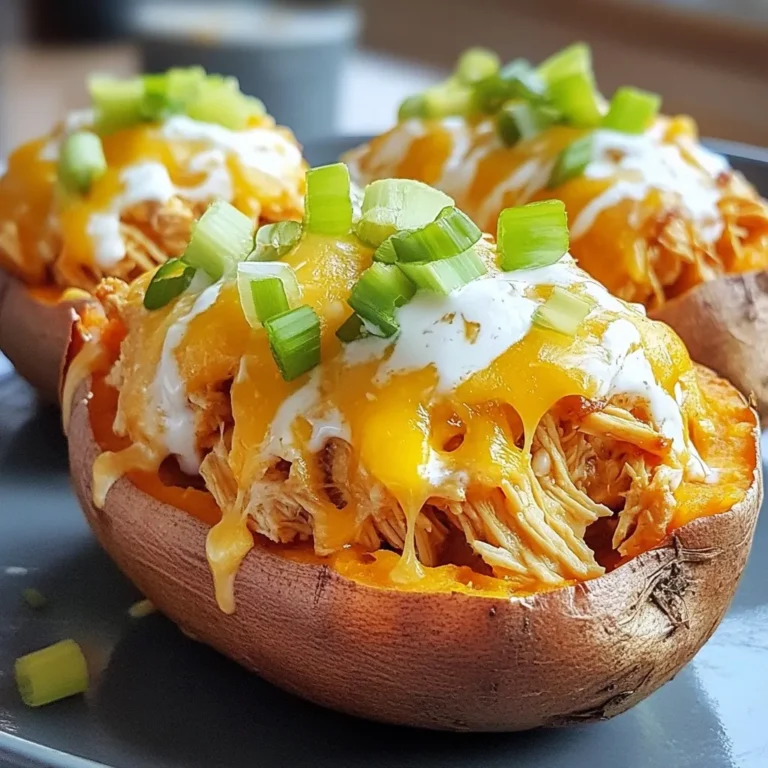
Buffalo Chicken Stuffed Sweet Potatoes Comfort Dish

To make a great Tomato Basil Bruschetta, you need: - 6 ripe Roma tomatoes, diced - 1 cup fresh basil leaves, finely chopped - 2 cloves garlic, minced - 2 tablespoons balsamic vinegar - 3 tablespoons extra virgin olive oil - Salt and freshly ground black pepper to taste - 1 French baguette, sliced into 1/2 inch pieces These fresh ingredients will create a tasty base for your bruschetta. The ripe tomatoes and fresh basil give it a bright flavor. The garlic adds a nice kick, while the balsamic vinegar and olive oil bring it all together. You can add some extra ingredients for more taste: - 1/4 cup shredded mozzarella cheese for garnish This cheese is great if you like a creamy touch. It melts just enough when you serve the bruschetta warm. When picking tomatoes and basil, look for vibrant colors. Choose tomatoes that feel firm but not hard. They should have a sweet smell. For basil, select leaves that are bright green and free from brown spots. Fresh ingredients make a big difference in flavor. Always go for the best quality you can find. First, gather your ingredients. You need 6 ripe Roma tomatoes, 1 cup of fresh basil leaves, and 2 cloves of garlic. Dice the tomatoes into small pieces. Chop the basil leaves finely. Then, mince the garlic. In a medium mixing bowl, combine the diced tomatoes, chopped basil, and minced garlic. Next, drizzle 2 tablespoons of balsamic vinegar and 3 tablespoons of extra virgin olive oil over the mix. Now, season with salt and freshly ground black pepper to taste. Gently toss everything together. Make sure each ingredient is coated well. Let this mixture sit for about 15 minutes. This waiting time helps the flavors blend nicely. While your tomato mixture rests, it’s time to prepare the baguette. Preheat your oven to 375°F (190°C). Slice a French baguette into 1/2 inch pieces. Arrange the baguette slices on a baking sheet. Brush one side of each slice with olive oil. This step adds flavor and helps them toast well. Place the baking sheet in the oven. Toast the baguette slices for about 5-7 minutes. Watch them closely. You want them golden and crispy but not burnt. Once toasted, remove the baguette slices from the oven. Let them cool for a minute before adding the tomato mix. Now comes the fun part—assembly! Take your toasted baguette slices and spoon the tomato and basil mixture onto the toasted side. Be generous with the topping, as it adds a burst of flavor. If you like, sprinkle some shredded mozzarella cheese on top for extra creaminess. Serve the bruschetta right away. You can add extra basil leaves or a drizzle of balsamic vinegar for a nice touch. Enjoy your delicious and fresh appetizer! To make the best tomato basil mixture, use ripe Roma tomatoes. They are sweet and juicy. Dice them into small pieces for easy bites. Fresh basil adds bright flavor, so chop it finely. Minced garlic gives a nice kick. Combine these in a bowl. Drizzle balsamic vinegar and olive oil for depth. Add salt and pepper to taste. Mix gently and let it sit for 15 minutes. This resting time helps the flavors blend well. For toasting the bread, preheat your oven to 375°F (190°C). Slice a French baguette into 1/2 inch pieces. Brush one side with olive oil for a golden crust. Arrange the slices on a baking sheet. Bake for 5-7 minutes until crispy. Keep an eye on them to prevent burning. A perfectly toasted bread adds crunch and holds the topping well. Serve the bruschetta right after you assemble it. Spoon the tomato basil mixture generously on the toasted side. If you want extra flavor, sprinkle shredded mozzarella cheese on top. Garnish with more basil leaves for color. Drizzle some balsamic vinegar before serving for a fancy touch. This dish is best enjoyed fresh, sharing it with friends or family. {{image_2}} You can switch up your bruschetta with fun toppings. Try adding sliced avocados for a creamy twist. You can also use roasted peppers for a smoky flavor. If you love cheese, sprinkle some feta or goat cheese on top. These toppings add new tastes while keeping the fresh vibe. Feel free to adjust the recipe to fit your needs. For a vegan option, skip the cheese or use a plant-based cheese. If you want a gluten-free version, use gluten-free bread. You can also cut down on oil for a lighter dish or add more garlic for a punchy kick. The key is to keep the balance of flavors. Presentation makes a big difference! You can serve bruschetta on a large platter for sharing. Or, stack the toppings on small toast bites for a fun appetizer. Another idea is to serve the tomato mixture in a bowl with toasted bread on the side. This lets guests build their own bites. Each style adds a unique touch to your meal. To store leftover bruschetta, place it in an airtight container. Keep it in the fridge. Make sure to separate the tomato mixture from the toasted bread. The bread can get soggy if mixed. Store the tomato mix for up to two days. When you want to eat it again, reassemble the bruschetta. To reheat toasted baguette, use your oven. Preheat it to 350°F (175°C). Place the slices on a baking sheet. Heat for about 5 minutes until warm. You can also use a toaster oven for this. Avoid the microwave; it makes the bread chewy. Fresh tomatoes last about one week in the fridge. Basil leaves stay fresh for up to five days. Olive oil can last for a year if stored well. Balsamic vinegar keeps for several years. Garlic lasts about a month when stored cool and dry. Always check ingredients for freshness before use. Yes, you can prepare the tomato mixture ahead of time. Just mix the diced tomatoes, basil, garlic, balsamic vinegar, and olive oil. Store it in the fridge for up to a few hours. This lets the flavors blend well. However, do not toast the bread until you are ready to serve. Toasting the bread keeps it crispy and fresh. Roma tomatoes are the best choice for bruschetta. They are juicy but not too watery. Their firm texture holds up well on the bread. You can also use vine-ripened tomatoes for a sweeter taste. Always choose ripe, fresh tomatoes for the best flavor. To make bruschetta gluten-free, use gluten-free bread. Many stores sell good options now. Look for gluten-free baguettes or artisan bread. Follow the same steps for toasting and topping. You’ll still enjoy that great flavor without the gluten! To sum up, we explored how to make delicious Tomato Basil Bruschetta. We covered essential and optional ingredients, plus tips for selecting fresh produce. You learned step-by-step instructions for preparing the mixture, toasting the baguette, and assembling each bite. I shared tips for perfect flavors and serving ideas. We also looked at fun variations and how to store leftovers. With these tips, you can impress your family and friends. Enjoy your cooking adventure, and remember to experiment with new flavors!

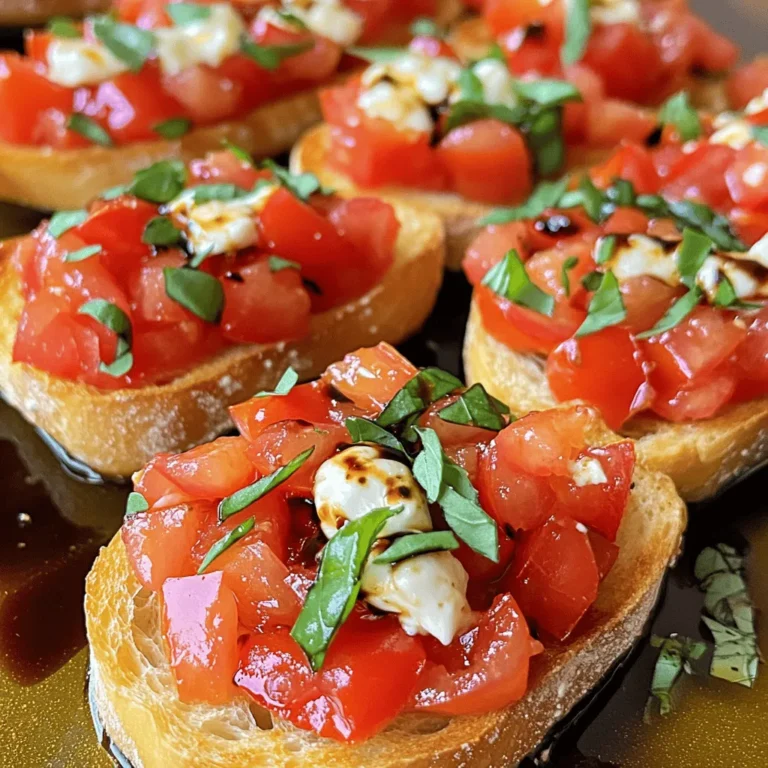
Tomato Basil Bruschetta Simple and Tasty Appetizer

For this recipe, I use 2 cups of mixed nuts. You can choose from almonds, cashews, walnuts, or pecans. Each nut adds a unique crunch and flavor. Almonds are great for their crispness. Cashews offer a soft and creamy bite. Walnuts lend a rich taste, while pecans bring a sweet note. Mixing these nuts creates a tasty blend that is hard to resist. Sriracha sauce is key for this recipe. I recommend using a brand that has a good balance of heat and flavor. Look for one that uses fresh chili peppers. This will give a bold kick to your nuts. If you prefer a milder taste, you can add less sauce. Adjusting the amount can help you control the heat level. Honey adds sweetness to our spicy nuts. I like to use raw honey for its rich flavor. You can also try flavored honey, like orange or lavender, for an extra twist. If you're looking for a vegan option, maple syrup works well too. It adds sweetness without losing that sticky texture we want. First, set your oven to 350°F (175°C). This heat will roast the nuts just right. Next, line a baking sheet with parchment paper. This helps the nuts not stick and makes cleanup easy. In a large bowl, mix together the honey, Sriracha sauce, olive oil, sea salt, smoked paprika, garlic powder, and black pepper. Stir well until all the items blend into a smooth mixture. This coating adds the sweet and spicy flavor that makes these nuts special. Now, add the mixed nuts to your bowl. Toss them in the coating until each nut is covered. Spread the nuts in a single layer on the baking sheet. Roast them in the oven for 15-20 minutes. Stir the nuts halfway through. This helps them roast evenly. When they turn golden brown and smell great, take them out. Let them cool on the baking sheet; they will get crispier as they cool. To get the best roast, watch the nuts closely. Nuts can go from golden to burnt fast. Stir them halfway through the roasting time. This helps them brown evenly. You want them crispy and fragrant, not bitter. Keep your Sriracha honey roasted nuts fresh in an airtight container. Store them in a cool, dry place. They will stay good for up to two weeks. If you want to keep them longer, try freezing them. Just make sure they are in a freezer-safe bag. These nuts make a great snack for any occasion. Serve them in a nice bowl for parties. You can also pack them in small bags for gifts or to take on the go. They add a spicy-sweet kick to cheese boards too. Enjoy them with drinks or as a topping for salads. {{image_2}} You can mix things up by using different nuts. Almonds, cashews, walnuts, and pecans all work well. You can also try peanuts or macadamia nuts for a twist. Each nut brings its own flavor and crunch. Experiment with what you like best. If you want more heat, add extra Sriracha. For a milder taste, cut back on the sauce. You can also add cayenne pepper or chili powder for more spice. Taste the mixture before roasting to find your perfect level. Honey is great, but you can try maple syrup or agave. Each sweetener adds its own unique flavor. You could even use brown sugar for a different taste. Adjust the amount to match your sweetness preference. To keep your Sriracha honey roasted nuts fresh, store them in an airtight container. They can last up to two weeks at room temperature. Keep them away from heat and sunlight. This ensures they stay crunchy and flavorful. If you notice any signs of spoilage, like a funny smell, toss them out. I love using glass jars or plastic containers with tight lids. They keep air out and help maintain freshness. Avoid using paper bags or boxes, as they let air in. Label your containers with the date you made the nuts. This helps you track how long they have been stored. You can freeze these nuts for later use. Place the roasted nuts in a freezer-safe bag. Remove as much air as possible before sealing. They can last up to three months in the freezer. When you want to enjoy them, let them thaw in the fridge overnight. This keeps them from getting soggy. Yes, you can use unsalted nuts. Unsalted nuts let the Sriracha and honey shine through. If you prefer, add a pinch of salt to the coating mix. This balances the flavors well. It’s all about what you like best! You can adjust the spice level easily. To make it milder, use less Sriracha. You might also add more honey to tone it down. If you like it spicier, add extra Sriracha or some cayenne pepper. Taste as you go to find your perfect heat! Serve these nuts in a nice bowl for parties. They look great and taste even better! You can also pack them in small bags for gifts. They make a fun snack for road trips or movie nights. Enjoy them with friends or keep them for yourself! Roasting mixed nuts with sriracha and honey creates a tasty snack for everyone. We covered key ingredients, from nut choices to honey variations. I shared step-by-step instructions for mixing and roasting. Remember the tips for achieving the perfect roast and storing for freshness. You can try different nuts and adjust spice levels to suit your taste. Store your roasted nuts well for long-lasting flavor. Enjoy this crunchy treat at your next gathering or snack time!

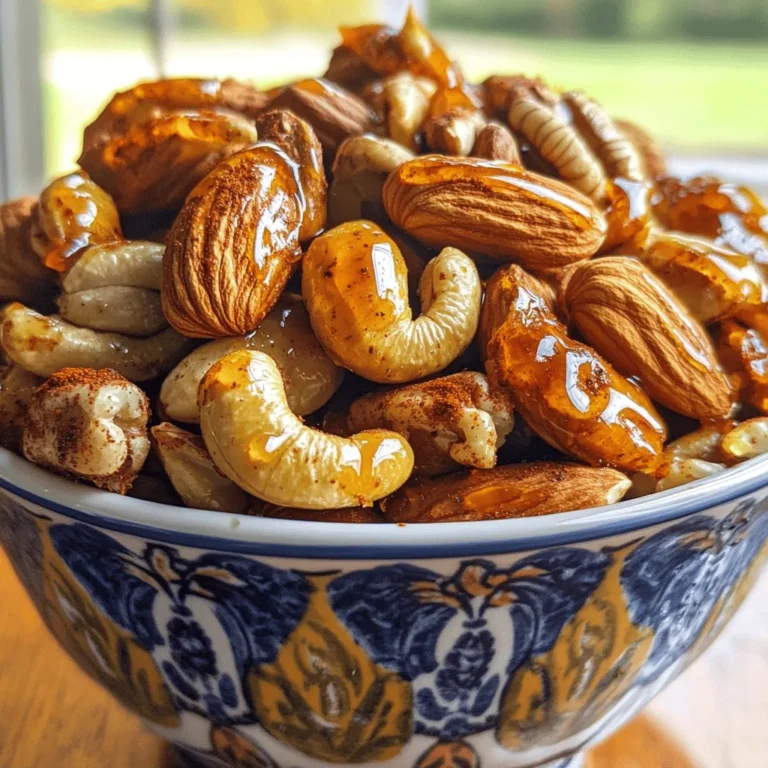
Sriracha Honey Roasted Nuts Crunchy and Flavorful Treat

- Chopped onion - Minced garlic - Diced carrot - Chopped red bell pepper - Diced zucchini - Canned chickpeas - Diced tomatoes - Ground cumin - Ground coriander - Ground cinnamon - Cayenne pepper - Salt and pepper - Olive oil - Vegetable broth - Fresh cilantro or parsley (for garnish) - Lemon wedges (for serving) When making Moroccan chickpea stew, fresh vegetables are key. You’ll want to start with a chopped onion. This gives your stew a great base. Next, add minced garlic for that lovely aroma. Diced carrots add sweetness and color, while the chopped red bell pepper brings a nice crunch. Diced zucchini adds a tender bite. For the canned goods, use two cups of canned chickpeas. Remember to drain and rinse them. This helps reduce the sodium level. A can of diced tomatoes adds a juicy texture and flavor. Now, let’s talk spices. Ground cumin and coriander give warmth. Ground cinnamon adds a touch of sweet spice. Cayenne pepper can kick up the heat, but adjust it to your taste. Don’t forget salt and pepper to enhance all the flavors. Finally, don’t skip the additional ingredients. Olive oil is essential for sautéing. Vegetable broth adds depth to the stew. Fresh cilantro or parsley makes for a beautiful garnish. Lemon wedges are perfect for serving, adding a zesty finish. Gather these ingredients, and you're ready to start your delicious stew! First, grab a large pot and heat two tablespoons of olive oil over medium heat. Next, chop one medium onion and add it to the pot. Sauté the onion until it turns translucent, which takes about five minutes. Then, mince two cloves of garlic and stir them in. Cook the garlic for one minute until you smell its great aroma. Now it’s time to add some color! Dice one large carrot, chop one red bell pepper, and dice one zucchini. Toss these into the pot and sauté them for five to seven minutes. You want them to soften a bit. After that, sprinkle in one tablespoon of ground cumin, one tablespoon of ground coriander, one teaspoon of ground cinnamon, and half a teaspoon of cayenne pepper. Don’t forget to add salt and pepper to taste. Stir everything well, coating the veggies with the spices, and cook for another two minutes. Now the magic happens! Pour in one can of diced tomatoes with their juices and two cups of drained and rinsed canned chickpeas. Then, add two cups of vegetable broth to the pot. Bring your mixture to a boil, then reduce the heat to low. Let it simmer uncovered for about 20 to 25 minutes. This will make the vegetables tender and blend all the flavors nicely. Taste it and adjust the seasoning if you need to. Enjoy your hearty stew! - Adjusting spice levels: Start with less cayenne pepper. You can add more later. Taste as you go. This way, you control the heat. - Ensuring vegetables are tender: Keep an eye on your cooking time. You want them soft, not mushy. Sauté them until they just begin to soften. This step adds great flavor. - Best garnishes: Fresh cilantro or parsley adds color and fresh taste. Chop it finely and sprinkle it on top just before serving. - Pairing options: This stew pairs well with crusty bread or fluffy couscous. You can serve it with lemon wedges for a zesty kick. - Overcooking vegetables: Don’t let them cook too long. They should be tender but still hold their shape. - Skipping seasoning: Always season your stew as you cook. Salt and pepper enhance the flavors of the dish. Taste it before you serve to adjust if needed. {{image_2}} You can mix in other beans for extra protein. Black beans or kidney beans work well. They add great texture and taste. Lentils are another option. They cook fast and soak up flavors nicely. You can use green or brown lentils. Just add them at the start to simmer with the stew. Feel free to swap in seasonal vegetables. Sweet potatoes add a nice sweetness. You can also use butternut squash for a creamy touch. Leafy greens can boost your stew’s nutrition. Spinach or kale are perfect. Add them near the end to keep them bright and fresh. Want to spice things up? Adding harissa gives a nice kick. It’s a North African chili paste that brings warmth. You can also experiment with different herbs. Fresh mint or dill can brighten the stew. Just stir them in before serving for a fresh taste. To store leftovers, place the stew in an airtight container. Make sure it cools down first. This will help keep the flavors fresh. In the fridge, your Moroccan chickpea stew lasts about 3 to 5 days. Always check for any signs of spoilage before eating. For freezing, let the stew cool completely. Then, pour it into freezer-safe bags or containers. Leave some space at the top, as it will expand when frozen. This stew can last up to 3 months in the freezer. When you want to eat it, take it out and let it thaw in the fridge overnight. To reheat, you can use a pot on the stove. Heat it on low and stir often. This helps keep the flavors strong. You can also use a microwave. Just cover it and heat in short bursts, stirring in between. This way, you avoid overcooking and keep the taste vibrant. Moroccan Chickpea Stew is a warm and hearty dish. It features chickpeas, lots of veggies, and rich spices. This stew comes from Morocco, a country famous for its vibrant flavors and spices. It blends sweet and savory notes, making each bite memorable. Making this stew takes about 40 minutes. You’ll spend 15 minutes prepping the ingredients. The cooking time is around 25 minutes, where flavors develop beautifully. Yes, you can make this stew ahead of time. Chop your veggies and store them in the fridge. You can also make the stew a day before. Just cool it down, store it in an airtight container, and keep it in the fridge. Absolutely! Chickpeas are full of protein and fiber. They help keep you full and satisfied. The veggies add vitamins and minerals, making this stew a balanced meal. Plus, it’s low in fat, especially when you use less oil. To add spice, use more cayenne pepper. You can also add fresh chili peppers for heat. Another option is to include harissa, a North African chili paste. Adjust the spice to fit your taste preferences! In this article, we explored how to make Moroccan Chickpea Stew with fresh veggies, canned goods, and spices. I shared tips for cooking, serving, and storing the dish. Remember, adjusting spices and using seasonal veggies can tweak flavors to your liking. Final thoughts: This stew is not just tasty but healthy too. Try it with friends or family for a delightful meal. Enjoy the warmth it brings!

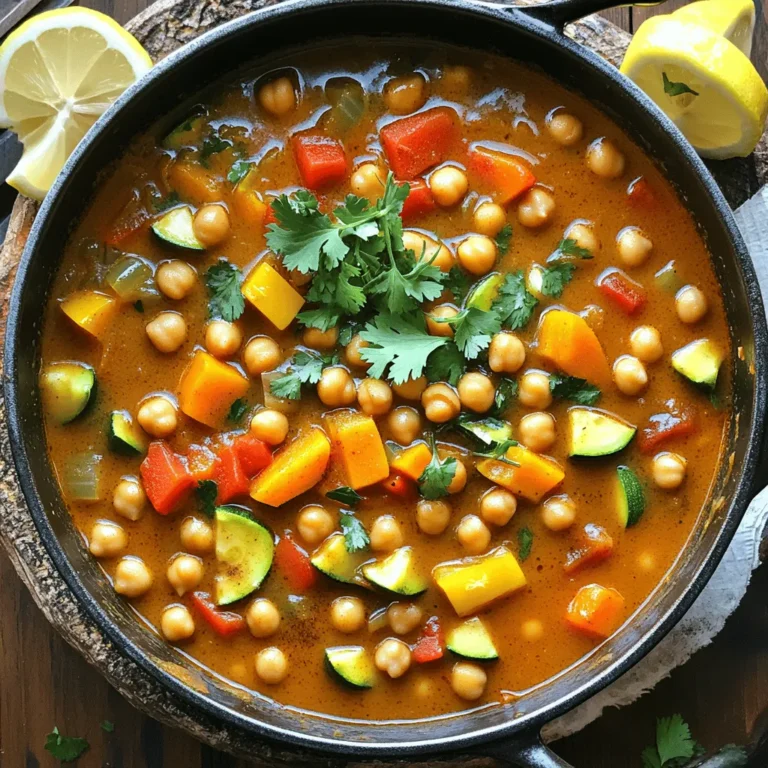
Moroccan Chickpea Stew Hearty and Flavorful Dish

To make this tasty soup, you will need the following main ingredients: - 1 lb (450g) chicken breast, diced - 1 tablespoon olive oil - 4 cloves garlic, minced - 1 medium onion, chopped - 3 medium carrots, diced - 2 stalks celery, diced - 4 cups chicken broth - 1 cup heavy cream - 2 cups potato gnocchi - 1 cup fresh spinach - 1 cup grated Parmesan cheese - 1 teaspoon dried thyme - 1 teaspoon dried oregano - Salt and pepper to taste - Fresh parsley for garnish These ingredients blend together to create a rich and creamy flavor that warms the soul. Feel free to customize your soup with these optional ingredients: - Add diced potatoes for extra heartiness. - Toss in some frozen peas for a pop of color. - Use kale instead of spinach for a different green. - Sprinkle in red pepper flakes for a little heat. These options let you make the soup your own, based on what you like and have on hand. To cook this delicious soup, gather these tools: - A large pot for cooking - A cutting board for chopping - A sharp knife for easy slicing - A wooden spoon for stirring - Measuring cups and spoons for accuracy - Bowls for serving Having the right tools makes cooking smooth and fun, helping you create a delightful meal. First, gather all your ingredients. You need: - 1 lb chicken breast, diced - 1 tablespoon olive oil - 4 cloves garlic, minced - 1 medium onion, chopped - 3 medium carrots, diced - 2 stalks celery, diced - 4 cups chicken broth - 1 cup heavy cream - 2 cups potato gnocchi - 1 cup fresh spinach - 1 cup grated Parmesan cheese - 1 teaspoon dried thyme - 1 teaspoon dried oregano - Salt and pepper to taste - Fresh parsley for garnish Next, prepare the chicken. Dice it into small pieces. This helps it cook evenly. Chop the onion, carrots, and celery. Keep them small so they cook quickly. Mince the garlic as well. Heat a large pot over medium heat. Add the olive oil and let it warm up. Once the oil is hot, add the diced chicken. Season it with salt and pepper. Cook for about 5-7 minutes. Make sure the chicken turns golden brown. After the chicken is cooked, take it out and set it aside. In the same pot, add the chopped onion, carrots, and celery. Sauté these veggies for 5-6 minutes until they soften. Now, stir in the minced garlic. Cook it for another 1-2 minutes until it smells great. Pour in the chicken broth and bring it to a boil. Add the dried thyme and oregano for flavor. Once it boils, reduce the heat. Add the potato gnocchi to the pot. Let it simmer for 3-4 minutes. The gnocchi will float when it’s done. Turn the heat to low. Stir in the heavy cream, cooked chicken, fresh spinach, and grated Parmesan cheese. Cook for another 2-3 minutes until the spinach wilts and the cheese melts. Taste your soup. Adjust the seasoning with more salt and pepper if needed. For serving, use large bowls. Garnish with fresh parsley and a sprinkle of Parmesan cheese on top. Serve with crusty bread for dipping. Enjoy your creamy garlic Parmesan chicken gnocchi soup! You can save time by prepping ingredients first. Chop the onion, carrots, and celery ahead of time. You can even dice the chicken breast the night before. If you use pre-cooked chicken, your soup cooks even faster. Just add it in when you pour in the broth. Using a pre-made broth cuts down on time too. To get that rich, creamy texture, use cold heavy cream when adding to the pot. Stir it in slowly while the heat is low. This helps the cream mix well without curdling. Grating fresh Parmesan cheese right before you add it makes a big difference. It melts beautifully and adds a nice touch. You can boost the flavor by adding a splash of lemon juice. It brightens the soup and balances the richness. Consider adding some chopped fresh herbs like basil or thyme. They add freshness and depth. A pinch of red pepper flakes can give a nice kick if you like heat. {{image_2}} You can easily make a vegetarian version of this soup. Just skip the chicken. Instead, add more veggies like bell peppers or zucchini. You can also use vegetable broth instead of chicken broth. This keeps the soup rich and flavorful. Don’t forget to add extra Parmesan cheese for that creamy texture. If you like heat, try a spicy version. Add red pepper flakes or diced jalapeños to the soup. You can mix them in while cooking the garlic. This gives the soup a nice kick. Always taste as you go, so you can find the right spice level for you. For a dairy-free soup, swap the heavy cream with coconut milk or almond milk. Use nutritional yeast instead of Parmesan cheese for a cheesy flavor. This way, you keep the soup creamy and delicious, but without dairy. Just make sure to check the labels for any added sugars or preservatives. After enjoying your Garlic Parmesan Chicken Gnocchi Soup, let it cool. Pour the soup into an airtight container. Seal it well to keep out air. This helps the soup stay fresh. You can store it in the fridge for up to 3 days. If you want it to last longer, consider freezing it. To reheat, you can use the stove or microwave. If using the stove, pour the soup into a pot. Heat it on low, stirring often. This keeps the soup from sticking. For the microwave, place the soup in a bowl. Cover it loosely to allow steam to escape. Heat in 1-minute bursts, stirring in between. This helps heat it evenly. To freeze your soup, first cool it completely. Use freezer-safe containers or bags. Leave some space at the top for expansion. Label each container with the date. You can freeze the soup for up to 3 months. When you’re ready to eat, thaw it overnight in the fridge. Then reheat it as explained above. This way, you can enjoy this delicious soup anytime! If you want a lighter soup, you can use whole milk or half-and-half. For a dairy-free choice, try coconut milk or almond milk. These options change the flavor a bit, but they still add creaminess. Just remember, the soup won't be as rich. Yes, you can use store-bought gnocchi. It saves time and effort. Look for fresh or frozen gnocchi in your grocery store. They cook quickly and give the soup a nice texture. Just follow the package instructions to prepare them. You can tell the gnocchi is cooked when they float to the surface of the soup. This usually takes about 3-4 minutes. Once they rise, they are ready to eat. Make sure not to overcook them, as they can become mushy. You learned how to make Garlic Parmesan Chicken Gnocchi Soup. We covered key ingredients, optional add-ins, and tools you'll need. The step-by-step guide took you from prep to serving. I shared tips to save time and boost flavor. You also found variations for different diets and learned about proper storage. As you prepare this soup, remember it’s all about personal touches. Enjoy the process, and make this dish your own!

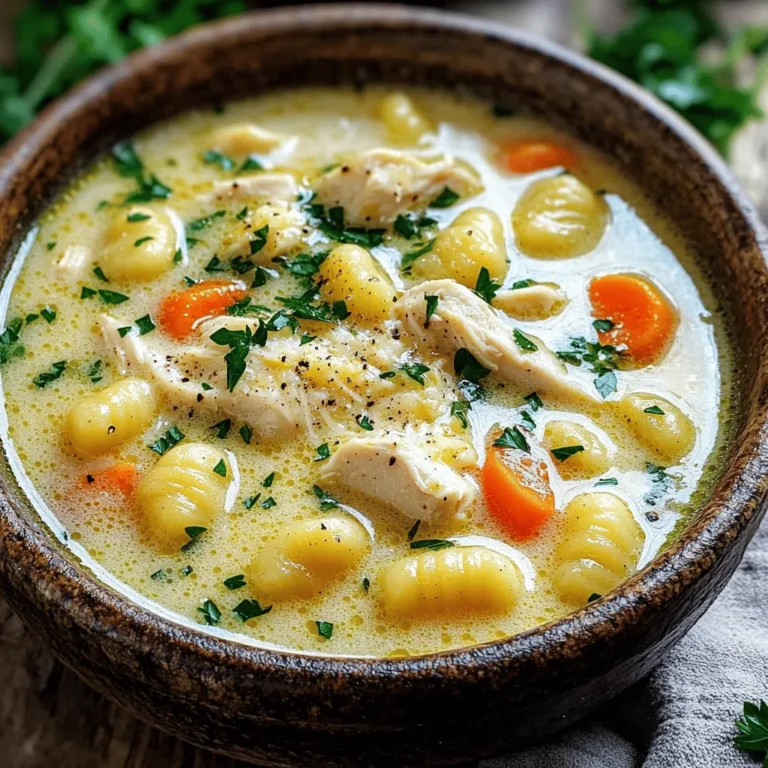
Garlic Parmesan Chicken Gnocchi Soup Simple Delight

- 1 cup uncooked jasmine rice - 2 ½ cups vegetable broth - 2 cups broccoli florets - 1 cup shredded sharp cheddar cheese - 1 cup milk - 2 tablespoons butter - 1 medium onion, finely chopped - 2 cloves garlic, minced - ½ teaspoon paprika - Salt and pepper to taste - ¼ cup grated Parmesan cheese (optional) When I make Cheesy Broccoli Rice Skillet, I love how simple the ingredients are. You start with jasmine rice for a lovely texture. The vegetable broth adds nice flavor. Fresh broccoli brings color and nutrients. Sharp cheddar cheese makes it creamy and rich. Milk helps blend everything together. Butter gives a nice base for the onions and garlic. I chop the onion finely to release its sweetness. Minced garlic adds that amazing aroma. Paprika gives it a slight kick. Lastly, salt and pepper season the dish perfectly. If I want to be extra fancy, I sprinkle some Parmesan cheese on top. - Large skillet - Measuring cups and spoons - Wooden spoon or spatula - Knife and cutting board Using the right tools makes cooking easier. A large skillet is key for all the ingredients. Measuring cups and spoons help with accuracy. I always use a wooden spoon or spatula for stirring. A sharp knife and cutting board make chopping quick and safe. These tools ensure that my Cheesy Broccoli Rice Skillet turns out just right every time. Step 1: Melting the butter and sautéing onions Start by taking a large skillet. Place it on medium heat. Add 2 tablespoons of butter. Let it melt fully. Once melted, add 1 medium onion, finely chopped. Stir the onion often. Cook until it turns soft and translucent, about 3-4 minutes. Step 2: Adding minced garlic Next, stir in 2 cloves of minced garlic. Cook this for about 1 minute. You want it to smell nice and fragrant. This step adds great flavor to your dish. Step 3: Toasting the jasmine rice Now, add 1 cup of uncooked jasmine rice to the skillet. Stir well to coat the rice in the buttery onion mix. Toast the rice for 1-2 minutes. This step helps enhance the rice's flavor. Step 4: Bringing to a boil and simmering Pour in 2 ½ cups of vegetable broth. Bring it to a gentle boil. Then, reduce the heat to low. Cover the skillet and let it simmer for 12-15 minutes. Check that the rice is tender and the liquid is absorbed. Step 5: Cooking broccoli with rice Once your rice is cooked, add 2 cups of broccoli florets. Cover the skillet again. Cook for another 5 minutes. The broccoli should turn bright green and tender. Step 6: Stirring in milk and cheese Now, lower the heat and pour in 1 cup of milk. Stir well to combine. Add 1 cup of shredded sharp cheddar cheese, along with ½ teaspoon of paprika, salt, and pepper to taste. Cook this until the cheese melts and the dish becomes creamy, about 2-3 minutes. If you like, sprinkle on ¼ cup of grated Parmesan cheese for extra flavor. Enjoy the rich, cheesy goodness! To prevent the rice from sticking, you must toast it first. Toasting rice adds flavor and helps it stay separate. Heat your skillet with butter, then add the uncooked jasmine rice. Stir for 1-2 minutes until it's lightly golden. This step is key to a perfect texture. When you add the broth, be sure to use a gentle simmer. If it boils too hard, the rice can clump together. Cover the skillet tightly so steam builds up. This keeps the rice moist and fluffy. For a creamy texture, sharp cheddar cheese works best. It melts beautifully and adds a great flavor. You can also mix in some mozzarella for extra creaminess. It gives the dish a nice stretch. To achieve that extra cheesiness, don’t hold back on the cheese. Add more than the recipe calls for. A sprinkle of grated Parmesan on top brings an amazing finish. Let it melt slightly for a cheesy crust that everyone will love. {{image_2}} You can easily swap ingredients to suit your taste. For example, using brown rice instead of jasmine rice adds a nutty flavor and extra fiber. Brown rice takes longer to cook, so adjust your broth and cooking time. Adding proteins like chicken or shrimp makes this dish heartier. Cook the chicken in the skillet first, then add the rice. If you choose shrimp, add it during the last few minutes of cooking. This keeps the shrimp juicy and tender. To make your Cheesy Broccoli Rice Skillet more exciting, consider adding spices for a kick. A pinch of cayenne or some crushed red pepper flakes can boost the heat. You can also try adding garlic powder or onion powder for more depth. Incorporating different vegetables can also change the dish. Peas, bell peppers, or even carrots add color and nutrition. Just make sure to adjust the cooking times so everything is tender. To keep your Cheesy Broccoli Rice Skillet fresh, store it in an airtight container. Place it in the fridge. It will stay good for about 3 to 4 days. Make sure it cools down to room temperature before sealing. This helps prevent moisture buildup. If you want to save it longer, consider freezing. For freezing, use a freezer-safe container. You can also use freezer bags. Remove as much air as you can before sealing. This will help avoid freezer burn. The dish can last in the freezer for up to 2 months. When you are ready to eat your leftovers, reheating is easy. You can use the microwave or the stove. If using the microwave, put it in a safe dish. Heat in short intervals, stirring often. This helps heat it evenly. If you prefer the stove, place it in a skillet over low heat. Add a splash of milk to help keep it creamy. Stir gently as it warms up. Avoid cooking it too fast to keep the rice and broccoli tender. Enjoy your comforting meal again! How can I make this recipe gluten-free? To make this Cheesy Broccoli Rice Skillet gluten-free, you can substitute the vegetable broth. Use gluten-free vegetable broth or water instead. The rice itself is gluten-free, so you won’t lose flavor or texture. Always check labels to ensure your ingredients are gluten-free. Can I use frozen broccoli instead of fresh? Yes, you can use frozen broccoli. It is quick and easy. Just add it in the same step as fresh broccoli. Cook until heated through and bright green. Your dish will still be tasty and creamy. What can I serve with Cheesy Broccoli Rice Skillet? This dish pairs well with grilled chicken or fish. You can also serve it with a fresh salad. A side of crusty bread adds a nice touch too. Feel free to get creative with sides that you enjoy! Is this dish suitable for meal prep? Yes, this dish is great for meal prep. It stores well in the fridge for up to four days. Just reheat in the microwave or on the stove. You can enjoy it for lunch or dinner throughout the week! This blog post covers a tasty Cheesy Broccoli Rice Skillet. We explored the ingredients needed, tools to use, and a simple step-by-step guide. I shared tips for cooking and ideas to vary the dish. Keeping leftovers fresh and answering common questions were also key points. This dish is easy to make and great for any meal. Try it out, and enjoy!

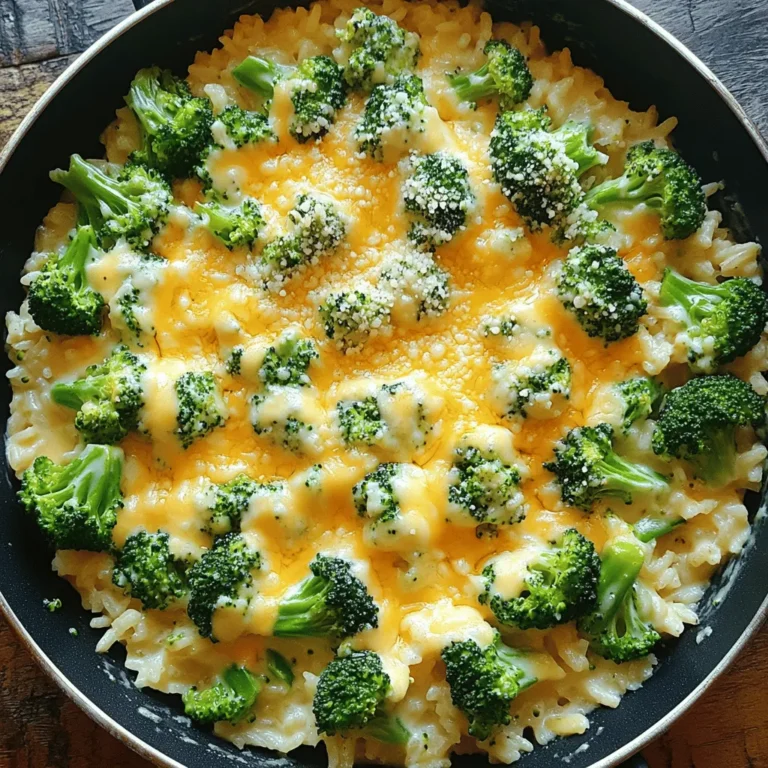
Cheesy Broccoli Rice Skillet Flavorful Comfort Meal

To make crispy air fryer Brussels sprouts, gather these simple ingredients: - 1 lb Brussels sprouts, trimmed and halved - 2 tablespoons olive oil - 1 teaspoon garlic powder - 1/2 teaspoon smoked paprika - Salt and pepper to taste For a little extra flavor, consider these optional ingredients: - 1/4 cup grated parmesan cheese - 1 tablespoon balsamic glaze (for drizzling) When picking Brussels sprouts, look for bright green ones. They should feel firm and compact. Avoid any that have yellow leaves or dark spots. Fresh sprouts will give you the best crunch and flavor. Always choose sprouts of similar size for even cooking. {{ingredient_image_1}} Start by washing 1 pound of Brussels sprouts. Try to pick fresh ones that are firm. Trim the ends and cut each sprout in half. This helps them cook evenly. In a large bowl, mix the halved Brussels sprouts with 2 tablespoons of olive oil. Add 1 teaspoon of garlic powder and 1/2 teaspoon of smoked paprika. Sprinkle salt and pepper to taste. Toss everything until each sprout is coated well. Next, preheat your air fryer to 375°F (190°C). Let it heat for about 5 minutes. This step gets your sprouts crispy. Place the Brussels sprouts in a single layer in the air fryer basket. Avoid crowding them. You may need to cook in batches. Air fry for 15 to 18 minutes. Shake the basket halfway through the cooking time. This ensures they cook evenly. They should turn golden brown and crispy. Once done, take the sprouts out of the air fryer. If you like, sprinkle 1/4 cup of grated parmesan cheese over the hot sprouts. Toss them gently to coat. Serve the Brussels sprouts hot. You can also drizzle balsamic glaze over them for extra flavor. Enjoy your crispy delight! To make your Brussels sprouts super crispy, start with dry sprouts. After washing, pat them down with a towel. The less moisture, the better. Use enough olive oil to coat them, but not too much. You want just enough to help the spices stick. Spread them out in a single layer in the air fryer. This way, hot air can move around them. Shake the basket halfway through cooking for even crispiness. Aim for that golden brown color; it shows they are perfectly cooked. One big mistake is overcrowding the air fryer. If you pack too many in, they won’t crisp up. Cook in batches if needed. Another mistake is not shaking the basket. Doing this helps them cook evenly. Make sure to keep an eye on the time. Overcooking can lead to a burnt taste. Lastly, skip the cheese if you want pure crispiness. Cheese can soften them up. You can mix up the flavors with different spices. Try adding cayenne for heat or lemon zest for brightness. A mix of Italian herbs can also give a nice twist. You can even use soy sauce for an umami boost. If you want something sweet, drizzle honey before serving. Each option brings a new taste to the dish. Enjoy experimenting with your favorite flavors! Pro Tips Choose Fresh Brussels Sprouts: Select firm, bright green Brussels sprouts with tight leaves for the best flavor and texture. Don’t Skip the Olive Oil: The olive oil helps to achieve that crispy texture and enhances the flavor of the spices. Experiment with Seasonings: Feel free to add other spices like cayenne pepper or lemon zest for an extra kick! Serve Immediately: For the best crunch, serve the Brussels sprouts right after air frying, as they can lose crispiness over time. {{image_2}} You can change up the flavor of Brussels sprouts by adding different spices. Try using cumin for a warm taste. A pinch of chili powder can add some heat. For a sweet twist, sprinkle cinnamon or nutmeg. Mixing in some lemon zest gives a fresh, bright flavor. You can also add herbs like thyme or rosemary for an earthy touch. Making this dish vegan is easy. Simply leave out the parmesan cheese. You can add nutritional yeast instead for a cheesy taste. It gives a nice flavor and boosts nutrients. For a more filling dish, toss in some cooked quinoa or chickpeas after cooking. This way, you get a full meal with your crispy sprouts. I love to serve these Brussels sprouts with tasty dips. Try a simple garlic aioli or a spicy sriracha mayo. Both options add great flavor. You can also pair them with soy sauce or tamari for an umami kick. Drizzling balsamic glaze on top adds sweetness. It makes each bite even more delicious. Once you finish your crispy air fryer Brussels sprouts, let them cool. Place them in an airtight container. Store them in the fridge. They will last for about 3 days. If you want them to stay fresh, do not add the balsamic glaze until ready to eat. To reheat your Brussels sprouts, use the air fryer again. Set it to 350°F (175°C). Heat them for about 5-7 minutes. This will keep them crispy. You can also use a skillet on medium heat. Just stir them gently until warm. You can freeze Brussels sprouts for later. First, blanch them in boiling water for 2-3 minutes. Then, let them cool quickly in ice water. Drain and dry them well. Place the sprouts in a freezer bag. They can last up to 3 months frozen. When ready to use, cook them straight from the freezer. It takes about 15 to 18 minutes to cook Brussels sprouts in an air fryer. I preheat my air fryer to 375°F (190°C) first. Then, I air fry the sprouts until they turn golden brown and crispy. I always shake the basket halfway through to help them cook evenly. Yes, you can use frozen Brussels sprouts. However, they may not get as crispy as fresh ones. If you use frozen, cook them a bit longer, about 20 to 25 minutes. Make sure to thaw and drain them well before cooking to remove excess moisture. For crispy Brussels sprouts, I love drizzling balsamic glaze for a sweet touch. You can also try ranch dressing or a spicy aioli for a kick. Another great option is a garlic herb dip, which complements the flavors nicely. You now know how to make crispy Brussels sprouts in an air fryer. We covered essential ingredients, step-by-step cooking, and tips for success. You can explore tasty variations and proper storage methods to enjoy later. Remember, fresh Brussels sprouts and careful prep lead to the best results. Avoid common mistakes for the perfect crunch. Keep experimenting with flavors to find your favorites. With these tips, you'll impress everyone with your dishes, making healthy eating fun and delicious.

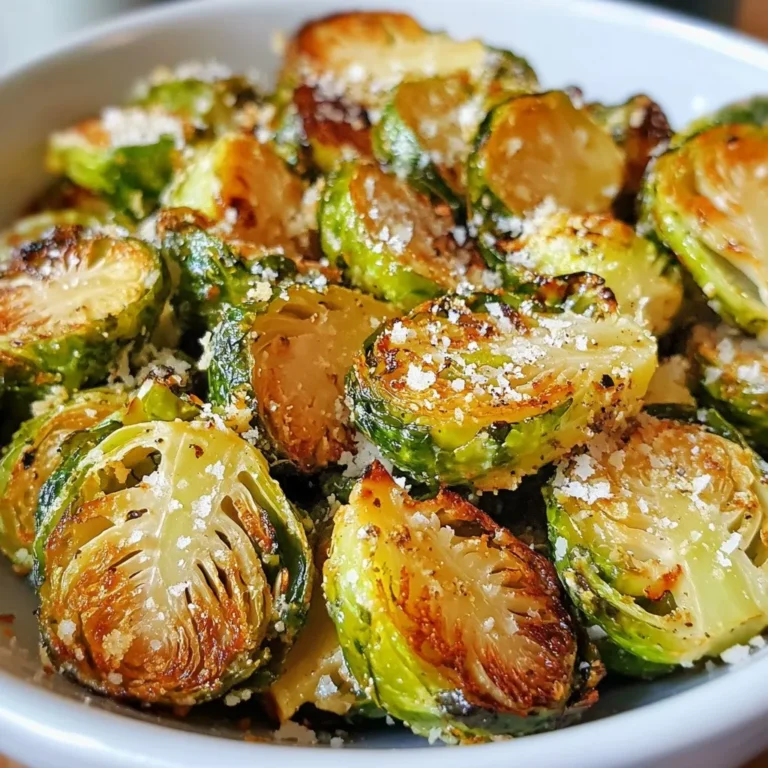
Crispy Air Fryer Brussels Sprouts Perfectly Cooked Delight

- 2 ripe mangoes, diced - 1 frozen banana - 1 cup coconut milk (or almond milk) - 1/2 cup Greek yogurt - 1 tablespoon honey or maple syrup (optional) - 1 tablespoon chia seeds - Toppings: sliced kiwi, coconut flakes, granola, fresh mint leaves You need ripe mangoes for sweetness and flavor. Frozen bananas make the bowl creamy. I love using coconut milk, but almond milk works too. Greek yogurt adds a nice tang and creaminess. If you want more sweetness, use honey or maple syrup. Chia seeds are a fantastic addition. They provide fiber and omega-3s. For toppings, I suggest sliced kiwi for color, coconut flakes for crunch, and granola for extra texture. Fresh mint leaves add a nice touch of freshness. Gather these ingredients. They will help you make a delicious tropical mango smoothie bowl. To start, gather your ingredients. You need two ripe mangoes, one frozen banana, one cup of coconut milk, half a cup of Greek yogurt, and some honey or maple syrup for sweetness if you like. 1. In a blender, combine the diced mangoes, frozen banana, coconut milk, Greek yogurt, and the sweetener. 2. Blend on high until the mix is smooth and creamy. This should take about 30 seconds. Make sure there are no lumps. If your smoothie is too thick, don't worry! You can easily fix this. Just add a bit more coconut milk to the blender. Blend again until you reach your desired thickness. Now it’s time for the fun part! Once your smoothie is blended, stir in one tablespoon of chia seeds. This adds a nice texture. Next, pour the smoothie into a bowl. Then, it’s time to arrange your toppings. Start with sliced kiwi. Next, sprinkle some coconut flakes and granola on top. Finally, add a few fresh mint leaves for color and extra flavor. Your tropical mango smoothie bowl is ready to enjoy! Using a high-speed blender is key for a smooth mango smoothie bowl. A strong blender breaks down the fruit fully. This gives you a creamy texture. I always choose a high-speed option for the best results. Also, use a frozen banana. It makes the smoothie thick and cold. This adds a nice texture to your bowl. How you arrange the toppings can make your bowl pop. Start with sliced kiwi in a circle on top. Next, add coconut flakes in a sprinkle. Then, layer some granola for crunch. Finally, place a few fresh mint leaves on top. This adds color and flavor. For an Instagram-worthy look, make it colorful and fun. Bright fruits catch the eye! To get the right sweetness, taste your smoothie before adding more sweetener. Start with a little honey or maple syrup first. Blend well and taste again. You want it sweet but not too sweet. Remember, the fruit adds natural sweetness too. Adjust slowly to find your perfect balance. {{image_2}} You can swap mangoes with other tropical fruits. Pineapple adds a sweet tang. Papaya brings a creamy texture. You can also try passion fruit for a tart flavor. Mixing these fruits can create a fun twist. Try blending mango with pineapple for a refreshing taste. You’ll enjoy the bright colors and new flavors. If you want a vegan or lactose-free option, use almond milk instead of coconut milk. You can also skip the Greek yogurt. Try using coconut yogurt or a nut-based yogurt. These options keep the smoothie bowl creamy and tasty. They also add a unique flavor twist. Toppings can change the whole vibe of your bowl. Sliced kiwi adds a bright green touch. Coconut flakes bring a chewy texture. Granola adds crunch and heartiness. Fresh mint leaves give a pop of color. You can even add nuts or seeds for extra nutrition. Mix and match to find your perfect combination! To keep your smoothie bowl fresh, store leftovers in an airtight container. Use the fridge for best results. It can last for about one day. Before eating, give it a good stir. If it seems thick, add a splash of coconut milk to thin it out. You can freeze smoothie components for later use. Peel and chop your mangoes and banana. Place them in a freezer bag. Remove as much air as possible before sealing. You can freeze the chia seeds in a separate bag. When ready, just blend them together with your milk and yogurt. This makes a quick and easy smoothie. Smoothie bowls are best served cold, so reheating is not usually needed. However, if you want a warm treat, gently heat it in the microwave. Use short bursts of about 15 seconds. Stir in between to prevent hot spots. Enjoy your smoothie bowl warm or cold! To make a vegan tropical mango smoothie bowl, swap dairy items for plant-based ones. Use almond milk instead of coconut milk. Replace Greek yogurt with a vegan yogurt, like coconut or soy yogurt. If you want sweetness, use maple syrup instead of honey. These easy swaps keep the bowl creamy and tasty! Yes, you can use fresh mango. However, it may change the texture and flavor. Fresh mango adds a lighter taste. The smoothie bowl might be less thick and creamy without frozen fruit. If you pick fresh mango, consider adding a handful of ice to keep it cool and refreshing. Chia seeds are tiny powerhouses of nutrition. They are rich in fiber, protein, and healthy fats. Here are some benefits: - Fiber: Helps keep you full and aids digestion. - Omega-3 fatty acids: Good for heart health. - Protein: Supports muscle growth and repair. - Antioxidants: Help fight free radicals in the body. Adding chia seeds to your smoothie bowl boosts its health value! You can lower the calorie count with simple swaps. Use unsweetened almond milk instead of coconut milk. Skip the Greek yogurt or use a low-fat version. If you want it sweeter, try using less honey or maple syrup. You can also limit the toppings to reduce calories while still enjoying the flavors. This blog post shared a simple recipe for a tropical mango smoothie bowl. We covered the main ingredients, preparation steps, and ways to make it your own. You learned tips for blending, presentation, and sweetness adjustment. We also talked about variations, storage tips, and answered common questions. Enjoy making your smoothie bowl! It’s a fun way to be creative with flavors and toppings. You can tailor it to fit your taste or dietary needs. This dish not only tastes great but is also good for your health.

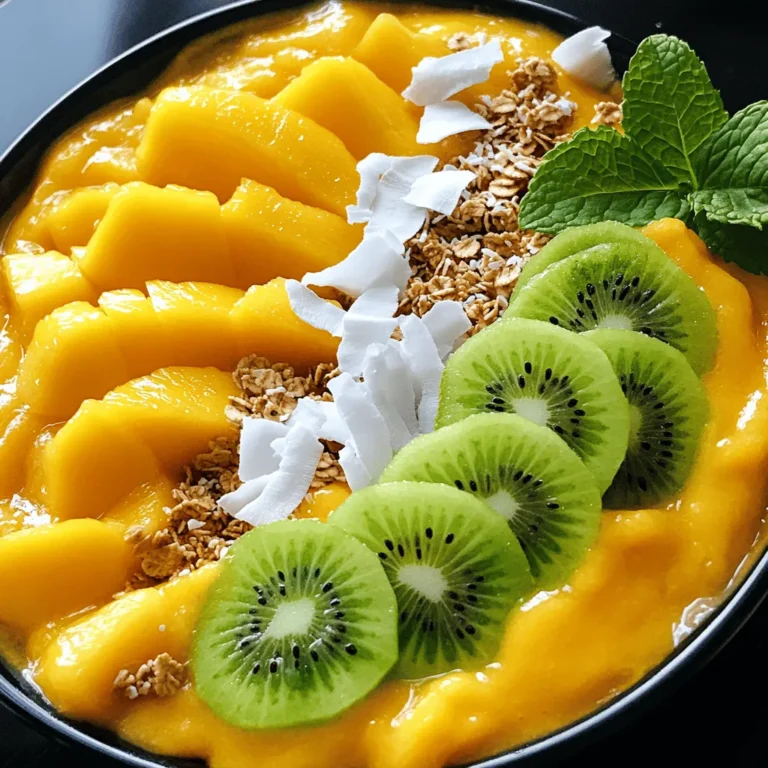
Tropical Mango Smoothie Bowl Healthy and Refreshing Treat

- 400g mushrooms (button or cremini), sliced - 1 large onion, chopped - 3 cloves garlic, minced - 2 cups vegetable broth - 1 cup coconut milk (or cashew cream) - 2 tablespoons soy sauce or tamari - 2 teaspoons Dijon mustard - 1 tablespoon olive oil - 2 tablespoons all-purpose flour (or gluten-free flour) - 1 teaspoon dried thyme - Salt and pepper to taste - Fresh parsley for garnish - 250g pasta of your choice (e.g., fettuccine, egg-free pasta) To create a delicious Vegan Mushroom Stroganoff, you need to gather quality ingredients. Start with fresh mushrooms, like button or cremini. These mushrooms offer great flavor and texture. A large onion adds sweetness and depth. Don't forget the garlic; it brings an aromatic punch to the dish. For the sauce, use vegetable broth for a rich base. Coconut milk or cashew cream adds creaminess. This is key for that comforting feel. Seasonings like soy sauce or tamari provide umami flavor. Dijon mustard adds a hint of tang. Olive oil helps sauté the vegetables perfectly. All-purpose flour thickens the sauce nicely. Dried thyme gives a subtle herbal note. Salt and pepper are essential for taste. Finally, don’t skip the fresh parsley. It brightens up the dish and adds color. When picking pasta, choose your favorite type. Fettuccine or egg-free pasta works well. This will soak up the creamy sauce beautifully. Gather these ingredients, and you are on your way to a hearty meal. Enjoy the process, and let your kitchen fill with wonderful smells! First, cook the pasta according to the package instructions. This usually takes about 8-10 minutes. Remember to check for the right texture. When it's ready, drain the pasta but save about 1/2 cup of the pasta water. This water will help to create a nice sauce later. In a large skillet, heat the olive oil over medium heat. Add the chopped onion and sauté until softened, about 5 minutes. The onion should be translucent. Next, add the minced garlic and sliced mushrooms to the skillet. Cook these for 6-8 minutes. The mushrooms should turn golden and any moisture should evaporate. This step adds great flavor to your dish. Once the vegetables are ready, sprinkle the flour over the mixture. Stir it well to mix. This will help thicken your sauce. Cook for 1-2 minutes to remove the raw flour taste. Now, gradually pour in the vegetable broth, stirring as you go. This helps avoid lumps. When the mixture begins to thicken, lower the heat. Add the coconut milk, soy sauce, Dijon mustard, and dried thyme. Stir everything together and let it simmer for 5-7 minutes until it becomes creamy. After your sauce is creamy, taste it. Adjust the seasoning with salt and pepper as needed. Now, mix in the cooked pasta, tossing it to coat well with the sauce. Let it heat through for about 2 minutes. Finally, serve the stroganoff on plates and garnish with fresh parsley. This adds a lovely color and fresh flavor to your dish. Enjoy your creamy vegan mushroom stroganoff! To make your vegan mushroom stroganoff super creamy, I suggest using cashew cream. It gives a rich flavor that can wow anyone. You can also adjust the coconut milk if you want a lighter taste. Start with one cup and taste as you go. Sautéing mushrooms well is key. Begin with a hot skillet and a bit of olive oil. Add sliced mushrooms and let them cook until they turn golden brown. This usually takes about 6 to 8 minutes. Make sure not to crowd the pan; otherwise, they will steam instead of sauté. After the mushrooms are done, add minced garlic. Timing is important, so add garlic in the last minute. This way, it will stay fragrant but won’t burn. If you are gluten-free, don’t worry! You can swap regular flour for gluten-free flour. Use the same amount. Also, choose gluten-free pasta. There are many options available. Just make sure to cook it according to package instructions. If you need more tips for gluten-free cooking, always check for cross-contamination and read labels carefully. {{image_2}} If you want a twist on the recipe, try these options: - Alternatives to mushrooms: You can use eggplant or jackfruit instead of mushrooms. Both give a nice texture. For added flavor, try lentils or chickpeas for a hearty bite. - Different types of pasta: While fettuccine works great, you can also choose penne, spaghetti, or even gluten-free pasta. Each type will change the feel of your dish. To make your stroganoff even better, consider these tips: - Adding nutritional yeast for cheesy flavor: Nutritional yeast adds a cheesy taste without dairy. Just sprinkle a few tablespoons into the sauce for a rich, savory boost. - Incorporating vegan protein options (e.g., tofu): For added protein, try adding cubed tofu or tempeh. This will make your dish more filling and nutritious. Don’t hesitate to play with spices and herbs: - Experimenting with fresh herbs: Fresh parsley is nice, but you can also use dill or basil. These herbs will brighten up the dish and add fresh notes. - Adding a kick with spices: If you like heat, add a pinch of cayenne pepper or red pepper flakes. This will bring warmth and excitement to your vegan mushroom stroganoff. After you enjoy your vegan mushroom stroganoff, store any leftovers in the fridge. Use an airtight container to keep it fresh. Make sure to cool the dish to room temperature before sealing. You can safely eat leftovers within 3 to 4 days. Always check for any off smells or changes in texture before consuming. To freeze vegan stroganoff, let it cool completely first. Then, place it in a freezer-safe container. Leave some space at the top, as the sauce will expand. You can freeze it for up to 3 months. When you're ready to eat, thaw it overnight in the fridge. Reheat it on low heat in a pan, adding a splash of vegetable broth if it seems too thick. For easy meal prep, you can make the sauce ahead of time. Store it in the fridge for up to 3 days. When you're ready to eat, cook your pasta and mix it with the sauce. This saves time on busy days. You can also pack it for lunch. Just keep the sauce and pasta separate until you're ready to enjoy your meal. Yes, you can easily make this recipe gluten-free. For the flour, you can use gluten-free all-purpose flour. Many brands offer great options. For the pasta, choose any gluten-free pasta you like. Cook it just like regular pasta. This way, you can still enjoy the creamy goodness of mushroom stroganoff without gluten. If you want a different taste, try using cashew cream. Just soak cashews in water, then blend them until smooth. You can also use soy milk or oat milk. These alternatives provide creaminess and flavor. Adjust the amount to fit your taste. To make your stroganoff richer, consider adding nutritional yeast. It gives a cheesy flavor without dairy. You can also add a splash of white wine for depth. A sprinkle of smoked paprika can add warmth. These tips will enhance the flavor and texture of your dish. Yes, there is a nut-free option! Instead of cashew cream, you can use silken tofu. Blend it until smooth for a creamy texture. You can also use sun-dried tomato paste for added richness. These options will help keep your stroganoff creamy and nut-free. Vegan mushroom stroganoff lasts about 3 to 5 days in the fridge. Store it in an airtight container to keep it fresh. When you reheat, add a splash of water or broth to restore creaminess. Enjoy your leftovers without worry! This vegan mushroom stroganoff recipe uses simple ingredients for a creamy, delicious meal. You prepare the pasta, cook the veggies, and blend them into a rich sauce. Remember tips for creaminess and gluten-free options for different diets. You can experiment with flavors and store leftovers easily. Enjoy making this dish your own. It’s not just tasty but also flexible to fit your needs. Keep cooking and have fun!

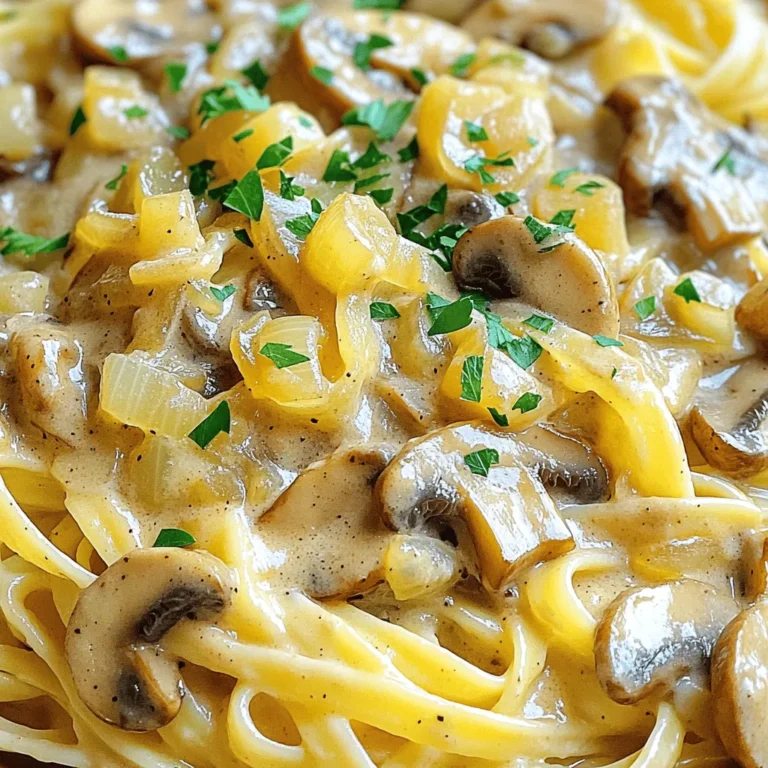
Vegan Mushroom Stroganoff Creamy Comfort Food Recipe

PREV 1 … 31 32 33 … 53 NEXT
cozy citrus kitchen

explore

DessertsDinnerAppetizersDrinks

Our Policies

  • Cookie Policy
  • Copyright Policy
  • Disclaimer
  • GDPR Policy
  • Terms Of Use
Back to Top
  • About
  • Contact Us
  • Privacy Policy
© 2025 cozy citrus kitchen