FREE DINNER EBOOK! Get your copy!
  • Cookie Policy
  • GDPR Policy
  • Disclaimer
  • Terms Of Use
  • Visit my other site: Fun Cookie Recipes
cozy citrus kitchen
  • Home
  • Dinner
  • Desserts
  • Drinks
  • Appetizers
  • Contact
  • About
  • Privacy Policy
  • Home
  • Dinner
  • Desserts
  • Drinks
  • Appetizers
  • Contact
  • About
  • Privacy Policy
  • Cookie Policy
  • GDPR Policy
  • Disclaimer
  • Terms Of Use
Visit my other site: Fun Cookie Recipes

HOME / CATEGORIES /

Latest

To make Slow Cooker Coconut Curry Lentils, you'll need a few simple ingredients. Here’s what to gather: - 1 cup dried green or brown lentils, rinsed - 1 can (14 oz) coconut milk - 1 cup vegetable broth - 1 medium onion, finely chopped - 2 cloves garlic, minced - 1 tablespoon fresh ginger, grated - 1 tablespoon curry powder - 1 teaspoon turmeric powder - 1 teaspoon cumin - 1 tablespoon soy sauce or tamari - 1 bell pepper, chopped (any color) - 1 cup diced tomatoes (canned or fresh) - 2 cups fresh spinach (optional) - Salt and pepper to taste - Fresh cilantro, for garnish - Lime wedges, for serving These ingredients blend together to create a rich, creamy curry. The lentils are the star of the dish, providing protein and fiber. Coconut milk adds a smooth texture and sweetness. The spices give it that warm, inviting flavor. Each vegetable adds its own touch, making every bite exciting. First, gather your base ingredients. You will need: - 1 cup dried green or brown lentils, rinsed - 1 can (14 oz) coconut milk - 1 cup vegetable broth - 1 medium onion, finely chopped - 2 cloves garlic, minced - 1 tablespoon fresh ginger, grated - 1 tablespoon curry powder - 1 teaspoon turmeric powder - 1 teaspoon cumin - 1 tablespoon soy sauce or tamari Place these items in your slow cooker. Stir them together well. This will form the rich base for your curry. Next, it's time to add vegetables and seasonings. Chop one bell pepper and add it to the slow cooker. You can use any color you like. Then, add one cup of diced tomatoes, either canned or fresh. Stir the mixture again to combine. Now, season your dish. Add salt and pepper to taste. This step is key for enhancing the flavors. Finally, set your slow cooker. Cover it with the lid. Choose low for 6-8 hours or high for 3-4 hours. This will let the lentils cook until they are tender. Understanding cooking times is important. The low setting allows for slow cooking. This helps the flavors blend well and the lentils to soften. The high setting cooks faster but may not develop the same depth of flavor. Lentils take about 6-8 hours on low or 3-4 hours on high. Check them for doneness before serving. They should be tender but not mushy. After cooking, it’s time for the final touches. If you want to add spinach, do this in the last 15 minutes. Stir it in and let it wilt. This adds a nice color and nutrition. When it's done, taste the curry. Adjust the seasoning if needed. For serving, ladle the lentil curry into deep bowls. Garnish with fresh cilantro. Don’t forget lime wedges on the side! These add a zesty kick. Enjoy your meal with rice or naan for a complete experience. To make your coconut curry lentils shine, adjust the seasoning to your taste. Start with salt and pepper. Add more if you want a stronger flavor. You can also add a bit of sweetness. A little brown sugar or honey can balance the spices well. If you like heat, try adding red pepper flakes or a dash of hot sauce. These tweaks can create a dish that's just right for you. Rinsing lentils is essential. It removes dust and any small stones. This step helps your dish taste fresh. Use cold water and rinse until it runs clear. Fresh ingredients also matter a lot. Use fresh garlic, onion, and spices for the best flavor. They make your curry taste vibrant and lively. Serving your lentils well can make a big difference. Use deep bowls for a nice look. Top each serving with fresh cilantro. The green color pops against the curry. Add lime wedges on the side for a zesty kick. Pair your dish with rice or naan. This adds texture and makes it more filling. The bright colors and fresh garnishes will impress anyone you serve. {{image_2}} You can easily switch up the lentils in this recipe. Try using black lentils or red lentils. Each type adds a unique taste and texture. If you want a grain base, swap lentils for quinoa or rice. These options cook well in a slow cooker too. Feel free to mix in different vegetables. Carrots, zucchini, or sweet potatoes work great. They add color and flavor to the dish. You can also toss in some peas or corn for extra sweetness. Spices can really change the dish. Experiment with paprika or garam masala. These spices bring warmth and depth to your curry. You could also add a pinch of cayenne for a spicy kick. If you're looking to boost protein, try adding chickpeas or tofu. They blend well with the lentils and absorb the curry flavors. You could even add cooked chicken for a heartier meal. To store your leftover lentils, let them cool first. This step keeps moisture from forming. Use airtight containers to keep them fresh. Glass or plastic containers work well. Label the containers with the date. This helps you know how long they have been stored. Refrigerate the lentils right away. They can last for up to five days in the fridge. When you want to enjoy your lentils again, reheating is easy. The best way is to use the stove. Just put the lentils in a pot over medium heat. Stir them often to avoid sticking. If they seem dry, add a splash of vegetable broth or water. You can also use a microwave. Heat in short bursts, stirring in between. This keeps them warm and tasty. Reheat until they are hot throughout, about 2-3 minutes in the microwave. Enjoying lentils again is quick and simple! What are the best lentils for this recipe? For this recipe, I recommend using green or brown lentils. They hold their shape well during cooking. Red lentils can work too, but they tend to become mushy. Can I make this dish vegan? Yes! This dish is vegan-friendly. Just use vegetable broth and soy sauce. You can skip the optional ingredients if you prefer. Caloric content and nutritional benefits A serving of slow cooker coconut curry lentils contains about 300 calories. They are high in protein and fiber, making them filling and nutritious. The coconut milk adds healthy fats. This dish is rich in vitamins from the veggies. Healthier additions to the recipe You can add more veggies like carrots or zucchini for added nutrients. Chopped kale or collard greens are great too. They boost vitamins and minerals. FAQs about slow cooking lentils When cooking lentils, rinse them before adding to the slow cooker. This helps remove any dirt or debris. Cooking on low for 6-8 hours gives the best flavor and texture. Troubleshooting common slow-cooker issues If your lentils are too hard, they may need more cooking time. Adding water can help if they seem dry. If they are mushy, try using less liquid next time. This article covered everything you need to make a delicious lentil dish in a slow cooker. We looked at key ingredients, preparation steps, and cooking times. I shared tips to enhance flavor and make your dish shine. You can swap ingredients and even experiment with spices. Storing and reheating leftovers is also easy with the right methods. Lentils are nutritious and versatile. Enjoy creating your own variations to find your favorite recipe!

Slow Cooker Coconut Curry Lentils Flavorful and Easy

- 1 lb large shrimp, peeled and deveined - 4 medium zucchini, spiralized into zoodles - 4 tablespoons unsalted butter - 4 cloves garlic, minced - 1/2 teaspoon red pepper flakes (adjust to taste) - Salt and pepper to taste - 2 tablespoons lemon juice - 1/4 cup chopped fresh parsley - Grated Parmesan cheese for topping (optional) If you don’t have shrimp, you can use chicken or tofu. Both options work well in this dish. For a dairy-free meal, skip the butter and try olive oil instead. You can also swap the zucchini for summer squash or carrots for a different twist. If you need a gluten-free option, stick with the zoodles; they are naturally gluten-free. In the summer, use fresh, ripe tomatoes for added flavor. Add cherry tomatoes or diced heirloom varieties for a burst of sweetness. In the fall, consider adding spinach or kale for extra nutrients. In winter, try butternut squash zoodles for a hearty feel. You can always mix in seasonal herbs for fresh tastes. First, grab four medium zucchinis. Use a spiralizer to turn them into zoodles. This fun tool makes long, noodle-like strands. Once you have your zoodles, place them in a colander. Let them sit for a bit to drain excess moisture. This step helps keep your dish from getting soggy. Next, heat a large skillet over medium-high heat. Add four tablespoons of unsalted butter. Once the butter melts, toss in four minced garlic cloves and half a teaspoon of red pepper flakes. Stir this mix for about a minute. You want the garlic to smell great without burning. Now, it’s time to add one pound of peeled and deveined shrimp. Season them with salt and pepper. Cook for about 2 to 3 minutes. Watch as they turn pink and opaque. Stir them gently to cook evenly. Now, it’s time to bring everything together. Add the zoodles to the skillet with the shrimp. Mix them well with the garlic butter. Sauté the whole mix for another 2 to 3 minutes. You want the zoodles slightly tender but still crunchy. After that, drizzle two tablespoons of lemon juice over the dish. Toss everything well to combine. Finally, remove the skillet from heat. Stir in a quarter cup of chopped fresh parsley for a burst of color and flavor. Serve the garlic butter shrimp zoodle mix on plates. If you like, top with grated Parmesan cheese for extra taste. Enjoy your quick and easy dinner! To make perfect shrimp, start with large, fresh shrimp. Peel and devein them first. Pat them dry with a paper towel. This helps them sear nicely in the pan. Heat the butter in a skillet over medium-high heat. Add garlic and red pepper flakes for flavor. Cook the shrimp for about 2-3 minutes. They are done when they turn pink and opaque. Do not overcrowd the pan; cook them in batches if needed. Using a spiralizer is easy and fun. Pick firm zucchini without soft spots. Cut off both ends before spiralizing. This makes a good grip. Secure the zucchini in the spiralizer and twist it to create zoodles. After spiralizing, let them drain in a colander. This removes excess moisture and keeps them crunchy. You can use a box grater if you do not have a spiralizer. Just grate the zucchini into thin strands. Garlic is the star of this dish. Use fresh garlic for the best taste. Mince it finely to release its flavor. Sauté it in butter until fragrant, but do not burn it. Fresh herbs like parsley add brightness. Chop them finely before adding to the dish. A squeeze of lemon juice at the end enhances all the flavors. Feel free to adjust the red pepper flakes for heat. {{image_2}} You can swap shrimp for chicken or tofu. Both options work well. For chicken, cut it into small pieces. Cook it in the same butter and garlic mix. This keeps the rich flavor. If you choose tofu, use firm tofu. Press it to remove extra water, then cube it. Sauté it until golden. Both options give a tasty twist. If you want more veggies, try adding bell peppers or spinach. Both add color and crunch. You can also mix in cauliflower rice for a hearty texture. This keeps the dish low-carb and filling. For a different flavor, add mushrooms. They soak up the garlic butter well. Besides lemon juice, you can use lime juice for a zesty kick. A splash of soy sauce adds a savory note. If you enjoy heat, try chili sauce or sriracha. For a creamy twist, mix in a touch of heavy cream. Each option brings its unique flavor, making the dish your own. Store your garlic butter shrimp zoodle in an airtight container. Let the meal cool to room temperature first. This helps keep the zoodles from getting soggy. Place the container in the fridge. Proper storage lets it last for up to three days. To reheat, use a skillet. Heat it over medium heat. Add a splash of water or broth to help with moisture. Toss in the garlic butter shrimp zoodle mix. Stir until warmed through, about 5 minutes. This keeps the zoodles from becoming mushy. You can freeze the shrimp zoodle mix, but the zoodles may lose texture. To freeze, place it in a freezer-safe bag. Squeeze out as much air as possible before sealing. It can last up to two months in the freezer. When ready to eat, thaw it overnight in the fridge. Reheat in a skillet to enjoy! Garlic butter shrimp zoodle lasts about 2-3 days in the fridge. Store it in an airtight container. The shrimp may lose some texture but will still taste great. Reheat it gently in a skillet to keep it tasty. Yes, you can use frozen shrimp. Just make sure to thaw them properly first. Place them in cold water for about 15-20 minutes. This way, they cook evenly in the dish. Frozen shrimp work well and save time. You can add many veggies to zoodles. Some great options include bell peppers, carrots, or spinach. These add color and flavor. You can also mix in some cherry tomatoes or mushrooms for extra taste. Feel free to get creative! This blog post covers how to make garlic butter shrimp zoodles. We discussed ingredients, including substitutions and seasonal picks. You learned how to prepare zoodles, cook shrimp, and combine the dish. Helpful tips showed the best ways to cook shrimp and spiralize zucchini. We also explored protein swaps, low-carb options, and storage methods. Cooking this meal can be easy and fun. I hope you try it out and enjoy every bite!

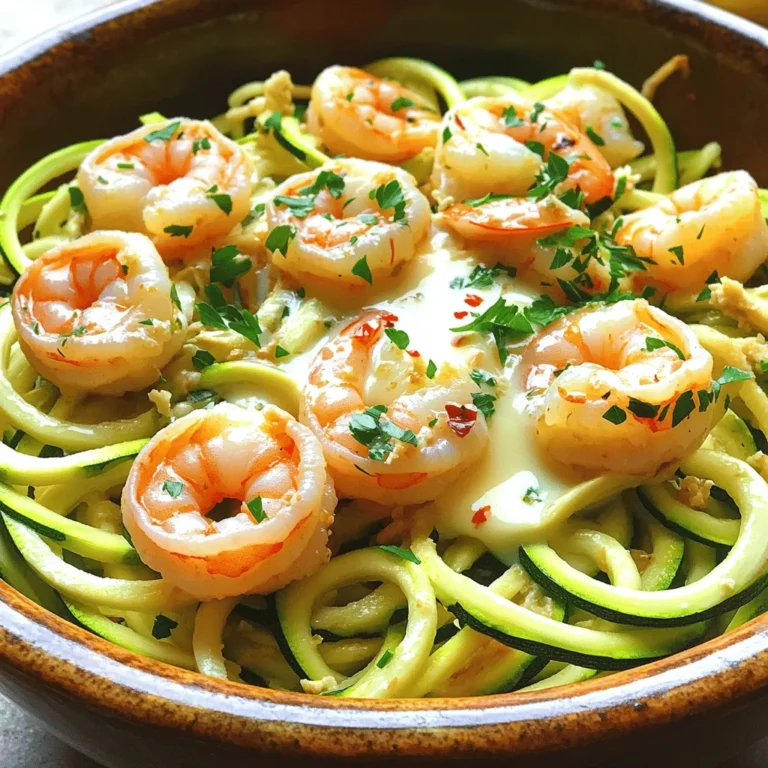
Garlic Butter Shrimp Zoodle Quick and Easy Dinner

To make this cozy drink, you need: - 4 cups apple cider - 1 cup cranberry juice - 1 orange, sliced - 1/2 cup fresh cranberries - 1 cinnamon stick - 1 teaspoon whole cloves - 1 teaspoon allspice berries - 2 tablespoons honey (or to taste) These ingredients blend to create a warm and tangy taste. The apple cider gives it sweetness, while cranberry juice adds a tart flavor. Fresh cranberries and orange slices enhance the drink's fresh notes. The spices bring warmth and depth. For a pretty touch, consider adding: - Additional orange slices - Extra cinnamon sticks - Whole cranberries These garnishes not only look nice but also boost the drink's flavor. They make your cider feel special and festive. If you want to change things up, try these swaps: - Use pear juice instead of cranberry juice for a sweeter twist. - Maple syrup can replace honey for a different sweetness. - Add a splash of ginger ale for fizz and flavor. These substitutions allow you to customize your cider. Feel free to mix and match based on what you have at home. Enjoy experimenting! To start, gather your ingredients. You need: - 4 cups apple cider - 1 cup cranberry juice - 1 orange, sliced - 1/2 cup fresh cranberries - 1 cinnamon stick - 1 teaspoon whole cloves - 1 teaspoon allspice berries - 2 tablespoons honey (or to taste) In a large pot, combine the apple cider and cranberry juice. Heat it on medium. Next, add the sliced orange, fresh cranberries, cinnamon stick, cloves, and allspice berries. Stir in the honey. Let it simmer gently for about 10 minutes. This step helps the flavors mix well. Keep the heat low after the first 10 minutes. A gentle simmer works best. This allows the spices and fruits to release their flavors. Aim for 15 to 20 more minutes. If you notice any foaming, skim it off with a spoon. This keeps your cider clear and bright. Once the cider is ready, it’s time to strain it. Use a fine mesh sieve. Place the sieve over a large bowl or another pot. Slowly pour the cider through the sieve. This step removes all the solids and spices. Press down lightly on the solids to extract extra flavor. Taste the cider and add more honey if you want it sweeter. Now, serve it hot in mugs. Enjoy with some garnish for a beautiful touch! To boost the flavor of your spiced cranberry orange hot cider, consider adding a few more spices. You can try adding star anise for a sweet, licorice taste. A pinch of nutmeg gives a warm, cozy feel. You might also add cardamom for a slight floral note. Each spice adds its own twist, making your cider unique. Just remember, a little goes a long way, so start small. When serving your hot cider, presentation matters. Pour the cider into clear mugs to show off its rich color. Garnish with fresh orange slices or a cinnamon stick. You can even float a few whole cranberries on top for a festive look. Consider serving with a plate of spiced cookies or sweet treats. This warms the heart and adds to the cozy vibe. Your spiced cranberry orange hot cider is not just tasty; it has health perks too. Cranberries are full of antioxidants. They help support the immune system and may improve heart health. Oranges give a healthy dose of vitamin C, which is great for fighting colds. Apple cider has natural compounds that may support digestion. Honey adds sweetness and has its own health benefits, like soothing sore throats. Enjoying this cider can be a delicious way to care for your body. {{image_2}} You can easily turn this drink into a fun cocktail. Add a splash of spiced rum or bourbon to each mug. The warmth of the alcohol pairs well with the spices. If you prefer a non-alcoholic drink, just stick with the recipe as is. It tastes great without any alcohol! Feel free to mix in other fruit juices. Pear juice adds a sweet touch. You can also use pomegranate juice for a tart twist. Each juice changes the flavor and makes it unique. Try adding a bit of ginger or lemon zest for extra zing! This cider works for any season. For Halloween, add pumpkin spice for a festive kick. For Thanksgiving, use more cinnamon and nutmeg. During Christmas, try adding peppermint extract for a wintery flavor. Each variation can make your cider special for any holiday gathering! To store leftover cider, let it cool first. Use a clean glass jar or a plastic container. Pour the cider into the container, leaving some room at the top. Seal it tightly. Place it in the fridge. It will last for up to five days. To reheat your cider, pour it into a pot. Heat it on low over the stove. Stir it gently as it warms. You can also use a microwave. Heat it in short bursts, stirring in between. This keeps it from boiling too much. You can freeze cider for later enjoyment. Pour the cooled cider into freezer-safe bags or containers. Leave some space for expansion. Label the bags with the date. It can last up to six months in the freezer. To use, thaw it in the fridge overnight. Then, reheat it to enjoy again. Yes, you can easily make spiced cider in a slow cooker. Just add all your ingredients to the slow cooker. Set it on low heat for about 4 hours. This method lets the flavors mix well. You can enjoy a warm drink without much effort. Cranberry juice offers many health benefits. It is rich in vitamin C, which helps your immune system. The juice also contains antioxidants. These can help fight off free radicals. Drinking cranberry juice may support urinary health too. Just remember to choose unsweetened juice for the best health benefits. To make this spiced cider vegan, simply replace honey with maple syrup or agave nectar. Both options add sweetness without animal products. You can still enjoy the same great flavors while keeping it plant-based. This way, everyone can enjoy a cup of this delicious cider! This blog post covered how to make spiced cranberry orange hot cider. We discussed ingredients, preparation steps, and storage tips. You can choose from variations, like alcoholic or non-alcoholic options, to suit your taste. Spiced cider warms you up and adds joy to any gathering. Try new ingredients or spices to make it your own. Enjoy this delightful drink this season and share it with friends. It's simple, tasty, and perfect for any occasion.

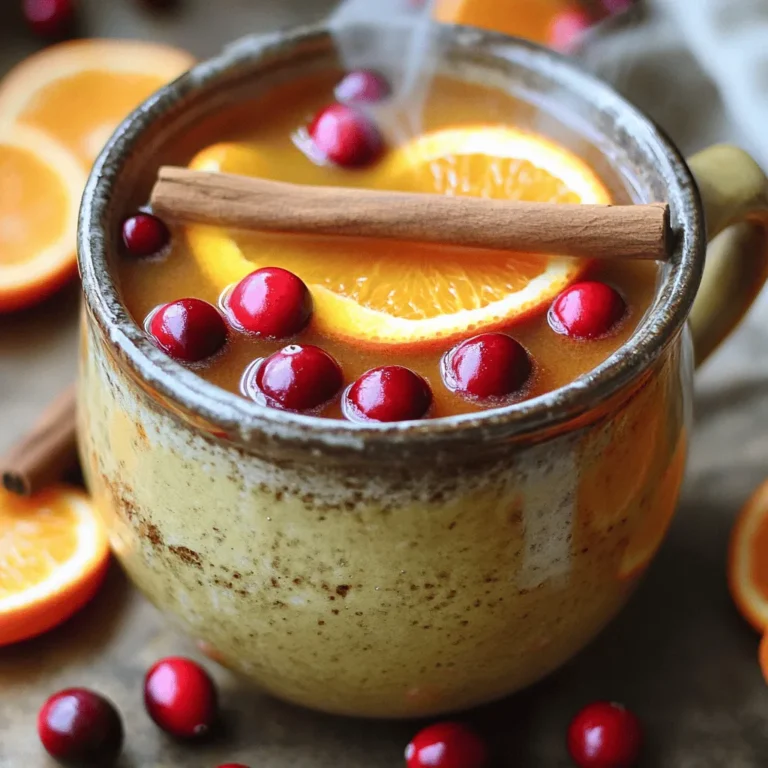
Spiced Cranberry Orange Hot Cider Flavorful Delight

- 4 boneless, skinless chicken breasts - 1 cup broccoli florets - 1 cup cherry tomatoes, halved - 1 red bell pepper, sliced - 1 zucchini, sliced - 5 cloves garlic, minced - ½ cup grated Parmesan cheese - ¼ cup olive oil The key to this dish lies in using fresh, quality ingredients. The chicken breasts are the star here, and boneless, skinless pieces cook quickly and stay juicy. Broccoli, cherry tomatoes, red bell pepper, and zucchini not only add color but also pack in nutrients. I love using garlic for its bold flavor. Minced garlic paired with buttery Parmesan cheese creates a savory punch. Olive oil enhances the dish and helps everything roast to perfection. - 1 teaspoon dried oregano - 1 teaspoon Italian seasoning - Salt and pepper to taste - Fresh parsley for garnish (optional) Seasonings bring life to your sheet pan meal. Dried oregano and Italian seasoning add warmth and depth. Salt and pepper are crucial too; they enhance every bite. Fresh parsley can brighten the dish and add a pop of color. It’s optional but highly recommended for that extra flair. First, preheat your oven to 400°F (200°C). This step is key for even cooking. While the oven heats, line a large sheet pan with parchment paper. This makes cleanup easy and helps prevent sticking. Next, let's make the garlic and herb mixture. In a large bowl, combine ¼ cup of olive oil, 5 cloves of minced garlic, 1 teaspoon of dried oregano, and 1 teaspoon of Italian seasoning. Add salt and pepper to taste. Mix everything well until combined. Now, take your four boneless, skinless chicken breasts and place them in the bowl. Toss the chicken in the garlic mixture until it's coated evenly. This will infuse the chicken with great flavor. Once the chicken is ready, arrange the chicken breasts in the center of the sheet pan. In the same bowl, add your chopped veggies: 1 cup of broccoli florets, 1 cup of halved cherry tomatoes, 1 sliced red bell pepper, and 1 sliced zucchini. Toss the vegetables in the remaining garlic mixture until they are well-coated. Spread the seasoned veggies around the chicken on the sheet pan. For an extra touch, sprinkle ½ cup of grated Parmesan cheese evenly over the chicken and veggies. Now it’s time to roast! Place the sheet pan in the preheated oven and cook for 25-30 minutes. The chicken should reach an internal temperature of 165°F (75°C) and the veggies should be tender. If you want a golden finish, switch the oven to broil for the last 2-3 minutes. Keep a close eye on it to prevent burning. Once done, take the sheet pan out and let it rest for a few minutes before serving. If you like, garnish with fresh parsley for a pop of color. Enjoy your delicious meal! To ensure your chicken is safe and tasty, cook it all the way through. The best way to check this is by using a meat thermometer. Insert it into the thickest part of the breast. The chicken is done when it reaches 165°F (75°C). This step keeps your meal safe and juicy. Choosing the right vegetables makes a big difference. I love using fresh, colorful veggies like broccoli, cherry tomatoes, and bell peppers. They not only look great but also taste amazing. To avoid overcooking, cut your veggies into equal sizes. This helps them cook evenly. Remember, tender veggies are the goal, but they should still have a bit of crunch. When it comes to presentation, serve straight from the sheet pan for a cozy feel. If you want something fancier, use a large platter. Drizzle some olive oil on top and sprinkle with fresh parsley for a pop of color. It brings the dish to life! You can also pair this meal with a simple salad or some crusty bread to soak up all the flavors. Enjoy your delightful feast! {{image_2}} You can mix and match any veggies you like. Seasonal vegetables work great. Try asparagus in spring or squash in fall. These fresh choices add color and taste. If you’re short on time, frozen vegetables are a good option. They cook well and save you prep time. Just make sure to thaw them before using. You don’t have to stick with chicken. Try turkey or pork for a tasty twist. Both cook well and soak up flavors just like chicken. For a meat-free option, use chickpeas or tofu. These choices add protein and keep the meal filling. Spice it up by adding your favorite herbs. Rosemary or thyme can add depth. You can also try a kick with red pepper flakes. Want to switch up the cheese? Use feta or mozzarella for a different taste. Each cheese brings its own flavor, making your meal unique. Enjoy experimenting with these options! To keep your Roasted Garlic Parmesan Chicken Veggies fresh, follow these tips: - Refrigeration: Place leftovers in an airtight container. Store them in the fridge for up to 3 days. Make sure to cool them to room temperature before sealing. This helps avoid moisture build-up. - Freezing: For longer storage, freeze leftovers. Use freezer-safe containers or bags. They can last for up to 3 months. For best quality, label your containers with the date. When it's time to enjoy those leftovers, use these methods: - Best methods: Reheat the chicken and veggies in the oven for even warmth. Preheat your oven to 350°F (175°C). Place the food in a baking dish and cover it with foil. Heat for about 15-20 minutes. - Microwave: If short on time, the microwave works too. Place your food in a microwave-safe dish. Heat in 1-minute bursts, stirring in between, until hot. - Maintaining flavor and texture: To keep your chicken moist, add a splash of olive oil or broth before reheating. This helps prevent dryness. For veggies, a quick sauté in a pan with a bit of oil can bring back their crispness. Following these tips ensures your Roasted Garlic Parmesan Chicken and veggies taste great every time you enjoy them! To know if the chicken is done, check its internal temperature. Use a meat thermometer and aim for 165°F (75°C). Insert the thermometer into the thickest part of the chicken. If it reads 165°F, the chicken is safe to eat. Let it rest for a few minutes before slicing. This helps keep it juicy! Yes, you can make this recipe in advance. Cook the chicken and veggies as directed, then let them cool. Store them in an airtight container in the fridge for up to three days. To reheat, place them in the oven at 350°F (175°C) until warmed through, about 15-20 minutes. You can also use a microwave for quicker reheating. This dish pairs well with many sides. Here are some great options: - A fresh green salad with vinaigrette - Garlic bread for a tasty crunch - Quinoa or brown rice for extra fiber - Roasted potatoes for hearty comfort These sides will enhance your meal and bring out the best flavors! This blog post covered how to make Roasted Garlic Parmesan Chicken. You learned about the main ingredients, preparation steps, and helpful cooking tips. We discussed variations for different tastes and how to store leftovers. Remember, roasting brings out great flavors in the chicken and veggies. Don't hesitate to try new ingredients or spices. Cooking should be fun and creative! Enjoy your meal and feel proud of your cooking skills.

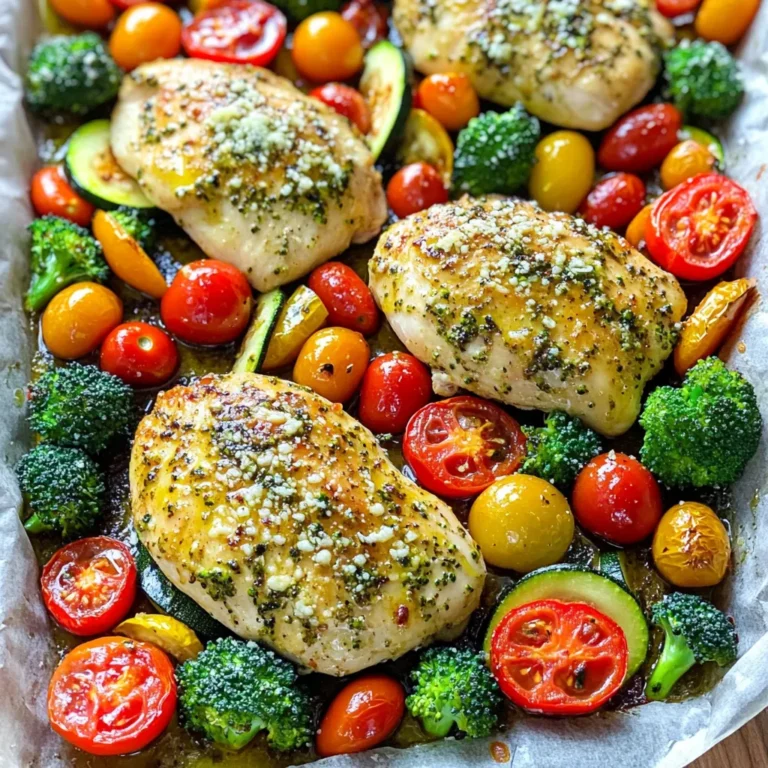
Roasted Garlic Parmesan Chicken Veggies Sheet Pan Delight

To make this delicious pumpkin cheesecake ice cream, you need a few key ingredients: - 2 cups heavy cream - 1 cup whole milk - 3/4 cup granulated sugar - 8 oz cream cheese, softened - 1 cup pumpkin puree - 1 teaspoon vanilla extract - 1 teaspoon ground cinnamon - 1/2 teaspoon ground nutmeg - 1/4 teaspoon ground ginger - 1/2 cup crushed graham crackers - 1/4 cup unsalted butter, melted These ingredients give the ice cream its rich and creamy texture. The pumpkin puree and spices add flavor and warmth. The cream cheese makes it smooth, while the graham crackers give it that lovely crunch. You can add a few optional ingredients to enhance this treat: - A pinch of salt for balance - Extra spices like allspice or cloves for depth - A splash of maple syrup for sweetness These optional ingredients can boost the flavor. Feel free to experiment and find what you love most. To make this ice cream, you will need some basic kitchen tools: - A large mixing bowl - An electric mixer - A whisk - An ice cream maker - A freezer-safe container Using the right equipment makes the process easier. The ice cream maker is key for achieving that perfect creamy texture. Enjoy making this treat! Start by gathering your ingredients. In a large mixing bowl, combine the softened cream cheese and granulated sugar. Use an electric mixer to beat them together. Mix until the cream cheese is smooth and creamy. This step creates a rich base for your ice cream. It is key to getting the right texture. Next, add the pumpkin puree, vanilla extract, ground cinnamon, nutmeg, and ginger to the cream cheese mixture. Blend well until all ingredients are fully mixed. In a separate bowl, whisk the heavy cream and whole milk together. Once combined, gently stir in the pumpkin mixture. This creates a delicious and smooth base for your ice cream. Now, pour the combined mixture into your ice cream maker. Churn it according to the manufacturer's instructions. This usually takes about 20-30 minutes. You want it to have a soft-serve consistency. While the ice cream churns, prepare the graham cracker swirl. In a small bowl, mix the crushed graham crackers with melted butter until crumbly. Once the ice cream is ready, layer half of it into a freezer-safe container. Sprinkle half of the graham cracker mixture over the top. Add the remaining ice cream, then finish with the rest of the graham crackers. With a knife or skewer, gently swirl the graham crackers into the ice cream for a nice marbled look. Be careful not to over mix. Cover the container and freeze for at least four hours. This will let your ice cream firm up and become ready to serve. To make the best pumpkin cheesecake ice cream, start with cold ingredients. Chill your heavy cream and milk before mixing. This helps the ice cream churn faster and get a better texture. When churning, follow your ice cream maker's instructions closely. Usually, it takes about 20-30 minutes. Stop churning when the ice cream is thick and has a soft-serve feel. This means it's ready for the next step. Creating that perfect graham swirl is easy. Mix crushed graham crackers with melted butter in a small bowl. This will give it a nice crumbly texture. When the ice cream is done churning, layer half of it in your container. Then, sprinkle half of the graham cracker mix on top. Add the rest of the ice cream and finish with the remaining graham mix. Use a knife to gently swirl it through. Don't overdo it; you want to see those beautiful swirls! When you're ready to serve, use chilled bowls. This keeps the ice cream colder for longer. Top each serving with extra crushed graham crackers for crunch. A sprinkle of cinnamon adds a lovely touch. For a pop of color, add a sprig of mint on top. This makes your dessert look even more inviting! Enjoy your creamy, pumpkin-flavored treat! {{image_2}} You can make this ice cream dairy-free! Use coconut milk instead of whole milk. For cream, use coconut cream. It gives a rich, creamy taste. You can also try almond milk. Make sure to pick unsweetened options for the best flavor. Want to mix it up? You can add chocolate chips or caramel swirls. Both pair well with pumpkin. Chopped nuts like pecans or walnuts add great crunch. Try different spices, too! A dash of allspice or clove can change the taste. You can even add a splash of maple syrup for sweetness. Crushed graham crackers are classic, but not the only choice. You can use crushed Oreos for a fun twist. They add a chocolate flavor that blends well. Try adding cookie crumbs from your favorite biscuits. Just remember to mix them with melted butter, like with graham crackers. This gives you that nice swirl in your ice cream. To keep your pumpkin cheesecake ice cream fresh, place it in an airtight container. Make sure to press a piece of plastic wrap against the surface before sealing. This prevents ice crystals from forming. When you freeze your ice cream, aim for a steady temperature. Avoid opening the freezer too often. If you plan to store it long-term, consider using a shallow container. This helps freeze it more evenly. Your ice cream will stay good for about 2-3 months in the freezer. For the best taste and texture, try to eat it within a month. If it gets too hard, let it sit at room temperature for a few minutes before scooping. Enjoy it as a special treat or a festive dessert! Yes, you can make this ice cream without an ice cream maker. First, mix your ingredients like normal. Then, pour the mixture into a freezer-safe container. Freeze it for about 45 minutes. After that, take it out and stir it well. Do this every 30 minutes for 2 to 3 hours. This helps break up ice crystals and makes it creamy. This ice cream will last up to two weeks in the freezer. Store it in an airtight container to keep it fresh. For best taste, eat it within the first week. After that, it may lose some flavor and texture. If you need a substitute for pumpkin puree, you can use butternut squash puree. It has a similar taste and texture. Another option is sweet potato puree. Both will give you a nice flavor in your ice cream. Just make sure they are smooth and not chunky. In this post, we explored making pumpkin cheesecake ice cream with a graham swirl. We covered the must-have and optional ingredients, along with helpful equipment. You learned step-by-step instructions for preparing and churning your ice cream. I also shared tips for perfect texture and ideas for fun variations. Lastly, we discussed storage options to keep your treat fresh. Enjoy creating this delightful dessert and customize it to your taste. Happy churning!

Delicious Pumpkin Cheesecake Ice Cream with Graham Swirl

This cake has simple yet rich flavors. Here are the key ingredients: - 1 cup unsalted butter - 1 cup pumpkin puree (canned or fresh) - 1 cup brown sugar, packed - ½ cup granulated sugar - 3 large eggs - 1 teaspoon vanilla extract - 2 cups all-purpose flour - 1 teaspoon baking powder - 1 teaspoon baking soda - 1 teaspoon ground cinnamon - ½ teaspoon ground nutmeg - ½ teaspoon ground ginger - ¼ teaspoon allspice - ½ teaspoon salt - ½ cup pure maple syrup (for drizzling) These ingredients work together to create a moist and tasty cake. Pumpkin adds warmth, while brown butter gives a nutty flavor. To take your cake to the next level, try these optional ingredients: - Powdered sugar for dusting - Chopped nuts for a crunchy texture - Chocolate chips for a sweet twist These extras can add a new layer of taste and make your cake even more special. For those using the metric system, here are some handy conversions: - 1 cup of butter = 227 grams - 1 cup of pumpkin puree = 245 grams - 1 cup of brown sugar = 220 grams - ½ cup of granulated sugar = 100 grams - 2 cups of all-purpose flour = 250 grams - 1 teaspoon = 5 milliliters These conversions ensure everyone can enjoy this delightful cake, no matter where they are. Start by preheating your oven to 350°F (175°C). This heat helps the cake rise well. Next, grease and flour a 9x13 inch baking pan. You can also line it with parchment paper for easy removal. This step ensures the cake comes out smooth and clean. 1. Brown the Butter: In a medium saucepan, melt the unsalted butter over medium heat. Stir and swirl it often. Cook until the butter turns golden brown and smells nutty. This takes about 5 to 7 minutes. Remove it from heat and let it cool slightly. 2. Mix Wet Ingredients: In a large bowl, combine the browned butter, pumpkin puree, brown sugar, granulated sugar, eggs, and vanilla extract. Whisk them together until the mixture is smooth and well combined. 3. Combine Dry Ingredients: In another bowl, whisk together the all-purpose flour, baking powder, baking soda, ground cinnamon, ground nutmeg, ground ginger, allspice, and salt. Make sure everything mixes well. 4. Combine Wet and Dry Ingredients: Gradually add the dry mixture to the wet ingredients. Stir gently until just combined. Be careful not to overmix; this keeps the cake light and fluffy. 5. Pour into Pan: Pour the batter into your prepared baking pan. Use a spatula to smooth the top. Place the pan in the preheated oven. Bake for 30 to 35 minutes. To check if the cake is done, insert a toothpick into the center. If it comes out clean, the cake is ready. Remove it from the oven and let it cool in the pan for 10 minutes. Then, transfer it to a wire rack. Let it cool completely before drizzling with maple syrup and dusting with powdered sugar. Enjoy your delicious cake! To make brown butter, heat unsalted butter in a saucepan over medium heat. Stir the butter as it melts. Keep an eye on it. After a few minutes, it will start to foam. This is normal! Watch for the color to change to a golden brown. You will smell a nutty aroma when it's ready. Remove it from the heat right away. Let it cool slightly before using. This step adds a rich flavor to your cake. To keep your cake moist, do not overmix the batter. Mix just until the dry ingredients blend with the wet. Also, make sure your oven is preheated to the right temperature. Bake the cake until a toothpick comes out clean but do not let it bake too long. If you want extra moisture, consider adding a little more pumpkin puree or a splash of milk. Lastly, let the cake cool properly before slicing. This helps keep it soft. One common mistake is not measuring ingredients correctly. Use measuring cups and spoons for accuracy. Another mistake is opening the oven door too often. This lets heat escape and can cause the cake to sink. Make sure to sift your dry ingredients to avoid lumps. Lastly, check the baking time; every oven is different. Trust your toothpick test. These tips help you bake a perfect cake every time! {{image_2}} You can easily make this cake gluten-free. Just swap all-purpose flour with a gluten-free blend. Look for a mix that has xanthan gum in it. This helps to bind the ingredients. Use the same amount as in the recipe. You will still get a moist and tasty cake. If you want to change the sweetness, try coconut sugar or honey. Both bring a different taste. You might need to adjust the liquid if you use honey. You can also add spices like cardamom for more warmth. Vanilla bean paste gives an extra punch of flavor too. This cake is perfect for any season. For fall, add chopped apples or walnuts. In winter, try adding peppermint extract for a festive twist. For spring, use lemon zest instead of some spices. It brightens the flavor and makes it fresh. In summer, consider adding fresh berries on top. They add color and a burst of taste. After you enjoy your cake, store any leftovers in an airtight container. Make sure to let the cake cool completely first. This keeps it fresh and moist. You can keep it on the counter for up to three days. If you want it to last longer, place it in the fridge. Just remember, chilling may change the texture a bit. To freeze the cake, first, slice it into pieces. Wrap each piece in plastic wrap. Then, place the wrapped slices in a freezer bag. This helps prevent freezer burn. You can freeze the cake for up to three months. When you're ready to eat, take out a slice and let it thaw in the fridge overnight. To reheat your cake, use the microwave. Place a slice on a microwave-safe plate. Cover it with a damp paper towel. Heat it for about 10-15 seconds to start. Check if it’s warm enough. If not, heat for a few more seconds. This method keeps the cake moist and tasty. Enjoy your delicious cake! You can use pumpkin pie filling, but it will change the taste. Pumpkin pie filling has spices and sweeteners added. If you use it, cut back on other spices and sugar. This change will keep your cake from being too sweet. To check if your cake is done, use a toothpick. Insert it into the center of the cake. If it comes out clean, the cake is ready. If you see wet batter, bake for a few more minutes. Keep checking until it’s done. If you run out of brown sugar, you can use white sugar. Add a bit of molasses to the white sugar to mimic brown sugar. Use one tablespoon of molasses for each cup of sugar. This will keep the same flavor and moisture in your cake. This blog post showed you how to make a tasty brown butter maple pumpkin spice cake. We covered key ingredients, preparation steps, and baking tips. I shared tips to avoid mistakes and keep your cake moist. You now know how to store leftovers properly and even how to make tasty variations. Remember, baking is fun and can spark creativity. Use these steps to make your own special cake today. Enjoy your baking journey and share your delicious results!

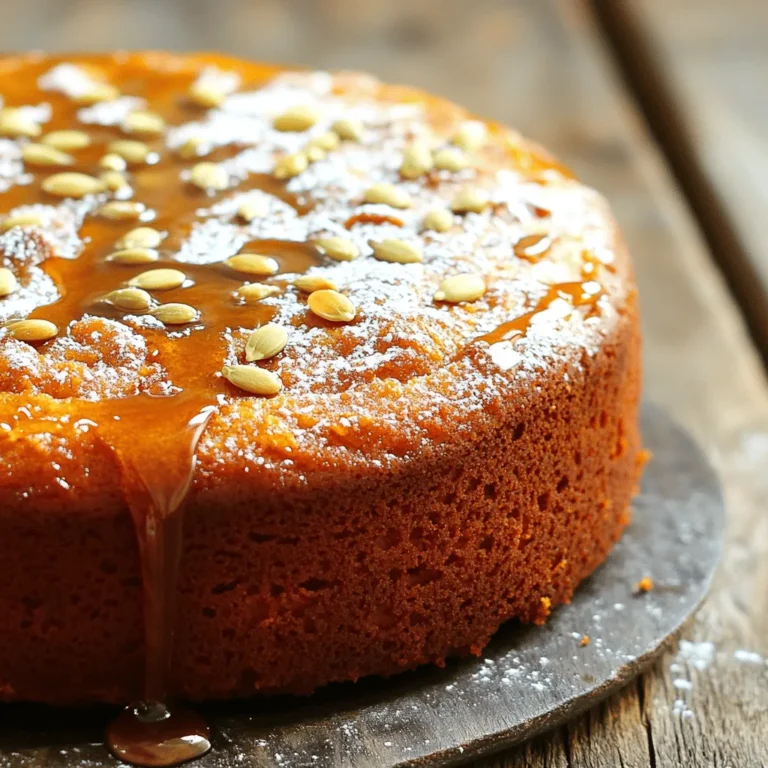
Brown Butter Maple Pumpkin Spice Cake Delightfully Simple

To make Creamy Parmesan Spinach Orzo, you need: - 1 cup orzo pasta - 2 cups fresh spinach, chopped - 1/2 cup heavy cream - 1 cup vegetable broth - 1/2 cup grated Parmesan cheese - 1 small onion, finely chopped - 2 cloves garlic, minced - 2 tablespoons olive oil - Salt and pepper to taste - A pinch of nutmeg (optional) - Fresh parsley, for garnish Using fresh ingredients makes a big difference. Fresh spinach has a bright flavor and vibrant color. Choose a high-quality vegetable broth. Look for low-sodium options to control the salt. If using frozen spinach, thaw and drain it well. This helps avoid excess water in your dish. For a vegetarian dish, use vegetable broth as I listed. To make it dairy-free, swap heavy cream for coconut cream or a cashew cream. Nutritional yeast can replace Parmesan cheese for a cheesy flavor without dairy. Adjust salt and seasonings to taste to ensure it still delights your palate. {{ingredient_image_1}} First, grab a medium pot and fill it with water. Bring the water to a boil. Once boiling, add 1 cup of orzo pasta. Cook it according to the package instructions until it is al dente. This usually takes about 8-10 minutes. After cooking, drain the orzo and set it aside. In the same pot, pour in 2 tablespoons of olive oil. Heat it over medium heat. When the oil is warm, add 1 small onion, finely chopped. Sauté the onion until it looks translucent, which should take around 3-4 minutes. Now, add 2 cloves of minced garlic. Cook for another minute until the garlic smells great. Next, pour in 1 cup of vegetable broth. Bring this mixture to a simmer. Turn the heat down to low and add 1/2 cup of heavy cream. Stir well to mix everything. Gradually add in 1/2 cup of grated Parmesan cheese. Stir constantly until it melts and creates a creamy sauce. Now, it’s time to add flavor. Toss in the chopped spinach and the cooked orzo into the pot. Mix everything together until the spinach wilts. Season with salt, pepper, and a pinch of nutmeg if you like. Let the dish heat through for a couple of minutes. Then, take it off the heat and get ready to serve! To get that smooth, creamy texture in your orzo, start with the right timing. After you add the heavy cream, keep the heat at low. This prevents the cream from boiling and breaking. Stir in the grated Parmesan slowly. It melts best when added gradually. If you find your sauce too thick, add a splash of vegetable broth. This keeps it creamy but not runny. You can boost the flavor of your dish with a few simple changes. Fresh herbs like basil or thyme add great taste. You can also try a pinch of red pepper flakes for some heat. If you want a nutty flavor, add a bit more nutmeg. Always taste as you go. This way, you can adjust to your liking. Cooking orzo well is key. Follow the package instructions for time. Usually, it takes 8 to 10 minutes. You want it al dente, not mushy. When sautéing your onion, wait until it turns translucent before adding garlic. Garlic cooks quickly, so add it last for the best flavor. This timing helps each ingredient shine in your dish. Pro Tips Use Fresh Ingredients: Fresh spinach and high-quality Parmesan will significantly enhance the flavor of your dish. Adjust the Creaminess: For a lighter version, you can substitute half of the heavy cream with more vegetable broth. Enhance with Herbs: Consider adding fresh herbs like basil or thyme for an aromatic twist. Perfect the Orzo: Be careful not to overcook the orzo; it should be al dente for the best texture in the final dish. {{image_2}} You can boost this dish by adding protein. Chicken is a great choice. Simply cook diced chicken in the pot before adding the onion. Shrimp works well too! Sauté shrimp until they turn pink, then add the garlic. For a plant-based option, use tofu. Press and cube the tofu, then fry it until golden before mixing it in. This adds texture and makes your meal more filling. Feel free to mix in other veggies! Broccoli adds a nice crunch. Steam or blanch it first, then toss it in with the spinach. Kale is another tasty option. Chop it finely and add it to the pot with the broth. Both veggies bring great color and nutrition to your orzo, making each bite exciting. To save time, turn this dish into a one-pot meal. After cooking the orzo, add all your ingredients to one pot. Start with the broth and cream, then stir in the orzo, spinach, and any added proteins or veggies. This method means less cleanup and ensures all flavors blend together. It's quick and easy, perfect for busy nights! To keep your Creamy Parmesan Spinach Orzo fresh, store it in an airtight container. Make sure it is cool before you seal it. This will help avoid condensation. Leftovers can last for up to three days in the fridge. Always label the container with the date. This way, you will know when to use it. When you’re ready to enjoy the leftovers, reheat them gently. Use a pan over low heat for best results. Stir in a splash of vegetable broth or milk. This will keep the orzo creamy and prevent it from drying out. Heat until warm, but don’t let it boil. You can also use the microwave. Cover the dish and heat in short bursts. Stir in between to ensure even heating. If you want to freeze your orzo, place it in a freezer-safe container. Leave some space at the top, as it may expand. It will stay good for up to two months. To thaw, place the container in the fridge overnight. You can also use the microwave to defrost it if you’re in a hurry. Once thawed, reheat it as mentioned above. This will help keep the creamy texture intact. Yes, you can. Prepare the dish and let it cool. Store it in an airtight container. It will stay good in the fridge for up to three days. When you are ready to serve, just reheat it on the stove or in the microwave. You might need to add a splash of broth or cream to bring back the creamy texture. Not at all. While heavy cream creates a rich flavor, you can use alternatives. For a lighter dish, try half-and-half or even whole milk. For a dairy-free option, use coconut milk or cashew cream. Each option will give a different taste, but they will still work well in this recipe. You have lots of choices! A simple green salad pairs nicely. Grilled chicken or shrimp adds protein to the meal. If you want a vegetarian option, serve it with roasted vegetables. Crusty bread is also great for soaking up the creamy sauce. Enjoy mixing and matching to find your perfect meal! In this blog post, we explored the recipe for Creamy Parmesan Spinach Orzo. I shared ingredients, cooking steps, and tips for great flavor. You learned about dietary substitutions, variations, and how to store leftovers. Remember, making this dish can be simple and fun. Use fresh ingredients for the best taste. Don’t hesitate to try different veggies or proteins. Enjoy the creamy comfort of this meal while saving time in the kitchen!

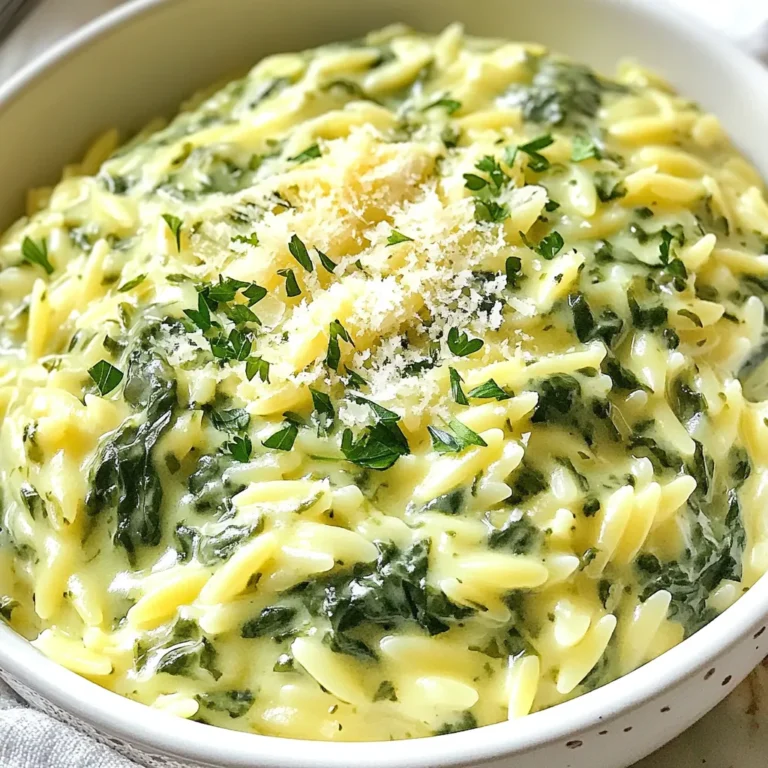
Creamy Parmesan Spinach Orzo With Rich Flavor Boost

For a tasty tofu stir fry, you need: - 1 block extra-firm tofu, drained and pressed - 2 tablespoons cornstarch - 2 tablespoons vegetable oil - 1 bell pepper (red or yellow), sliced - 1 cup broccoli florets - 1 cup sugar snap peas - 2 cloves garlic, minced - 1 tablespoon fresh ginger, grated - 3 green onions, chopped - Salt and pepper to taste The extra-firm tofu gives your dish a great texture. Cornstarch helps make it crispy. Choose fresh vegetables for the best flavor. To make the peanut sauce, gather: - 1/3 cup natural peanut butter - 2 tablespoons soy sauce - 1 tablespoon maple syrup - 1 tablespoon lime juice - 1 teaspoon sesame oil - 1 tablespoon water (or more for desired consistency) This sauce adds a rich, nutty flavor. The lime juice brings a nice tang. Adjust the water to get your preferred sauce thickness. When choosing vegetables, look for these signs: - Bright colors show freshness. - Firmness means the veggies are crisp. - No brown spots or wilting. Fresh produce makes your stir fry taste better. Spend time picking the best veggies at the store. {{ingredient_image_1}} Start by cutting the pressed tofu into bite-sized cubes. Use a sharp knife for clean cuts. Pat the tofu dry with a paper towel to remove excess moisture. This step is key for a crispy texture. Next, toss the tofu cubes in cornstarch. Make sure each piece is evenly coated. This will help create a nice crispy crust when frying. Heat 1 tablespoon of vegetable oil in a large non-stick skillet or wok over medium-high heat. Add the tofu cubes in a single layer. Cook them until golden and crispy on all sides, about 8-10 minutes. Remove the crispy tofu and set it aside. In the same skillet, add the remaining tablespoon of oil. Toss in the sliced bell pepper, broccoli florets, and sugar snap peas. Stir-fry these veggies for about 3-4 minutes. You want them to be crisp-tender. In a small mixing bowl, combine all the peanut sauce ingredients. This includes the peanut butter, soy sauce, maple syrup, lime juice, sesame oil, and water. Whisk until the mixture is smooth. If you find the sauce too thick, add more water to reach your desired consistency. This sauce adds rich flavor to every bite. Return the crispy tofu to the skillet with the vegetables. Add the minced garlic and grated ginger, then stir-fry for another minute. Season with salt and pepper to taste. Pour the peanut sauce over the tofu and vegetables. Stir well to coat everything evenly. Cook for an additional 2 minutes to heat the sauce through. Finally, garnish with chopped green onions before serving. Enjoy your tasty tofu stir fry! To get crispy tofu, start with extra-firm tofu. Drain and press it well to remove moisture. Cut it into bite-sized cubes. Toss the cubes in cornstarch until they are fully coated. This step is key for that crunchy outside. Heat vegetable oil in your skillet over medium-high heat. Cook the tofu cubes in a single layer. Let them brown for about 8-10 minutes. Don’t overcrowd the pan. Flip them to cook all sides evenly. This method gives you that perfect crispy texture. To boost flavors, use fresh herbs and spices. Garlic and ginger add a bright kick to your stir fry. Mince the garlic finely and grate the ginger for best results. You can also add fresh herbs like cilantro or basil for a fragrant touch. Consider using red chili flakes if you want some heat. These simple additions will enhance your dish. They bring freshness and depth, making every bite exciting. For a smooth peanut sauce, mix the ingredients well. Start with natural peanut butter, soy sauce, maple syrup, lime juice, and sesame oil in a bowl. Add water to this mix until it reaches your desired thickness. If it feels too thick, stir in more water. A thinner sauce coats the tofu and veggies better. If you want a richer flavor, use less water. Finding that perfect balance makes your stir fry more enjoyable. Pro Tips Press Tofu Well: Ensure you press the tofu thoroughly to remove excess moisture. This helps achieve a crispy texture during frying. Use High Heat: Cooking the tofu and vegetables over medium-high heat will give you that delicious stir-fried flavor and a nice char. Customize Vegetables: Feel free to swap out or add any of your favorite vegetables, such as carrots or zucchini, to make the dish your own. Adjust Sauce Consistency: If the peanut sauce is too thick, gradually add more water until you reach your desired consistency for easy pouring. {{image_2}} You can swap tofu with different proteins. Tempeh is a great choice. It offers a nutty flavor and chewy texture. Chicken or shrimp works well, too. Just cook them until fully done before adding veggies. For a vegan option, use chickpeas. They add protein and fiber to your dish. Feel free to mix and match your veggies. In the spring, add asparagus or snap peas. In the fall, use butternut squash or Brussels sprouts. Seasonal veggies taste fresher and can change the dish's vibe. Just remember to cut them into similar sizes for even cooking. You can spice up the sauce in many ways. Add chili paste for heat or a splash of coconut milk for creaminess. Try a sesame or teriyaki sauce for a different taste. You can even use almond butter if you want a twist. Each variation will give you a unique flavor profile. To store your tofu stir fry, wait for it to cool. Place it in an airtight container. Make sure to separate the tofu and vegetables if you can. This helps keep the texture. Store it in the fridge for up to three days. If you want to keep it longer, consider freezing. When reheating, I suggest using a skillet. Heat it over medium heat and add a splash of water. This helps steam the dish. Stir often to prevent sticking. You want to keep that crispy tofu texture. Avoid using the microwave if you can; it can make everything soggy. To freeze your stir fry, pack it in a freezer-safe container. Leave some space for expansion. It will keep well for about a month. When ready to eat, thaw it overnight in the fridge. Reheat it on the stove to get it hot and crispy again. Enjoy your meal without the fuss of cooking! Yes, you can use different types of tofu. Soft or silken tofu works well in soups. However, for stir fry, extra-firm tofu is best. It holds its shape and gets crispy. If you prefer a softer texture, try firm tofu. Just know it may not crisp up as well. To make this dish gluten-free, swap soy sauce with tamari. Tamari is a gluten-free soy sauce. Also, ensure your peanut butter is pure and free from additives. Most cornstarches are gluten-free, but check the label. This way, you enjoy all the flavor without gluten. Serve tofu stir fry in a deep bowl. This allows for a nice presentation. Drizzle extra peanut sauce on top for added flavor. Sprinkle crushed peanuts and sesame seeds for crunch. You can also serve it with rice or noodles for a hearty meal. To make the peanut sauce spicy, add chili paste or sriracha. Start with a small amount and taste as you go. You can also add crushed red pepper flakes for heat. Adjust the spice level to your liking, and enjoy the extra kick! We’ve explored the essentials for a tasty tofu stir fry, from ingredients to cooking tips. You learned how to prepare tofu, cook veggies, and make a rich peanut sauce. Remember to choose fresh produce for the best flavor and texture. Try different proteins and sauces for unique twists. Store leftovers properly and reheat to enjoy them later. With these tips, you can create delicious meals that suit your taste and needs. Happy cooking!

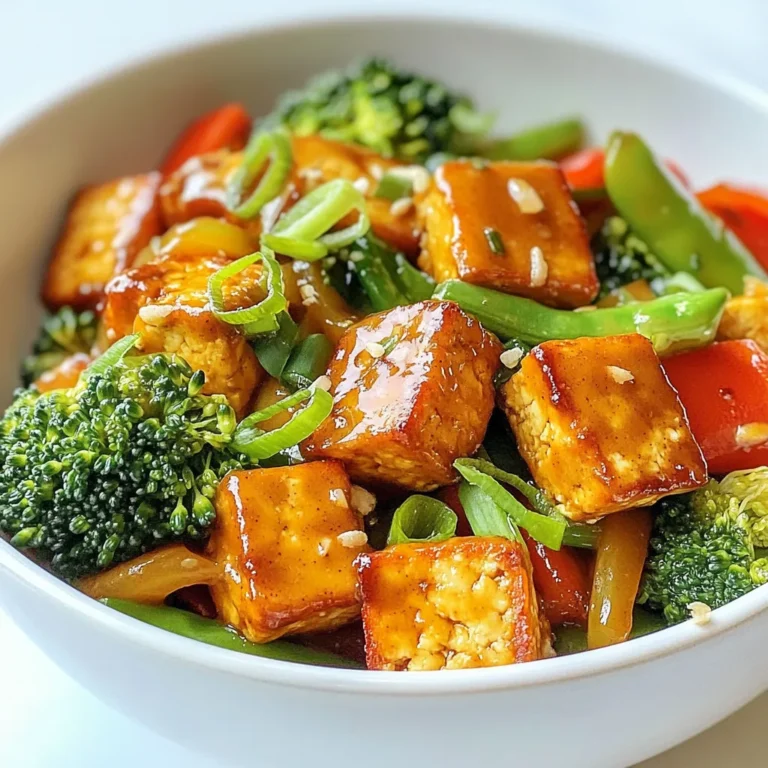
Tofu Stir Fry with Peanut Sauce Flavorful and Easy Dish

- 1 cup Greek yogurt (high-protein, plain or vanilla-flavored) - 1/2 cup fresh strawberries, hulled and sliced - 2 tablespoons cream cheese, softened The main ingredients create a rich base. Greek yogurt adds protein and creaminess. Fresh strawberries give a burst of flavor and color. Cream cheese makes the mixture smooth and cheesecake-like. - 1 tablespoon honey or maple syrup (adjust for sweetness) - 1/4 teaspoon vanilla extract Sweeteners enhance the taste. You can choose honey or maple syrup. They add natural sweetness. Vanilla extract brings warmth and depth to the flavor. - 1 tablespoon chia seeds - 1/4 cup granola or crushed graham crackers (for topping) - Fresh mint leaves (for garnish) Toppings add texture and fun. Chia seeds boost nutrition and crunch. Granola or crushed graham crackers add a sweet crunch. Fresh mint leaves brighten the dish and add a pop of color. This yogurt bowl is not just tasty; it’s also a great source of protein. You can enjoy it for breakfast or as a snack. Feel free to experiment with the ingredients to make it your own. Start by taking a mixing bowl. Add 1 cup of Greek yogurt and 2 tablespoons of softened cream cheese. Use a spatula to mix them well. You want a smooth and creamy texture. Next, add 1 tablespoon of honey or maple syrup. Choose the sweetener that you like best. Then, add 1/4 teaspoon of vanilla extract. This will give your yogurt a lovely flavor. Mix everything together until it is well combined. Once your yogurt mixture is smooth, it's time for the chia seeds. Measure out 1 tablespoon of chia seeds. Gently fold the chia seeds into the yogurt mixture. Be careful not to overmix, as you want to keep that creamy texture. The chia seeds will add a nice texture and extra protein. Now, grab a serving bowl or a glass. Begin by layering half of the yogurt mixture at the bottom. Spread it evenly to cover the base. Next, add a layer of sliced fresh strawberries on top. Use about 1/2 cup of strawberries, hulled and sliced. Then, spoon the remaining yogurt mixture over the strawberries. This creates a nice second layer. Top the dish with the rest of the strawberry slices. Sprinkle 1/4 cup of granola or crushed graham crackers on top. This will add a delightful crunch. If you want, drizzle a bit more honey on top for extra sweetness. Finally, garnish with fresh mint leaves for a pop of color and freshness. Enjoy your high-protein strawberry cheesecake yogurt bowl! To get a smooth texture, start by using a mixing bowl. Add the Greek yogurt and softened cream cheese. Use a whisk to blend them well. This helps break up any lumps. Mix until creamy with no visible chunks. Then, gently fold in chia seeds. This keeps the mixture light and fluffy. Taste is key! Start with one tablespoon of honey or maple syrup. Mix it in well. After tasting, you can add more if you like it sweeter. Remember, the ripe strawberries add some natural sweetness too. Adjust based on your preference to find your perfect balance. Make your yogurt bowl look great! After layering the yogurt and strawberries, top it with granola or crushed graham crackers. This adds crunch and texture. A few fresh mint leaves on top make it pop with color. You can even drizzle a little honey for a touch of shine. A beautiful dish is always more fun to eat! {{image_2}} You can change the taste of your yogurt bowl easily. Try using different fruits like blueberries or bananas. These fruits add unique flavors and colors. You can also use agave syrup instead of honey. This swap offers a different sweetness. Each fruit and sweetener brings its own twist, making your bowl fun and fresh. Need a dairy-free option? Use coconut yogurt instead of Greek yogurt. It still gives you a creamy texture and rich taste. For those watching carbs, switch to low-carb sweeteners. This choice keeps the bowl healthy and tasty. Adjusting the ingredients makes it fit various diets. You can pair this yogurt bowl with other breakfast items. Try serving it with whole grain toast or scrambled eggs. This adds variety to your morning meal. You can also transform it into a dessert. Simply layer it in a fancy cup and add more toppings. It becomes a sweet treat for any time of day. To keep your High-Protein Strawberry Cheesecake Yogurt Bowl fresh, store leftovers in the fridge. Use an airtight container to avoid spills and keep out air. This helps maintain its creamy texture and flavor. You can enjoy it cold right from the fridge. This yogurt bowl stays fresh for about 2 to 3 days in the fridge. After that, it may lose flavor and texture. Always check for any off smells or changes in texture before eating. If you notice anything odd, it's best to toss it. You can enjoy your yogurt bowl cold, which is refreshing. If you prefer, you can warm it slightly in the microwave. Just heat it for a few seconds and check the temperature. Avoid overheating, as that can change the texture and taste. I recommend using high-protein yogurt, like Greek yogurt. It makes the dish creamy and filling. Regular yogurt has less protein, which can make the bowl less satisfying. High-protein yogurt boosts your energy and helps you feel full longer. This is especially good if you want a healthy start to your day. Yes, you can make this yogurt bowl ahead of time! To prepare in advance, mix the yogurt and cream cheese as directed. Store the mix in the fridge for up to two days. Just wait to add the strawberries and toppings until right before you eat. This keeps the strawberries fresh and crunchy. Absolutely! This yogurt bowl is great for meal prep. You can make several portions at once. Use small containers to divide the yogurt mix. Layer the strawberries and toppings in each container. This way, you have quick, healthy breakfasts ready to go all week. This blog post covered a tasty yogurt bowl made with Greek yogurt and fresh strawberries. I shared step-by-step instructions for preparing the mixture and suggested fun toppings for flavor and crunch. You can easily adjust the sweetness and customize the ingredients based on your taste. Remember, feel free to experiment with different fruits too! This yogurt bowl is not just a great breakfast; it can be a delicious dessert as well. Enjoy making a healthy treat that suits your needs!

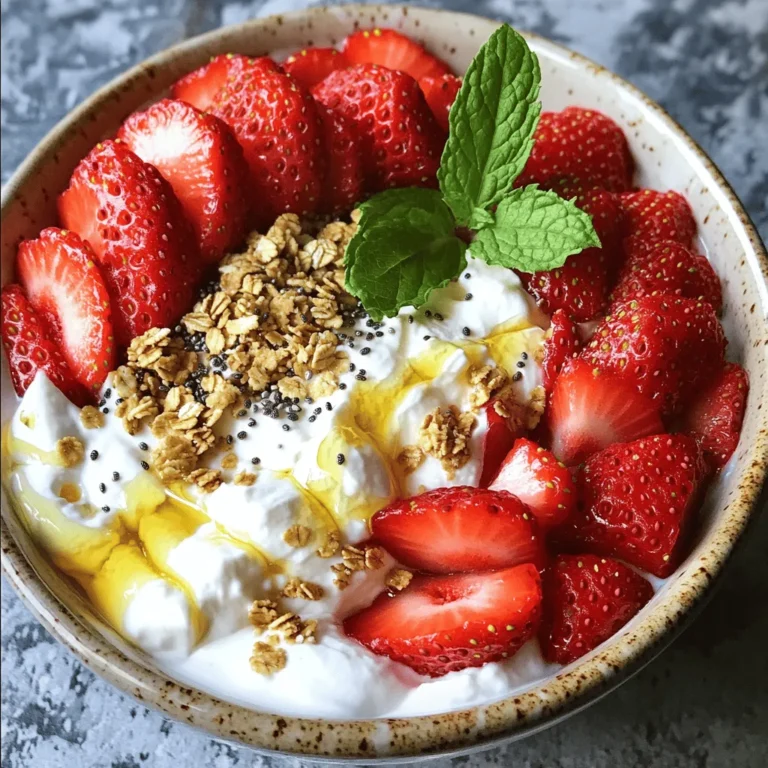
High-Protein Strawberry Cheesecake Yogurt Bowl Delight

- 2 medium zucchinis (spiralized into zoodles) - 1 cup bell peppers (sliced, red and yellow for color) - 1 cup snap peas - 1/2 cup carrots (julienned) - 1 tablespoon sesame oil - 2 tablespoons creamy peanut butter - 1 tablespoon soy sauce (or tamari for gluten-free) - 1 tablespoon honey or maple syrup - 1 teaspoon Sriracha (adjust to taste) - 1 garlic clove (minced) - 1 tablespoon fresh ginger (grated) - 1/4 cup chopped green onions (for garnish) - Crushed peanuts (for garnish) - Lime wedges (for serving) The secret to a great Minute Spicy Peanut Zoodle Stir-Fry lies in fresh, colorful ingredients. Start with your zucchinis. Spiralize them into zoodles. This gives your dish a fun twist. Next, grab some bell peppers. Use red and yellow ones for a vibrant look. Snap peas add a nice crunch, while julienned carrots bring sweetness. Now let's talk about pantry staples. You need sesame oil to stir-fry the veggies. Creamy peanut butter adds richness. Soy sauce gives it a salty kick, and honey or maple syrup brings in sweetness. For flavor, Sriracha adds heat. Garlic and ginger give depth and aroma. Finally, green onions and crushed peanuts add texture and a pop of flavor. Don’t forget the lime wedges. They brighten up the dish. Gather these ingredients, and you're ready to cook a meal that is quick, simple, and packed with taste! - Heat sesame oil in a skillet or wok over medium-high heat. - Sauté minced garlic and grated ginger for about 30 seconds. This step makes the kitchen smell amazing. - Add bell peppers, snap peas, and carrots to the skillet. - Stir-fry for 3-4 minutes until vegetables soften. They should still have a little crunch to them. - In a bowl, mix together peanut butter, soy sauce, honey, and Sriracha. - Pour the peanut sauce over the zoodles in the skillet. Toss everything until heated through, about 2-3 minutes. This makes the zoodles soak up all the great flavors. Serve hot, and enjoy your quick and tasty meal! To make your sauce just right, you can adjust the spice. If you want more heat, add more Sriracha. Start with a teaspoon and taste it. You can always add more later. If your sauce feels too thick, thin it out. Add a little water until you reach the consistency you want. This will help it coat the zoodles evenly. Spiralizing zucchinis can be fun! Use a spiralizer to create long, noodle-like shapes. Make sure to press down firmly while twisting. This gives you nice, even zoodles. To prevent mushy zoodles, don’t overcook them. Add them to the pan last and stir-fry just until heated. This keeps them firm and tasty. Garnishes can add great crunch and flavor. Try using crushed peanuts or sesame seeds for extra texture. You can also sprinkle on some cilantro or mint for a fresh touch. Serve with lime wedges for a zesty kick. A squeeze of lime adds brightness and enhances all the flavors. {{image_2}} You can easily add protein to your zoodle stir-fry. Chicken, tofu, or shrimp work great. For chicken, use bite-sized pieces. Cook them first in the hot oil until browned. For shrimp, add them when the veggies start to soften. They cook fast, so keep an eye on them. If you choose tofu, cube it and pan-fry it until golden. This adds more texture and flavor to your dish. If you want to change up the veggies, try using carrots or squash instead of zoodles. Spiralized carrots give a sweet crunch. You can also use butternut squash for a different taste. Feel free to add seasonal vegetables like asparagus or broccoli. They add freshness and color. Just remember to cut them into small pieces for even cooking. You can easily make this dish vegan or vegetarian. Just skip the chicken or shrimp, and it will still taste great. For a gluten-free option, use tamari instead of soy sauce. Always check labels for allergens in sauces. This way, everyone can enjoy your tasty stir-fry without worry. To store your zoodle stir-fry, follow these easy steps: - Allow the dish to cool to room temperature. - Use airtight containers to keep it fresh. - Store in the fridge for up to three days. This method helps maintain the flavor and texture of your meal. If you want to avoid sogginess, keep the sauce separate until you’re ready to eat. When reheating zoodle stir-fry, you want to keep it tasty and crunchy. Here’s how: - Use a skillet over medium heat for about five minutes. - Stir gently to avoid breaking the zoodles. - You can also use the microwave. Heat in short bursts of 30 seconds, stirring in between. This way, you won’t lose the nice texture of the zoodles. Can you freeze zoodle stir-fry? Yes, but with care. Here are tips: - Zoodles can become watery when frozen. It’s best to freeze the stir-fry without them. - Store the cooked veggies and sauce in airtight containers. - For zoodles, freeze them separately for up to a month. When ready to eat, thaw the veggies and sauce in the fridge overnight. Cook the zoodles fresh to keep them firm and flavorful. This dish takes just 15 minutes from start to finish. You will spend about 10 minutes prepping. The cooking time is around 5 minutes. This means you can enjoy a tasty meal in no time! Yes, you can make this dish ahead of time! You can prepare the veggies and sauce early. Just store them in the fridge. When you are ready to eat, cook it fresh. This keeps the zoodles from getting soggy. Leftovers can last up to 3 days in the fridge. If you don't have zoodles, you can use other noodles. Try rice noodles, whole wheat spaghetti, or even quinoa. These options work well with the sauce and veggies. Just cook them according to their package instructions. This blog post provided a simple and tasty zoodle stir-fry recipe. We covered fresh produce, pantry staples, and flavor boosters. You learned step-by-step cooking methods and useful tips for perfecting your dish. I also shared ways to customize the recipe for dietary needs and storage advice for leftovers. Cooking can be fun and easy. Enjoy trying this recipe, and feel free to make it your own!

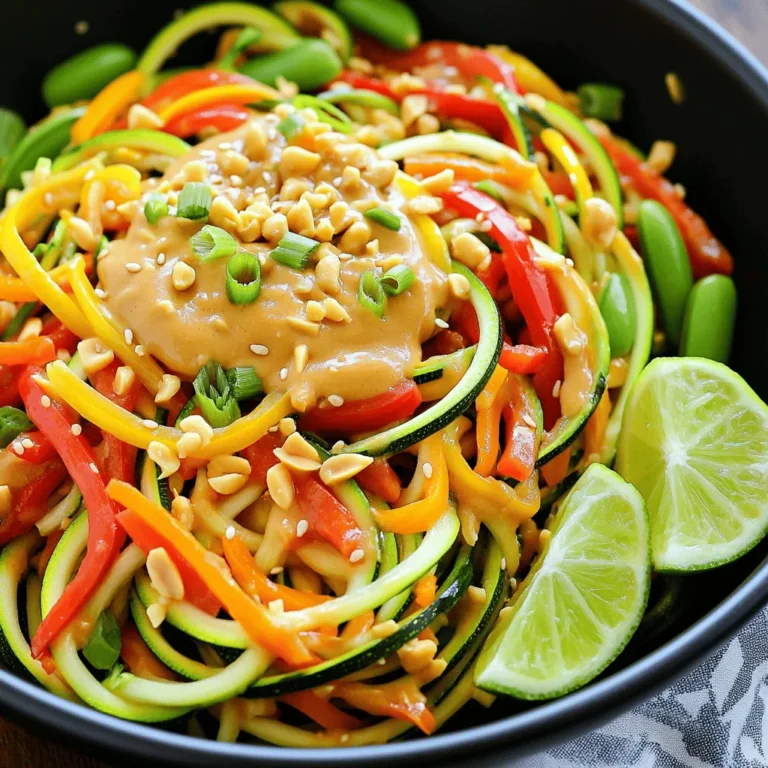
Minute Spicy Peanut Zoodle Stir-Fry Quick and Simple

PREV 1 … 24 25 26 … 53 NEXT
cozy citrus kitchen

explore

DessertsDinnerAppetizersDrinks

Our Policies

  • Cookie Policy
  • Copyright Policy
  • Disclaimer
  • GDPR Policy
  • Terms Of Use
Back to Top
  • About
  • Contact Us
  • Privacy Policy
© 2025 cozy citrus kitchen