FREE DINNER EBOOK! Get your copy!
  • Cookie Policy
  • GDPR Policy
  • Disclaimer
  • Terms Of Use
  • Visit my other site: Fun Cookie Recipes
cozy citrus kitchen
  • Home
  • Dinner
  • Desserts
  • Drinks
  • Appetizers
  • Contact
  • About
  • Privacy Policy
  • Home
  • Dinner
  • Desserts
  • Drinks
  • Appetizers
  • Contact
  • About
  • Privacy Policy
  • Cookie Policy
  • GDPR Policy
  • Disclaimer
  • Terms Of Use
Visit my other site: Fun Cookie Recipes

HOME / CATEGORIES /

Latest

- 1 pound boneless, skinless chicken breasts (cubed) - 8 ounces penne pasta - 2 tablespoons olive oil - 1 small onion, diced - 3 cloves garlic, minced - 1 cup chicken broth - 1 cup heavy cream - ½ cup buffalo sauce (adjust to taste) - 1 cup shredded cheddar cheese - Salt and pepper to taste In this dish, chicken brings protein and richness. The penne pasta soaks up all the flavors. Olive oil adds healthy fats and helps cook the chicken. Onion and garlic give a tasty base that makes everything smell great. Chicken broth adds depth to the sauce. Heavy cream makes the dish creamy and smooth. Buffalo sauce brings heat and tang. Finally, cheddar cheese melts beautifully, adding flavor and texture. - ½ cup blue cheese crumbles - Fresh herbs (like parsley or chives) Blue cheese crumbles add a sharp flavor that works well with buffalo sauce. Fresh herbs brighten the dish and give it a fresh touch. You can skip them or use your favorites. Adding these ingredients can make your pasta even more flavorful and exciting! First, heat 2 tablespoons of olive oil in a large pot over medium heat. Add 1 pound of cubed chicken breasts. Season with salt and pepper. Cook for 5-7 minutes until the chicken is golden brown and cooked through. Remove the chicken from the pot and set it aside. This helps keep the chicken juicy and tender. In the same pot, add 1 small diced onion. Sauté it for 2-3 minutes, until it turns translucent. Next, add 3 minced garlic cloves. Cook for an additional 30 seconds while stirring. This step builds a strong flavor base for your dish. Pour in 1 cup of chicken broth and bring it to a simmer. Add 8 ounces of penne pasta and ½ cup of buffalo sauce. Stir well to combine all the ingredients. Cover the pot and cook for 12-15 minutes. Stir occasionally to keep the pasta from sticking. This timing helps the pasta cook to the perfect al dente texture. Once the pasta is done, lower the heat. Stir in 1 cup of heavy cream and 1 cup of shredded cheddar cheese. Mix until the cheese melts and the sauce is creamy. Add the cooked chicken back into the pot and stir to combine everything. This creates a rich and satisfying sauce. If you want, sprinkle ½ cup of blue cheese crumbles over the top. Stir gently until melted. Taste the dish and adjust seasoning with more salt, pepper, or buffalo sauce as needed. Let it sit for a couple of minutes to thicken slightly. Serve in deep bowls, garnished with chopped green onions and an extra drizzle of buffalo sauce. Enjoy your delicious meal! To make sure your chicken cooks evenly, cut it into even pieces. This helps it cook faster and brown nicely. Heat the olive oil in your pot first, then add the chicken. Season it well with salt and pepper. Cook it for about 5-7 minutes. Always check that it is no longer pink inside. This means it is safe to eat. To get a rich and creamy sauce, add the heavy cream after cooking the pasta. Turn down the heat before adding it. This keeps the cream from curdling. Stir in the shredded cheddar cheese slowly. It melts better this way. If you like blue cheese, sprinkle it in last. It adds a nice kick to the sauce. To store any leftovers, let the pasta cool first. Then, put it in an airtight container. You can keep it in the fridge for 3-4 days. When you want to reheat it, add a splash of chicken broth or cream. This helps keep the sauce creamy. Warm it on low heat, stirring often to avoid burning. {{image_2}} If you need to make this dish fit your diet, there are easy swaps. - Gluten-free pasta alternatives: You can use brown rice pasta or chickpea pasta. Both work well and taste great. - Dairy-free options: Try coconut cream instead of heavy cream. This gives a nice richness. Use nutritional yeast for a cheesy flavor without dairy. To change things up, consider adding more ingredients or sauces. - Adding vegetables or different sauces: You can toss in spinach, bell peppers, or even corn. These add color and health. For a twist, try ranch dressing instead of buffalo sauce for a milder taste. - Spicy adjustments for heat lovers: If you like heat, add more buffalo sauce. You can also throw in a pinch of cayenne pepper or some sliced jalapeños. Pair your dish to make it a full meal. - Pairings with sides or salads: Serve this creamy pasta with a fresh green salad. A side of garlic bread is also a great choice. You can even top it with extra green onions or serve it with ranch dressing on the side for dipping. To keep your One-Pot Creamy Buffalo Chicken Pasta fresh, store it in airtight containers. Use glass or plastic containers that seal well. Let the pasta cool to room temperature first. This helps avoid condensation, which can make it soggy. Place the containers in the fridge. Enjoy your leftovers within 3-4 days for the best taste. You can freeze this dish for longer storage. Allow the pasta to cool completely before freezing. Use freezer-safe bags or containers. Be sure to remove as much air as possible to prevent freezer burn. Label your containers with the date. You can freeze it for up to 3 months. To thaw, place it in the fridge overnight before reheating. When you're ready to enjoy your pasta again, reheat it gently. Use a saucepan on low heat. Add a splash of chicken broth or cream to keep it creamy. Stir often to prevent sticking. You can also use the microwave, but cover the dish to trap steam. Heat in short bursts and stir in between. This keeps the flavor and texture just right. Yes, you can make this recipe ahead of time. For meal prep, cook the dish fully and let it cool. Store it in an airtight container in the fridge for up to three days. You can also freeze it for longer storage. When ready to eat, reheat it on the stove over low heat. Stir often to keep it creamy and prevent sticking. I recommend using a medium heat buffalo sauce. If you like it hotter, go for a hot sauce brand that you enjoy. Store-bought sauces like Frank's RedHot work great. You can also make your own buffalo sauce. Just mix melted butter with hot sauce for a fresh taste. Adjust the ratio based on your heat preference. To add more heat, consider these ingredients: - Extra buffalo sauce - Red pepper flakes - Diced jalapeños - Hot sauce on the side for serving You can add these to your liking for an extra kick. Each option lets you customize the heat to suit your taste! To wrap up, we covered key ingredients like chicken, pasta, and tasty seasonings. You learned how to prepare and cook each step for the best results. We shared tips for perfect chicken and the creamiest sauce. Variations can help fit your taste, and we discussed how to store or reheat leftovers. In the end, this dish is fun to make and enjoy. Feel free to get creative, and your meal will impress!

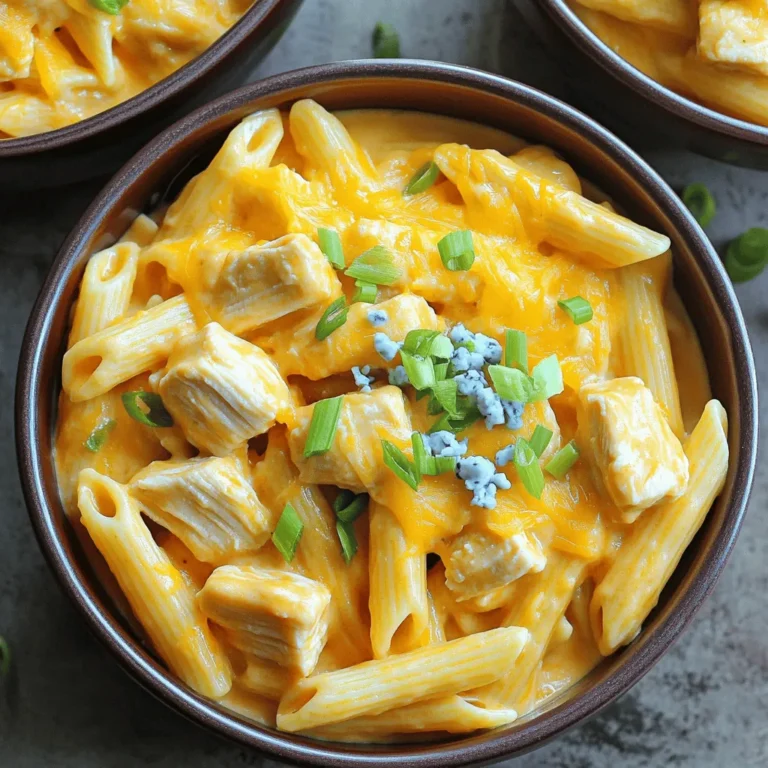
One-Pot Creamy Buffalo Chicken Pasta Delight

To make Air Fryer Chimichurri Steak Bites, you need fresh and simple ingredients. Here’s the list: - 1 lb sirloin steak, cut into 1-inch cubes - 2 tablespoons olive oil - Salt and pepper to taste - 1 cup fresh parsley, finely chopped - 1/4 cup fresh cilantro, finely chopped - 3 cloves garlic, minced - 1 teaspoon red pepper flakes - 1 tablespoon red wine vinegar (or apple cider vinegar) - Juice of 1 lemon Each ingredient plays a key role in the dish. The sirloin steak gives you rich flavor and tender bites. The olive oil helps with cooking and adds richness. Salt and pepper bring out the meat's natural taste. Herbs like parsley and cilantro make the chimichurri bright and fresh. Garlic adds depth, while red pepper flakes give a nice kick. Vinegar and lemon juice balance everything with acidity. Using fresh ingredients is important. They enhance the dish and make it taste great. When you gather these items, you prepare for a flavorful cooking experience. To start, gather your fresh herbs. You will need parsley and cilantro. Chop them finely. Next, take three cloves of garlic and mince them well. In a bowl, combine the chopped herbs, garlic, red pepper flakes, vinegar, and lemon juice. Mix everything thoroughly. This will create a bright, zesty chimichurri sauce. You want a smooth texture; make sure all ingredients blend well. Now, let's move on to the steak. Take one pound of sirloin steak and cut it into 1-inch cubes. Place the steak cubes in a large bowl. Drizzle them with two tablespoons of olive oil. Sprinkle salt and pepper to taste. Toss the cubes gently to coat them evenly. Next, add half of your chimichurri sauce to the steak. Mix it well and let it marinate for at least 30 minutes. This helps the flavors soak in. While you wait, preheat your air fryer to 400°F (200°C) for about five minutes. Once it's ready, place the marinated steak bites in the air fryer basket. Arrange them in a single layer, giving them room to cook. Air fry the steak for about 8 to 10 minutes. Make sure to shake the basket halfway through. This helps them cook evenly. After cooking, check if they are done to your liking. Let the steak bites rest for a couple of minutes before serving. Drizzle the reserved chimichurri sauce on top for a fresh finish. Enjoy your flavorful steak bites! For these steak bites, I recommend using sirloin. Sirloin has great flavor and tenderness. It cooks well in the air fryer. Other cuts, like ribeye or tenderloin, can work too. They may cost more, but they offer rich taste. Look for marbling in the meat; it adds juiciness. To get your steak bites just right, aim for medium rare to medium. Use a meat thermometer for best results. Here are some key temperatures: - Rare: 125°F (51°C) - Medium Rare: 135°F (57°C) - Medium: 145°F (63°C) Cook your steak bites for about 8-10 minutes. Shake the basket halfway through cooking. This helps them cook evenly. Let them rest for a few minutes before serving. This keeps them juicy and tasty. While chimichurri adds a lot of taste, you can boost it even more. Try adding spices like cumin or smoked paprika to the steak. You can also use different herbs like oregano or basil in the chimichurri. If you like heat, consider more red pepper flakes. Marinades with soy sauce or lime juice can also add a nice kick. {{image_2}} You can swap out sirloin steak for chicken or tofu. Chicken thighs work well and stay juicy. Cut them into bite-sized pieces, just like you would the steak. For tofu, use firm or extra-firm. Press out extra water, then cube the tofu. Marinate with the same chimichurri sauce for flavor. Both options will give you a tasty twist. Chimichurri is versatile! You can try different herbs for new tastes. Fresh oregano or basil can brighten the sauce. Add a pinch of cumin for warmth or a dash of smoked paprika for depth. If you like it spicy, increase the red pepper flakes. Feel free to experiment until you find your favorite mix. These steak bites are great on their own, but you can enhance your meal. Serve them with rice or quinoa for a hearty dish. Roasted veggies add color and nutrition. You can also pair them with dipping sauces like ranch or a spicy aioli for extra flavor. Enjoy finding the perfect sides! To keep your Air Fryer Chimichurri Steak Bites fresh, store them in an airtight container. Place a piece of parchment paper between layers if you stack them. This helps prevent sticking. Refrigerate the leftovers within two hours of cooking. For longer storage, freeze them. Use freezer-safe bags or containers. Remember to remove as much air as possible. This helps avoid freezer burn. When you're ready to enjoy your leftovers, reheating is key. The best way is in the air fryer. Preheat to 350°F (175°C). Place the steak bites in the basket for about 5 minutes. Check to ensure they heat evenly. If using a microwave, place them on a microwave-safe plate. Heat for 1 minute, then check. Stir or flip them for even heating. Avoid overcooking, as it can dry out the steak. In the fridge, your steak bites stay fresh for about 3 days. If frozen, they last for up to 2 months. Always check for any off smells or changes in texture before eating. If they look or smell odd, it's best to toss them out. Enjoy your flavorful bites while they are still at their best! Yes, you can make chimichurri sauce ahead of time. Store it in a sealed container in the fridge. It stays fresh for up to one week. The flavors deepen and improve if you let it sit for a day. Just remember to give it a good stir before using. One common mistake is overcooking the steak bites. This can make them tough. Aim for medium rare to medium doneness for the best texture. Another mistake is under-seasoning. Don’t be shy with salt and pepper. It enhances the flavor of the steak and the sauce. Yes, you can grill or pan-sear the steak bites instead of air frying. If grilling, preheat your grill to medium-high heat. Cook for about 7-9 minutes, turning until done. For pan-searing, heat a skillet over medium-high heat. Cook the steak bites for about 5-7 minutes, flipping halfway. Adjust cooking times based on the thickness of the meat. This post covered everything you need to create delicious steak bites with chimichurri. We went through important ingredients and step-by-step instructions to prepare and cook them perfectly. I shared tips to pick the best steak and avoid common mistakes. You can even explore variations to suit your taste. I hope you feel ready to try this dish and impress your family and friends. Enjoy your cooking and use this recipe to make great meals!

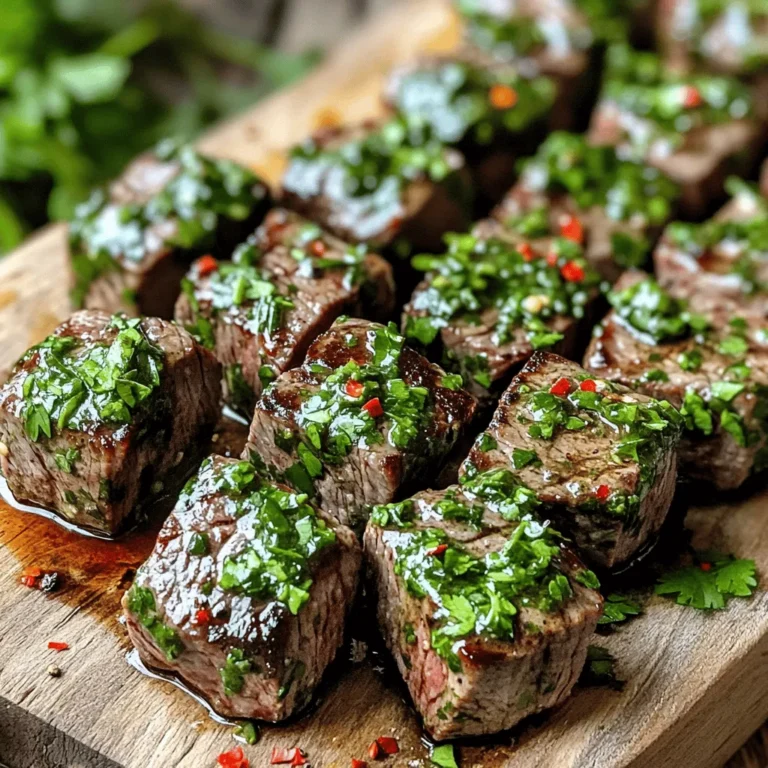
Air Fryer Chimichurri Steak Bites Flavorful Delight

To make honey garlic glazed carrots, you need a few simple items. Here’s what you will use: - 1 lb baby carrots, peeled - 3 tablespoons honey - 2 tablespoons unsalted butter - 2 cloves garlic, minced - 1 tablespoon soy sauce - Salt, to taste - Freshly ground black pepper, to taste - 1 tablespoon fresh parsley, chopped (for garnish) These ingredients blend together to create a sweet and savory dish. The baby carrots shine in this recipe. Their natural sweetness pairs well with the honey and garlic. Using unsalted butter gives you control over the saltiness. Garlic adds a rich flavor that really brings the dish alive. The soy sauce adds depth and umami, making the glaze irresistible. When choosing honey, opt for raw or local varieties for the best flavor. Fresh parsley not only adds color but also a burst of freshness. You will enjoy how these ingredients come together to make a tasty side dish! - Wash and peel the baby carrots. - If you use larger carrots, slice them into even-sized sticks. - First, melt the butter in a large skillet over medium heat. - Add minced garlic to the melted butter and sauté for about 1 minute. You want it fragrant but not browned. - Next, add the peeled carrots to the skillet. Stir them to coat in the garlic butter. Cook for about 5 minutes, stirring occasionally. - In a small bowl, mix honey and soy sauce. Pour this mixture over the carrots and stir well. - Continue cooking the carrots for another 10 to 12 minutes. Stir them often until they're tender and glazed. If the glaze gets too thick, just add a splash of water to loosen it. - Season with salt and freshly ground black pepper to taste. - Remove from heat and transfer the glazed carrots to a serving dish. Sprinkle with chopped parsley for a pop of color. To get the best glaze on your carrots, focus on the timing. Cook the carrots until they are tender but not mushy. This usually takes about 10 to 12 minutes after adding the honey mixture. Stir often to coat them well in the glaze. Stirring is key during cooking. It ensures the carrots cook evenly and soak up the flavors. If the glaze thickens too much, just add a splash of water. This keeps the carrots moist and flavorful. You can elevate the taste with a few simple changes. Consider adding fresh herbs like thyme or rosemary for a new twist. A pinch of ginger or red pepper flakes can add a nice kick. If you want a different sweet flavor, try maple syrup or agave nectar instead of honey. This gives the dish a unique taste while keeping it just as delicious. {{image_2}} You can make honey garlic glazed carrots even tastier. Adding spices like ginger gives a warm kick. A pinch of cinnamon can add sweetness and depth. Try mixing in other veggies, too. Broccoli or green beans work well. Just cut them small so they cook with the carrots. This way, you create a colorful and healthy dish. If you want this dish vegan, swap out the butter for olive oil. It still tastes great! To make it gluten-free, choose a gluten-free soy sauce. You can also change the sweetness. If you like it less sweet, reduce the honey. You can even try maple syrup for a different flavor. These simple changes make the dish fit your needs while keeping it delicious. To store leftover honey garlic glazed carrots, place them in an airtight container. This keeps the carrots fresh. Make sure to cool them before sealing. Store the container in the fridge. They will last for about three to five days. When you're ready to eat them, simply reheat in a skillet or microwave until warm. If you want to freeze glazed carrots, first let them cool completely. Then, spread them on a baking sheet in a single layer. This prevents them from sticking together. Freeze for a few hours, then transfer to a freezer bag. Remove as much air as possible to avoid freezer burn. These glazed carrots can last for up to three months. When you're ready to enjoy them, thaw in the fridge overnight and reheat gently. You can serve honey garlic glazed carrots with many dishes. They pair well with roasted chicken, grilled fish, or pork chops. They also make a great side for a veggie burger. Try them with rice or quinoa for a wholesome meal. These carrots add color and flavor to any plate. Yes, you can make this recipe in advance. Cook the carrots and let them cool. Then, store them in an airtight container in the fridge. When you are ready to eat, just reheat them on the stove. You might want to add a little water to help with the glaze. Check the carrots for tenderness. They should be soft enough to pierce with a fork. If you want them more tender, cook them a few minutes longer. Keep stirring to ensure they glaze evenly. The carrots will shine and have a nice color when they are ready. This blog post walked you through making honey garlic glazed carrots. It covered required ingredients, step-by-step prep, and tips for cooking. You learned how to customize flavors and store leftovers. These carrots can be a star side dish for any meal. With a few simple steps, you can create a tasty dish that everyone will love. Enjoy experimenting with this recipe and make it your own!

Honey Garlic Glazed Carrots Tasty and Wholesome Side

- 1 ½ cups Biscoff cookie crumbs - ½ cup unsalted butter, melted - 2 (8 oz) packages cream cheese, softened - 1 cup powdered sugar - 1 teaspoon vanilla extract - 1 cup heavy whipping cream - ½ cup Biscoff spread - Extra Biscoff cookies for garnish To make these No-Bake Biscoff Cheesecake Bars, you need specific ingredients. Each one plays a key role in the flavor and texture of the dessert. First, for the crust, I use Biscoff cookie crumbs. These crumbs provide a sweet, spicy base that pairs perfectly with the rich filling. Mixing these crumbs with melted butter gives you a firm crust that holds together well. Next, the cheesecake filling is truly the star. Softened cream cheese creates that creamy texture we love. Adding powdered sugar sweetens the mix, while vanilla extract adds a warm flavor. The heavy cream is crucial because whipping it gives volume and lightness. Finally, the Biscoff spread adds depth, giving a hint of caramel and spice. For the topping, I like to use extra Biscoff cookies. They not only add a nice crunch but also make the dessert look stunning. This simple touch makes each square even more inviting. With these ingredients ready, you can create an unforgettable dessert that everyone will love. 1. Combine 1 ½ cups of Biscoff cookie crumbs and ½ cup of melted butter in a bowl. 2. Stir until the mixture looks like wet sand. 3. Press this mixture firmly into the bottom of a lined 9x9-inch baking pan. 4. Refrigerate for 15 minutes to let the crust set. 1. In a large bowl, beat 2 packages (8 oz each) of softened cream cheese until smooth, about 2 minutes. 2. Gradually add 1 cup of powdered sugar and 1 teaspoon of vanilla extract. Mix until well combined. 3. In a separate bowl, whip 1 cup of heavy cream until stiff peaks form. 4. Gently fold the whipped cream into the cream cheese mixture until fully blended. 1. Swirl in ½ cup of Biscoff spread gently for a marbled look. 2. Pour the cheesecake mixture over the chilled crust and smooth the top with a spatula. 3. Refrigerate for at least 4 hours, or until set. To get smooth cream cheese, make sure it’s softened. Take it out of the fridge ahead of time. This helps it blend well. Beat it for about two minutes. You want it creamy, with no lumps. Whipped cream needs stiff peaks for the best results. This means it should hold its shape well. To whip it, use a clean bowl and beaters. Start on low speed, then go faster. Stop when it looks fluffy and firm. For an elegant touch, serve the cheesecake bars on a nice plate. You can also drizzle extra Biscoff spread on top. This adds a beautiful look. Plus, it gives more flavor. Use a squeeze bottle for easy drizzling. You can also add a sprinkle of cookie crumbs on top. This makes it look even nicer and adds some crunch. You can prepare this dessert in advance. It stays fresh in the fridge. Make it a day ahead for the best taste. Just follow the recipe and chill it well. Store it in an airtight container after it sets. This keeps it from drying out. If you want, you can cut it into squares before serving. This makes it easy for guests to grab and enjoy! {{image_2}} You can easily change the taste of your cheesecake bars. Adding chocolate is a great choice. Try folding in mini chocolate chips or using chocolate cookies for the crust. For a fruity twist, top your cheesecake bars with fresh berries. Strawberries, blueberries, or raspberries add a nice burst of flavor. You can also drizzle melted chocolate or caramel sauce on top for extra sweetness. If you want a gluten-free version, it’s simple! Just swap out regular Biscoff cookies for gluten-free cookies. There are many tasty options available now. Look for brands that offer gluten-free cookie varieties. This way, everyone can enjoy these delicious bars without worry. Making mini cheesecake bars is a fun idea! You can use a muffin tin instead of a baking pan. Just press the cookie crumb mixture into the bottom of each cup. Pour in the cheesecake filling, then chill until set. Once ready, pop them out and serve. These mini bars are perfect for parties or special events. To keep your No-Bake Biscoff Cheesecake Bars fresh, store them in the refrigerator. You should place them in a well-sealed container. This helps keep moisture out and flavors in. I suggest using an airtight container. This way, they stay creamy and delicious for days. Yes, you can freeze cheesecake bars! To freeze, cut the bars into squares first. Wrap each square tightly in plastic wrap. Then, place them in a freezer-safe bag. This helps prevent freezer burn. They can last up to three months in the freezer. When you want to enjoy them, let them thaw in the fridge overnight. This way, they stay tasty and smooth. Biscoff cookies are crunchy, spiced cookies. They have a rich caramel flavor. These cookies are often served with coffee. They give a sweet, warm taste that pairs well with desserts. Biscoff cookies are made with simple ingredients like flour, sugar, and spices. The unique taste comes from the caramelization of sugar during baking. Their delightful crunch adds a nice texture to many recipes. Yes, you can use different cream cheese types. Neufchâtel cheese is a great low-fat option. Mascarpone adds a rich and creamy texture. You can also try flavored cream cheese for a twist. Just make sure it’s softened for easy mixing. Each option will change the taste a bit but will still be yummy. You can keep leftover cheesecake bars for about 4 to 5 days. Store them in the fridge for the best taste. Use an airtight container to keep them fresh. If you want to keep them longer, you can freeze them. Wrap each bar in plastic wrap and place them in a freezer bag. They can last for up to 3 months in the freezer. This guide shared a simple way to make a Biscoff cheesecake. We covered the crust, filling, and topping, which make the dessert amazing. You learned about tips for perfect texture and presentation. Plus, we've discussed fun variations and storage tips. Enjoy each creamy bite of your cheesecake creation. Homemade desserts like this not only taste great, but they also impress guests. Keep exploring different flavors to make it your own. The kitchen is your canvas—get creative!

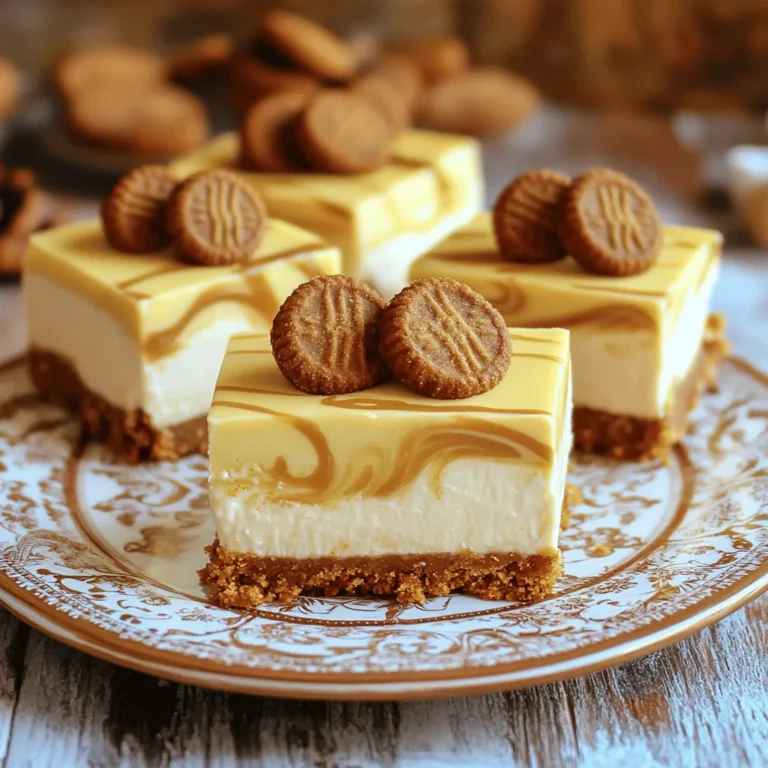
No-Bake Biscoff Cheesecake Bars Delightful Dessert

To make Creamy Gochujang Ramen, you need some key ingredients. Here’s what you need: - 200g ramen noodles - 2 tablespoons gochujang (Korean chili paste) - 1 cup coconut milk - 2 cups vegetable broth - 1 tablespoon sesame oil - 1 clove garlic, minced - 1 small onion, chopped - 1 cup baby spinach - 1 carrot, julienned - 1 green onion, sliced - 1 tablespoon soy sauce - Salt and pepper to taste - 2 boiled eggs (optional for topping) - Sesame seeds, for garnish These ingredients create a rich and creamy broth that warms you up. You can play with the recipe. Here are some optional ingredients: - Mushrooms for extra texture - Tofu for added protein - Hot pepper flakes for more heat - Cilantro for fresh flavor Feel free to add what you love. This dish is all about personal taste. Sometimes, you might not have all the ingredients. Here are some great swaps: - Use chicken or beef broth instead of vegetable broth. - Try almond milk if you can’t find coconut milk. - For gluten-free, use rice noodles instead of ramen. These substitutions still give you a tasty dish. Don’t be afraid to experiment! First, bring a pot of water to a boil. When the water is bubbling, add 200g of ramen noodles. Cook them according to the package instructions, usually about 3 to 4 minutes. Once done, drain the noodles and put them aside. This will keep them from getting soggy. Next, take a large pot and heat 1 tablespoon of sesame oil over medium heat. Once hot, add 1 small chopped onion. Sauté the onion for about 3 minutes until it looks soft and clear. Then, add 1 clove of minced garlic and 2 tablespoons of gochujang. Stir these ingredients for 1 minute until you smell the great aroma. Now, pour in 1 cup of coconut milk and 2 cups of vegetable broth. Stir well to mix everything together. Bring this mixture to a gentle simmer. After that, add 1 cup of baby spinach and 1 julienned carrot. Let the mix simmer for another 5 minutes. This will make the vegetables tender and flavorful. To finish, stir in 1 tablespoon of soy sauce. Add salt and pepper to taste. If you want more heat, you can add more gochujang. Now, gently add the cooked ramen noodles to the pot. Stir everything together to coat the noodles in the creamy broth. Heat for another 2 to 3 minutes. Finally, ladle the ramen into bowls. Top with sliced green onions, a boiled egg if you like, and sprinkle sesame seeds on top for a nice touch. Enjoy the warm, creamy goodness! To make your creamy gochujang ramen even tastier, think about these tips: - Use fresh ingredients. Fresh vegetables boost flavor. Look for bright green spinach and crisp carrots. - Adjust the gochujang. Add more gochujang for heat. Taste as you go to find your perfect balance. - Add umami depth. Consider adding a splash of soy sauce. It enhances the broth's richness. - Include herbs. Fresh cilantro or basil can brighten the dish. Just sprinkle them on before serving. Cooking noodles correctly is key to great ramen: - Use plenty of water. A large pot helps noodles cook evenly. Too little water makes them sticky. - Follow package instructions. Each brand may have different cooking times. Check to avoid overcooking. - Rinse with cold water. After draining, rinse noodles briefly. This stops cooking and prevents clumping. - Combine quickly. Add noodles to the broth right before serving. This keeps them warm and flavorful. Presentation matters, so consider these serving ideas: - Use deep bowls. They hold more broth and keep noodles submerged. This makes every bite flavorful. - Top generously. Add sliced green onions and sesame seeds. They add crunch and flavor. - Include boiled eggs. A soft-boiled egg adds richness. Cut it in half for a nice visual touch. - Try pickled veggies. They add a zingy contrast. Radishes or kimchi work well for extra flavor. {{image_2}} You can use many types of noodles for your creamy gochujang ramen. Ramen noodles are a classic choice. However, you can also try udon or soba noodles. Udon noodles are thick and chewy. They add a nice bite. Soba noodles are made from buckwheat, giving a nutty flavor. You can even use rice noodles for a gluten-free option. Experiment with different noodles to find your favorite. If you want a heartier meal, adding protein is a great idea. You can include chicken, shrimp, or tofu. For chicken, use cooked, shredded meat for easy mixing. If you like shrimp, just add it in the last few minutes of cooking. Tofu is perfect for a plant-based meal. Use firm tofu and sauté it to give it a nice texture. Each protein adds flavor and makes the dish more filling. You can easily make this dish vegan and gluten-free. For a vegan option, skip the eggs and use vegetable broth. Make sure your noodles are gluten-free, like rice noodles. You can also replace coconut milk with almond or oat milk for a lighter taste. Using these swaps keeps the creamy texture while fitting your diet. Enjoy your creamy gochujang ramen without worry! To store your creamy gochujang ramen, first let it cool. Place leftovers in an airtight container. This keeps your ramen fresh. Store it in the fridge. It stays good for up to three days. If you used eggs, it’s best to eat them soon. They may not stay fresh for long. When reheating ramen, add a splash of broth or water. This helps prevent it from drying out. Heat it on the stove over low heat. Stir gently to mix the flavors. You can also use a microwave. Heat in short bursts, stirring in between. Make sure it’s hot all the way through before serving. Freezing creamy gochujang ramen is a bit tricky. The noodles can get mushy when thawed. If you want to freeze it, store the broth and noodles separately. Use freezer-safe containers. The broth can last up to three months in the freezer. When you’re ready to eat, thaw the broth overnight in the fridge. Cook fresh noodles to add to the reheated broth. This way, your ramen stays tasty and fresh! Gochujang is a Korean chili paste. It has a sweet, spicy, and umami flavor. Using gochujang adds depth to your ramen. It makes the dish more exciting and flavorful. This paste blends well with coconut milk, creating a creamy base. You can find it in Asian markets or online. Yes, you can! If you want more heat, just add extra gochujang. Start with a little and taste as you go. This way, you control the spice level. You can also add chili flakes or fresh chili slices. These options let you customize the heat just how you like it. To make the broth less creamy, use less coconut milk. Try using half a cup instead of a full cup. You can also add more vegetable broth. This will lighten the broth while keeping the flavor. Mixing in some water can achieve the same effect. Just be sure to taste and adjust the seasoning. You can serve this ramen with various toppings. Try adding sliced green onions and sesame seeds for crunch. Boiled eggs are a great choice for extra protein. You can also serve it with pickled vegetables or kimchi. These sides pair well and enhance the meal's flavors. This blog post covered the essential and optional ingredients for creamy gochujang ramen. We walked through cooking methods, flavor tips, and serving ideas. You learned about variations, from noodles to vegan options. We also discussed storage tips for your leftovers. Gochujang ramen is fun to make and enjoy. Customize it to fit your taste. Have fun experimenting with new flavors and ingredients. You can create a dish that warms your stomach and soul.

Creamy Gochujang Ramen Flavorful and Simple Recipe

- Block of feta cheese (200g) - Cherry tomatoes (2 cups, halved) - Garlic (3 cloves, minced) - Dried oregano (1 teaspoon) - Red pepper flakes (½ teaspoon, optional) - Olive oil (3 tablespoons) - Salt and pepper - Pasta (300g, penne or fusilli) - Fresh basil leaves - Grated Parmesan cheese (optional) The ingredients for TikTok Baked Feta Pasta are simple yet packed with flavor. You start with a block of feta cheese. This creamy cheese melts beautifully in the oven. Next, you need cherry tomatoes. They burst with sweetness when baked. Garlic adds a nice punch. Use three cloves, minced, to amp up the taste. For seasoning, you will need dried oregano. It brings a nice earthy flavor. If you like heat, add red pepper flakes. Just half a teaspoon will do. You will also need olive oil for drizzling. It helps meld all the flavors together. Don’t forget salt and pepper to taste. Now, for the pasta, you can use either penne or fusilli. Both hold the creamy sauce well. Lastly, fresh basil leaves brighten the dish. You can sprinkle grated Parmesan cheese on top for extra richness. It’s a simple yet delightful combination! - Set the temperature to 400°F (200°C). - Place a block of feta cheese in the center of your baking dish. - Surround the feta with two cups of halved cherry tomatoes. - Add three cloves of minced garlic on top. - Sprinkle one teaspoon of dried oregano and half a teaspoon of red pepper flakes if you like heat. - Drizzle three tablespoons of olive oil over the feta and tomatoes. - Season with salt and pepper to taste before placing it in the oven. - Bake for 25-30 minutes. Look for blistered tomatoes and soft, melty feta. - While it bakes, cook 300g of pasta, like penne or fusilli, according to the package. - Drain the pasta and set it aside once it’s al dente. - After baking, take the dish out of the oven. - Use a fork to mash the feta and tomatoes into a creamy sauce. - Toss the cooked pasta with the sauce until well mixed. - Serve right away, garnished with fresh basil leaves and grated Parmesan cheese if you want. - Bake the feta and tomatoes for 25-30 minutes. This allows the tomatoes to burst and the feta to melt. - After baking, use a fork to mash the feta and tomatoes well. This creates a smooth, creamy sauce. - Cook your pasta until it is al dente. This means it should be firm when you bite into it. - Drain the pasta and set it aside, keeping it warm. You can toss it with a little olive oil to prevent sticking. - Pair this dish with a fresh salad or crusty bread. Both complement the flavors well. - For a nice touch, garnish with fresh basil leaves and a sprinkle of grated Parmesan cheese. This adds color and taste. {{image_2}} You can switch out the feta cheese. Try goat cheese or ricotta for a different taste. Each cheese brings its own flavor. For tomatoes, use grape or sun-dried tomatoes. They add a fun twist. Want to add protein? Cook some chicken or shrimp. They pair well with the creamy sauce. For a vegetarian option, mix in chickpeas or lentils. These options keep the dish filling and tasty. You can boost the flavor with more herbs. Try basil, thyme, or parsley. They add freshness to the dish. For spice lovers, add more red pepper flakes. This gives the pasta a nice kick. Store any leftovers in an airtight container. This keeps the pasta fresh and tasty. Place it in the fridge within two hours of cooking. Use the pasta within three days for the best taste. You can reheat the pasta in a microwave or oven. If using a microwave, heat it in short bursts. Stir in between to keep it creamy. If using the oven, place it in a dish and cover it. Bake at 350°F (175°C) for about 15 minutes. This helps keep the creaminess. You can freeze baked feta pasta! Use a freezer-safe container. Make sure to let the pasta cool first. To thaw, move it to the fridge overnight. Reheat it in the oven for the best results. TikTok Baked Feta Pasta is a simple, creamy pasta dish. It became popular on TikTok due to its ease and taste. The recipe features a block of feta cheese, cherry tomatoes, and pasta. When baked, the feta melts and mixes with the tomatoes. This creates a rich sauce that coats the pasta. The dish is quick, fun, and perfect for any meal. Yes, you can! While penne and fusilli work best, any pasta will do. You can try spaghetti, rigatoni, or even gluten-free options. Just cook the pasta according to the package. Feel free to experiment with shapes and textures. Each type brings a unique twist to the dish. To make baked feta pasta gluten-free, choose gluten-free pasta. Many brands now offer great options. Look for pasta made from rice, corn, or chickpeas. Cook it just like regular pasta. Follow the package instructions for the best results. You’ll still enjoy the creamy sauce and flavors. Baked feta pasta can be part of a healthy diet. Feta cheese is lower in fat than many other cheeses. It offers protein and calcium, too. The cherry tomatoes add vitamins and antioxidants. To keep it healthy, use less oil or add more veggies. Balance is key, and this dish can fit well into most meal plans. Yes, you can prep this dish in advance! You can chop tomatoes and garlic ahead of time. Store them in the fridge until you’re ready. However, for the best flavor, bake it fresh. You can cook the pasta ahead and mix it later. Just combine everything right before serving for the best taste. This blog outlined a simple and tasty baked feta pasta recipe. We covered key ingredients, clear steps, and helpful tips for the best results. Remember, baking the feta and tomatoes creates a creamy sauce that makes every bite rich and flavorful. So, get creative with variations, and enjoy this dish with loved ones. Whether you choose to add protein or try different herbs, this recipe is sure to impress. Enjoy your cooking adventure and share your delicious results!

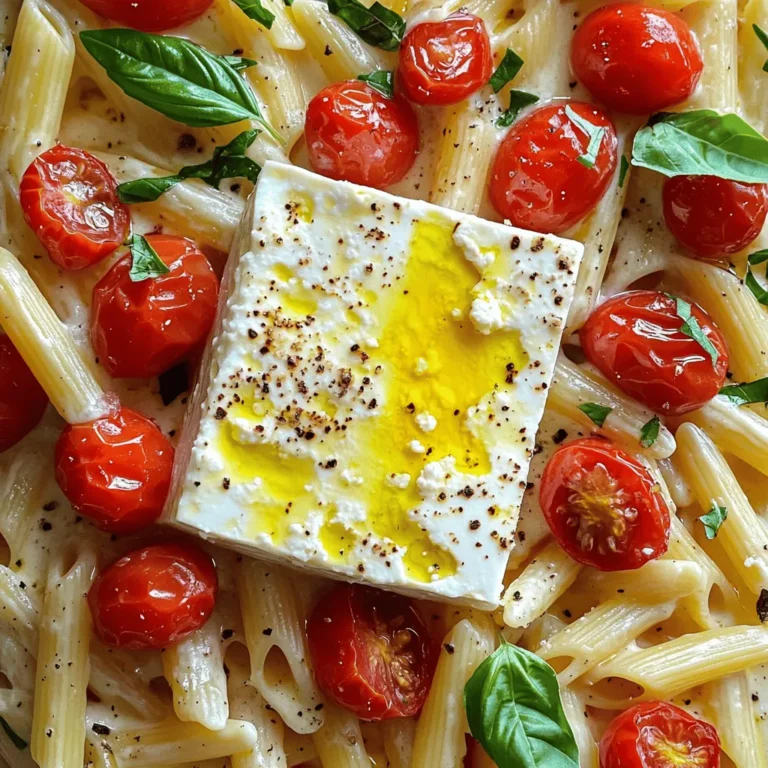
TikTok Baked Feta Pasta Quick and Easy Recipe

- Mozzarella sticks - All-purpose flour - Eggs - Panko breadcrumbs - Garlic powder - Italian seasoning - Paprika - Salt and pepper - Cooking spray The ingredient list is simple and easy to find. You will need mozzarella sticks as the star of the show. Choose fresh, high-quality sticks for the best taste. Next, get all-purpose flour to help the coating stick. Eggs will bind everything together. Panko breadcrumbs create that extra crunch we all love. Adding garlic powder and Italian seasoning will give your sticks a burst of flavor. Paprika adds a bit of color and warmth. Don’t forget salt and pepper to enhance all those flavors. Finally, cooking spray helps achieve a golden crust. Gather these items, and you're ready to start making crispy mozzarella sticks that pop with flavor! To start, freeze the mozzarella sticks for about one hour. This step helps them keep their shape when cooking. If you skip this, they may melt too quickly in the air fryer. Next, set up your breading stations. You will need three shallow bowls. In the first bowl, add one cup of flour. Season it with a pinch of salt and pepper. In the second bowl, beat two large eggs. In the third bowl, mix two cups of panko breadcrumbs with one teaspoon of garlic powder, one teaspoon of Italian seasoning, half a teaspoon of paprika, and a dash of salt and pepper. Now it’s time to coat the mozzarella sticks. Take each frozen stick and dip it into the flour. Shake off any extra flour. Next, dip the stick into the beaten eggs. Allow the excess egg to drip off. Finally, roll the stick in the panko mixture. Press gently to get an even coating. Repeat this for all the mozzarella sticks. Before you cook, preheat your air fryer to 400°F (200°C) for about five minutes. This helps the sticks cook evenly. Lightly spray the air fryer basket with cooking spray. Arrange the breaded mozzarella sticks in a single layer. Make sure they do not touch each other. Air fry the sticks for six to eight minutes. Check for a golden brown color and a crispy texture. Shake the basket halfway through to ensure even cooking. Once they are done, carefully remove the sticks and let them cool for a few minutes before serving. To get that crispy bite, start by freezing the mozzarella sticks for one hour. This helps them hold their shape during cooking. Next, the breading method is key. Use three bowls: one for flour, one for beaten eggs, and one for seasoned panko. The flour helps the egg stick. The panko gives that nice crunch. Make sure to coat each stick well. These mozzarella sticks go great with dipping sauces. Marinara sauce is a classic choice. You can also try ranch or spicy ketchup for a twist. For garnishing, sprinkle fresh parsley on top. It adds a pop of color and a hint of flavor. Avoid overcrowding the fryer. If you stack the sticks, they won’t cook evenly. Leave space between them for hot air to flow. Also, don’t forget to shake the basket halfway through cooking. This ensures all sides get crispy and golden brown. {{image_2}} You can switch up the cheese for fun. Cheddar, pepper jack, or even gouda work great. Each cheese brings its own flavor. Try using a blend for more depth. This gives you a tasty twist every time. Want some spice? Add cayenne pepper or chili powder to your breading. A little heat makes the sticks exciting! If you prefer herbs, mix in dried basil or oregano. These add a fresh taste and aroma. Experiment with your favorite spices to find the right mix. For a gluten-free version, replace all-purpose flour with almond flour. Use gluten-free panko breadcrumbs instead of regular ones. These swaps keep the crunch and taste just as good. You won't miss the gluten in these crispy delights! After you enjoy your mozzarella sticks, store any leftovers in the fridge. Place them in an airtight container. They stay fresh for up to three days. If you leave them out, they can get soggy and lose their crunch. In the air fryer The air fryer is best for reheating. Set it to 350°F (175°C). Place the mozzarella sticks in a single layer. Heat for about 3 to 5 minutes. This brings back the crispiness and warmth. Oven reheating You can also use the oven. Preheat to 375°F (190°C). Place the mozzarella sticks on a baking sheet. Bake for 10 to 12 minutes. This method works well too, but may take longer than the air fryer. You can freeze mozzarella sticks before or after cooking them. If freezing before cooking, follow these steps: - Lay the breaded sticks on a tray. - Freeze for about an hour until firm. - Then, transfer them to a freezer bag. Seal tightly to keep air out. If you freeze them after cooking, let them cool first. Then, place them in a freezer-safe bag. They can last for up to 3 months. To make mozzarella sticks, follow these key steps: - Freeze 12 mozzarella sticks for one hour to help them hold shape. - Set up three bowls: one with seasoned flour, one with beaten eggs, and one with panko mixed with garlic powder, Italian seasoning, and paprika. - Coat each stick in flour, dip in eggs, and roll in the panko mixture. - Preheat your air fryer to 400°F (200°C). - Arrange the sticks in the fryer basket and cook for 6-8 minutes until golden. Yes, you can use regular breadcrumbs. However, panko gives a crunchier texture. Regular breadcrumbs may make your sticks softer and less crisp. If you want that perfect crunch, stick with panko. Cook mozzarella sticks for 6-8 minutes at 400°F (200°C). Shake the basket halfway through. This ensures even cooking and helps them get crispy all around. Popular dipping sauces include marinara sauce, ranch dressing, and spicy aioli. You can also try garlic butter for a rich flavor. Each adds a tasty twist to your crispy mozzarella sticks. You now know how to make crispy mozzarella sticks in an air fryer. We covered all the steps from gathering ingredients to serving. Remember, freezing shapes your sticks, and proper breading ensures the crunch. Try different cheeses and seasonings to mix it up. Store leftovers well and reheat for tasty snacks later. Keep these tips in mind, and enjoy your delicious snacks!

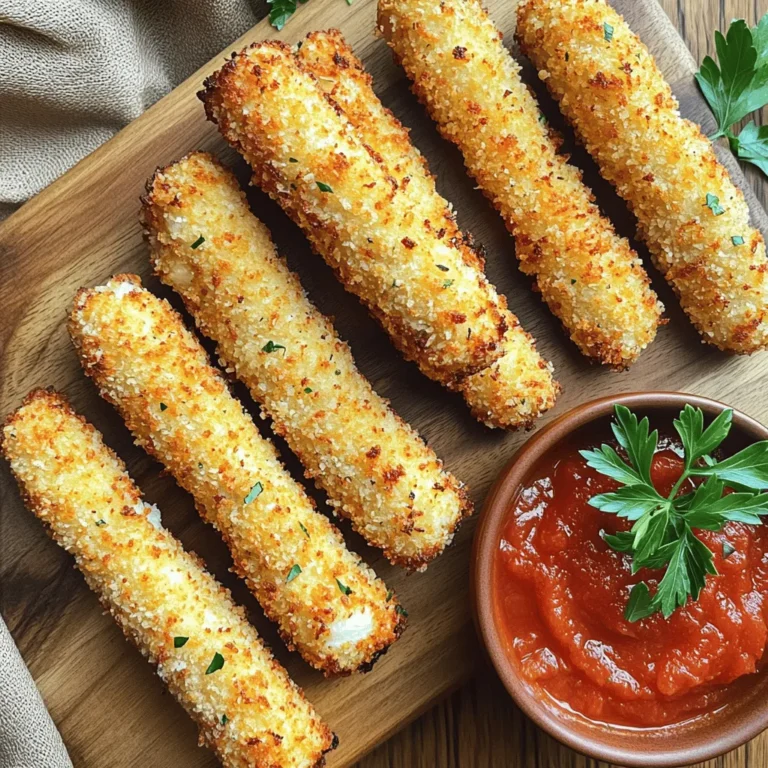
Air Fryer Crispy Mozzarella Sticks Perfectly Crunchy

To make Maple Pecan Overnight French Toast, you need some simple and tasty items. Here’s the list of ingredients: - 1 loaf of challah bread, sliced - 4 large eggs - 1 cup whole milk - 1 cup heavy cream - 1/2 cup maple syrup - 1 teaspoon vanilla extract - 1 teaspoon ground cinnamon - 1/4 teaspoon nutmeg - 1 cup pecans, roughly chopped - A pinch of salt Each ingredient plays a key role. The challah bread gives a soft and sweet base. Eggs, milk, and cream create a rich custard. Maple syrup adds a sweet touch. Vanilla extract and spices like cinnamon and nutmeg bring warmth and flavor. Finally, the pecans add a crunchy texture. This mix makes a perfect dish, ready to impress! Start by grabbing a big bowl. In this bowl, whisk together 4 large eggs, 1 cup of whole milk, and 1 cup of heavy cream. Mix them until they blend well. Next, add in 1/2 cup of maple syrup and 1 teaspoon of vanilla extract. These will give your French toast a sweet flavor. Then, sprinkle in 1 teaspoon of ground cinnamon, 1/4 teaspoon of nutmeg, and a pinch of salt. Whisk everything together until it looks smooth. The spices add warmth, making this dish cozy and inviting. Now, take your loaf of challah bread and slice it into thick pieces. Arrange the slices in a greased 9x13 inch baking dish. Overlap them slightly for a nice look. Once the bread is in place, pour the egg mixture evenly over the slices. Make sure each piece gets soaked well. Next, sprinkle 1 cup of roughly chopped pecans on top. Press them gently into the mixture. This step adds a nice crunch and flavor to the dish. Cover your baking dish with plastic wrap and place it in the refrigerator. Let it chill overnight or for at least 4 hours. This helps the bread soak up all the yummy flavors. The next morning, preheat your oven to 350°F (175°C). Take the dish out of the fridge. Let it sit at room temperature for about 15 minutes. This helps it bake evenly. Bake the French toast uncovered for 40 to 45 minutes. Look for a golden-brown top and a set center. Once done, let it cool for a few minutes before slicing. Enjoy this warm, tasty treat! To ensure the best texture for your Maple Pecan Overnight French Toast, follow these tips. First, soak the bread for at least four hours. Overnight soaking gives the bread time to absorb the egg mixture fully. If you can, let it soak for 12 hours. This way, you’ll get a soft, creamy center. When baking, preheat your oven to 350°F (175°C). Bake it uncovered for 40 to 45 minutes. This allows the top to turn golden brown. Keep an eye on it during the last few minutes. You want a crisp top while the inside stays moist. Now, let’s talk about serving. I love to top my French toast with extra maple syrup and whipped cream. Fresh berries also add a burst of flavor and color. You can even sprinkle some powdered sugar on top for a sweet touch. Pair your French toast with a cup of hot coffee or a refreshing glass of orange juice. The flavors mix well and make breakfast feel special. Try different drinks, like hot chocolate or herbal tea, to change things up. Making this dish ahead is easy. If you have leftovers, store them in an airtight container in the fridge. They will last for about three days. To reheat, place pieces in the oven at 350°F (175°C) for 10-15 minutes. You can also microwave them for a faster option. Just cover the French toast with a damp paper towel to keep it moist. Enjoy your delicious breakfast anytime! {{image_2}} You can easily make this dish nut-free. Start by using a different type of bread. You can use brioche or sourdough for a tasty change. These breads soak up the mix well and offer a nice texture. If you want to skip the pecans, simply omit them. You can also use seeds like sunflower seeds for a little crunch. Adding fruits or extracts can boost flavor. Fresh berries or sliced bananas work well in this dish. You can also mix in some vanilla or almond extract for a twist. For seasonal fun, try adding pumpkin spice during fall. It adds warmth and a festive touch to your meal. If you need gluten-free options, choose gluten-free bread. Many brands offer great flavors and textures. For dairy-free substitutions, use almond or oat milk instead of whole milk and cream. You can also replace the eggs with flaxseed meal mixed with water to keep the dish tasty and suitable for everyone. You can keep Maple Pecan Overnight French Toast in the fridge for up to three days. To store it properly, use an airtight container. This helps keep the flavors fresh. If you have leftovers, make sure to cut them into portions. Then, place them in the container. This way, you can grab a piece easily. You can freeze this dish either before or after baking. If you freeze it before baking, cover the dish tightly with plastic wrap. This keeps it from getting freezer burn. When you're ready to bake, thaw it in the fridge overnight and bake as usual. If you choose to freeze it after baking, let it cool completely first. Wrap individual pieces in plastic wrap, then place them in a freezer-safe bag. When you want to enjoy a piece, thaw in the fridge. Reheat in the oven at 350°F (175°C) for about 15-20 minutes. This warms it through perfectly. Yes, you can make this dish ahead of time. In fact, it’s perfect for that! You should prepare it the night before and let it soak in the fridge. This helps the bread absorb all the tasty flavors. Just cover it well with plastic wrap and refrigerate. I recommend using challah bread for this recipe. Its soft texture soaks up the egg mixture well. You can also try brioche or French bread if you want. These types give a rich and fluffy result. To make this dish gluten-free, swap the challah bread for gluten-free bread. There are many good options available now. Just make sure to check the labels for gluten-free certification. The rest of the recipe stays the same. Yes, you can use different nuts if you like. Walnuts and almonds are great choices. Just chop them roughly and sprinkle them on top. They will add a nice crunch and flavor. You’ll know it’s done when the top is golden brown. The center should look set and not jiggly. You can check it with a knife. If it comes out clean, your French toast is ready to enjoy! This blog post covers how to make Maple Pecan Overnight French Toast. You learned about the key ingredients, step-by-step instructions, and helpful tips for success. I shared ways to customize the dish, including nut-free and gluten-free options. Remember to store leftovers properly and to reheat them for best results. This recipe is simple and enjoyable for everyone. It’s a great way to start your day with a delicious meal. Enjoy making this tasty breakfast that your friends and family will love!

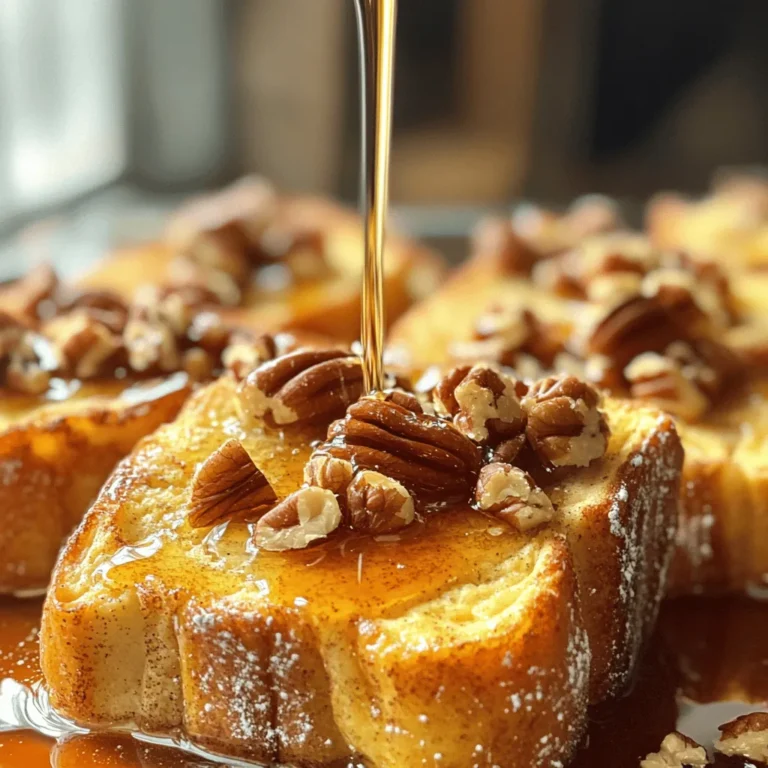
Maple Pecan Overnight French Toast Simple and Tasty

- 1 cup rolled oats - 1/2 cup almond flour - 1/2 cup nut butter (almond or peanut) - 1/4 cup maple syrup (or honey) - 1/4 cup mini chocolate chips - 1/4 cup rainbow sprinkles - 1 tsp vanilla extract - Pinch of salt These ingredients come together to make a fun treat that packs a punch. The rolled oats give great texture and fiber. Almond flour adds a nice nutty taste. Nut butter provides healthy fat and protein. You can use either almond or peanut butter, depending on what you like. The maple syrup or honey adds sweetness, while mini chocolate chips bring a fun twist. Rainbow sprinkles add color and joy, making these bites special for any birthday. The vanilla extract gives a lovely aroma, and the salt balances the sweetness. If you want to change things up, there are great swaps available. You can use any nut butter you prefer, like cashew or sunflower seed butter. For the sweetener, maple syrup and honey are both tasty. Choose what suits your diet or taste. If you need a gluten-free option, look for gluten-free rolled oats. They work just as well and keep the treats safe for those with gluten issues. These swaps keep the recipe flexible, so you can enjoy it your way. - Mixing dry ingredients: Start with a large bowl. Add 1 cup of rolled oats and 1/2 cup of almond flour. Stir them well until they mix together. This step ensures a good base for your bites. - Adding wet ingredients: Next, add 1/2 cup of nut butter, 1/4 cup of maple syrup, 1 teaspoon of vanilla extract, and a pinch of salt to the dry mix. Stir until everything blends nicely. This mix gives your energy bites a sweet and nutty flavor. - Recommended chilling time: After mixing, put the bowl in the fridge for about 15-20 minutes. This chilling time makes the mix easier to handle. - Tips for forming bite-sized balls: Once chilled, take the mix out. Use your hands to shape small balls, about 1 inch wide. If your hands are getting sticky, wet them a bit. This trick helps in forming neat bites. - Storing energy bites: Place the formed bites on a parchment-lined baking sheet. You can store them in an airtight container in the fridge for up to a week. For longer storage, freeze them. - Rolling in sprinkles for decoration: If you want extra fun, roll the bites in more rainbow sprinkles before chilling. This adds a festive touch to your energy bites! To make the best no-bake birthday cake energy bites, choose the right nut butter. Almond butter gives a mild, sweet taste. Peanut butter adds a rich, nutty flavor. Fresh ingredients make a big difference too. Use fresh oats and sprinkles for the best taste. Quality maple syrup or honey enhances the sweetness. Sometimes the mixture may be too wet or dry. If it’s too wet, add more almond flour or oats. If too dry, mix in a little extra nut butter or syrup. Adjust sweetness by adding more maple syrup if needed. Taste as you go to find what you like. Make your energy bites fun and pretty! Roll them in extra sprinkles to add color. You can use chocolate drizzle for a sweet touch. If gifting, pack them in clear bags with a ribbon. This makes them look special and fun. A personal touch always makes a gift better! {{image_2}} You can switch up the flavor of your energy bites easily. Try a chocolate birthday cake version by adding cocoa powder and dark chocolate chips. You will get a rich, sweet treat everyone will love. Funfetti bites are also a hit! Mix in colorful sprinkles for a cheerful look. You can even use different colors to match a theme. Want a protein boost? Add protein powder to your mix. This will make your bites filling and good for post-workout snacks. If you're vegan, replace honey with maple syrup. You can also choose nut butters like sunflower seed or soy nut butter. This way, you keep the taste while making it plant-based. Make these bites festive! For holidays, think about using red and green sprinkles for Christmas. You can also add peppermint extract for a minty twist. In summer, try adding dried fruits like cranberries or diced mango. These fruity bites are refreshing and perfect for warm days. To keep your No-Bake Birthday Cake Energy Bites fresh, store them in the fridge. Use an airtight container to prevent them from drying out. If you want to save some for later, they freeze well. Just place them in a freezer-safe bag, remove as much air as you can, and seal it tight. In the fridge, these bites stay fresh for about a week. Always check for signs of spoilage, like an off smell or change in texture. If you see any mold, toss them out. When you're ready to enjoy a frozen bite, take it out and let it sit for a few minutes. They soften quickly. For parties, serve these bites on a fun platter with extra sprinkles. They make great snacks too, perfect for kids and adults alike! No-bake energy bites last about a week in the fridge. Store them in an airtight container. If you freeze them, they can last up to three months. Just thaw when you’re ready to eat. This makes them great for meal prep! Yes, you can make these energy bites nut-free. Use sunflower seed butter instead of nut butter. You can also try soy nut butter. Both options will keep the energy bites tasty and safe for kids with nut allergies. Absolutely! Kids love these no-bake energy bites. They are fun to eat and packed with good ingredients. The rainbow sprinkles and chocolate chips make them feel like a treat. You can also make them healthier by using less sweetener. If you need a substitute for almond flour, try oat flour. You can make oat flour by blending rolled oats until fine. Coconut flour is another option, but use less. Coconut flour absorbs more moisture than almond flour. This recipe makes about 15 to 20 energy bites. The exact number depends on how big you make each bite. If you want more, just double the recipe. They’re perfect for sharing or for a quick snack! Making no-bake energy bites is simple and fun. We covered the ingredients, substitutions, and step-by-step instructions. You can easily adjust flavors, textures, and nutrition to match your needs. Remember to store them right for lasting freshness. These bites are great snacks for all ages. Enjoy experimenting with different toppings and variations. With these tips, you can make delicious bites anytime. Keep exploring and have fun with your recipes!

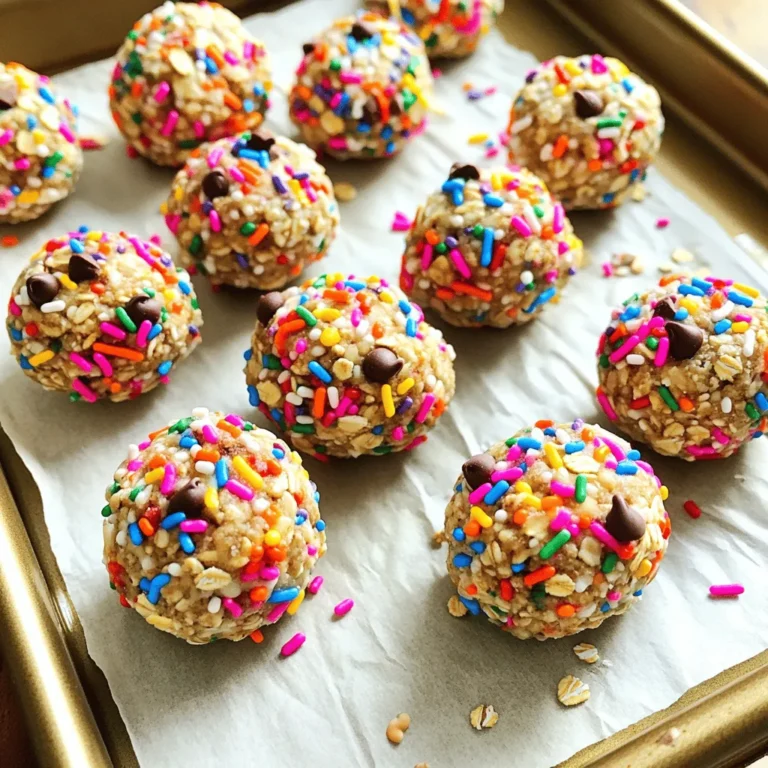
No-Bake Birthday Cake Energy Bites Simple Treat

- 1 pound ground beef or ground turkey - 2 tablespoons soy sauce (low sodium) - 1 tablespoon sesame oil - 1 tablespoon brown sugar - 2 cloves garlic, minced - 1 teaspoon ginger, grated - 1 tablespoon rice vinegar - 1 carrot, shredded - 1/2 cup green onions, sliced - 1 head of butter or romaine lettuce, leaves separated - Shredded carrot and sliced green onions - Chopped cilantro and peanuts for garnish - Large skillet - Measuring spoons and cups - Spatula In this recipe, you can use either ground beef or turkey. Both options work well. The soy sauce gives a salty taste. I like low sodium for a healthier touch. Sesame oil adds a rich flavor, and brown sugar balances the saltiness. You will also need garlic and ginger. They add a nice kick and aroma. Rice vinegar brings some tang to the mix. Don't forget the vegetables! Shredded carrots and green onions add color and crunch. For garnish, cilantro and peanuts give extra flavor and texture. Use butter or romaine lettuce for the wraps. The leaves hold the filling well and keep everything fresh. Gather these items before cooking. This way, you will have everything ready to make your Minute Korean Beef Lettuce Wraps quick and fun! 1. Start by heating the sesame oil in a large skillet over medium-high heat. 2. Add the minced garlic and grated ginger. Sauté for about 1 minute until it smells great. 3. Next, add the ground beef. Break it apart with a spatula. Cook it until browned, which takes about 5 to 7 minutes. 1. In a small bowl, mix together the soy sauce, brown sugar, and rice vinegar. Stir well until it is smooth. 2. Pour this sauce over the cooked beef. Stir to coat all the meat. Let it simmer on low heat for 2 to 3 minutes. 1. Add the shredded carrot and sliced green onions to the beef mixture. Cook for one more minute until the carrots soften a bit. 2. Remove the skillet from the heat. Let the mixture cool for a couple of minutes. 3. To serve, take a lettuce leaf and add a good amount of the beef mix into the center. 4. Top it all with chopped cilantro. If you like crunch, sprinkle some chopped peanuts on top. 5. Wrap the lettuce around the filling like a taco. Now, enjoy your tasty wraps! To get perfect browning on your meat, use a hot skillet. Heat your skillet first, then add sesame oil. This helps the beef sear nicely. Break the beef apart with a spatula as it cooks. Stir often to avoid steaming. Using low sodium soy sauce is key. It keeps the dish tasty without being too salty. This balance lets other flavors shine. Plus, it’s healthier, so you can enjoy more! When arranging your lettuce wraps, use large, sturdy leaves. Butter or romaine lettuce works best for this recipe. Spoon the beef mixture in the center. Then, fold the lettuce around it like a taco. This makes for easy eating! For garnishing, fresh cilantro adds color and flavor. You can also sprinkle chopped peanuts on top. This gives a nice crunch and makes them look fancy! Prep your ingredients ahead of time. Chop garlic, ginger, and vegetables before you cook. This makes the cooking process quick and smooth. Using pre-shredded vegetables can save you even more time. Look for bags of shredded carrots or coleslaw mix. They add crunch without the prep work! {{image_2}} You can switch up the protein in these wraps. Ground turkey or chicken works great. These options keep the dish lighter but still tasty. If you want a vegetarian choice, try tofu or tempeh. Just crumble the tofu or cut the tempeh into small pieces. Cook them just like the beef for a delicious meal. To add some heat, try chili paste. This gives the wraps a spicy kick. You can also experiment with different sauces. For example, hoisin sauce or spicy mayo can change the taste. Feel free to mix and match your favorite flavors to keep it exciting! These wraps can be served with some fun sides. Try serving them with rice or a fresh salad. You can also add extra sauces for dipping. This makes the meal more filling and satisfying. For a complete meal, consider serving crunchy veggies on the side. Enjoy the layers of flavor and texture! To store leftovers, first let the beef cool down. Then, place it in an airtight container. This helps keep the beef fresh. Store the container in the fridge. Leftovers can last for about 3 to 4 days. Always check for any off smells before eating. When reheating the beef mixture, use a skillet over medium heat. Stir it often to heat evenly. If you want to keep the lettuce crisp, reheat the beef only when you are ready to serve. Avoid microwaving the lettuce. Instead, serve the beef in fresh lettuce leaves. Yes, you can freeze the beef mixture! To freeze, let it cool completely first. Use a freezer-safe container or bag. Remove as much air as you can before sealing. The beef can stay good for up to 3 months. When you're ready, thaw it in the fridge overnight before reheating. Making Minute Korean Beef Lettuce Wraps is quick. You need about 10 minutes for prep. The cooking time is around 10 minutes. So, in just 20 minutes, you can enjoy this tasty dish. Yes, you can use different types of lettuce. Iceberg is crunchy and great for wraps. Romaine has a nice shape and holds fillings well. Both options work well for this recipe. You can make this dish gluten-free. Use gluten-free soy sauce instead of regular soy sauce. Make sure the brown sugar and rice vinegar are also gluten-free. This way, everyone can enjoy the wraps! You learned how to make Minute Korean Beef Lettuce Wraps using simple ingredients and steps. The recipe includes ground beef or turkey, a tasty sauce, and fresh vegetables. You saw tips for cooking and presentation, plus ways to change up the flavors. Remember, these wraps are quick and fun to make. Try them out and enjoy a healthy meal. With practice, you’ll perfect these tasty wraps and impress your friends and family. Happy cooking!

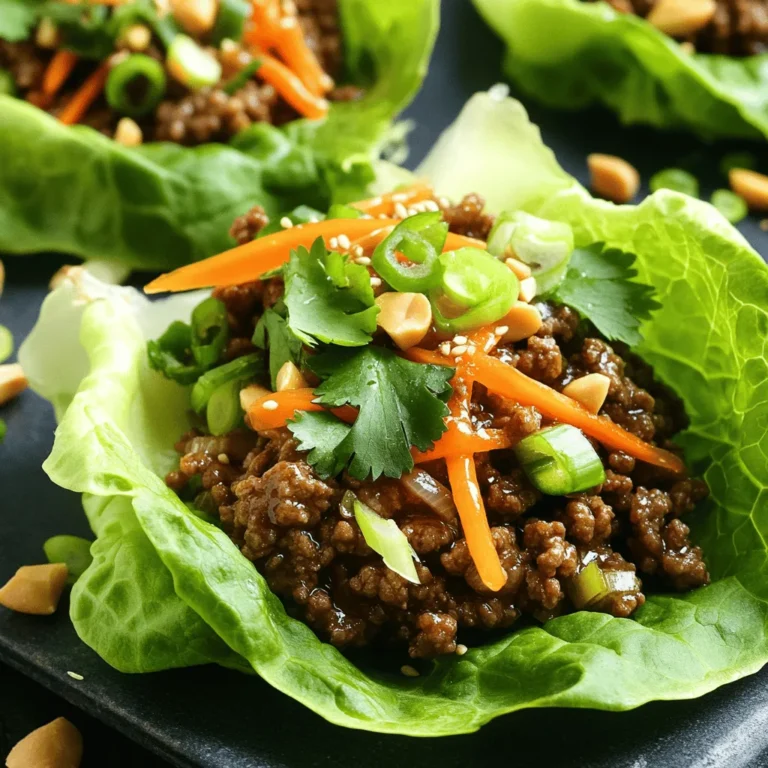
Minute Korean Beef Lettuce Wraps Quick and Flavorful Dish

PREV 1 … 23 24 25 … 53 NEXT
cozy citrus kitchen

explore

DessertsDinnerAppetizersDrinks

Our Policies

  • Cookie Policy
  • Copyright Policy
  • Disclaimer
  • GDPR Policy
  • Terms Of Use
Back to Top
  • About
  • Contact Us
  • Privacy Policy
© 2025 cozy citrus kitchen