FREE DINNER EBOOK! Get your copy!
  • Cookie Policy
  • GDPR Policy
  • Disclaimer
  • Terms Of Use
  • Visit my other site: Fun Cookie Recipes
cozy citrus kitchen
  • Home
  • Dinner
  • Desserts
  • Drinks
  • Appetizers
  • Contact
  • About
  • Privacy Policy
  • Home
  • Dinner
  • Desserts
  • Drinks
  • Appetizers
  • Contact
  • About
  • Privacy Policy
  • Cookie Policy
  • GDPR Policy
  • Disclaimer
  • Terms Of Use
Visit my other site: Fun Cookie Recipes

HOME / CATEGORIES /

Latest

For the base of the Peach Cobbler Pound Cake, you need: - 1 ½ cups all-purpose flour - 1 teaspoon baking powder - ½ teaspoon baking soda - ½ teaspoon salt - 1 cup unsalted butter, softened - 1 ½ cups granulated sugar - 3 large eggs - 1 teaspoon vanilla extract - 1 cup sour cream These ingredients work together to create a moist and rich pound cake. The butter gives a nice creamy texture. The eggs help the cake rise. Sour cream adds moisture and tang. For the peach filling and crumb topping, gather: - 2 cups fresh peaches, peeled and diced - 1 teaspoon cinnamon - ½ cup brown sugar (for topping) - 2 tablespoons unsalted butter, melted (for topping) Fresh peaches bring a sweet and juicy burst. Peeling and dicing them ensures even mixing. Cinnamon enhances the flavor, adding warmth. The brown sugar and melted butter mix to form a crumb topping, adding a crunchy finish to the cake. {{ingredient_image_1}} First, you need to preheat your oven to 350°F (175°C). This step is key for even baking. While the oven heats, grab a 9x5-inch loaf pan. Grease it well with butter, then dust it with flour. This helps the cake come out easily once it's baked. Next, mix the dry ingredients. In a medium bowl, whisk together the all-purpose flour, baking powder, baking soda, and salt. Set this bowl aside. In a larger bowl, cream together the softened butter and granulated sugar. Use an electric mixer on medium speed for about five minutes. This makes the mixture light and fluffy. Add three large eggs to the butter mixture, one at a time. Make sure to mix well after each egg. Now, stir in one teaspoon of vanilla extract. Gradually add the dry mix to the wet mix, switching with one cup of sour cream. Start and end with the dry mix. Mix on low speed until just combined. Now it’s time for the peaches! Fold in the two cups of diced peaches and one teaspoon of cinnamon. Gently mix until the peaches are well spread in the batter. Pour the batter into the prepared loaf pan. Use a spatula to smooth the top. In a small bowl, mix half a cup of brown sugar with two tablespoons of melted butter. This will be your crumb topping. Sprinkle this mixture evenly over the batter. Now, place the loaf pan in the preheated oven. Bake for 60 to 70 minutes. Check for doneness by inserting a toothpick in the center. If it comes out clean, your cake is ready! Once baked, let it cool in the pan for 10 minutes. Then, transfer it to a wire rack to cool completely. Using room temperature ingredients is key. When eggs and butter are at room temp, they mix better. This gives your cake a light, fluffy texture. Balancing sweetness enhances the peach flavor. You want the cake to taste peachy, not just sweet. So, use ripe peaches for the best flavor. Their natural sweetness works well in this dessert. To prevent overmixing, mix until you see no dry flour. Overmixing makes the cake dense. Use a spatula to fold in peaches gently. This keeps the peaches intact and juicy. For a golden crust, bake at the right temperature. A 350°F oven works best for an even bake. Check the cake at 60 minutes for doneness. To make this dessert more special, add toppings. A light dusting of powdered sugar looks nice. Serve with a scoop of vanilla ice cream for a creamy contrast. You can also slice fresh peaches on the side. For an elegant touch, use a decorative plate. This makes your presentation pop and impresses guests. Pro Tips Use Ripe Peaches: Ensure your peaches are ripe for the best flavor and sweetness. They should yield slightly to pressure when squeezed. Alternate Mixing: When adding the dry ingredients and sour cream, alternate them to maintain a light and airy batter. Cool Properly: Allow the cake to cool in the pan for 10 minutes before transferring it to a wire rack. This prevents it from breaking apart. Enhance Flavor: Consider adding a splash of peach schnapps to the batter for an extra depth of peach flavor. {{image_2}} You can easily change the taste of your Peach Cobbler Pound Cake. Adding nuts like walnuts or pecans gives a nice crunch. You can also mix in other fruits, such as blueberries or raspberries, for a twist. Each fruit adds its own flavor, making it fun to try different combinations. Experimenting with spices can also be exciting. Besides cinnamon, you could add nutmeg or cardamom. A dash of ginger can brighten the flavor too. These spices can make your cake unique and personal to your taste. If you need a gluten-free version, use gluten-free flour instead of all-purpose flour. It works well and keeps the cake moist. You can find many options at the store, so pick one that suits your needs. For a vegan version, swap out the eggs and butter. Use flaxseed meal mixed with water as an egg replacement. For butter, try coconut oil or vegan butter. Both options will keep your cake rich and tasty without dairy. To keep your peach cobbler pound cake fresh at room temperature, follow these steps: - Place the cake in an airtight container. - Use plastic wrap if you do not have a container. - Store it in a cool, dry place away from direct sunlight. If you want to refrigerate the cake, do this: - Wrap the cake in plastic wrap or foil. - This helps to keep the moisture in. - Store it in the fridge for up to five days. For long-term storage, freezing is your best option: - Slice the cake into individual pieces for easier thawing. - Wrap each slice in plastic wrap, then foil. - Place the wrapped slices in a freezer bag or container. - Label the bag with the date and type of cake. To thaw the cake, follow these steps: - Remove the desired slices from the freezer. - Leave them in the fridge overnight. - For a quick thaw, place slices at room temperature for an hour. To maintain freshness, remember: - Keep the cake wrapped until you are ready to eat. - Avoid exposing it to air, which can dry it out. - Enjoy your delicious treat even weeks later! How do I know when my pound cake is done? You can tell if your pound cake is done by using a toothpick. Insert it into the center of the cake. If it comes out clean, your cake is ready. Bake for 60 to 70 minutes. The cake should also feel firm and spring back when touched. Can I use canned peaches instead of fresh? Yes, you can use canned peaches if fresh ones are not available. Make sure to drain them well to avoid extra moisture. You may also want to reduce the sugar slightly since canned peaches can be sweeter. What is the best way to reheat peach cobbler pound cake? To reheat your pound cake, you can use the microwave or oven. In the microwave, place a slice on a plate and heat for 15 to 20 seconds. For the oven, preheat it to 350°F (175°C) and warm the cake for 10 minutes. This keeps it moist and tasty. What can I serve with peach cobbler pound cake? Peach cobbler pound cake pairs well with many treats. You can serve it with a scoop of vanilla ice cream. Whipped cream is also a great choice. Fresh peach slices on the side add beauty and flavor. How to enhance the dessert for special occasions? To make your cake feel special, try dusting it with powdered sugar. You can also add fresh mint leaves for color. For a unique touch, drizzle a sweet glaze over the top. This makes the cake look and taste amazing. In this blog post, we covered key ingredients for making peach cobbler pound cake. We discussed how to prepare the batter, bake it, and enhance its flavor. I shared tips for perfect texture and creative variations, along with storage advice. Remember, the right ingredients and careful steps lead to a delicious cake. Enjoy sharing this sweet treat with others, and don’t hesitate to get creative. Baking is about fun, flavor, and enjoying the process!

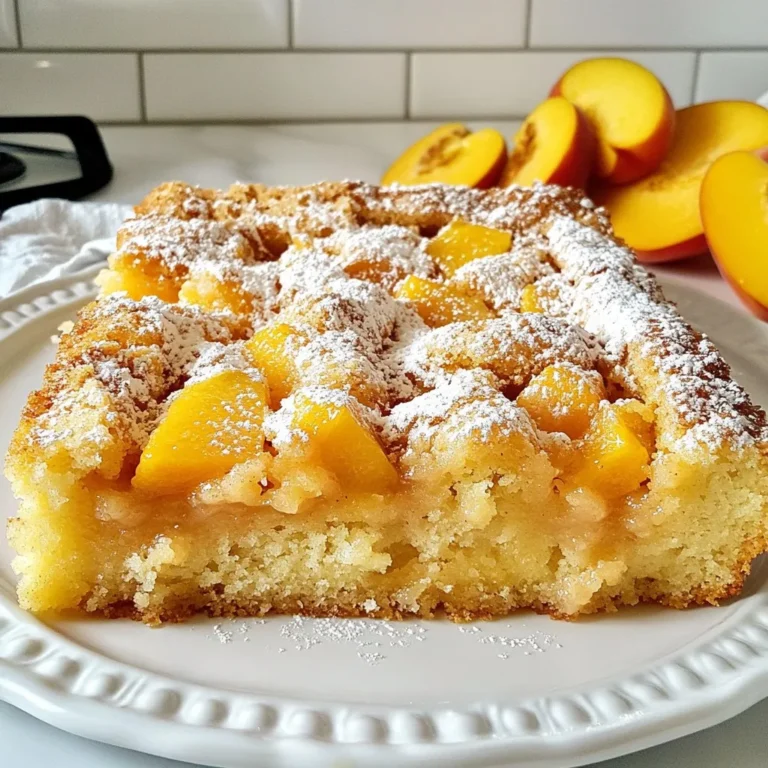
Peach Cobbler Pound Cake Tasty and Simple Dessert

To make the best creamy spinach artichoke dip, you need these key ingredients: - 1 cup fresh spinach, chopped - 1 cup canned artichoke hearts, drained and chopped - 1 cup cream cheese, softened - 1/2 cup sour cream - 1/2 cup mayonnaise - 1 cup shredded mozzarella cheese - 1/4 cup grated Parmesan cheese - 2 cloves garlic, minced - 1/2 teaspoon garlic powder - 1/2 teaspoon onion powder - Salt and pepper to taste - 1 tablespoon olive oil These items work together to create a rich and creamy texture that everyone loves. You can also add some optional ingredients for more flavor: - Red pepper flakes for heat This simple addition can take your dip to the next level. If you need to make some changes, here are a few substitutions: - Use Greek yogurt instead of sour cream for a healthier option. - Swap mozzarella for Gouda or cheddar cheese for a different taste. - Try fresh garlic if you prefer a stronger flavor. These swaps can help fit your taste or dietary needs while still keeping the dip delicious! {{ingredient_image_1}} 1. Preheat your oven to 350°F (175°C). This helps your dip bake evenly. 2. In a medium skillet, heat 1 tablespoon of olive oil over medium heat. 3. Add 2 cloves of minced garlic and sauté for 1 minute. Watch it closely! 4. In a large bowl, mix 1 cup of softened cream cheese, 1/2 cup sour cream, and 1/2 cup mayonnaise until smooth. 5. Stir in 1 cup of chopped fresh spinach and 1 cup of drained, chopped artichoke hearts. 6. Blend in 1 cup of shredded mozzarella cheese and 1/4 cup of grated Parmesan cheese. 7. Add the sautéed garlic, 1/2 teaspoon garlic powder, and 1/2 teaspoon onion powder. 8. Season with salt and pepper to taste. If you like heat, add red pepper flakes. 1. Transfer the dip mixture to an oven-safe baking dish. Spread it out evenly. 2. Bake for 25-30 minutes. Look for a bubbly, golden top. This means it’s ready! 3. Once done, take it out and let it cool slightly before serving. Serve your warm dip with tortilla chips, sliced baguette, or fresh veggie sticks. For a nice touch, garnish with fresh parsley or a sprinkle of red pepper flakes. Enjoy! To get a creamy dip, you want to mix well. Start with softened cream cheese. Mix it with sour cream and mayonnaise until smooth. This base gives your dip a nice, rich feel. When you add spinach and artichokes, chop them finely. This helps them blend better. For that gooey stretch, use fresh mozzarella. It melts beautifully and adds flavor. Baking your dip right is key. Preheat your oven to 350°F (175°C) to start. This temperature helps the dip cook evenly. Aim for 25 to 30 minutes in the oven. You want the top to turn golden and bubbly. If you bake it too long, it can dry out. So, keep an eye on it as it cooks. One mistake is not softening the cream cheese. Cold cream cheese makes it hard to mix. Another mistake is overcooking the dip. Watch for that golden top! Also, don’t forget to season well. Salt and pepper can enhance the flavors. Lastly, if you want heat, add red pepper flakes before baking. This gives a nice kick to your dip! Pro Tips Fresh Ingredients: Using fresh spinach and high-quality artichoke hearts will enhance the flavor of your dip significantly. Adjust the Creaminess: If you prefer a creamier dip, feel free to add more cream cheese or sour cream to the mixture. Make Ahead: This dip can be prepared a day in advance. Just store it covered in the fridge and bake it right before serving. Flavor Variations: Experiment with adding different spices or cheeses such as feta or cheddar for a unique twist on the classic recipe. {{image_2}} You can change the cheese for new flavors. Try adding Gouda or Cheddar for a rich taste. Gouda melts well and adds a smoky flavor. Cheddar gives a sharp bite that many love. You can mix different cheeses for more depth. Just remember to keep the blend creamy. Fresh herbs can brighten your dip. Add basil or dill for a fresh twist. Basil gives a sweet, aromatic quality. Dill adds a nice, tangy note. You can also try parsley or chives for a mild flavor. Mix these herbs right into the dip for a burst of taste. Want a lighter dip? Use Greek yogurt instead of sour cream. It adds creaminess and cuts calories. You can also swap out some mayo for more yogurt. This keeps the dip tasty while making it healthier. You can enjoy your dip guilt-free while still savoring every bite. To keep your creamy spinach artichoke dip fresh, store it in an airtight container. Let the dip cool to room temperature before sealing it. Place the container in the fridge. It will stay good for about three to five days. When you're ready to enjoy the dip again, reheat it gently. Use the oven or microwave. If using the oven, preheat to 350°F (175°C). Place the dip in an oven-safe dish and cover with foil. Bake for about 15-20 minutes, or until warm. If using a microwave, heat in 30-second intervals, stirring in between. This keeps it creamy and delicious. You can freeze the dip if you want to save some for later. Place it in a freezer-safe container. Make sure to leave some space at the top for expansion. It can last for about two to three months in the freezer. To use, thaw it in the fridge overnight. Reheat as mentioned before for the best taste. Yes, you can make this dip ahead of time. Prepare it fully, then cover and refrigerate it. When you are ready to bake, just pop it in the oven. It may need a few extra minutes to heat through. I often prepare it the night before and bake it just before serving. This way, it’s fresh and warm for my guests. Yes, this dip is gluten-free. All the ingredients listed, like cream cheese and artichoke hearts, do not contain gluten. Just be sure to check any store-bought items, like mayonnaise, to ensure they are labeled gluten-free. This dip is a great choice for gluten-free gatherings. You can serve this dip with many tasty options. Here are some of my favorites: - Tortilla chips - Sliced baguette - Fresh vegetable sticks, like carrots or celery - Pita chips These choices add a nice crunch and complement the creamy dip well. You can mix and match to find what you like best! In this post, we explored how to make creamy spinach artichoke dip, from key ingredients to baking tips. We discussed optional ingredients and substitutions to boost flavor. I shared the best ways to store and reheat leftovers, plus common mistakes to avoid. This dip is versatile, and you can even try different cheeses. Keep experimenting until you find your favorite version. With these tips, you will impress everyone with your dip at the next gathering. Enjoy making it!

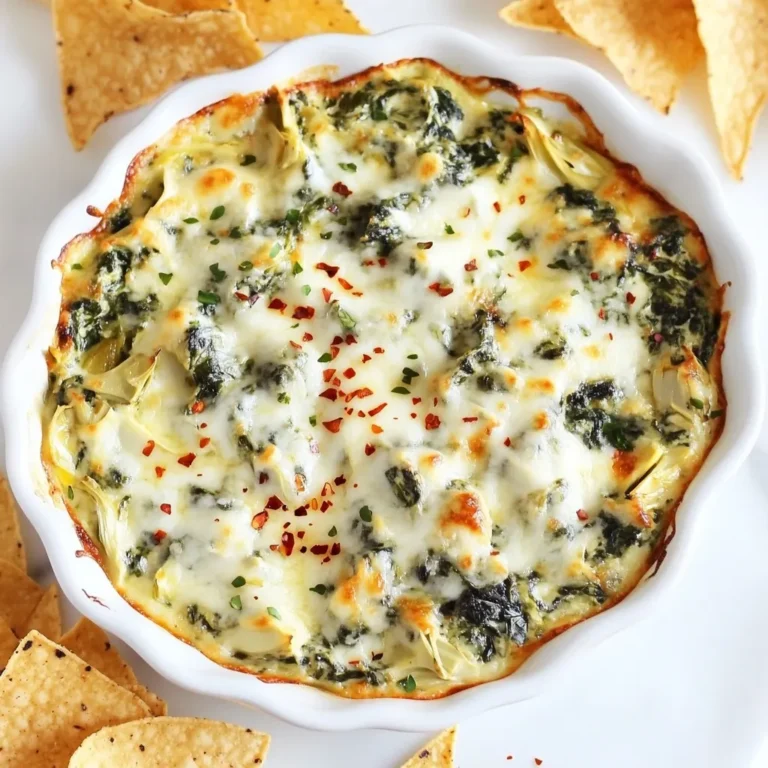
Creamy Spinach Artichoke Dip Tasty and Easy Recipe

To make these tasty peanut butter chocolate energy balls, you will need: - 1 cup rolled oats - 1/2 cup natural peanut butter - 1/4 cup honey or maple syrup - 1/4 cup unsweetened cocoa powder - 1/4 cup chocolate chips (dark or semi-sweet) - 1/4 cup ground flaxseed - 1 teaspoon vanilla extract - A pinch of salt These energy balls are not just delicious; they are also packed with nutrients. Each ball contains a good mix of protein, fiber, and healthy fats. The oats and flaxseed offer fiber that helps with digestion. Peanut butter gives you protein and healthy fats that keep you full. The cocoa powder adds antioxidants, which are great for your health. If you want to switch things up, you can try different ingredients. Here are some suggestions: - Nut butter: Swap peanut butter for almond or cashew butter. - Sweetener: Use agave syrup instead of honey or maple syrup. - Cocoa powder: If you prefer a less rich taste, use carob powder instead. - Add-ins: Consider adding nuts, seeds, or dried fruit for extra flavor and texture. These options keep the recipe flexible while catering to your taste! {{ingredient_image_1}} To start, grab a large mixing bowl. Add 1 cup of rolled oats. Then, scoop in 1/2 cup of natural peanut butter. Next, pour in 1/4 cup of honey or maple syrup. Don't forget the 1 teaspoon of vanilla extract. Stir everything together. Mix until you see a smooth and even blend. Now, it's time for the cocoa powder. Add 1/4 cup of unsweetened cocoa powder and 1/4 cup of ground flaxseed. Sprinkle in a pinch of salt. Mix again until the cocoa and flax are fully combined. Finally, fold in 1/4 cup of chocolate chips. This makes it extra tasty! Once your mixture is ready, wash your hands. Grab small portions of the mix. Aim for about 1 inch in diameter. Roll these portions into balls. Make sure they are round and compact. Place each ball on a parchment-lined baking sheet. Keep rolling until you use all the mixture. This step is fun and helps you feel involved in the process! After rolling, it's time to chill. Place the baking sheet in the fridge. Let the energy balls firm up for at least 30 minutes. This helps them hold their shape. Once they are set, transfer them to an airtight container. Store them in the fridge to keep them fresh. These energy balls last for up to 1 week. Enjoy them as a quick snack or a tasty treat anytime! To get the best texture, use natural peanut butter. It blends well and keeps your balls soft. If your mixture feels too dry, add a bit more honey or maple syrup. You want a sticky consistency that holds together. If it’s too wet, add a little more oats or ground flaxseed. You can boost flavor by adding spices like cinnamon or nutmeg. A dash of sea salt can also make the chocolate taste richer. For a fun twist, try adding a splash of almond extract. You might even mix in some dried fruits like cranberries or raisins. These will add a nice chewiness. One big mistake is not chilling the balls long enough. Chilling helps them firm up and makes rolling easier. Another mistake is using sweetened peanut butter. It can make the balls too sweet. Lastly, avoid overmixing when you add the chocolate chips. This keeps them from breaking. Pro Tips Chill for Better Texture: Refrigerating the energy balls for at least 30 minutes helps them firm up, ensuring a perfect bite every time. Customize Your Sweetness: Adjust the amount of honey or maple syrup to your taste preference for a sweeter or less sweet treat. Experiment with Mix-Ins: Feel free to add nuts, seeds, or dried fruit to the mixture for added texture and flavor diversity. Store Properly: Keep the energy balls in an airtight container in the refrigerator to maintain freshness and flavor for up to one week. {{image_2}} You can play with flavors in your energy balls. Try adding a teaspoon of cinnamon for warmth. Or swap cocoa powder for matcha powder for a green twist. If you love fruit, mix in dried cranberries or chopped dates. These add sweetness and chewiness. For a tropical vibe, use coconut flakes instead. You can even switch peanut butter for almond or cashew butter for a new taste. These energy balls can fit many diets. To make them vegan, use maple syrup instead of honey. Use a vegan chocolate option for the chips. For gluten-free eaters, ensure your oats are certified gluten-free. This way, everyone can enjoy these tasty treats without worry. Get creative with add-ins for extra crunch and nutrition. Chopped nuts like almonds or walnuts add a nice bite. Seeds like chia or pumpkin seeds boost the nutrients too. You can even add protein powder if you want a protein boost. Experiment and find your favorite mix-ins. Each batch can be a new adventure! To keep your peanut butter chocolate energy balls fresh, use an airtight container. This will help prevent moisture and air from ruining them. Place a piece of parchment paper between layers if you stack them. This stops them from sticking together. These energy balls can last up to one week in the fridge. After that, they may lose their taste and texture. Always check for any off smells or changes in color before eating. If they look or smell funny, it’s best to toss them. You can freeze these energy balls for longer storage. To do this, place them in a single layer on a baking sheet. Freeze for about an hour until firm. After that, transfer them to a freezer-safe bag or container. They can last for up to three months in the freezer. When ready to eat, let them thaw in the fridge or at room temperature. Yes, you can swap honey with maple syrup or agave nectar. Each sweetener adds a unique taste. Maple syrup gives a nice caramel flavor. Agave nectar is milder and less sticky. Just keep the same amount as the recipe states. These energy balls last about one week in the fridge. Store them in an airtight container. If you want them to last longer, freeze them. They can stay good for about three months in the freezer. Just thaw them before eating. Absolutely! If you want to skip chocolate, try adding more oats or nuts. You can use dried fruit for sweetness. Raisins or cranberries work great. Just keep the same base ingredients for the best texture and flavor. Making energy balls is easy with the right steps and ingredients. We discussed essential ingredients, their nutrition, and some tasty swaps. I shared clear steps for mixing, rolling, and storing your treats. You learned tips for perfect texture and flavor while avoiding common mistakes. Experiment with variations that fit your diet and taste, like vegan or gluten-free options. Proper storage keeps your energy balls fresh longer. These snacks are fun to make, healthy to eat, and offer endless possibilities. Dive in and enjoy creating your perfect energy ball today!

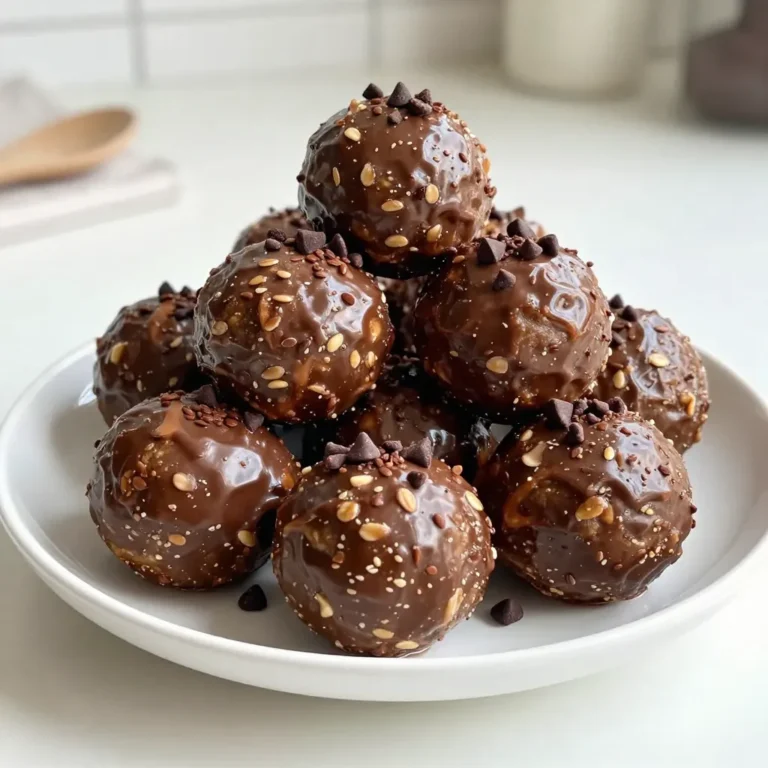
Peanut Butter Chocolate Energy Balls Simple Treats

To make Spicy Mango Habanero Salsa, you need fresh and simple ingredients. Here’s what you will need: - 1 ripe mango, diced - 1-2 habanero peppers, finely chopped (adjust to taste) - 1/2 red onion, finely chopped - 1/4 cup fresh cilantro, chopped - Juice of 2 limes - Salt to taste - 1/2 teaspoon garlic powder - 1/4 teaspoon cumin (optional) Each ingredient adds a special touch. The ripe mango gives a sweet base. Habanero peppers bring heat, so adjust them to your taste. Red onion adds crunch and flavor. Fresh cilantro gives a nice herbal note. Lime juice brightens everything up. Salt enhances all the flavors. Garlic powder adds depth, and cumin can add a warm touch if you choose. Gather these ingredients before you start. Freshness is key for the best flavor. Check your lime for juiciness and your mango for ripeness. {{ingredient_image_1}} - Dicing the mango Start by peeling the ripe mango. Cut it into small cubes. Place the diced mango in a mixing bowl. The sweet mango adds flavor and texture to the salsa. - Chopping the habanero Next, take 1-2 habanero peppers. Carefully chop them finely. If you want less heat, remove the seeds first. Add the chopped habanero to the bowl with the mango. - Mixing ingredients Now, finely chop half a red onion. Add it to the bowl. Then, chop a quarter cup of fresh cilantro and mix it in. Squeeze the juice from two fresh limes over the mixture. Sprinkle in salt, garlic powder, and optional cumin. Gently fold all the ingredients together until they are well combined. - Refrigerating before serving After mixing, taste the salsa. Adjust the seasoning if needed. For the best flavor, cover the bowl and refrigerate it for at least 30 minutes. This allows the flavors to meld together, creating a delicious salsa. To control the heat in your spicy mango habanero salsa, start with the seeds. If you want less spice, remove the seeds from the habanero peppers. You can also adjust the lime and salt. More lime juice can help balance the heat, while extra salt adds flavor. Make sure to let the salsa sit for at least 30 minutes. This time allows the flavors to meld together. Chilling it in the fridge enhances the taste and makes it even better. When serving your salsa, use a decorative bowl. A colorful bowl makes the dish pop. You can also garnish with fresh cilantro leaves on top for a nice touch. Pair your salsa with tortilla chips for a fun snack. It also works great as a topping for grilled chicken or fish. This combo creates a burst of flavor that everyone will enjoy. Pro Tips Adjust the Heat: For a milder salsa, remove the seeds and membranes from the habanero peppers before chopping. This will significantly reduce the heat while still providing flavor. Fresh Ingredients Matter: Use fresh, ripe mangoes and vibrant herbs for the best flavor. The quality of your ingredients can elevate the entire dish. Let It Chill: Allowing the salsa to chill in the refrigerator for at least 30 minutes lets the flavors meld together, creating a more harmonious taste. Serving Suggestions: This salsa pairs beautifully with grilled meats, fish, or as a topping for tacos. It also works well as a dip with tortilla chips for a refreshing appetizer. {{image_2}} You can change the fruit in this salsa. Try using pineapple or peach instead of mango. Each fruit brings a different taste and sweetness. For heat, you can switch the habanero peppers. Jalapeños give a milder spice. Serrano peppers offer a nice kick without being too hot. Adjust according to your taste. This salsa pairs well with many proteins. Use it on grilled chicken or fish for extra flavor. You can also enjoy it with shrimp tacos or steak. Salsa can serve as a tasty marinade or dressing. Mix it with olive oil and use it on salads. This adds zest and freshness to your meals. To keep your spicy mango habanero salsa fresh, refrigeration is key. Place the salsa in an airtight container. This keeps moisture out and flavors in. Store it in the fridge for best results. Always use a clean spoon when serving. This helps avoid contamination. If you want to keep the salsa longer, freezing is a great option. Use freezer-safe containers or bags. Leave some space at the top, as salsa expands when frozen. Thaw it in the fridge overnight before using. How long will salsa last? In the fridge, your salsa will stay fresh for about 3 to 5 days. If you freeze it, the salsa lasts up to 3 months. After that, the taste may not be as good. Always check for signs of spoilage, like off smells or changes in color. If you see any, it’s best to toss it out. Enjoy your salsa while it’s fresh for the best flavor! To make the salsa milder, remove the seeds from the habanero peppers. The seeds hold much of the heat. You can also use just one habanero instead of two. Adding more mango will also balance the spice. Mixing in some diced avocado or cucumber can help reduce heat, too. This salsa pairs well with tortilla chips. It also goes great on grilled chicken or fish. You can use it as a topping for tacos or burritos. Try it in wraps or salads for extra flavor. The sweet and spicy mix adds zest to many dishes. Yes, you can make this salsa ahead of time. For the best taste, prepare it a few hours before serving. Refrigerate it for at least 30 minutes to let the flavors blend. You can also store it for up to three days in the fridge. Just give it a stir before serving. This blog post covered how to make Spicy Mango Habanero Salsa. We looked at the key ingredients, like ripe mango and habanero peppers, with simple steps to prepare it. I shared tips on adjusting spice levels and unique serving ideas. You learned about storage and how to enjoy this salsa fresh. Consider making this salsa for your next meal or gathering. The mix of sweet, heat, and flavor will impress everyone. Try different fruits and peppers to find your favorite twist. Enjoy creating your best salsa!

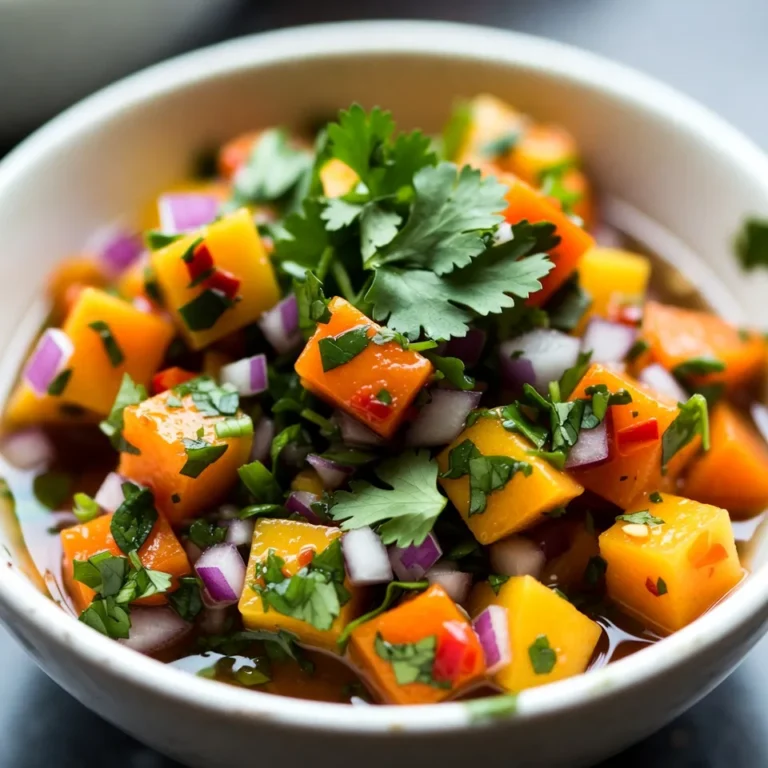
Spicy Mango Habanero Salsa Flavorful and Fresh Recipe

Here’s what you need for Buffalo Chicken Stuffed Avocados: - 2 ripe avocados - 1 cup cooked shredded chicken - 1/4 cup buffalo sauce - 1/2 cup Greek yogurt - 1/4 cup chopped celery - 1/4 cup crumbled blue cheese (optional) - 2 tablespoons chopped green onions - Salt and pepper - Fresh cilantro for garnish These ingredients create a tasty, filling meal. The avocados provide a creamy base, while the buffalo chicken adds a spicy kick. Greek yogurt keeps it light and adds a nice tang. You can easily adjust the spice level by changing the amount of buffalo sauce. If you love blue cheese, sprinkle some on top for that classic flavor. Fresh cilantro adds a pop of color and freshness. Gather these ingredients, and you’ll be ready to make a delicious dish! {{ingredient_image_1}} To start, grab a medium bowl. Add your shredded chicken and pour in the buffalo sauce. Mix them together until the chicken is well coated. This gives your chicken a nice, spicy flavor. Next, add the Greek yogurt, chopped celery, and green onions. Stir the mixture until everything blends well. The yogurt makes it creamy and balances the heat from the buffalo sauce. Season with salt and pepper to taste. Now, take your ripe avocados. Carefully cut them in half and remove the pits. Use a spoon to scoop out a bit of the flesh from the center of each half. This creates extra space for your filling. Don’t waste the avocado flesh; you can save it for another dish or mash it up as a snack. It’s time to put it all together! Spoon the buffalo chicken mixture into each avocado half. Press down gently to pack it in well. If you like blue cheese, sprinkle some on top for extra flavor. Finish by garnishing with fresh cilantro. This adds a bright touch to your dish. Serve these stuffed avocados right away for the best taste! To pick the best avocados, look for ones that feel slightly soft. Press gently with your thumb. If it gives a little, it’s ripe. Avoid any with dark spots or cracks. These can mean bad spots inside. Signs of ripeness include a dark green color and smooth skin. Ripe avocados should feel heavy for their size. If they’re too hard, they need time to ripen. You can leave them on the counter for a few days. To get a creamy texture, use Greek yogurt. It adds richness and helps balance the flavors. Mix the shredded chicken with buffalo sauce first. Make sure every piece of chicken is coated. When you add Greek yogurt, celery, and green onions, stir well. This keeps the mix creamy and delicious. Adjust the buffalo sauce to your taste. More sauce means more heat! For the best meal, serve these stuffed avocados with fresh veggies. A side salad adds color and crunch. You can also pair them with tortilla chips for a fun crunch. If you want a complete meal, add rice or quinoa. This makes your meal filling and hearty. Don’t forget to garnish with cilantro for a fresh touch! Pro Tips Use Fresh Ingredients: For the best flavor, ensure your avocados are ripe and your chicken is freshly cooked or shredded. Adjust the Heat: Feel free to modify the amount of buffalo sauce based on your spice tolerance. Start with less and add more to taste. Mix It Up: Experiment with different types of cheese like feta or cheddar to customize the flavor profile of your stuffed avocados. Chill Before Serving: For a refreshing twist, chill the stuffed avocados in the fridge for about 10 minutes before serving. {{image_2}} For those on a gluten-free diet, this dish is perfect as is. The avocados and chicken do not contain gluten. To make it dairy-free, swap Greek yogurt for a dairy-free yogurt. This keeps the dish creamy without dairy. If you want a vegetarian option, you can use plant-based chicken. Many brands offer great taste and texture. This way, everyone can enjoy Buffalo Chicken Stuffed Avocados. You can change the flavor by using different sauces. Try ranch dressing instead of buffalo sauce for a milder taste. For a spicy twist, add sriracha or chipotle sauce. You can also add extra spices, like paprika or cayenne pepper. This gives your dish a nice kick. Feel free to mix and match flavors until you find your favorite! Toppings can really make your dish shine. Instead of blue cheese, try feta or shredded cheddar for a new taste. Fresh herbs like parsley or dill can brighten up the flavors. You can also add chopped tomatoes or sliced radishes for crunch. These toppings add color and make your meal more exciting. To store leftovers, place them in an airtight container. Cover the filled avocados with plastic wrap if you do not have a container. This keeps them fresh. You can store leftovers in the fridge for up to two days. When reheating, use the microwave on low power. Heat gently to avoid overcooking the chicken. You can freeze stuffed avocados, but it’s not the best choice. Freezing can change the texture of the avocado. If you choose to freeze them, scoop out the filling first. Store the filling in a freezer-safe bag. Thaw in the fridge overnight before serving. You can then refill the avocados after thawing. Buffalo Chicken Stuffed Avocados last in the fridge for about two days. Look for browning on the avocado as a sign of spoilage. If the filling smells off or has changed color, it’s best to throw it away. Always check for freshness before eating leftovers. You can make Buffalo Chicken Stuffed Avocados as spicy as you like. The main heat comes from the buffalo sauce. If you want less spice, just use less buffalo sauce. You can also use a milder sauce or mix in some ranch dressing for a creamy touch. Adjusting the spice lets you enjoy this meal just right for your taste buds. Yes, rotisserie chicken works great in this dish! It saves time and adds flavor. You can shred the chicken straight from the rotisserie. Just mix it with the buffalo sauce as you would with any cooked chicken. This option is super handy if you’re in a rush or want extra taste without extra work. Buffalo Chicken Stuffed Avocados pair well with many sides. Here are some great options: - Crunchy carrot sticks - Celery sticks with ranch dip - A fresh green salad - Tortilla chips with salsa These sides balance the rich flavors of the stuffed avocados and add a fun crunch. To make this dish healthier, try these tips: - Use less buffalo sauce or choose a lighter version. - Swap Greek yogurt for low-fat Greek yogurt or cottage cheese. - Skip the blue cheese if you want to cut calories. - Add more veggies, like diced bell peppers or cucumbers, to the filling. These changes keep the dish tasty while making it more nutritious. Buffalo Chicken Stuffed Avocados make a tasty meal. You’ve learned the recipe, ingredient tips, and variations. Picking ripe avocados is key to great flavor. Mixing well gives the dish a creamy texture. Add your favorite toppings to make it special. Store leftovers properly to enjoy later. This meal is easy and fun. Try it and impress your family or friends!

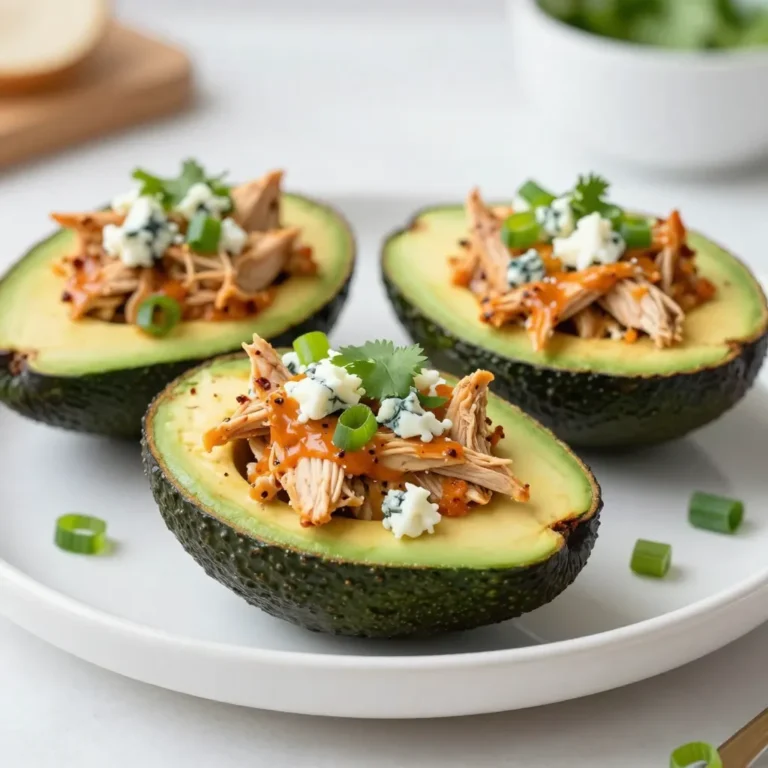
Buffalo Chicken Stuffed Avocados Flavorful Meal Idea

- 1 lb ground chicken (or turkey for a leaner option) - 1 bag (14 oz) coleslaw mix (cabbage and carrot) - 1 cup snap peas, trimmed and halved - 3 green onions, chopped The main ingredients give this dish its heartiness. Ground chicken or turkey serves as the protein base. You can choose turkey for a lighter meal. The coleslaw mix adds crunch and color. Snap peas bring a sweet and fresh flavor. Green onions add a mild, oniony bite. - 2 cloves garlic, minced - 1 tablespoon fresh ginger, grated - 3 tablespoons soy sauce (or tamari for gluten-free) - 1 tablespoon sesame oil - 1 teaspoon sriracha (optional, for heat) Flavor enhancers make the dish pop. Garlic and ginger add warmth and depth. Soy sauce or tamari gives a savory umami note. Sesame oil adds richness and a nutty aroma. If you like spice, add sriracha for heat. This blend of flavors makes every bite exciting. - Sesame seeds for garnish - Fresh cilantro for garnish (optional) Garnishes bring the dish to life. Sesame seeds add crunch and a hint of nutty flavor. Fresh cilantro can brighten the dish with freshness. You can skip the cilantro if you prefer. But it does add a nice touch. Garnishing elevates the look and taste of your meal. {{ingredient_image_1}} First, grab a large skillet or wok. Set it on medium-high heat and pour in the sesame oil. Let it warm up for about 30 seconds. Next, add the minced garlic and grated ginger. Sauté them until they smell great. This step adds a kick of flavor to your dish. Once your kitchen smells amazing, it’s time to add the ground chicken or turkey. Break it apart with a spatula. Cook it until it is browned and no longer pink. This should take about 5 to 7 minutes. Make sure to stir it often for even cooking. Now, stir in the coleslaw mix and snap peas. Cook these for 3 to 4 minutes. You want them to stay bright and crisp. Then, pour in the soy sauce and optional sriracha. Mix everything well and let it cook for another 2 minutes. This allows all the flavors to blend nicely. Finally, remove the pan from the heat. Add chopped green onions, saving some for a garnish. Serve it hot, topped with sesame seeds and fresh cilantro if you like. Enjoy your tasty meal! To get even browning, use high heat. Heat the sesame oil well before adding garlic and ginger. This helps release their flavors. When you add the ground chicken, break it up right away. This ensures it cooks evenly. If you use turkey, cook it a bit longer since it might get drier. Cooking times may vary with different proteins. Ground turkey takes a few extra minutes compared to chicken. If you switch to beef or pork, ensure they reach a safe temperature. Always check with a meat thermometer if unsure. You can add more vegetables for extra crunch and nutrition. Try bell peppers, broccoli, or mushrooms. Shredded zucchini or carrots also work well. These add color and taste to your dish. For sauces, soy sauce is a must, but you can mix it up! Try hoisin sauce for sweetness or teriyaki for a twist. Add chili garlic sauce for heat, or go for a tangy rice vinegar kick. Pairing Egg Roll in a Bowl with rice or noodles enhances the meal. Jasmine rice or brown rice complements the flavor. For noodles, try udon or rice noodles. To make your dish look appealing, use a colorful bowl. Garnish with sesame seeds and fresh cilantro. Arrange the green onions on top for a pop of color. A nice presentation makes the meal more inviting! Pro Tips Use Fresh Ingredients: Fresh garlic and ginger will enhance the flavor significantly compared to dried versions. Adjust the Heat: If you prefer a milder dish, reduce the amount of sriracha or omit it entirely. Meal Prep Friendly: This dish can be made ahead of time and stored in the fridge for quick meals throughout the week. Customize Your Veggies: Feel free to add other vegetables like bell peppers or broccoli for added nutrition and variety. {{image_2}} To make your egg roll in a bowl gluten-free, simply swap the soy sauce for tamari. Tamari is a great choice since it offers a similar taste without gluten. You can also check labels when buying coleslaw mix and ensure no gluten is added. For vegan alternatives, replace the ground chicken with tofu or tempeh. Crumble firm tofu and cook it the same way as the meat. This keeps the dish hearty while making it plant-based. You can still use the same sauces for flavor. Want to add a twist? Try using shrimp or tofu as your protein. Both options bring a different texture and taste. If you choose shrimp, cook them until pink and tender. For tofu, ensure it’s crispy for a great bite. You can also boost the flavor by adding spices. A pinch of five-spice powder can give a sweet and warm flavor. You might also like to drizzle some hoisin sauce over the top for a sweet finish. Mixing in chili flakes adds heat and extra zing. Using seasonal veggies can make this dish even better. In spring, add asparagus or snap peas for crunch. In summer, try bell peppers for sweetness. Fall brings great options like butternut squash, and in winter, add hearty greens like kale. You can also change the flavor profile based on the season. In fall, add warm spices like cinnamon or nutmeg for a cozy feel. In summer, a splash of lime juice brightens the dish. Explore what your local market offers to keep it fresh and exciting! To keep your Egg Roll in a Bowl fresh, use an airtight container. Glass or plastic containers work well. Make sure to let the dish cool down first. Once cool, cover it tightly and place it in the fridge. It stays good for about three to four days. When you're ready to enjoy your leftovers, reheat them in a skillet. Heat on medium until warm, stirring often. You can also use a microwave. Place the dish in a microwave-safe bowl and cover it. Heat in short intervals, about 1-2 minutes, stirring in between. If you want to save some for later, freezing is a great option. Let the dish cool completely before freezing. Portion it into freezer-safe bags or containers. Remove as much air as you can to prevent freezer burn. To thaw, move it to the fridge overnight before reheating. This way, it tastes just as good as fresh! You can use several options instead of ground chicken. Ground turkey is a lean choice. For a plant-based option, try crumbled tofu or tempeh. Both give a nice texture. You can also use ground beef or pork if you prefer. Yes, it is quite healthy! The dish is low in carbs and high in protein. The coleslaw mix adds fiber and vitamins. Using lean meats keeps fat content down. You can control the sodium by using low-sodium soy sauce. This dish also has fresh veggies, which boost nutrients. The total time is about 20 minutes. You’ll spend around 10 minutes prepping. Cooking takes another 10 minutes. This speed makes it perfect for busy nights! This article covers making a tasty Egg Roll in a Bowl. You learned about key ingredients like ground chicken, cabbage, and seasonings that boost flavor. We went step-by-step through cooking methods and shared tips for perfecting each dish. Remember, you can adjust recipes based on your diet or what you have at home. Enjoy experimenting with different flavors and veggies. With practice, you will master this quick and healthy meal!

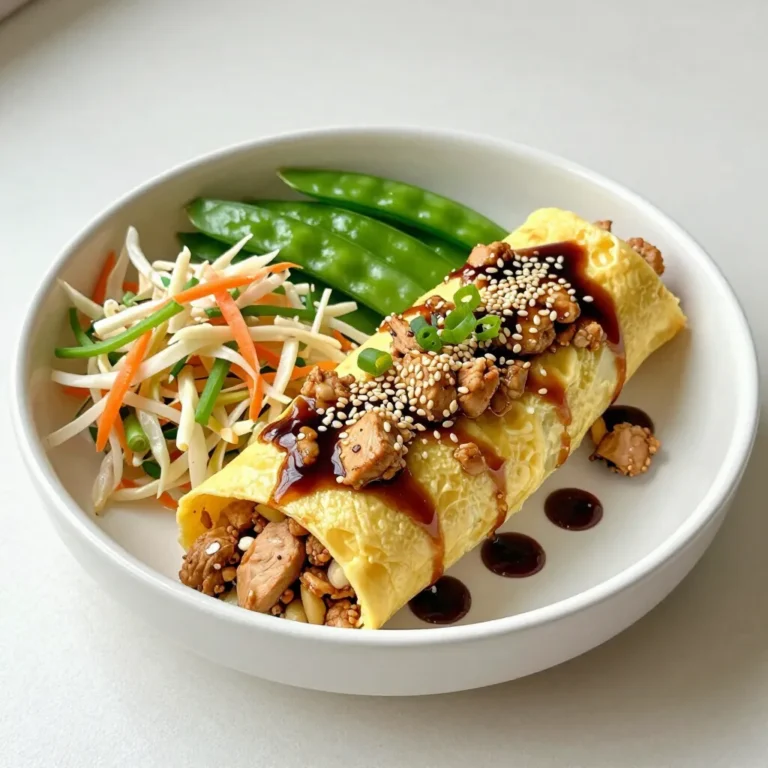
Egg Roll in a Bowl Flavorful and Quick Dinner Idea

- 1 cup pumpkin puree - 1/2 cup vegetable oil - 1 cup brown sugar - 1/2 cup granulated sugar - 3 large eggs - 1 teaspoon vanilla extract - 1 1/2 cups all-purpose flour - 1 teaspoon baking soda - 1/2 teaspoon baking powder - 1 teaspoon ground cinnamon - 1/2 teaspoon ground nutmeg - 1/4 teaspoon ground ginger - 1/2 teaspoon salt - 1 cup semi-sweet chocolate chips - 1/2 cup chopped walnuts (optional) Gather these ingredients before you start. Using pumpkin puree gives your bread a sweet and moist flavor. The blend of sugars adds depth. The eggs help bind the mixture, while the oils keep it soft. The spices create that warm, fall taste. You can choose whether to add walnuts or not. They add crunch and flavor, but they are not a must. The semi-sweet chocolate chips are the star. They melt in the oven and create little pockets of joy. Make sure your ingredients are fresh. This ensures the best taste and texture. If you want to swap things out, feel free! You can use applesauce instead of oil, or try different nuts. Enjoy the process of making this delightful bread! {{ingredient_image_1}} Set your oven to 350°F (175°C). This step warms up your oven for baking. In a large bowl, combine 1 cup of pumpkin puree, 1/2 cup of vegetable oil, 1 cup of brown sugar, and 1/2 cup of granulated sugar. Mix these well until smooth. Then, add 3 large eggs, one at a time. Stir in 1 teaspoon of vanilla extract. In a separate bowl, sift together 1 1/2 cups of all-purpose flour, 1 teaspoon of baking soda, 1/2 teaspoon of baking powder, 1 teaspoon of ground cinnamon, 1/2 teaspoon of ground nutmeg, 1/4 teaspoon of ground ginger, and 1/2 teaspoon of salt. This helps to blend the dry ingredients evenly. Gradually add the dry mixture to your wet batter. Stir gently until just combined. Be careful not to overmix. Overmixing can make the bread tough. Now, fold in 1 cup of semi-sweet chocolate chips and 1/2 cup of chopped walnuts if you like. Make sure they are evenly distributed throughout the batter. Pour the batter into a greased 9x5 inch loaf pan. Smooth the top with a spatula. Bake in your preheated oven for 60 to 70 minutes. Check if it is done by inserting a toothpick in the center. It should come out clean, though a few chocolate smudges are fine. To make the best Pumpkin Chocolate Chip Bread, avoid overmixing the batter. When you add the dry ingredients, mix just until you see no flour. This keeps your bread light and fluffy. Overmixing can lead to a dense loaf. Remember, a few lumps are okay! Use the toothpick method to check if your bread is done. Insert a toothpick into the center of the loaf. If it comes out clean or with a few chocolate smudges, your bread is ready! If you see wet batter, bake for a few more minutes. This simple test helps ensure your bread is baked just right. You can adjust the spices to make this bread your own. If you like a spicy kick, add more cinnamon or nutmeg. Want something warm and cozy? A pinch of cloves or allspice can also work. Feel free to play with these spices to find the perfect balance for your taste! Pro Tips Use Fresh Pumpkin: If possible, use fresh pumpkin puree for a more vibrant flavor. Roast and puree your own pumpkin for the best results! Don't Overmix: When combining the dry and wet ingredients, mix just until incorporated to keep the bread tender and fluffy. Chocolate Chip Tips: For a more indulgent treat, use a mix of semi-sweet and dark chocolate chips. This adds depth to the flavor. Storage Secrets: Store leftover bread in an airtight container at room temperature for up to 3 days, or refrigerate for longer freshness. {{image_2}} If you want a nut-free bread, skip the walnuts. The bread will still taste great. Chocolate chips add sweetness and richness. You won’t miss the nuts at all. This option works well for kids or anyone with nut allergies. Just focus on the pumpkin and chocolate flavors. You can choose different types of chocolate chips. Dark chocolate chips give a rich taste. They balance well with pumpkin's sweetness. White chocolate chips add a creamy touch. They make the bread sweeter and lighter. Both options are delicious, so pick your favorite! Want to mix it up? Try adding dried cranberries or raisins. These fruits add a nice chew and tartness. They bring extra flavor to the bread. Just fold them in with the chocolate chips. This small change can make your bread even better. Store your pumpkin chocolate chip bread at room temperature. Wrap it in plastic wrap or place it in an airtight container. This keeps it fresh for up to three days. For best taste, enjoy it within this time. If you leave it uncovered, it may dry out. For long-term storage, freeze the bread. First, allow it to cool completely. Wrap it tightly in plastic wrap, then in aluminum foil. This prevents freezer burn. You can also slice it before freezing for easy serving later. It can last up to three months in the freezer. To enjoy leftovers, try these reheating methods. Use a toaster oven for a few minutes until warm. This keeps the crust nice and crisp. You can also microwave it for about 10-15 seconds for a soft texture. Serve warm with butter or a drizzle of maple syrup for extra flavor. Yes, you can use fresh pumpkin. To prepare, start by cutting a pumpkin in half. Scoop out the seeds and stringy bits. Roast the halves in the oven at 350°F until soft, about 45 minutes. Once cool, scoop the flesh into a bowl and mash it. Measure one cup for your recipe. Fresh pumpkin adds a nice, rich flavor to the bread. To check if your bread is done, insert a toothpick into the center. It should come out clean or with just a few chocolate smudges. If it has wet batter, bake it a little longer. The edges will also pull away from the pan slightly when it’s ready. The top should look golden brown. You can make this recipe vegan with a few swaps. Use flax eggs instead of regular eggs. Mix 1 tablespoon of ground flaxseed with 2.5 tablespoons of water for each egg. You can also replace the vegetable oil with applesauce or coconut oil. Lastly, ensure your chocolate chips are dairy-free. This bread is great on its own, but you can jazz it up. Serve warm slices with butter or cream cheese. You can drizzle maple syrup on top for extra sweetness. Pair it with coffee or tea for a cozy treat. For a fun twist, add a scoop of vanilla ice cream for dessert! This recipe shows how to make pumpkin chocolate chip bread from start to finish. You need simple ingredients like pumpkin puree, sugars, and spices. I shared tips for perfect texture and ways to customize this bread. Use variations like nuts or dried fruit to make it your own. Store it well to enjoy later. Baking is fun, and this bread will delight everyone. Try it out and share your thoughts!

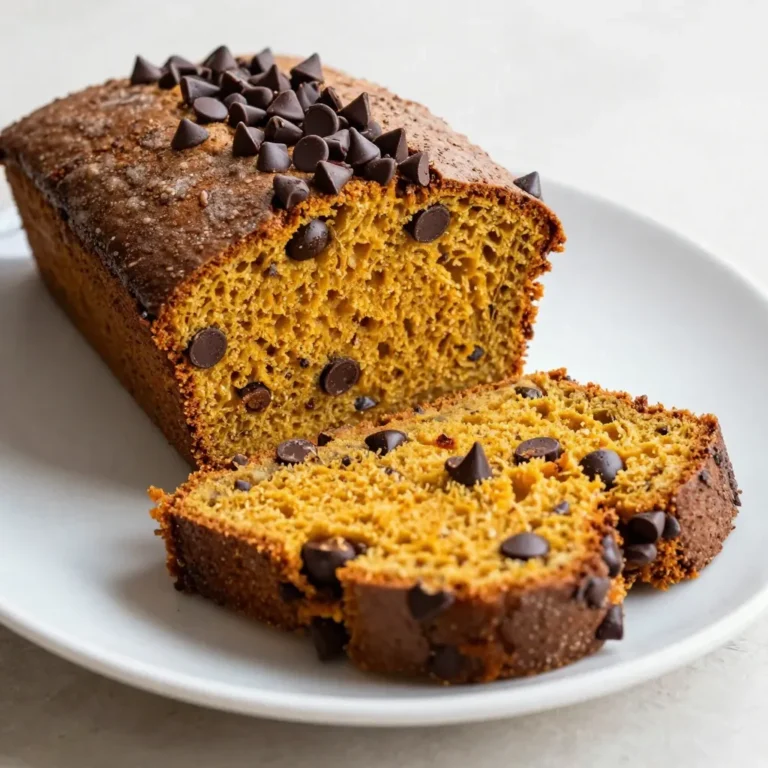
Pumpkin Chocolate Chip Bread Simple and Tasty Delight

To make Creamy Spinach Parmesan Gnocchi, gather these key items: - 1 pound potato gnocchi - 2 cups fresh spinach, chopped - 1 cup heavy cream - 1 cup grated Parmesan cheese - 1 tablespoon olive oil - 2 cloves garlic, minced - 1/2 teaspoon nutmeg - Salt and pepper to taste - Optional: Fresh basil for garnish These ingredients blend to create a rich and flavorful dish. The potato gnocchi serves as a soft base, while the spinach adds color and nutrients. Cream and Parmesan bring a creamy texture that enhances every bite. If you have dietary restrictions, you can swap some ingredients. For a lighter version, use half-and-half instead of heavy cream. To make it dairy-free, try coconut cream and a dairy-free Parmesan. For gluten-free needs, ensure the gnocchi is made from gluten-free flour. You can also use frozen spinach if fresh isn’t available. Using fresh ingredients elevates this dish. Look for gnocchi that feels firm and fresh. Choose spinach that is vibrant green without yellow spots. When buying garlic, pick bulbs that are firm and plump. For Parmesan, always go for freshly grated over pre-packaged. Fresh ingredients will enhance the flavors and make your meal stand out. {{ingredient_image_1}} Start by boiling water in a large pot. Add salt to the water. Once boiling, drop in the potato gnocchi. Cook them until they float, which takes about 2-3 minutes. This shows they are ready. Drain the gnocchi and set them aside while you move to the next step. In a large skillet, heat olive oil over medium heat. Add minced garlic and cook until it smells great, about 1 minute. Then, toss in the chopped spinach. Stir the spinach until it wilts, which will take about 2-3 minutes. Next, pour in the heavy cream. Bring the mixture to a gentle simmer. Add grated Parmesan cheese and stir until it melts into a creamy sauce. Season the sauce with nutmeg, salt, and pepper to taste. Now, add the cooked gnocchi to the creamy spinach sauce. Gently fold the gnocchi to coat them in the sauce. Heat everything together for about 2-3 minutes. This warms the dish through. Serve hot and garnish with fresh basil if you like. Enjoy this creamy spinach Parmesan gnocchi as a delightful dinner! To make your sauce creamy, use heavy cream. It gives a rich texture. Stir the cream gently into the spinach and cheese mixture. This helps blend all the flavors. Nutmeg adds warmth, but don’t use too much. Taste as you go to find the perfect balance. The cheese should melt smoothly. If it clumps, lower the heat and stir more. A common mistake is cooking the gnocchi too long. Remember, they are done when they float! Overcooking can make them mushy. Also, don’t rush the spinach. Cook it just until wilted. If you skip this, it can taste raw. Mixing ingredients too fast can break the gnocchi apart. Gently fold them into the sauce for the best result. Serve your creamy spinach Parmesan gnocchi hot. A sprinkle of fresh basil adds color and flavor. You can pair this dish with a simple salad. A light vinaigrette works well. For a heartier meal, add grilled chicken or shrimp. This makes it a full dinner. Enjoy this dish with a glass of white wine for a lovely touch. Pro Tips Use Fresh Ingredients: Fresh spinach and high-quality Parmesan cheese will elevate the flavors of this dish significantly. Don’t Overcook Gnocchi: Gnocchi are done when they float to the surface; avoid letting them sit in boiling water for too long to maintain their texture. Adjust Creaminess: If you prefer a lighter sauce, you can substitute half of the heavy cream with vegetable broth for a delicious alternative. Enhance Flavor: Adding a pinch of red pepper flakes can provide a subtle heat that complements the creamy sauce beautifully. {{image_2}} You can make this dish heartier by adding chicken or shrimp. Cook the protein first. For chicken, use bite-sized pieces and sauté them in the skillet. For shrimp, add them after the garlic, cooking until pink. Both options boost flavor and nutrition. To make this dish vegetarian, leave out the cheese and use a plant-based cream. For a vegan twist, swap the gnocchi for a vegan brand. You can also use nutritional yeast for a cheesy flavor without dairy. Enhance your dish with fresh herbs like basil or parsley. Just sprinkle them in before serving. You can also add a pinch of red pepper flakes for heat. Mixing in some lemon zest brightens the flavors too. These small changes can make a big difference! After you finish your meal, let the gnocchi cool down. Place it in an airtight container. Store it in the fridge for up to three days. This keeps the flavors fresh and tasty. If you want to store it longer, consider freezing. To reheat, put the gnocchi in a skillet. Add a splash of water or cream. Heat on low, stirring gently. This helps the sauce regain its creamy texture. You can also use the microwave. Heat in short bursts to avoid overcooking. Stir between each burst to heat evenly. If you want to freeze the gnocchi, do it before cooking. Spread uncooked gnocchi on a baking sheet. Freeze until solid, then transfer to a freezer bag. For cooked gnocchi, store in an airtight container. Use within two months for the best taste. When you're ready to eat, cook from frozen. Just add a few extra minutes to the cooking time. Use potato gnocchi for the best texture. It has a soft and pillowy feel. You can find it fresh or frozen at most stores. Fresh gnocchi cooks quickly in boiling water. Frozen gnocchi works well too; just add a minute to the cooking time. Yes, you can prepare the sauce ahead. Cook the gnocchi just before serving. If you make the sauce early, store it in the fridge. When you’re ready to eat, heat the sauce and add the gnocchi. This keeps the dish fresh and tasty. To lighten the dish, swap heavy cream for half-and-half or a plant-based milk. You can also use less cheese. Adding more spinach can make it healthier too. This keeps the creamy mouthfeel while cutting down on calories. Pair this dish with a simple salad or garlic bread. A light vegetable medley also works well. If you want protein, grilled chicken or shrimp makes a great addition. These sides enhance the meal and add variety. You learned about the key ingredients for making delicious Creamy Spinach Parmesan Gnocchi. We covered cooking tips, serving ideas, and ways to tweak the dish for your needs. Remember, quality ingredients matter for flavor and texture. Use the steps and tips to avoid common mistakes and make it creamier. Finally, enjoy creating variations with proteins or herbs. This dish is easy to store and reheat, keeping it fresh for later. Dive in and start cooking!

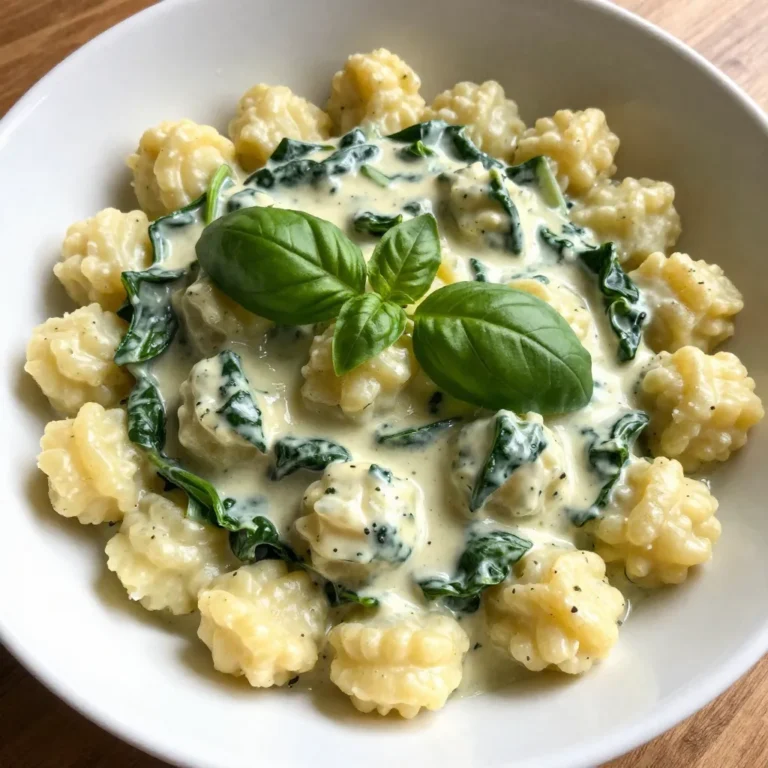
Creamy Spinach Parmesan Gnocchi Flavorful Dinner Delight

To make Honey Garlic Chicken Bites, gather these simple ingredients: - 1 lb (450g) boneless, skinless chicken breasts, cut into bite-sized pieces - 1/4 cup honey - 1/4 cup soy sauce (low sodium recommended) - 3 garlic cloves, minced - 1 tablespoon fresh ginger, grated - 1 tablespoon cornstarch - 2 tablespoons vegetable oil - 1/4 teaspoon red pepper flakes (optional, for heat) - Sesame seeds for garnish - Chopped green onions for garnish You can easily change up the recipe. Here are some ideas: - Use chicken thighs instead of breasts for more flavor. - Swap honey for maple syrup if you want a different sweetness. - Try adding bell peppers or broccoli for extra veggies. - Use teriyaki sauce in place of soy sauce for a different taste. - Add a squeeze of lime juice for a bright twist. Here’s a quick look at the nutrition for one serving: - Calories: about 250 - Protein: 25g - Carbohydrates: 20g - Fat: 10g - Sugar: 12g This meal is a good balance of protein and carbs. It can fit well into a healthy diet. {{ingredient_image_1}} 1. Start by cutting 1 pound of boneless, skinless chicken breasts into small pieces. 2. In a medium bowl, mix together 1/4 cup honey, 1/4 cup soy sauce, and 3 minced garlic cloves. 3. Add 1 tablespoon of grated ginger and 1 tablespoon of cornstarch to the mixture. 4. Whisk until everything is well combined and smooth. 1. Heat 2 tablespoons of vegetable oil in a large skillet over medium-high heat. 2. Once the oil is hot, add the chicken bites to the skillet. 3. Cook the chicken for 5 to 7 minutes, stirring often until golden brown. 4. When the chicken is cooked, lower the heat to medium. 5. Pour the honey garlic sauce over the chicken in the skillet. 6. Stir gently to coat each piece of chicken with the sauce. 7. Cook for an extra 3 to 4 minutes until the sauce thickens. 8. If you like heat, add a pinch of red pepper flakes. 9. Remove the skillet from heat and transfer the chicken to a serving platter. To get the sauce just right, be sure to whisk the cornstarch well. This helps the sauce thicken nicely. If your sauce is too thick, add a tiny bit of water to loosen it up. If it’s too thin, let it cook a bit longer. Adjust until it's the perfect consistency for your taste. I like to cook honey garlic chicken bites in a skillet. It gives me a nice sear. Use medium-high heat. This helps brown the chicken well. Make sure to stir often. This keeps the chicken from sticking. You can also bake the chicken. Just place it on a baking sheet. Bake at 400°F for about 15-20 minutes. To avoid overcooking, watch the chicken closely. Cook it for 5-7 minutes, until golden brown. Use a meat thermometer. The chicken should reach 165°F. If you cook too long, the chicken can become dry. Once it’s golden and cooked through, add the sauce right away. Serve the chicken bites over rice or quinoa. They add great flavor and texture. You can also make them an appetizer. Use toothpicks for easy eating. Top with sesame seeds and green onions. For a sweet touch, drizzle more honey on top. This elevates the dish and makes it more fun! Pro Tips Marinate for More Flavor: Allow the chicken to marinate in the honey garlic sauce for at least 30 minutes before cooking. This will enhance the flavor and tenderness of the chicken. Use Fresh Ingredients: For the best taste, use fresh garlic and ginger. They provide a more vibrant flavor compared to dried or powdered versions. Adjust the Sweetness: If you prefer a sweeter sauce, you can increase the amount of honey. Conversely, add more soy sauce for a saltier flavor profile. Perfect Serving Temperature: Serve the chicken bites immediately after cooking for the best taste and texture. They can be kept warm in a low oven if needed. {{image_2}} You can switch up the protein in this recipe. Chicken thighs work well if you want more flavor. They stay juicy and tender. You can also try shrimp for a quick cook time and a different taste. Just make sure to reduce the cooking time to about 3-4 minutes. For a heartier option, use pork tenderloin, cut into bite-sized pieces. If you want a vegetarian twist, try using tofu. Firm tofu absorbs flavors nicely. Press it to remove water, then cut it into cubes. Cook it the same way as chicken for a tasty meal. For another option, use tempeh, which has a nutty flavor. It pairs well with the honey garlic sauce. You can change the flavor to suit your taste. Add citrus juice, like lime or lemon, for a zesty kick. A splash of sesame oil adds depth and richness. For a sweeter taste, mix in some pineapple juice. If you want spice, add more red pepper flakes or some sriracha. Each change will give you a new and exciting meal. After cooking, let the honey garlic chicken bites cool. Place them in an airtight container. Store them in the fridge for up to four days. To keep them fresh, avoid mixing them with rice or other sides. This way, you can enjoy each part just right. To reheat, use a skillet over medium heat. Add a splash of water or broth to keep the chicken moist. Stir gently until heated through, about five minutes. You can also use the microwave. Heat in short bursts of 30 seconds, stirring in between. This helps to warm them evenly without drying them out. If you want to freeze them, do so right after cooking. Let the chicken bites cool completely. Then, place them in a freezer-safe bag, removing as much air as possible. They can last up to three months in the freezer. When ready to eat, thaw them overnight in the fridge before reheating. Yes, you can use chicken thighs. They stay juicy and tender. Thighs have more fat, which adds flavor. Just cut them into bite-sized pieces like the breasts. Cook them the same way. This swap will keep your meal tasty. Add red pepper flakes to the sauce for heat. Start with a small amount, like 1/4 teaspoon. You can add more if you like it fiery. Another option is to mix in some sriracha or chili paste. Adjust to fit your taste. Serve these chicken bites with rice or quinoa for a full meal. Steamed veggies like broccoli or green beans make a good side too. You can also try a crisp salad for a fresh touch. These sides will balance the sweet and savory flavors. This article covered key ingredients, steps, and tips for making honey garlic chicken bites. You learned about ingredient variations and nutritional information. I provided tips to ensure perfect cooking and serving. Don't forget about storage options for leftovers and how to reheat them. Whether you prefer chicken or vegetarian options, there's something for everyone. With these insights, you can confidently create a delicious meal. Enjoy your cooking!

Honey Garlic Chicken Bites Tasty Easy Weeknight Meal

- 1 cup all-purpose flour - 1/2 teaspoon baking soda - 1/4 teaspoon salt - 1/2 cup unsalted butter, softened - 1/2 cup brown sugar - 1/4 cup granulated sugar - 1 teaspoon vanilla extract - 1 large egg - 1 cup semi-sweet chocolate chips The quality of your ingredients matters. Fresh flour and chocolate chips make a big difference. Softened butter helps create a rich, smooth dough. Using high-quality brown sugar adds depth of flavor. Always choose the best you can find. - 1/2 cup chopped walnuts (optional) - Vanilla ice cream for serving (optional) You can add walnuts for a nice crunch. If you want a nut-free version, simply leave them out. Want to shake things up? Use dark chocolate chips or even white chocolate. For a fun twist, try adding a sprinkle of sea salt on top. If you love ice cream, serve a scoop on top for extra joy. {{ingredient_image_1}} 1. Preheating the oven: First, set your oven to 350°F (175°C). This step is key to baking your cookie evenly. 2. Mixing dry ingredients: In a small bowl, whisk together 1 cup of all-purpose flour, 1/2 teaspoon of baking soda, and 1/4 teaspoon of salt. This mix adds structure and flavor to your cookie. 1. Techniques for creaminess: In a large bowl, cream together 1/2 cup of softened unsalted butter, 1/2 cup of brown sugar, and 1/4 cup of granulated sugar. Beat this until it’s light and fluffy, about 2-3 minutes. This step adds air for a soft cookie texture. 2. Incorporating the egg and vanilla: Next, beat in 1 large egg and 1 teaspoon of vanilla extract. Mix until fully combined. This will give your cookie a rich flavor. 1. Properly greasing the skillet: Use non-stick cooking spray or a bit of extra butter to grease a 10-inch oven-safe skillet. This helps prevent sticking. 2. Signs for doneness: Pour the cookie dough into the skillet and smooth the top. Bake for 20-25 minutes. Look for golden edges and a center that is set but still slightly soft. The cookie will continue to firm up as it cools. To get a soft center in your cookie skillet, aim for underbaking. Bake until the edges turn golden brown, but the center should still look a bit shiny. This method gives you that melty cookie feel. To avoid overbaking, set a timer for 20 minutes. Check your cookie after this time. If the edges look done, but the center seems soft, take it out. The cookie will continue to cook a bit after you remove it from the oven. This helps keep that gooey texture. Serving directly from the skillet adds charm. It creates a cozy feel for your guests. Use a large spoon for serving, so everyone can dig in. If you want to impress, try plating slices with a scoop of vanilla ice cream. Drizzle some chocolate sauce over the ice cream for extra flavor. You can also sprinkle chopped nuts or chocolate chips on top for a fun finish. Pro Tips Room Temperature Ingredients: Make sure your butter and egg are at room temperature before starting. This helps create a smoother batter and improves the texture of your cookie skillet. Don't Overmix: After adding the flour mixture, mix just until combined. Overmixing can lead to a tough cookie, so keep it gentle. Check for Doneness: The cookie is done when the edges are golden brown and the center is still slightly soft. It will continue to cook a little after being removed from the oven. Custom Flavors: Feel free to experiment with different mix-ins like white chocolate chips, dried fruits, or even a sprinkle of sea salt on top for a gourmet touch! {{image_2}} You can make this cookie skillet even more fun. Here are some ideas: - Different types of chocolate: Use dark chocolate, milk chocolate, or white chocolate chips. Each type adds a new taste. Mix and match them for a layered flavor. - Incorporating fruits or candy: Add dried fruits like cranberries or cherries for a tangy twist. You can also toss in candy like M&M's or Reese's Pieces for a sweet crunch. Each option makes your skillet unique. Feeling like a different approach? Here are some adjustments: - Gluten-free options: Swap all-purpose flour with almond flour or a gluten-free blend. This way, you can enjoy the cookie without gluten. Ensure other ingredients are also gluten-free. - Vegan alternatives: Use coconut oil instead of butter. Replace the egg with a flaxseed egg (1 tablespoon ground flaxseed mixed with 2.5 tablespoons water). This keeps the cookie moist and tasty while being plant-based. These variations let you tailor the cookie skillet to your taste and dietary needs. Enjoy experimenting! To store your chocolate chip cookie skillet, let it cool first. Once cooled, cover it with plastic wrap or foil. You can also place it in an airtight container. This helps keep it fresh. Store it in the fridge. It will last about three to four days. For the best results, reheat your cookie skillet in the oven. Preheat the oven to 350°F (175°C). Place the skillet in the oven for about 10 minutes. This restores the warm, gooey texture. You can also use the microwave. Heat it for about 20-30 seconds. Just be careful not to overheat. Enjoy your treat warm, just like fresh out of the oven! Can I make this recipe in advance? Yes, you can prepare the dough ahead of time. Store it in the fridge for up to two days. When ready, spread the dough in the skillet and bake it fresh. This way, you enjoy the warm, gooey cookie right out of the oven! What size skillet is best for this recipe? A 10-inch oven-safe skillet works best. It gives the cookie enough space to spread. If your skillet is smaller, the cookie might bake unevenly, leading to a flat result. Why is my cookie skillet flat? A flat cookie skillet may result from too much butter or not enough flour. Ensure you measure your ingredients correctly. Also, check your baking soda for freshness. Old baking soda may not help the cookie rise. How do I know when it's done baking? Look for golden edges and a slightly soft center. You can also insert a toothpick in the center. If it comes out mostly clean, your cookie is done! Let it cool for a few minutes before serving. This article covered the key ingredients, step-by-step instructions, and tips for making a delicious cookie skillet. Quality ingredients matter, and optional ones can enhance flavor. I shared ways to achieve a perfect texture and suggested fun variations. You can store leftovers properly and reheat them without losing freshness. Keep experimenting with flavors and adjustments to suit your tastes. Enjoy your baking journey and create something special to share with others!

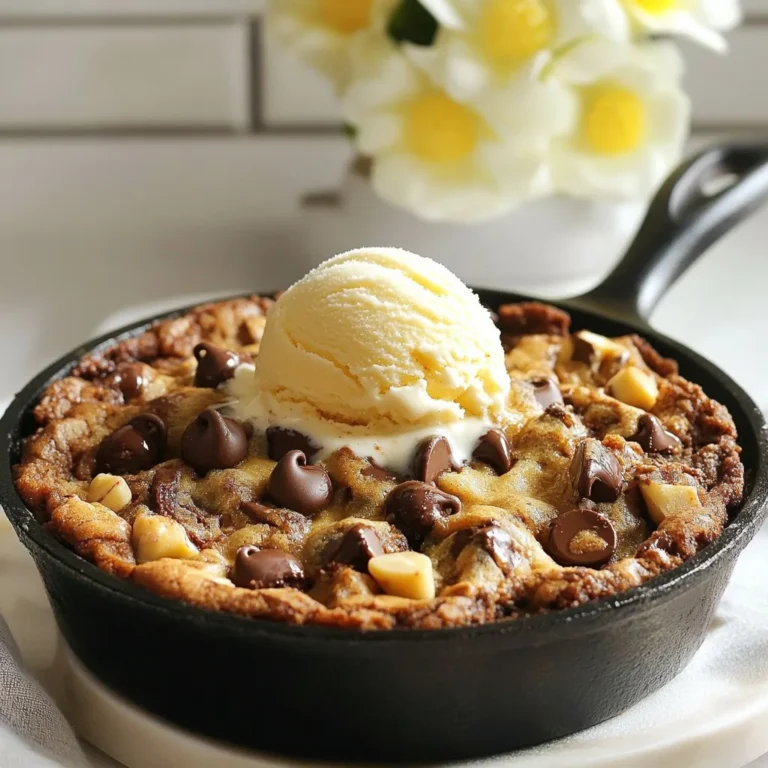
Chocolate Chip Cookie Skillet Delightful Treat Recipe

PREV 1 2 3 … 72 NEXT
cozy citrus kitchen

explore

DessertsDinnerAppetizersDrinks

Our Policies

  • Cookie Policy
  • Copyright Policy
  • Disclaimer
  • GDPR Policy
  • Terms Of Use
Back to Top
  • About
  • Contact Us
  • Privacy Policy
© 2026 cozy citrus kitchen