FREE DINNER EBOOK! Get your copy!
  • Cookie Policy
  • GDPR Policy
  • Disclaimer
  • Terms Of Use
  • Visit my other site: Fun Cookie Recipes
cozy citrus kitchen
  • Home
  • Dinner
  • Desserts
  • Drinks
  • Appetizers
  • Contact
  • About
  • Privacy Policy
  • Home
  • Dinner
  • Desserts
  • Drinks
  • Appetizers
  • Contact
  • About
  • Privacy Policy
  • Cookie Policy
  • GDPR Policy
  • Disclaimer
  • Terms Of Use
Visit my other site: Fun Cookie Recipes

HOME / CATEGORIES /

Latest

- 1 cup almond flour - 2 ripe bananas, mashed - 2 large eggs - 1/4 cup almond milk (or any preferred milk) - 1 teaspoon vanilla extract - 1 teaspoon baking powder - 1/2 teaspoon cinnamon - Pinch of salt - Coconut oil or butter for cooking You can swap almond flour with coconut flour for a different taste. Just use less coconut flour, about 1/3 cup. If you don't have ripe bananas, you can use applesauce in the same amount. This recipe is great for those who avoid gluten and dairy. Use a plant-based milk for a dairy-free option. The pancakes are naturally sweet from the bananas, so you don’t need extra sugar. They are also low in carbs, thanks to the almond flour. Enjoy these pancakes as a healthy breakfast or snack! 1. Start by mixing the wet ingredients. In a bowl, mash the ripe bananas. Add the eggs, almond milk, and vanilla extract. Stir until smooth. 2. Next, combine the dry ingredients in another bowl. Mix almond flour, baking powder, cinnamon, and a pinch of salt together. This helps to ensure even distribution. 3. Gradually add the dry mix to the wet mix. Stir gently until just combined. A few lumps are fine; overmixing makes pancakes tough. - To make fluffy pancakes, watch your heat. Medium heat works best. If it’s too hot, the outside will burn before the inside cooks. - Always preheat your skillet or griddle. This helps the pancakes cook evenly. Add coconut oil or butter to prevent sticking. - For toppings, try drizzling maple syrup or honey. Fresh berries add color and flavor. A sprinkle of cinnamon enhances taste and looks. - You can serve pancakes stacked high on a plate. This makes for a great presentation. Adding a dollop of yogurt on top can also be nice! 1. Overmixing the batter: When you mix the wet and dry ingredients, stop when they just blend. A few lumps are okay. Overmixing can make your pancakes tough instead of fluffy. 2. Cooking at too high a temperature: If your skillet is too hot, the outside cooks fast, but the inside stays raw. Keep the heat medium to get even cooking and a perfect golden brown color. - Adding nuts or chocolate chips: You can add chopped nuts like walnuts or chocolate chips for extra flavor. Just fold them into the batter before cooking. - Experimenting with spices: Try adding a pinch of nutmeg or cardamom to the batter. These spices can bring a new twist to your pancakes. - Prepping ingredients in advance: You can mix the dry ingredients and store them in a container. This saves time on busy mornings. - Freezing pancakes for later use: After cooking, let the pancakes cool. Then, stack them with parchment paper in between and freeze. To eat, just reheat in a toaster or microwave. This makes breakfast quick and easy! {{image_2}} You can mix almond flour with coconut flour for a fun twist. Coconut flour adds a light sweetness and a unique texture. Use equal parts almond and coconut flour for a great blend. If you want to try other gluten-free options, consider oat flour or chickpea flour. Both work well and add different flavors and textures. Adding fruits like blueberries or strawberries takes these pancakes to the next level. Simply fold in a handful of fresh or frozen fruit into the batter. You can also enhance flavor by adding extracts, like almond or orange. A bit of lemon zest can brighten the taste too! If you want low-carb options, consider using only almond flour and adding a sugar substitute. For vegan substitutions, replace the eggs with flax eggs. Combine one tablespoon of ground flaxseed with three tablespoons of water. Let it sit for five minutes to thicken. This will keep your pancakes fluffy and delicious. To keep your pancakes fresh, store them in an airtight container. Layer parchment paper between pancakes to prevent sticking. You can keep cooked pancakes in the fridge for up to three days. For longer storage, freeze them. Place pancakes in a single layer on a baking sheet. Once frozen, stack them in a freezer bag. This method keeps them from clumping together. For raw batter, store it in the fridge in a sealed container. Use it within 24 hours for the best flavor and texture. If you need to keep it longer, you can freeze the batter in ice cube trays. Once frozen, transfer the cubes to a bag. Just thaw and mix before cooking. Reheating pancakes can be simple. The best method is to use a toaster or an oven. For the toaster, place the pancakes directly in the slots. Heat them until warm, about 2-3 minutes. In the oven, preheat to 350°F (175°C) and place pancakes on a baking sheet. Cover with foil and heat for 10 minutes. You can also use a microwave, but it may change the texture. Place pancakes on a plate and cover with a damp paper towel. Heat for 30 seconds. To keep the texture and flavor, avoid overheating. Always check to ensure they are warm, not hot. Enjoy your pancakes just like they were fresh! Can I use regular flour? No, regular flour is not gluten-free. Almond flour works well here. It gives a nice, nutty flavor. Plus, it keeps the pancakes light and fluffy. How do I ensure my pancakes are fluffy? To make fluffy pancakes, do not overmix the batter. Mix just until the wet and dry ingredients combine. A few lumps are okay. Also, let the batter sit for a few minutes before cooking. It helps the baking powder work better. Can I replace bananas with applesauce? Yes, you can replace bananas with applesauce. Use the same amount. Applesauce adds moisture and sweetness, just like bananas do. What do I use instead of almond milk? You can use any milk you like. Dairy milk, soy milk, or oat milk all work well. Each will give a slightly different taste, but they are all good options. How to serve pancakes for a crowd? Make a big stack of pancakes and keep them warm in the oven at a low heat. Serve with syrup, fresh fruit, and nuts on the side. This way, everyone can customize their meal. Best tips for pancake flipping? Wait until bubbles form on the pancake’s surface before flipping. Use a spatula to gently lift the pancake. Flip it quickly but carefully to avoid mess. A non-stick skillet helps a lot too! You now have the complete guide to making almond flour pancakes. We covered every step, from ingredients to cooking techniques. You learned about tasty variations and smart storage tips. Avoiding common mistakes will help you achieve fluffy pancakes every time. Enjoy the freedom to experiment with flavors and dietary needs. Whether you prefer chocolate chips or a low-carb option, these tips will enhance your pancake experience. Now, it's time for you to cook and share your delicious creations!

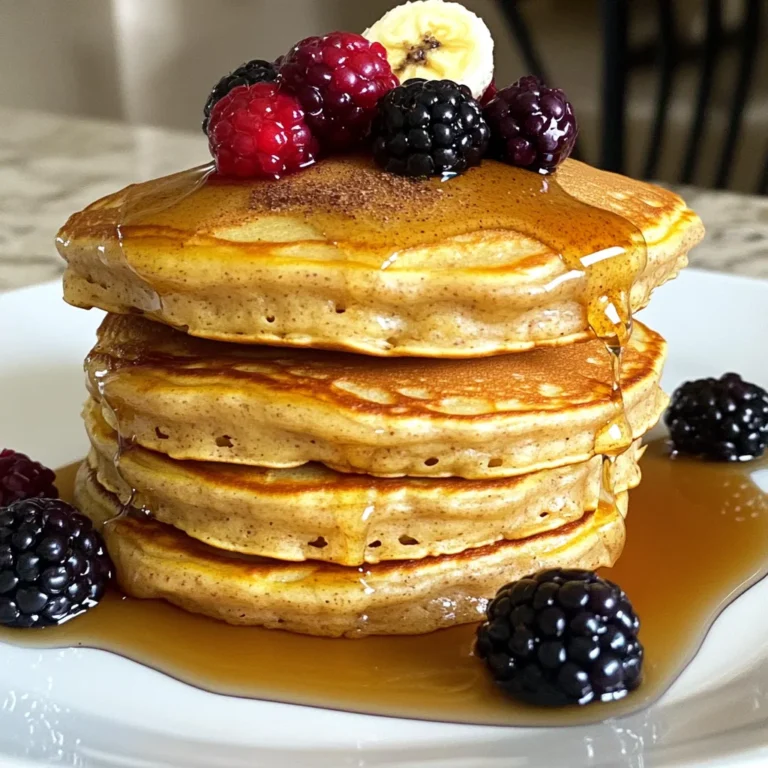
Gluten-Free Almond Flour Banana Pancakes Easy Recipe

- 1 tablespoon coconut oil - 1 medium onion, diced - 3 cloves garlic, minced - 1 tablespoon fresh ginger, grated - 1 tablespoon curry powder - 1 teaspoon turmeric powder - 1 can (14 oz) coconut milk - 4 cups vegetable broth - 1 can (15 oz) chickpeas, drained and rinsed - 1 cup diced tomatoes (fresh or canned) - 2 cups spinach or kale, chopped - Salt and pepper to taste - Juice of 1 lime - Fresh cilantro for garnish The main ingredients in this soup create a rich, creamy base. Coconut oil brings a lovely flavor. The onion, garlic, and ginger add depth and warmth. Curry powder and turmeric give it that vibrant yellow hue. Coconut milk makes the soup creamy and smooth. The chickpeas provide protein, while the tomatoes add freshness. Spinach or kale boosts the nutrition and color. Lime juice brightens the taste, and fresh cilantro finishes the dish perfectly. - Sliced lime wedges - Extra cilantro - Chopped green onions - Red pepper flakes These garnishes can enhance the look and flavor of your soup. Sliced lime adds a tangy kick. Extra cilantro brings a fresh taste. Chopped green onions add crunch. Red pepper flakes can spice things up if you like heat. - Coconut Oil: Contains healthy fats that help with heart health. - Chickpeas: Packed with protein and fiber, they support digestion. - Spinach or Kale: Rich in vitamins A, C, and K, they boost immunity. - Coconut Milk: Provides fats that are good for energy and skin health. - Tomatoes: High in antioxidants, they support heart health. Each key ingredient in this soup brings its own health benefits. Together, they make a comforting and nutritious meal. Enjoy the flavors while knowing you're nourishing your body too! First, gather all your ingredients. You will need coconut oil, onion, garlic, ginger, curry powder, turmeric, coconut milk, vegetable broth, chickpeas, tomatoes, spinach or kale, lime, salt, and pepper. This will make cooking smoother and faster. 1. Heat the Oil: Start by heating 1 tablespoon of coconut oil in a large pot over medium heat. 2. Sauté the Onion: Add the diced onion. Cook it for about 5 minutes. You want it to be soft and clear. 3. Add Garlic and Ginger: Next, stir in 3 cloves of minced garlic and 1 tablespoon of grated ginger. Cook for 1-2 minutes. The smell will be amazing! 4. Toast the Spices: Sprinkle in 1 tablespoon of curry powder and 1 teaspoon of turmeric. Stir and cook for 1 more minute. This brings out the flavors. 5. Add Liquids: Pour in 14 ounces of coconut milk and 4 cups of vegetable broth. Stir well. Bring the pot to a gentle simmer. 6. Add Chickpeas and Tomatoes: Now, add 1 can of drained chickpeas and 1 cup of diced tomatoes. Let the mixture simmer for 15 minutes. This helps the flavors mix well. 7. Incorporate Greens: After 15 minutes, add 2 cups of chopped spinach or kale. Cook for another 5 minutes until the greens are soft. 8. Season and Serve: Finally, season with salt and pepper to your taste. Squeeze in the juice of 1 lime for a fresh kick. Serve hot, and garnish with fresh cilantro. - Prep Time: 10 minutes - Cooking Steps: - Heating oil and sautéing onion: 5 minutes - Adding garlic and ginger: 2 minutes - Toasting spices: 1 minute - Simmering liquids: 5 minutes (until it begins to simmer) - Adding chickpeas and tomatoes: 15 minutes - Adding greens: 5 minutes - Total Cooking Time: 30 minutes This quick and simple method gives you a rich soup that warms your heart! To make your Vegan Coconut Curry Chickpea Soup even better, try these tips: - Fresh herbs: Add fresh cilantro at the end for a bright taste. - Citrus zest: Use lime or lemon zest for extra zing. - Chili flakes: Add a pinch for some heat if you like spice. - Nut butters: Stir in a spoonful of almond or peanut butter for creaminess. These simple additions can elevate your soup to new heights. When making this soup, watch out for these pitfalls: - Overcooking greens: Add spinach or kale last to keep them vibrant. - Too much salt: Start with less and season at the end for balance. - Neglecting to toast spices: Sautéing spices enhances their flavors. Avoid these mistakes for a perfect soup every time. Pair your soup with these ideas for a complete meal: - Crusty bread: Serve with fresh bread to soak up the soup. - Rice or quinoa: Add a scoop for extra nutrients and fullness. - Salad: A simple side salad adds freshness and crunch. These options make your meal satisfying and enjoyable. {{image_2}} You can change this soup to fit your taste. Swap the chickpeas for black beans or lentils. These options give you more protein and fiber. If you want a creamier soup, add more coconut milk. You can also stir in some sweet potato for extra sweetness and texture. Do you like spice? Add more curry powder or a pinch of cayenne. If you prefer a milder soup, cut back on the spices. You can also add a dollop of yogurt or coconut cream on top. This helps balance the heat and adds creaminess. This soup is vegan and can fit many diets. If you need it gluten-free, you are in luck! All the ingredients are gluten-free. For a nut-free option, check the coconut milk brand. Some brands may add nuts. You can skip the lime juice if you have citrus allergies. This soup is flexible and can adapt to your needs. To store leftovers of Vegan Coconut Curry Chickpea Soup, first let it cool down. Transfer the soup to an airtight container. Make sure to seal it tightly. You can keep it in the fridge for about 3 to 4 days. Always label the container with the date. This helps you keep track of freshness. If you want to freeze the soup, use freezer-safe containers. Leave some space at the top since the soup may expand when frozen. You can freeze it for up to 3 months. When you’re ready to enjoy it, thaw the soup overnight in the fridge. You can also thaw it in the microwave if you're in a hurry. When reheating the soup, do it on the stove for the best taste. Pour the soup into a pot and heat on medium-low. Stir it often to make sure it warms evenly. You can add a splash of vegetable broth if it seems too thick. Heat until it's steaming hot, then enjoy! Yes, this soup is gluten-free. The main ingredients are coconut milk, vegetable broth, and chickpeas. These do not contain gluten. Make sure to check the broth label to ensure it is gluten-free. You can use fresh chickpeas, but you will need to cook them first. Dried chickpeas require soaking and boiling before adding them to the soup. This adds extra time but can enhance the taste. This soup lasts about 4-5 days in the fridge. Store it in an airtight container to keep it fresh. Reheat on the stove or in the microwave when ready to enjoy. You can serve this soup with rice or quinoa for a full meal. Fresh bread or naan pairs well too. A side salad adds a nice crunch and freshness. Enjoy your meal! This vegan coconut curry chickpea soup is easy to make and very nourishing. You learned about main ingredients, helpful tips, and how to store leftovers. The recipe allows for fun customizations based on your taste. Always keep in mind how to adjust flavors and spice levels, too. With these steps and tips, you can create a warm, tasty meal anytime. Enjoy your cooking journey and savor every bowl!

Vegan Coconut Curry Chickpea Soup Comforting Delight

To make a rich Rustic White Bean Chicken Chili, gather these key ingredients: - 2 cups cooked shredded chicken (rotisserie or poached) - 2 cans (15 oz each) white beans, drained and rinsed (cannellini or great northern) - 1 can (15 oz) diced tomatoes with green chilies - 1 medium yellow onion, diced - 3 cloves garlic, minced - 1 cup chicken broth - 1 green bell pepper, diced - 1 teaspoon ground cumin - 1 teaspoon smoked paprika - ½ teaspoon chili powder - Salt and pepper to taste - 1 tablespoon olive oil - 1 cup corn (fresh, frozen, or canned) - Fresh cilantro for garnishing Each ingredient plays a role in the flavor and texture of the chili. The cooked shredded chicken provides protein, while the white beans add creaminess. Diced tomatoes with green chilies bring a bit of spice and acidity. The onion, garlic, and green bell pepper create a hearty base. The spices, including cumin and smoked paprika, give depth. Olive oil helps in sautéing the vegetables and adds richness. Lastly, corn adds sweetness, and fresh cilantro brightens the dish when used as a garnish. With these ingredients, you can create a meal that warms hearts and homes. 1. Heat the olive oil in a skillet over medium heat. 2. Add the diced onion and sauté for about 3-4 minutes. It should look translucent. 3. Add minced garlic and diced green bell pepper to the skillet. Cook for 2-3 minutes until fragrant. 4. Transfer the sautéed mixture to the slow cooker. 1. In the slow cooker, add the cooked shredded chicken, white beans, diced tomatoes with green chilies, corn, chicken broth, cumin, smoked paprika, chili powder, salt, and pepper. Stir well to combine. 2. You can cook on low for 6-8 hours. Alternatively, set it on high for 3-4 hours. 3. Once the cooking time is up, taste your chili. Adjust the seasoning as needed. Add more salt, pepper, or spices to suit your taste. 4. Serve hot, garnished with fresh cilantro for a bright finish. This method ensures a deep flavor that melds over time, making your chili a comforting delight. Adjusting the seasoning is key. Taste your chili before serving. Add salt, pepper, or spices as needed. This will help bring out the best flavors in your dish. To enhance flavor, consider adding more spices. A pinch of cayenne can give it a kick. You might also try adding a dash of oregano for depth. Choosing the right chicken can make a big difference. Rotisserie chicken adds great flavor and saves time. Poached chicken is a good choice too, as it stays tender and juicy. For an attractive dish, use rustic bowls. A dollop of sour cream or Greek yogurt adds creaminess. Crispy tortilla strips on top give a nice crunch. Fresh cilantro adds a pop of color and flavor. Complementary side dishes can really elevate your meal. Serve cornbread or a simple green salad alongside. Both options balance the hearty chili well. Recommended toppings can add extra flavor. Try sliced jalapeños for heat. Shredded cheese or avocado can also make it richer and more satisfying. {{image_2}} You can easily change up some ingredients in this chili. If you want, swap the white beans for kidney beans. They add a nice color and flavor. For protein, try turkey or tofu instead of chicken. Both options work great. You can also add more vegetables. Zucchini, carrots, or spinach fit in well. This way, you can make the dish your own. Adjusting spice levels is simple. If you like it hot, use fresh chilies. You can chop jalapeños or serranos and add them in. For a milder version, skip the chili powder. You can also reduce the cumin and paprika. This keeps the chili friendly for all ages. Remember, you can always serve hot sauce on the side for those who want more heat. After enjoying your chili, store leftovers in an airtight container. Let it cool first, then cover it. Place it in the fridge. It stays fresh for up to five days. To freeze, use a freezer-safe container. Leave some space at the top for expansion. It can last for about three months in the freezer. When you want to eat it, thaw it overnight in the fridge. Reheat in a pot on the stove over medium heat. Stir often to heat evenly. You can also use the microwave, but be sure to stir halfway through. Rustic white bean chicken chili can last in the fridge for five days. If frozen, it stays good for three months. To tell if your chili has spoiled, check for a sour smell or unusual color. If you see mold, throw it out. If it looks and smells fine, give it a taste test. If it doesn’t taste right, it’s better to discard it. Always trust your senses when it comes to food safety. Can I make this chili vegetarian? Yes, you can make this chili vegetarian. Simply replace the chicken with cooked mushrooms or extra beans. You can use vegetable broth instead of chicken broth to keep the flavors rich. How do I thicken my chili? To thicken chili, you can mash some of the beans against the side of the slow cooker. You can also stir in 1-2 tablespoons of cornstarch mixed with water. Let it cook for a bit longer to reach your desired thickness. Can I cook it overnight? Yes, you can cook this chili overnight. Set your slow cooker to low and let it cook for 8 hours. Make sure to follow safety guidelines for overnight cooking. What are the best beans to use for chili? The best beans for chili are white beans like cannellini or great northern. You can also try kidney beans or black beans for different textures and flavors. Can this recipe be doubled or halved? Yes, you can easily double or halve this recipe. Just adjust the cooking time accordingly. If you double it, keep the cooking time the same, but if you halve it, check for doneness sooner. This article covered a delicious recipe for rustic white bean chicken chili. We explored the key ingredients, step-by-step cooking methods, and ways to perfect this dish. I shared tips for customizing flavors, adjusting heat levels, and caring for leftovers. Chili is easy to make and very versatile. You can switch ingredients and tweak spices to fit your taste. Enjoy this dish with friends and family. It is sure to become a favorite in your home!

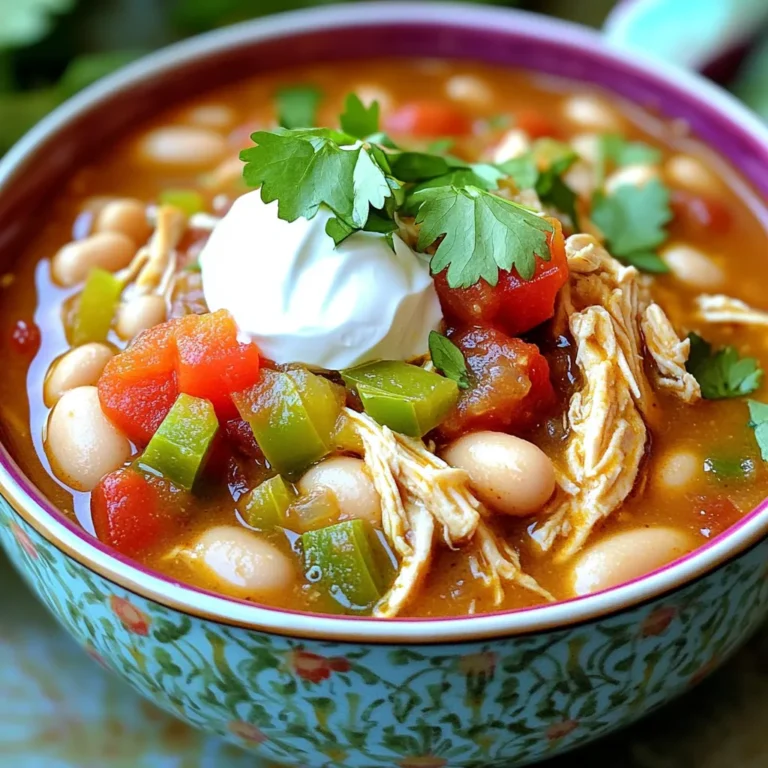
Rustic White Bean Chicken Chili Slow Cooker Delight

To make this dish, you need the following main ingredients: - 12 oz ziti pasta - 2 tablespoons olive oil - 1 small onion, chopped - 2 garlic cloves, minced - 1 bell pepper, diced - 1 pound Italian sausage (or plant-based sausage) - 1 jar (24 oz) marinara sauce - 1 teaspoon dried oregano - 1 teaspoon dried basil - 1 ½ cups ricotta cheese - 2 cups shredded mozzarella cheese - ½ cup grated Parmesan cheese - 1 teaspoon red pepper flakes (optional) These ingredients create a hearty ziti base. The ziti pasta holds sauce well. The Italian sausage adds rich flavor. If you prefer a plant-based option, use plant-based sausage. The marinara sauce ties everything together. For the delicious garlic bread crust, gather these key items: - 1 large baguette - ½ cup unsalted butter, softened - 2 tablespoons fresh parsley, chopped This garlic bread crust adds a crispy, buttery layer. The baguette is perfect for soaking up the sauce. The garlic and parsley bring fresh flavor. You can enhance your dish with these optional add-ins: - 1 teaspoon red pepper flakes for heat - Fresh basil for garnish Adding red pepper flakes gives a nice kick. Fresh basil adds a pop of color and taste. Feel free to mix and match these options to suit your taste. Start by preheating your oven to 400°F (200°C). Cook 12 oz of ziti pasta until it is al dente. Drain the pasta and set it aside. In a large skillet, heat 2 tablespoons of olive oil over medium heat. Add 1 small chopped onion and sauté for 2-3 minutes. Next, add 2 minced garlic cloves and 1 diced bell pepper. Cook this mix for another 2-3 minutes until softened. Then, add 1 pound of Italian sausage to the skillet. Break it apart with a spoon and cook until it is browned and fully cooked. Season the mixture with salt, pepper, 1 teaspoon of dried oregano, and 1 teaspoon of dried basil. Stir in a 24 oz jar of marinara sauce and the cooked ziti pasta. Mix everything well, then remove it from heat and let it cool slightly. Spread the pasta mixture evenly in a large baking sheet. For the garlic bread crust, slice a large baguette in half lengthwise. In a small bowl, mix ½ cup of softened unsalted butter with 2 minced garlic cloves and 2 tablespoons of chopped fresh parsley. Spread this garlic butter on both halves of the baguette. Place the baguette halves on the baking sheet around the ziti. Now, dollop 1 ½ cups of ricotta cheese over the pasta mixture. Sprinkle 2 cups of shredded mozzarella and ½ cup of grated Parmesan cheese on top. Bake everything in the oven for 20-25 minutes. Look for bubbly and golden cheese. If the garlic bread crust browns too fast, cover it with aluminum foil. Once baked, take it out of the oven and let it cool for a few minutes. Slice and serve directly from the sheet pan. Garnish with extra parsley and offer crushed red pepper flakes for some heat. Enjoy your delicious baked ziti! To make perfect baked ziti, follow these steps: - Cook the Pasta Al Dente: Cook the ziti just until firm. This keeps it from getting mushy when baked. - Season the Meat Well: If using sausage, make sure to season it with salt, pepper, oregano, and basil. This adds great flavor. - Mix Carefully: When combining the pasta with sauce and meat, stir gently. This keeps the ziti intact. A great garlic bread crust makes the dish shine. Here’s how: - Use Softened Butter: This helps spread the garlic mix easily. - Add Fresh Herbs: Chopped parsley gives your garlic bread a fresh taste. - Watch the Oven: If the bread browns too fast, cover it with foil. This helps it bake evenly. When serving baked ziti, presentation matters: - Serve from the Sheet Pan: This keeps it casual and fun. - Add a Garnish: Sprinkle extra parsley on top for color. - Offer Extras: Set out a bowl of crushed red pepper flakes. This lets guests add heat if they want. {{image_2}} You can easily make this dish vegetarian. Just skip the Italian sausage. Use a plant-based sausage for a similar taste. You can also add more veggies like mushrooms or spinach. These will give extra flavor and texture. For a vegan option, use dairy-free cheese. Replace ricotta with a mix of cashews and nutritional yeast. This will keep the creaminess without any dairy. Use olive oil instead of butter on the garlic bread. To make this dish gluten-free, swap the ziti pasta for gluten-free pasta. There are many options available, like chickpea or rice pasta. Check the cooking time, as it may differ from regular pasta. Use gluten-free breadcrumbs on the garlic bread for extra crunch. Just mix them with the garlic butter for a tasty topping. Cheese is key to this dish. You can mix and match different types of cheese. Try using provolone or gouda for a unique twist. For more flavor, add feta or goat cheese to the ricotta mix. If you like a spicy kick, sprinkle some pepper jack cheese on top. It melts well and adds a nice heat. You can also use a blend of cheeses to create a rich, layered taste. To store leftover baked ziti, first let it cool. Once cool, transfer it to an airtight container. You can also use plastic wrap or aluminum foil. Make sure to cover it tightly. Leftover ziti can last in the fridge for up to three days. This keeps the flavors fresh and tasty. When it's time to enjoy your leftovers, preheat your oven to 350°F (175°C). Place the ziti in an oven-safe dish. Add a splash of marinara sauce if it looks dry. Cover the dish with foil to keep it moist. Heat for about 20 minutes or until it's hot all the way through. You can also microwave it in a bowl for a quicker option. Just heat for 1-2 minutes, stirring halfway through. If you want to freeze baked ziti, do it before baking. Assemble the dish but do not bake it yet. Cover it well with plastic wrap and then foil to prevent freezer burn. It can last up to three months in the freezer. When you’re ready to eat, thaw it overnight in the fridge. Then, bake it at 400°F (200°C) until bubbly and golden, usually about 25-30 minutes. Enjoy a tasty meal with ease! To make your ziti creamier, add more ricotta cheese. You can mix it with a bit of heavy cream. This will give you a rich, smooth texture. Stir in some extra mozzarella too. It melts well and adds creaminess. You can also try using cream cheese. Blend it into the ricotta for a richer taste. Another option is to sprinkle in some grated Parmesan. This will enhance the flavor and creaminess. Yes, you can use a different type of pasta! Ziti is great, but you can swap it out for penne or rigatoni. Just make sure to cook it until it's al dente. This means it will still have a little bite when you mix it with the sauce. You can even try using gluten-free pasta if needed. Just follow the cooking time on the package. The important part is to avoid mushy pasta. Nobody likes a soggy baked dish! You can store baked ziti in the fridge for about 3 to 5 days. Make sure to keep it in an airtight container. This will help keep it fresh and tasty. When you want to eat it again, just reheat it in the oven or microwave. If you’re using the oven, cover it with foil to keep it moist. Enjoy your tasty leftovers! Baked ziti is a delightful dish made from simple ingredients. We explored the main items needed and how to create a tasty garlic bread crust. You learned step-by-step instructions to prepare and bake your ziti, along with tips for a perfect meal. We discussed variations to suit everyone’s taste and shared essential storage tips. Embrace these ideas to make your baked ziti a hit. Enjoy the fun of cooking and let your creativity shine. Happy baking!

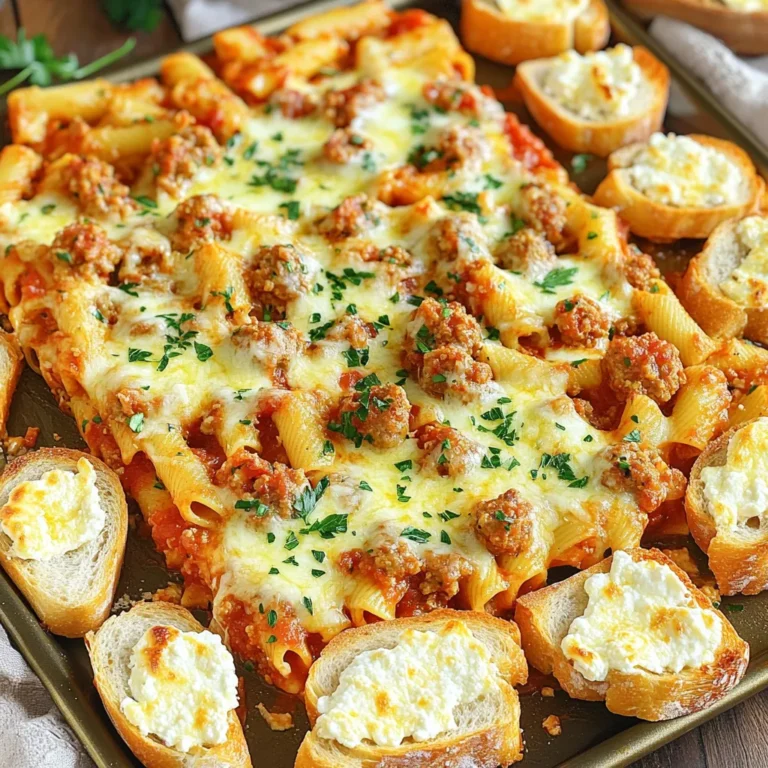
Baked Ziti Sheet Pan with Garlic Bread Crust Delight

To make these tasty bars, you need these key items: - 1 cup pumpkin puree - 1 cup rolled oats - 1/2 cup unsweetened cocoa powder - 1/2 cup almond butter (or any nut butter) - 1/2 cup protein powder (chocolate or vanilla) - 1/4 cup maple syrup or honey - 1 teaspoon vanilla extract - 1/2 cup dark chocolate chips (dairy-free if desired) - Pinch of salt These ingredients blend together to give you a rich, chocolatey flavor. The pumpkin adds moisture and nutrition. You can enjoy these bars without any baking! You can change these bars to fit your taste. Here are some ideas: - Add nuts or seeds for extra crunch. - Use different nut butters like cashew or peanut. - Swap out maple syrup for agave nectar or honey. - Add spices like cinnamon or nutmeg for warmth. Feel free to get creative! These options let you make the bars unique and fun. These bars pack a punch of nutrition. Here are some highlights: - Pumpkin provides vitamins A and C. - Oats offer fiber that helps keep you full. - Nut butter gives healthy fats and protein. - Protein powder helps build and repair muscles. Each bar is a great snack or post-workout treat. They are not just tasty; they also fuel your body! First, take a large mixing bowl. Add 1 cup of pumpkin puree. Then, add 1/2 cup of almond butter. Next, pour in 1/4 cup of maple syrup. Add 1 teaspoon of vanilla extract. Mix everything together until it is smooth and creamy. This step is key for flavor. In a separate bowl, whisk together the rolled oats, cocoa powder, protein powder, and a pinch of salt. Use 1 cup of rolled oats and 1/2 cup of cocoa powder. For protein, you can choose either chocolate or vanilla protein powder, and use 1/2 cup. Make sure everything is well combined. Now, gradually add the dry mix to the wet mixture. Stir it well until combined. The mixture will be thick and slightly sticky. This texture helps the bars hold together. Next, fold in 1/2 cup of dark chocolate chips. Make sure they are evenly spread throughout the mixture. Then, line an 8x8 inch baking dish with parchment paper. Leave some overhang. This will help lift the bars out later. Press the mixture into the dish firmly. Spread it out evenly and compact it well. This step is important for keeping the bars together. Place the dish in the fridge for at least 2 hours. This cooling time helps the bars set. Once set, lift the mixture out using the parchment overhang. Cut it into bars or squares. For serving, place the bars on a wooden board. You can drizzle extra melted chocolate on top. Sprinkling cocoa powder or coconut flakes adds a nice touch. Store any leftovers in an airtight container in the fridge. To get the best texture, mix your wet and dry ingredients well. The mixture should feel thick and slightly sticky. If it’s too dry, add a bit of water or almond milk. If it's too wet, add more oats or cocoa powder. This is key for bars that hold together. Store your bars in an airtight container. This keeps them fresh longer. Place parchment paper between layers to avoid sticking. You can keep them in the fridge for up to a week. If you want to store them longer, consider freezing them. Just wrap each bar tightly before freezing. For a fun touch, serve your bars on a wooden board. Drizzle melted chocolate over the top for a fancy look. You can also sprinkle cocoa powder or coconut flakes for extra flair. This makes your snack appealing and ready for sharing. {{image_2}} If you want to switch up the nut butter, you have options. Almond butter works well, but you can also use peanut butter or sunflower seed butter. Each choice gives a different taste. Sunflower seed butter is a great option for those who have nut allergies. Just pick what you like best! To add some excitement, consider mixing in spices or extracts. A pinch of cinnamon or nutmeg can give a warm flavor. You could also add a splash of maple extract or almond extract for a twist. These small changes can make your bars feel new and fresh. Get creative and find your favorite mix! If you want to change the sweetener, try these options. You can use agave syrup, honey, or even stevia. Depending on your taste, each sweetener can change the flavor slightly. Keep in mind that the amount you use might change based on the sweetness level you prefer. Always taste as you go! To keep your chocolate pumpkin protein bars fresh, place them in an airtight container. This helps maintain their soft texture and rich flavor. You can stack the bars with parchment paper between layers. This way, they won’t stick together. These bars last about one week in the fridge. If you want to keep them longer, freezing is a great option. Wrap each bar in plastic wrap or foil. Then, place them in a freezer bag. They can stay fresh for up to three months in the freezer. To enjoy, just thaw them in the fridge overnight. You do not need to reheat these bars, as they taste great cold. If you prefer a warm treat, you can microwave a bar for 10-15 seconds. Watch closely to avoid melting them too much. Enjoy the warm, gooey chocolate chips! You can use pumpkin pie filling, but it has added spices and sugar. This will change the taste and sweetness of your bars. If you want a pure pumpkin flavor, stick with pumpkin puree. To make these bars vegan, use maple syrup instead of honey. Additionally, choose a plant-based protein powder. For the nut butter, ensure it does not contain any dairy. Use dairy-free chocolate chips too. You can use ground flaxseed or chia seeds as a substitute. They add fiber and protein. You can also use more rolled oats, but this may change the texture. You can adjust sweetness by adding more maple syrup or honey. Taste the mixture before pressing it into the dish. If you want less sweetness, reduce the syrup and add unsweetened cocoa. These chocolate pumpkin protein bars are easy to make and tasty. We covered the main ingredients, optional mix-ins, and their great nutrition. You learned how to mix, combine, and cut them. I shared tips for the best texture and storage. There are fun variations for flavors and ingredients. Now you can enjoy these bars any time! They are great for snacks, meals, or quick fuel. Get creative and make them your own. Happy cooking!

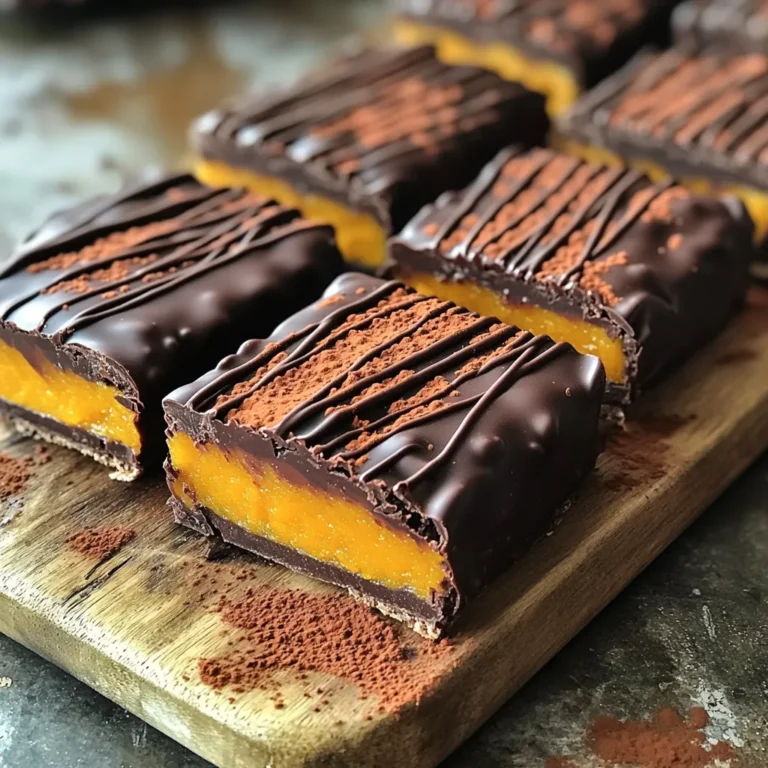
Chocolate Pumpkin Protein Bars No-Bake Simple Snack

- 8 oz. rice noodles - 1 lb. large shrimp, peeled and deveined - 1 cup broccoli florets - 1 bell pepper, thinly sliced (any color) - 1 carrot, julienned For this teriyaki shrimp noodle bowl, I always use rice noodles. They cook fast and soak up flavor well. Large shrimp add a sweet and juicy bite. Broccoli florets give crunch and color. A bell pepper adds sweetness, which pairs nicely with the sauce. Lastly, the carrot brings a nice color and texture. - 2 tablespoons soy sauce - 2 tablespoons teriyaki sauce - 1 tablespoon sesame oil - 1 tablespoon fresh ginger, minced - 1 clove garlic, minced The soy sauce gives a salty base. Teriyaki sauce adds a sweet glaze. Sesame oil brings a nutty taste that lifts the dish. Fresh ginger and garlic create a fragrant aroma and warm flavor. These sauces and seasonings are key to making this dish shine. - 2 green onions, chopped - Sesame seeds for garnish Green onions add a fresh crunch. They also enhance the color. Sesame seeds provide a nutty finish and look great on top. These simple garnishes make the dish pop and add layers of flavor. First, I bring a large pot of water to a boil. I add the rice noodles and cook them according to the package instructions. This usually takes about 3 to 5 minutes. Once they are soft, I drain the noodles and set them aside. Next, I heat sesame oil in a large skillet over medium heat. I add minced ginger and garlic. I cook them for about 30 seconds until they smell great. Then, I toss in the broccoli, bell pepper, and carrot. I stir-fry them for about 3 to 4 minutes. I want them tender but still crisp. Now, I add the shrimp to the skillet. I pour in the soy sauce and teriyaki sauce. I stir often and cook for about 3 to 4 minutes. The shrimp will turn pink and cook through. After the shrimp are cooked, I add the drained noodles to the skillet. I toss everything together until well combined and heated through. Finally, I garnish the noodle bowls with chopped green onions and sprinkle sesame seeds on top. This adds a nice crunch and flavor. To cook shrimp well, focus on timing and temperature. Shrimp cooks fast. Use medium heat to avoid overcooking. Cook shrimp for about 3-4 minutes. They change from gray to pink when done. They should be firm and opaque. If they curl tightly, they are overcooked. You can easily boost flavor in your teriyaki shrimp noodle bowls. Add spices like red pepper flakes for heat or add herbs like cilantro for freshness. Feel free to customize sauces, too. You might mix teriyaki sauce with a bit of honey or lime juice for a sweet and tangy twist. Prep can be quick and easy. Pre-chop your vegetables a day ahead. This saves time when cooking. You can also use frozen shrimp. They thaw fast and are just as tasty. This way, you can whip up a meal in no time. Enjoy your delicious Teriyaki Shrimp Noodle Bowls! {{image_2}} You can change the veggies in your bowl. Swap out broccoli for snap peas or spinach. They add a nice crunch and fresh taste. Adding mushrooms boosts umami flavor and makes the dish more hearty. Want to switch up the protein? You can use chicken or tofu instead of shrimp. Chicken gives a different texture, while tofu is great for a plant-based meal. You can also add beef slices for a richer taste. Not a fan of rice noodles? Try soba or udon noodles. They bring unique flavors and textures. If you need gluten-free options, you can use gluten-free pasta. It works well and keeps the dish tasty. To store leftover Teriyaki Shrimp Noodle Bowls, let them cool first. Place them in an airtight container. This helps keep them fresh longer. Use glass or BPA-free plastic containers. These options work well for storage. Make sure to seal the container tightly to avoid air exposure. This keeps flavors intact. You can freeze Teriyaki Shrimp Noodle Bowls for later. First, let the dish cool completely. Then, transfer the noodles and shrimp to a freezer-safe container. Label the container with the date. When you're ready to eat, thaw it in the fridge overnight. To reheat, use a microwave or a skillet. Heat on medium and stir often to warm evenly. Leftovers last about three to four days in the fridge. After this, they may spoil. Signs of spoilage include an off smell or change in color. If you see any mold, throw it away immediately. Always trust your senses! This dish is quick to prepare. It takes just 15 minutes from start to finish. You will spend about 10 minutes prepping ingredients and 5 minutes cooking. This makes it a great choice for busy weeknights. Yes, you can! You can cook the shrimp and veggies ahead of time. Just store them in an airtight container in the fridge. When ready to eat, reheat and add the noodles. This saves time and keeps your meal fresh. Absolutely! You can use gluten-free soy sauce instead of regular soy sauce. This simple swap makes the dish safe for those with gluten sensitivity. Also, check the rice noodles to ensure they are gluten-free. To make it spicier, add red pepper flakes or a dash of hot sauce. If you prefer mild flavors, skip the spicy additions. You can also balance heat with a bit of sugar or honey. This gives you control over the spice level. This blog post covered how to make Teriyaki Shrimp Noodle Bowls from scratch. You learned about the key ingredients, including rice noodles, shrimp, and veggies. I explained step-by-step cooking methods to help you achieve the perfect meal. You also got tips on variations and storage to keep your dish fresh. Remember, cooking is fun and easy. Experiment with flavors and make it your own. Enjoy your tasty creation, and happy cooking!

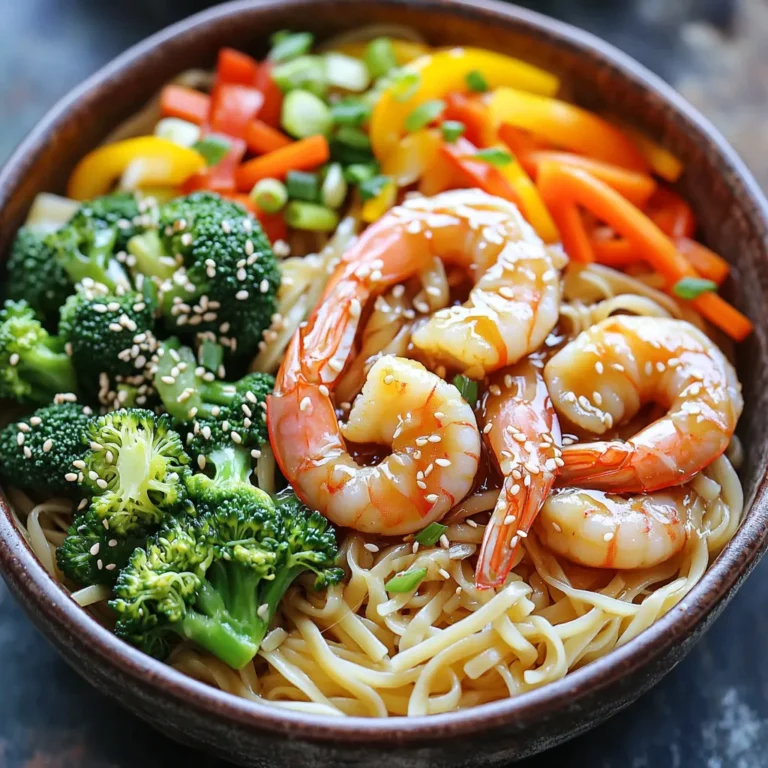
Delicious Teriyaki Shrimp Noodle Bowls 15 Minutes Recipe

- 2 cups apple cider - 1 tablespoon fresh lemon juice - 1 tablespoon honey (or maple syrup for a vegan option) - 1/4 teaspoon ground cinnamon - 1/4 teaspoon ground ginger - 1/4 teaspoon ground nutmeg - 1/2 cup hot water - Cinnamon stick and lemon slices for garnish This mocktail makes use of simple, fresh ingredients. Apple cider serves as the base, giving a sweet and tart flavor. Fresh lemon juice adds a bright kick. Honey or maple syrup sweetens the drink. Ground cinnamon, ginger, and nutmeg bring warmth and spice to the mix. Hot water helps blend the flavors. If you want to swap ingredients, here are some ideas: - Use orange juice instead of lemon juice for a citrus twist. - Try agave nectar instead of honey for a different sweetener. - For a spicier kick, add a pinch of cayenne pepper. - You can replace apple cider with pear cider for a unique flavor. These alternatives keep the drink exciting and tailored to your taste. Garnishing your mocktail adds a nice touch. Here are some options: - Use a cinnamon stick for stirring. - Add a slice of lemon on the rim for a fresh look. - Toss in a few whole cloves for extra aroma. - Add apple slices for a lovely presentation. Garnishes make your drink more appealing and enhance the flavor. 1. First, gather all your ingredients to make this warm drink. You will need: - 2 cups apple cider - 1 tablespoon fresh lemon juice - 1 tablespoon honey or maple syrup - 1/4 teaspoon ground cinnamon - 1/4 teaspoon ground ginger - 1/4 teaspoon ground nutmeg - 1/2 cup hot water - Cinnamon stick and lemon slices for garnish 2. Start by measuring the apple cider. Pour it into a medium saucepan. 3. Heat the cider on medium heat. Warm it until it feels hot but not boiling. 4. While it warms, measure the lemon juice, honey, and spices. 5. Stir the lemon juice, honey, cinnamon, ginger, and nutmeg into the warm cider. Mix well until everything blends. 1. Once combined, remove the saucepan from the heat. 2. Add the hot water to the mixture. This helps to dilute the drink slightly. 3. Stir the mixture again to ensure it is well mixed. 4. Take a taste and adjust the flavors. If you want it sweeter, add more honey. If you like more spice, add a pinch of cinnamon or nutmeg. 1. Carefully pour the hot mocktail into heatproof mugs or cups. 2. For a festive touch, garnish each drink with a cinnamon stick and a slice of lemon. 3. Serve immediately and enjoy the warm, cozy flavors. Perfect for a chilly day! To make your Apple Cider Hot Toddy Mocktail even better, try adding a splash of vanilla extract. It gives the drink a warm, cozy taste. You can also use fresh herbs like rosemary or thyme for a unique twist. Just drop in a sprig while you heat the cider. Experiment with fresh ginger slices for extra zing. One common mistake is letting the cider boil. Boiling can change the flavor and make it bitter. Always heat it gently. Another mistake is not adjusting the sweetness. Taste your mocktail before serving. Everyone’s sweetness level is different, so add more honey or syrup if needed. Lastly, don’t skip the garnish. A cinnamon stick and lemon slice make it look and taste better. Presentation matters, even for a simple drink. Use clear mugs to show off the rich color of the cider. Add a lemon slice on the rim for a pop of color. Place the cinnamon stick in the mug for a rustic touch. You can also sprinkle a little cinnamon on top for an extra special look. These small touches will impress your guests and make your drink feel festive. {{image_2}} You can change the taste of your Apple Cider Hot Toddy Mocktail with seasonal flavors. Try adding a splash of cranberry juice for a tart twist. Pear juice also works great, giving a sweet touch. During the holidays, incorporate a few cloves or star anise for warmth. You can also add a dash of vanilla extract for creamy sweetness. Sweetness can vary based on your taste. Honey is the classic choice, but maple syrup is a great vegan option. Agave nectar offers another sweet alternative that blends well. For a low-calorie option, consider using stevia or monk fruit. Each sweetener brings its own unique flavor, so feel free to experiment. Garnishing adds a fun touch to your mocktail. While a cinnamon stick and lemon slice are perfect, you can mix it up. Try using fresh rosemary for a fragrant twist. Apple slices also make for a nice garnish, adding color and flavor. If you want something festive, use pomegranate seeds for a pop of color. You can store your Apple Cider Hot Toddy Mocktail in the fridge. Use an airtight container for best results. It stays fresh for up to three days. If it separates, just stir before serving. While I don’t recommend freezing this mocktail, you can freeze the apple cider alone. Pour it into ice cube trays. This way, you can add it to your next drink for a chill. To reheat, pour the mocktail into a saucepan. Warm it over low heat until it’s hot but not boiling. Stir well to mix the flavors again. You can also use a microwave. Heat it in short bursts, stirring in between. Enjoy it warm for a cozy drink! Yes, you can make this mocktail ahead of time. Just prepare it and store it in the fridge. It can last for a few days. When you are ready to serve, heat it gently on the stove. This way, you save time and enjoy it warm. You can add various spices to enhance the flavor. Try adding cloves for a warm kick. Star anise gives a nice touch too. If you like it spicy, add a dash of cayenne pepper. Experiment with different spices to find your perfect blend. Absolutely! This mocktail is perfect for kids. It has no alcohol, just tasty ingredients. Kids will love the sweet apple cider and the warm spices. It’s a great drink for family gatherings or cozy nights. Enjoy it together with your little ones! This blog covered essential ingredients, step-by-step instructions, and valuable tips. I shared ways to enhance flavor and avoid common mistakes. You can also explore fun variations, storage methods, and answer important FAQs. When you try this recipe, remember to have fun. Experimenting will lead to your unique drink. Enjoy creating a tasty mocktail that everyone can love.

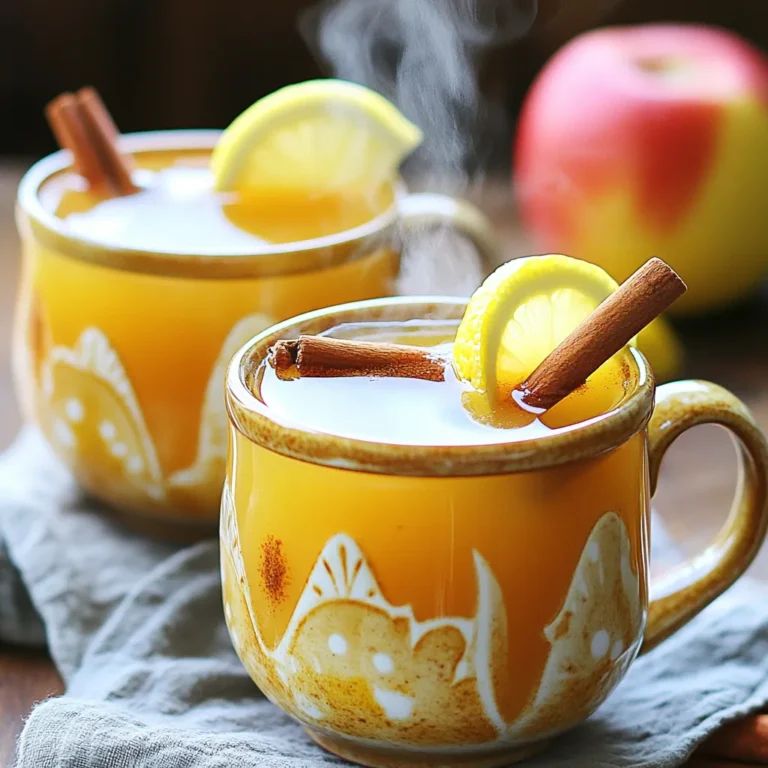
Refreshing Apple Cider Hot Toddy Mocktail Recipe

For Maple Pecan Overnight Oats, you need a few simple items. Gather these ingredients for a tasty breakfast: - 1 cup rolled oats - 2 cups unsweetened almond milk - 2 tablespoons pure maple syrup - 1/4 cup chopped pecans - 1/2 teaspoon vanilla extract - 1 tablespoon chia seeds - 1/2 teaspoon cinnamon - Pinch of salt - Fresh fruit for topping These ingredients create a creamy and nutty dish. The rolled oats form the base, while almond milk gives it a rich texture. Pure maple syrup adds sweetness, and chopped pecans bring a delightful crunch. Vanilla extract enhances the flavor, while chia seeds offer a boost of nutrition. Cinnamon adds warmth, and a pinch of salt balances everything out. Fresh fruit on top makes it even better. You can use bananas or berries for a splash of color and taste. Enjoy making your overnight oats! 1. In a large mixing bowl, combine: - 1 cup rolled oats - 2 cups unsweetened almond milk - 2 tablespoons pure maple syrup - 1/2 teaspoon vanilla extract - 1 tablespoon chia seeds - 1/2 teaspoon cinnamon - A pinch of salt Mix these well until smooth. This will create a creamy base. 2. Next, fold in 1/4 cup chopped pecans gently. This adds crunch and flavor. 3. Divide the mixture equally into two jars. Make sure the jars have lids. This helps keep them fresh. 1. Cover the jars with their lids. Place them in the fridge overnight. If you’re short on time, let them chill for at least 6 hours. 2. Chilling time is key. It allows the oats to soak up the milk and flavors. This makes them soft and tasty. 1. When ready to eat, stir the oats. If they seem too thick, add a splash of almond milk. This helps reach your desired creaminess. 2. Top with fresh fruit, like bananas or berries. Add extra chopped pecans for an extra crunch. This makes each bite even better! - To get the best texture, soak rolled oats in liquid. This helps them soften. - Adjust the amount of maple syrup to fit your taste. More syrup means sweeter oats. - Use jars with lids for easy storage. Mason jars work great for overnight oats. - A good whisk or spoon helps mix ingredients well. You want everything combined. {{image_2}} You can change up the flavor of your Maple Pecan Overnight Oats. Adding cocoa powder gives a rich, chocolatey taste. This works great with the maple flavor. You can also try different nuts. Walnuts or almonds add a nice crunch. Fruits are another fun way to mix things up. Use seasonal fruits for better taste. In summer, add fresh berries. In fall, try diced apples or pears. You can even mash bananas for a creamy twist. If you want vegan oats, switch to plant-based milk. Almond milk is a great choice. It keeps the recipe light and tasty. You can also use maple syrup as your sweetener. For a nut-free option, just leave out the pecans. Instead, add seeds like pumpkin or sunflower. This keeps the crunch and adds healthy fats. You can still enjoy a delicious meal without nuts. To keep your maple pecan overnight oats fresh, store them in the fridge. Use airtight containers or jars to lock in the flavor. This helps prevent spoilage and keeps them creamy. You can easily make a batch for the week. They stay delicious for up to four days. If you want to save some for later, you can freeze them. Portion the oats into freezer-safe containers. Leave some space at the top for expansion. This helps avoid spills. They can last in the freezer for up to three months. To thaw them, move the containers to the fridge overnight. You can also leave them out at room temperature for a few hours. Once thawed, stir well. If they seem dry, add a splash of almond milk before enjoying. Can I make these oats without chia seeds? Yes, you can skip the chia seeds. They add texture and some nutrition, but the oats will still taste great without them. Just remember to mix everything well. How long can I keep leftover oats? You can keep leftover oats in the fridge for up to three days. Just make sure to store them in a sealed container. If they get too thick, add a splash of milk before eating. Can I use quick oats instead of rolled oats? Yes, you can use quick oats. They will soak up the liquid faster and may become softer. The flavor will still be good, but the texture will be different. What fruits pair well with these oats? Fruits like bananas, berries, and apples work well. You can mix and match to find your favorite combo. They add sweetness and freshness to your oats. Are there any toppings to avoid? Avoid toppings that are too wet or sticky. For example, syrup or heavy sauces can make the oats soggy. Stick with nuts, seeds, or fresh fruit for the best taste and texture. You’ve learned how to make easy and tasty overnight oats. We covered the ingredients, step-by-step prep, and tips for perfect results. Remember, you can customize these oats to match your taste. Storage is simple, too, whether in the fridge or freezer. Overall, overnight oats are a quick, healthy breakfast choice. Enjoy personalizing your flavors and toppings. You’ll love how easy it is to have breakfast ready for busy mornings. Start creating your own version today!

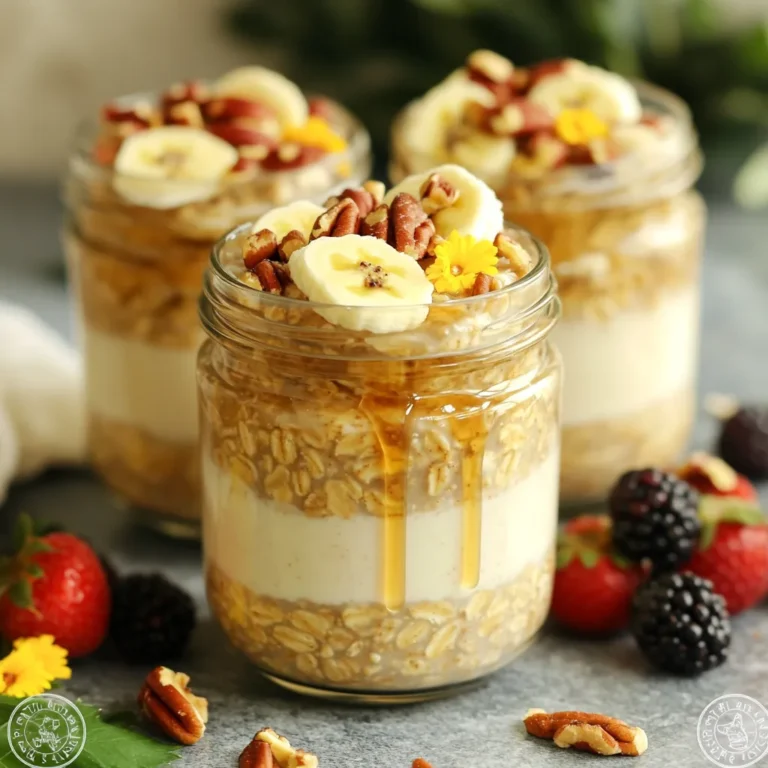
Maple Pecan Overnight Oats Deliciously Simple Recipe

To make these Brown Butter Apple Cinnamon Blondies, you will need simple ingredients that blend well together. Here’s a detailed list: - Butter: 1/2 cup unsalted butter (1 stick) - Sugars: 1 cup packed brown sugar, 1/2 cup granulated sugar - Eggs: 2 large eggs - Vanilla extract: 1 teaspoon - Flour: 1 1/2 cups all-purpose flour - Baking powder: 1 teaspoon - Baking soda: 1/2 teaspoon - Salt: 1/2 teaspoon - Cinnamon: 1 tablespoon - Apples: 1 cup diced apples (peeled and cored) - Walnuts: 1/2 cup chopped walnuts (optional) Each ingredient adds its own unique flavor and texture. The butter gives richness, while the sugars add sweetness. The eggs help bind everything together. Vanilla adds a nice aroma. The flour, baking powder, and baking soda create a soft texture. Salt and cinnamon enhance the taste. Finally, the apples bring moisture and sweetness, and walnuts add a nice crunch if you choose to use them. These ingredients work in harmony to create a treat that's not just tasty but also comforting. You can mix and match some ingredients based on your taste. Enjoy the process! Start by melting the butter in a small saucepan over medium heat. Keep stirring as it melts. After a few minutes, the butter will foam. This means it is cooking. Continue to cook it until it turns a nice golden brown. You will smell a rich, nutty aroma after about 5 to 7 minutes. Be careful not to burn it. Once it reaches that color, remove it from the heat. Let it cool for a few minutes. In a large mixing bowl, combine the warm brown butter with the brown sugar and granulated sugar. Use a whisk to blend them well. You want a smooth and creamy mix. Make sure there are no lumps. This step is key for a rich flavor in your blondies. Next, add the eggs and the vanilla extract to the sugar mix. Whisk them together until you see a smooth consistency. The eggs add moisture, while the vanilla gives a warm flavor. Mix well, and ensure everything is fully blended. In a separate bowl, mix together the flour, baking powder, baking soda, salt, and cinnamon. These dry ingredients are important for the structure of your blondies. Gradually add this dry mix to the wet ingredients. Stir until just combined. Do not overmix, as this can make the blondies tough. Now it's time to fold in the diced apples and chopped walnuts if you are using them. Gently mix them into the batter. Make sure they are evenly distributed. This adds a nice texture and flavor. The apples will keep the blondies moist. Preheat your oven to 350°F (175°C). While it heats, prepare your baking dish. Grease or line an 8x8-inch baking pan with parchment paper. This helps with easy removal. Pour the batter into the pan and smooth the top with a spatula. Bake for 25 to 30 minutes. Check for doneness by inserting a toothpick in the center. It should come out clean. After baking, let the blondies cool in the pan for about 10 minutes. This helps them set. Once slightly cool, transfer them to a wire rack to cool completely. Once cooled, cut them into squares or rectangles. Enjoy your delicious treat! To make brown butter, melt unsalted butter in a saucepan over medium heat. Stir it often. Keep an eye on the color. You want it to turn a rich golden brown. This process takes about 5 to 7 minutes. Watch closely to avoid burning. Once it smells nutty and looks brown, remove it from the heat. Let it cool slightly before using it in your blondies. The brown butter adds a deep flavor that makes these blondies special. For this recipe, choose apples that are sweet and firm. Good options include Granny Smith, Honeycrisp, or Fuji apples. Granny Smith apples add a nice tartness that balances the sweetness. Honeycrisp apples bring a crunchy texture and sweetness. Fuji apples are sweet and juicy, perfect for baking. Make sure to peel and core the apples before dicing them. This helps them mix well into the batter. Adding spices can boost the flavor of your blondies. Along with cinnamon, you can try nutmeg or allspice for warmth. A pinch of ginger adds a nice zing. If you like a little heat, add a touch of cayenne. These spices work well together and enhance the apple flavor. Just remember to keep the spice amounts balanced. Too much can overpower the dish. {{image_2}} You can make these blondies even better by adding chocolate chips. Just fold in 1 cup of semi-sweet or dark chocolate chips with the apples. The warm, melted chocolate pairs perfectly with the cinnamon and apple flavor. You can also mix in peanut butter chips for a fun twist. If you don't like walnuts, you can try other nuts. Chopped pecans or almonds work well. You can even skip the nuts if you prefer a nut-free treat. Seeds like pumpkin or sunflower seeds are great options too. They add a nice crunch without overpowering the other flavors. You can change the fruit in this recipe based on the season. In fall, try using pears or cranberries for a fresh taste. In summer, swap in diced peaches or berries. You can also play with spices. Add nutmeg or ginger for a warm flavor. Experimenting makes each batch special and fun! To keep your blondies fresh, store them in an airtight container. Line the bottom with parchment paper. This helps prevent sticking. Place a piece of parchment paper between layers if you stack them. Keep them at room temperature for the best flavor. You can freeze blondies for later. First, let them cool completely. Wrap each piece in plastic wrap, then place them in a freezer bag. Remove as much air as possible. When you want to enjoy one, take it out and let it thaw at room temperature. You can also warm it in the oven for a few minutes. Brown butter apple cinnamon blondies stay fresh for about 3 days at room temperature. In the fridge, they last about a week. Freezing extends their life to about 3 months. You can use cake flour, but it will change the texture. Cake flour has less protein than all-purpose flour. This means your blondies will be softer and lighter. If you choose cake flour, reduce the amount by about 2 tablespoons. This keeps the blondies from being too airy. To make these blondies gluten-free, try using almond flour or a gluten-free blend. Both options work well. Ensure the blend has xanthan gum for the best texture. You can also use oat flour for a nutty flavor. Just check labels to be sure they are gluten-free. These blondies shine with a scoop of vanilla ice cream. A drizzle of caramel sauce adds a lovely touch. You can also serve them with whipped cream and a sprinkle of cinnamon. For a festive twist, top with chopped nuts or fresh apple slices. Enjoy them warm for the best flavor! In this article, we explored a delicious Brown Butter Apple Cinnamon Blondies recipe. I shared key ingredients, step-by-step instructions, and helpful tips for perfect results. You also learned how to store and freeze blondies for future enjoyment. Baking these blondies is a fun way to enjoy apples and brown butter. Try mixing in different flavors or nuts for a unique twist. Enjoy your baking adventure!

Brown Butter Apple Cinnamon Blondies Irresistible Treat

- 2 cups crushed pretzel sticks - 1 cup sweetened condensed milk - 1 cup semi-sweet chocolate chips - 1 cup caramel sauce - 1 teaspoon vanilla extract - ½ teaspoon sea salt - ½ cup chopped pecans or walnuts (optional) To make No-Bake Salted Caramel Pretzel Fudge, you need simple and tasty ingredients. The crushed pretzel sticks give a nice crunch. Sweetened condensed milk adds creaminess and sweetness. Semi-sweet chocolate chips bring rich chocolate flavor. Caramel sauce ties it all together with its sweet and gooey goodness. Vanilla extract enhances the taste, while the sea salt balances sweetness. If you want extra flavor, add chopped pecans or walnuts. They add a lovely nutty crunch. Using quality ingredients makes a big difference. Choose a caramel sauce you love. A good chocolate will also shine through. This mix of flavors creates a sweet and salty treat that everyone will enjoy. Start by grabbing a large mixing bowl. Add the crushed pretzel sticks into the bowl. Next, pour in the sweetened condensed milk. Then, add the semi-sweet chocolate chips and caramel sauce. Don’t forget the vanilla extract and sea salt! Mix all these ingredients together until they blend well. If you like nuts, toss in the chopped pecans or walnuts for extra crunch. This mixture should feel thick and sticky. Now it's time to prep your baking dish. Take an 8x8-inch dish and line it with parchment paper. Make sure the paper hangs over the edges. This helps later when you lift out the fudge. The parchment prevents sticking and makes clean-up easy. Pour the mixed fudge into the lined baking dish. Use a spatula to spread it evenly. Press it down firmly to make a compact layer. For an extra treat, drizzle more caramel sauce on top. Sprinkle a pinch of sea salt for flavor. Now, place the dish in the refrigerator. Let it chill for at least 3 hours. After that, the fudge should be firm and ready to cut. Lift it out using the parchment overhang. Cut into squares and enjoy! To get your fudge just right, focus on the mixing. Make sure all ingredients blend well. This helps in achieving a smooth texture. Use your hands to press the mixture firmly into the pan. This helps the fudge hold together. If it feels too soft, chill it a bit longer. This will help it set properly. When ready to serve, cut the fudge into neat squares. Place them on a pretty plate. Drizzle extra caramel sauce on top for a nice touch. Add some crushed pretzel pieces on the side. This creates a fun, crunchy look. You can also sprinkle sea salt on top. This balances the sweetness perfectly and makes it look gourmet. You can easily switch up the flavors in this recipe. Try adding a pinch of cinnamon for warmth. If you like nuts, add chopped pecans or walnuts. They bring a nice crunch. You can even use peanut butter chips instead of chocolate chips. This adds a rich and nutty taste. If you want a sweeter fudge, add more caramel sauce. Adjust according to your taste! {{image_2}} Want to mix things up? Try adding peanut butter! To make chocolate peanut butter pretzel fudge, simply blend in ½ cup of creamy peanut butter into your mixture. This gives the fudge a rich, nutty flavor. The chocolate and peanut butter work well together, making each bite a delight. You will enjoy the added creaminess and taste! If you need a nut-free option, skip the nuts. The fudge remains delicious without them. You can also add more pretzel sticks for crunch. This keeps the texture fun and tasty, even without nuts. Everyone can enjoy this treat safely. To celebrate the seasons, add spices! For a fall twist, mix in 1 teaspoon of pumpkin spice to your fudge. This warm flavor pairs well with caramel and chocolate. You can also try cinnamon or nutmeg for a different taste. Seasonal flavors will make your fudge special for any occasion! To keep your No-Bake Salted Caramel Pretzel Fudge fresh, store it in an airtight container. Use parchment paper to separate layers. This will help avoid sticking. Place the container in the refrigerator to maintain the fudge's texture. If you have extra caramel sauce, keep it in a separate jar in the fridge. This fudge lasts up to two weeks in the fridge. You can tell it’s fresh by its firm texture. If the fudge starts to feel hard, it may be drying out. Always check for any off smell or changes in color. These signs mean it’s time to toss it. You can make this fudge ahead of time. Just follow the recipe, let it set, and store it. For freezing, wrap individual pieces in plastic wrap. Then place them in a freezer bag. The fudge can freeze well for about three months. When ready to enjoy, simply thaw it in the fridge overnight. Yes, you can use homemade caramel sauce. Making your own adds a personal touch. Just ensure it's thick enough to hold its shape. A well-made sauce will enhance the flavor of the fudge. If you prefer a store-bought option, that works too. Both will taste great in this recipe. If you need a substitute, try using coconut milk with sugar. Mix one cup of coconut milk with ⅔ cup of sugar. Cook it down until it thickens. You can also use evaporated milk with added sugar. Adjust the sweetness to your taste for the best results. To check if the fudge is set, touch the top lightly. It should feel firm and not sticky. Refrigerate it for at least three hours. If it's still soft, give it more time. Once set, it will cut into neat squares easily. Enjoy your delicious fudge! This blog post covered how to make delicious pretzel fudge. We looked at the key ingredients and shared easy steps. Tips helped ensure your fudge has the best texture. I also shared fun flavor variations and storage tips. In the end, making this fudge is simple and fun. Enjoy creating your own tasty treats!

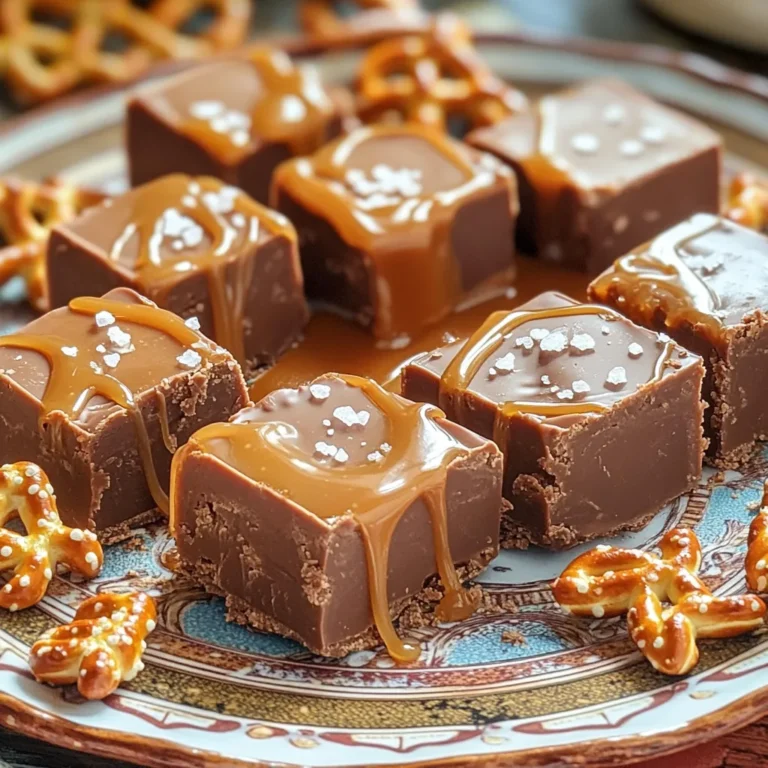
No-Bake Salted Caramel Pretzel Fudge Delight

PREV 1 … 12 13 14 … 52 NEXT
cozy citrus kitchen

explore

DessertsDinnerAppetizersDrinks

Our Policies

  • Cookie Policy
  • Copyright Policy
  • Disclaimer
  • GDPR Policy
  • Terms Of Use
Back to Top
  • About
  • Contact Us
  • Privacy Policy
© 2025 cozy citrus kitchen