FREE DINNER EBOOK! Get your copy!
  • Cookie Policy
  • GDPR Policy
  • Disclaimer
  • Terms Of Use
  • Visit my other site: Fun Cookie Recipes
cozy citrus kitchen
  • Home
  • Dinner
  • Desserts
  • Drinks
  • Appetizers
  • Contact
  • About
  • Privacy Policy
  • Home
  • Dinner
  • Desserts
  • Drinks
  • Appetizers
  • Contact
  • About
  • Privacy Policy
  • Cookie Policy
  • GDPR Policy
  • Disclaimer
  • Terms Of Use
Visit my other site: Fun Cookie Recipes

HOME / CATEGORIES /

Latest

To make Creamy One-Pot Spinach Feta Orzo, gather these simple ingredients: - 1 cup orzo pasta - 4 cups vegetable broth - 2 cups fresh spinach - 1 cup feta cheese, crumbled - 1 small onion, finely chopped - 3 cloves garlic, minced - 1 tablespoon olive oil - 1 teaspoon dried oregano - 1/2 teaspoon red pepper flakes (optional for heat) - Salt and pepper to taste - Fresh parsley, chopped (for garnish) These ingredients blend well to create a creamy and flavorful dish. The orzo brings a nice texture, while the feta adds a rich taste. You can customize this dish easily. Consider adding: - Grilled chicken for protein - Sun-dried tomatoes for extra flavor - Artichoke hearts for a unique twist These additions can change the dish to suit your taste. Feel free to experiment and make it your own! To prepare this dish, you’ll need some basic tools: - A large pot or deep skillet - A wooden spoon for stirring - A sharp knife for chopping Having the right tools makes cooking easier. With these items, you're set to create a delightful meal! Gather all your ingredients first. This makes cooking smooth and easy. You will need: - 1 cup orzo pasta - 4 cups vegetable broth - 2 cups fresh spinach - 1 cup feta cheese, crumbled - 1 small onion, finely chopped - 3 cloves garlic, minced - 1 tablespoon olive oil - 1 teaspoon dried oregano - 1/2 teaspoon red pepper flakes (optional) - Salt and pepper to taste - Fresh parsley, chopped Chop the onion and mince the garlic. Crumble the feta cheese. Wash the spinach. This prep makes it easy to cook quickly. Start by heating the olive oil in a large pot or deep skillet over medium heat. Add the chopped onion and cook for 3-4 minutes until it turns soft and clear. This step builds flavor. Next, stir in the minced garlic. Cook it for about 1 minute, but do not let it burn. Now, add the orzo pasta. Toast it by stirring for 1-2 minutes until it gets a light golden color. This adds a nice nutty taste. Pour in the vegetable broth. Add the dried oregano and red pepper flakes if you want a little heat. Stir everything well. Bring the mix to a boil, then lower the heat to a simmer. Cover the pot and let it cook for about 10 minutes. Stir it every now and then. The orzo should be soft, and most of the broth should be soaked up. Once done, take the pot off the heat. Stir in the fresh spinach and crumbled feta cheese. The heat will wilt the spinach and melt the cheese, creating a creamy texture. Now, taste your dish. Add salt and pepper as needed. For serving, I love to use deep bowls. This way, it looks great. Drizzle a bit of olive oil on top for extra flavor and a shine. Garnish with fresh parsley for a pop of color. Enjoy your creamy one-pot spinach feta orzo! To get orzo just right, watch the cooking time closely. Cook it until it is al dente, which means it should still have a slight bite. Stir occasionally to stop it from sticking. If you want a creamier dish, add a splash of vegetable broth or water at the end. This helps create a smooth, rich texture. Add depth to your orzo by using fresh herbs. Basil, thyme, or even dill can brighten the dish. For a kick, include more red pepper flakes. If you love garlic, don't hold back. Adding more minced garlic boosts the flavor. A squeeze of fresh lemon juice at the end adds a nice zing too. Use pre-chopped onions and garlic to save time. You can also buy pre-washed spinach to cut down on prep. Cook the orzo in the same pot as the other ingredients to save on dishes. This one-pot method makes cleanup easy and quick. Make sure to have all your ingredients ready before you start cooking. This way, you can keep things moving smoothly. {{image_2}} You can easily add meat to this dish. Cooked chicken or shrimp works well. Just toss it in after you add the spinach and feta. This adds protein and makes the meal heartier. If you prefer beef, ground meat is a great choice too. Brown it first with the onion for extra flavor. You can also use sausage for a tasty twist. If you want a vegetarian version, skip the meat and use vegetable broth. Replace feta cheese with tofu or a vegan cheese. This keeps it creamy while making it plant-based. For a nutty flavor, add nutritional yeast. It gives a cheesy taste without dairy. You can also mix in other greens like kale or Swiss chard for added nutrients. Feel free to swap in seasonal veggies. In spring, add peas or asparagus for freshness. In summer, zucchini or bell peppers bring color and taste. Fall brings squash or pumpkin for a cozy feel. In winter, root vegetables like carrots or sweet potatoes work well. Just adjust cooking time based on the veggies you choose to keep them tender. To store leftover Creamy One-Pot Spinach Feta Orzo, let it cool first. Transfer it to an airtight container. This helps keep it fresh. You can store it in the fridge for up to three days. If you plan to keep it longer, freezing is a better option. When reheating, use a pot on low heat. Add a splash of vegetable broth for moisture. Stir it often to avoid sticking. This keeps the orzo creamy and tasty. You can also microwave it in short bursts. Check and stir between intervals to heat evenly. For freezing, place the orzo in a freezer-safe container. Leave some space for expansion. It can last up to three months in the freezer. To eat, thaw it overnight in the fridge. Reheat as mentioned above for the best flavor and texture. Orzo takes about 10 minutes to cook. When you add it to the pot, keep an eye on it. Stir occasionally to prevent sticking. You want it to be al dente, which means it should still have a slight bite. Yes, you can use different cheese. If you don't have feta, try goat cheese or ricotta. Each cheese will bring a different flavor. Just remember to use a cheese that melts well for a creamy texture. You can serve orzo with a fresh salad or grilled chicken. It also pairs well with roasted vegetables. For a lighter meal, try adding a side of steamed broccoli or a simple tomato salad. Enjoy mixing and matching! This guide covers ingredients, cooking steps, and tips for perfect orzo. You learned how to customize it with different ingredients and tools. We touched on making it vegetarian or adding meat. I shared storage tips and answered common questions. With this information, you can make orzo your own. Now, it’s time to gather your ingredients and start cooking!

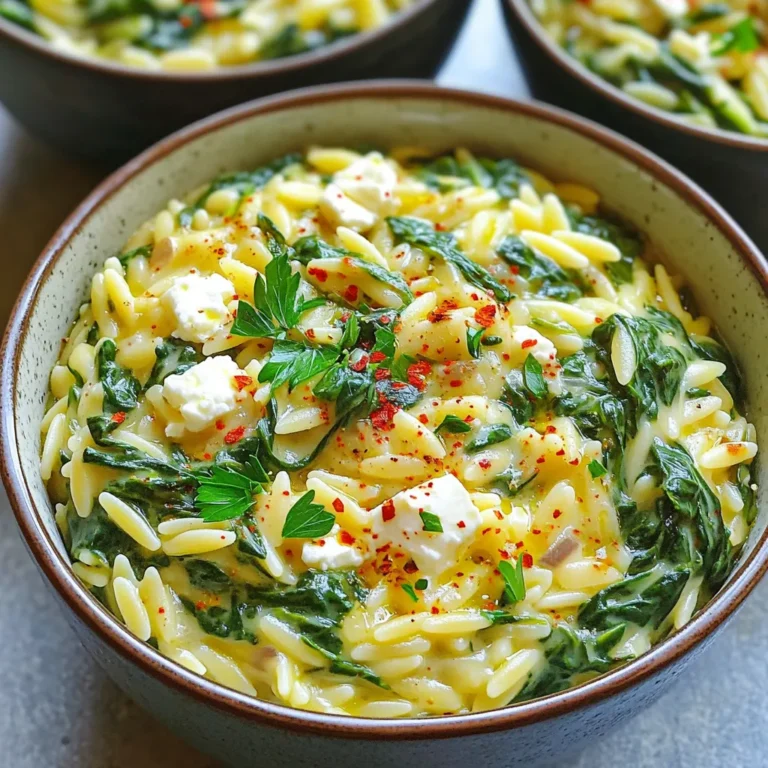
Creamy One-Pot Spinach Feta Orzo Simple Delight

Baking starts with the right ingredients. For bakery-style raspberry white chocolate muffins, gather the following: - 2 cups all-purpose flour - 1 tablespoon baking powder - ½ teaspoon baking soda - ½ teaspoon salt - ¾ cup granulated sugar - ½ cup unsalted butter, melted and cooled - 2 large eggs - 1 teaspoon vanilla extract - ¾ cup buttermilk - 1 cup fresh raspberries (or frozen, thawed and drained) - ½ cup white chocolate chips - Zest of 1 lemon (optional) - Extra sugar for topping These ingredients work together to create moist, fluffy muffins with sweet bursts of raspberry and creamy white chocolate. Each component plays an important role. The flour gives structure, while the baking powder and baking soda make them rise. Sugar adds sweetness and helps with browning. The buttermilk keeps muffins tender and adds flavor. Using fresh raspberries provides a tart contrast to the sweet white chocolate. The lemon zest, if you choose to use it, adds a bright note. Feel free to adjust the sugar for your taste, but remember that the extra sugar on top creates that lovely bakery-style crunch! Preheat your oven to 375°F (190°C). This helps the muffins bake evenly. Line a muffin tin with paper liners or lightly grease it. This will make it easy to remove the muffins later. In a large bowl, mix the dry ingredients. Combine 2 cups of all-purpose flour, 1 tablespoon of baking powder, ½ teaspoon of baking soda, ½ teaspoon of salt, and ¾ cup of granulated sugar. Whisk them together until they blend well. This step is key for a fluffy muffin. In another bowl, blend the wet ingredients. Whisk together ½ cup of melted butter, 2 large eggs, 1 teaspoon of vanilla extract, and ¾ cup of buttermilk. Make sure everything blends smoothly. This mix adds moisture to the muffins. Now, pour the wet mix into the dry mix. Gently fold them together with a spatula. Do not overmix! A few lumps are fine. This keeps the muffins light and airy. Next, add in the fun stuff! Gently fold in 1 cup of fresh raspberries and ½ cup of white chocolate chips. If you like, include the zest of 1 lemon for a bright taste. Ensure they spread evenly in the batter. Fill each muffin cup about ¾ full with the batter. For a tall bakery-style muffin, you can fill them a bit more. Lightly sprinkle extra sugar on top for a nice crunch. Bake for 18-22 minutes. Check if a toothpick comes out clean. Let the muffins cool in the tin for about 5-10 minutes. Then, transfer them to a wire rack to cool completely. Enjoy the sweet aroma while they cool! To make bakery-style muffins, focus on measuring. Use a kitchen scale for the best results. If you don't have one, spoon flour into a cup without packing it down. This way, you avoid too much flour, which makes muffins dense. The batter should be thick but not dry. A few lumps are okay; they help keep muffins soft and tender. Oven temperature matters. I recommend using an oven thermometer. It helps you know if your oven is hot enough. Place the muffin tin in the center of the oven. This spot gets the best heat. If the muffins are too close to the heat source, they may burn. Check your muffins a few minutes early. Every oven is a bit different. To keep your muffins fresh, let them cool completely. Store them in an airtight container at room temperature. If you want to keep them longer, freeze them. Wrap each muffin tightly in plastic wrap and place them in a freezer bag. When you're ready to eat, thaw them at room temperature or warm them in the oven. Enjoy your fresh muffins! {{image_2}} If you need gluten-free muffins, try using almond flour or a gluten-free blend. For dairy-free options, swap the buttermilk with almond milk and use coconut oil instead of butter. To make vegan muffins, replace the eggs with flax eggs and use plant-based yogurt in place of buttermilk. These choices keep the muffins tasty and fluffy! You can play with flavors in many ways. Add nuts like chopped walnuts or pecans for a crunchy bite. Spices like cinnamon or nutmeg add warmth and depth. For a fruity twist, try using blueberries, strawberries, or peaches instead of raspberries. Each fruit gives a unique taste and keeps things exciting! Get creative with muffin toppings! Instead of just sugar, sprinkle on crushed nuts or oats for added crunch. A drizzle of honey or maple syrup adds sweetness. You can also top the muffins with a cream cheese glaze for a rich finish. Try adding lemon zest or fresh herbs for a fresh twist! To keep your muffins fresh, store them in an airtight container. This helps keep moisture in while keeping air out. You can also place a paper towel inside to absorb extra moisture. Store them at room temperature for up to three days. If you want them to last longer, consider refrigerating them. They can stay fresh for about a week in the fridge. Freezing muffins is a great way to save them for later. First, let the muffins cool completely. Wrap each muffin tightly in plastic wrap. Then, place them in a freezer bag or container. Be sure to remove as much air as possible. Muffins can stay frozen for up to three months. When you're ready to eat them, thaw in the fridge overnight or at room temperature for a few hours. To reheat muffins without drying them out, use the oven or microwave. For the oven, preheat to 350°F (175°C). Place the muffins on a baking sheet and cover with foil. Heat for about 10 minutes. For the microwave, wrap a muffin in a damp paper towel. Heat for 10 to 15 seconds. Check if it's warm, and repeat if needed. This keeps your muffins soft and tasty! To keep your muffins moist, avoid overmixing the batter. Overmixing can lead to dry muffins. Use room temperature ingredients like eggs and buttermilk. Always measure flour correctly; too much can dry out the muffins. Adding extra fat, like melted butter, also helps. Lastly, do not bake them too long. Aim for a golden top and a toothpick that comes out with just a few crumbs. Yes, you can use frozen raspberries. Thaw them and drain any extra liquid before adding to the batter. Frozen berries may break apart more, adding color to your muffins. Fresh raspberries are firmer and keep their shape better. Both options taste great, so choose based on what you have. You can make a buttermilk substitute easily. Mix one cup of milk with one tablespoon of vinegar or lemon juice. Let it sit for five minutes to curdle. You can also use plain yogurt or sour cream thinned with a bit of milk. Each option adds a nice tang and moisture to your muffins. To stop muffins from sticking, choose high-quality paper liners. Lightly grease the muffin tin before placing the liners in. You can use a bit of cooking spray or melted butter. This extra step will help your muffins release easily after baking. You now have a complete guide to making delicious raspberry and white chocolate muffins. We covered the key ingredients, step-by-step instructions, and practical tips for baking. Remember, measuring ingredients correctly is key to great muffins. You can also play with flavors and toppings to make these muffins your own. Storing them right keeps them fresh longer. Enjoy your baking adventure, and savor each bite of your tasty creations. Happy baking!

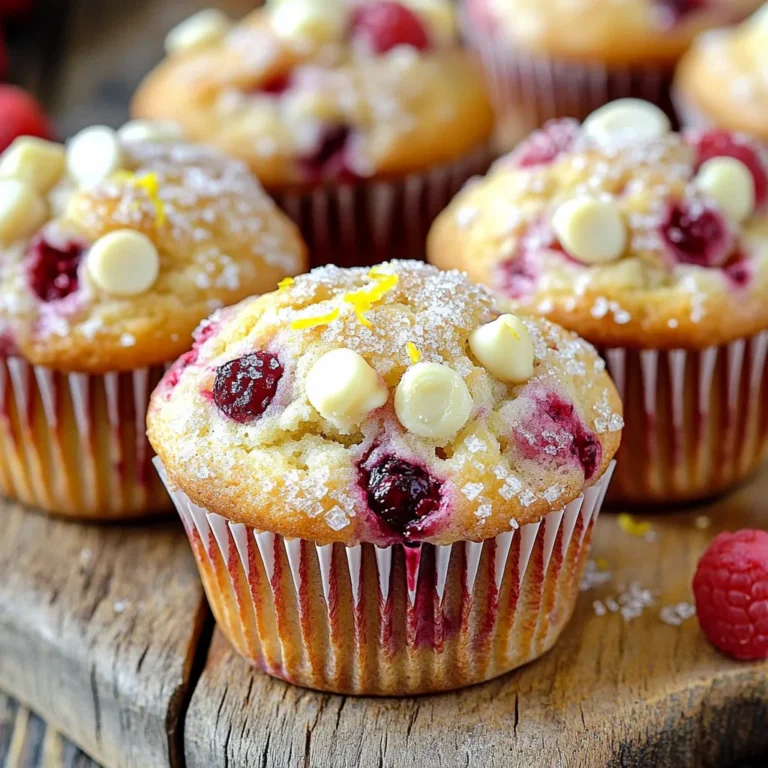
Bakery-Style Raspberry White Chocolate Muffins Delight

- 1 lb large shrimp, peeled and deveined - 1 lb asparagus, trimmed - 3 tablespoons olive oil - 3 tablespoons fresh lemon juice - Zest of 1 lemon - 4 cloves garlic, minced - 1 teaspoon dried oregano - 1 teaspoon dried thyme - Salt and pepper to taste - Lemon wedges, for serving - Fresh parsley, chopped (for garnish) To make this dish shine, start with large shrimp. They offer great texture and flavor. Choose fresh asparagus for a crisp bite. Olive oil adds richness, while fresh lemon juice brings a bright zing. For seasoning, lemon zest adds a burst of citrus. Minced garlic gives depth and warmth. Dried oregano and thyme bring earthy notes. Adjust salt and pepper to your taste. Don’t forget the finishing touches! Lemon wedges add a fresh squeeze when serving. Chopped parsley brightens up the plate and adds color. Each ingredient plays a key role in this delicious meal. - Preheat the oven to 400°F (200°C). - In a large bowl, whisk together: - 3 tablespoons olive oil - 3 tablespoons fresh lemon juice - Zest of 1 lemon - 4 cloves garlic, minced - 1 teaspoon dried oregano - 1 teaspoon dried thyme - Salt and pepper to taste This marinade brings lots of flavor to the shrimp. You want to mix it well so that every shrimp gets coated. - Add the shrimp to the bowl and toss to coat them in the marinade. - On a sheet pan, arrange the asparagus. Drizzle with a little olive oil and sprinkle with salt and pepper. Toss to coat. - Make space in the middle of the sheet pan and lay the marinated shrimp in a single layer. The shrimp should sit in the middle, while the asparagus surrounds them. This setup helps everything cook evenly. - Bake the shrimp and asparagus in the oven for 10-12 minutes. The shrimp will turn pink and opaque, while the asparagus becomes tender-crisp. - Carefully remove the pan from the oven. Garnish the dish with fresh parsley. Serving it with lemon wedges on the side adds a bright touch. You can squeeze the lemon on top for extra zing! - Cook shrimp for 10-12 minutes. This keeps them juicy. - Check for pink and opaque color. This means they’re done. - Avoid cooking too long. Overcooked shrimp become rubbery. - Make sure they are in a single layer. This helps them cook evenly. - Always choose bright green, firm asparagus. It tastes best. - Thicker stems need more time. Cook them for about 15 minutes. - If your asparagus is thin, check at 10 minutes. You want them tender but firm. - Pair this dish with rice or quinoa for a full meal. - A fresh salad with lemon vinaigrette works well too. - Try adding a sprinkle of chili flakes for a kick. - Serve with more lemon wedges for an extra burst of flavor. {{image_2}} You can change the taste of your dish easily. Try adding spices or herbs. For instance, fresh basil or dill works great with shrimp. You can also mix in some paprika for a smoky twist. If you like a bit of heat, add chili flakes. Just a pinch can make a big difference! Adjust these flavors to suit your taste buds. This dish can fit many diets. If you need a gluten-free option, check your seasonings. Most dried herbs are gluten-free, but always read the labels. You can also make this meal vegetarian. Swap shrimp for hearty veggies like bell peppers or zucchini. Just be sure to adjust cooking times for softer veggies. Want to switch up the protein? Chicken works well in this recipe. Cut chicken breasts into bite-sized pieces. Cook them the same way you would the shrimp. For a plant-based version, use tofu. Press and cube the tofu, then marinate it just like the shrimp. This will soak up all those lovely lemon and herb flavors. To store leftovers, place the shrimp and asparagus in an airtight container. This keeps them fresh and tasty. You can keep them in the fridge for up to three days. After that, the shrimp may lose their flavor and texture. If you want to freeze the dish, let it cool completely first. Place the shrimp and asparagus in a freezer-safe bag. Remove as much air as possible before sealing. You can freeze it for up to three months. For thawing, move it to the fridge overnight before reheating. This helps keep the texture nice. To reheat, you have a few options. You can use the oven, microwave, or stovetop. If using the oven, set it to 350°F (175°C). Place the dish in a baking dish and cover it to keep it moist. Heat for about 10 minutes. In the microwave, heat in short bursts. Stir in between to ensure even heating. This way, the shrimp stays juicy and the asparagus remains crisp. Cooking shrimp takes about 10 to 12 minutes. The shrimp should turn pink and opaque. This quick cooking time helps keep them tender and juicy. If you overcook shrimp, they can become tough. Watch them closely as they cook. Yes, you can use frozen shrimp. Just make sure to thaw them first. The best way to thaw shrimp is to place them in cold water for 15 to 20 minutes. You can also leave them in the fridge overnight. Once thawed, peel and devein if needed. Shrimp should be cooked to an internal temperature of 120°F (49°C). Using a food thermometer can help you check this. When shrimp reach this temperature, they are safe to eat. They should also look pink and feel firm to the touch. This blog post covered an easy shrimp and asparagus recipe. We explored the main ingredients like shrimp, asparagus, and olive oil. You learned simple steps for preparing, cooking, and serving this dish. I shared tips for perfect shrimp and alternatives for asparagus. Finally, we discussed how to store leftovers and answered common questions. Now, it’s your turn. Gather the ingredients and try the recipe. Enjoy a tasty meal that’s simple and quick to make. You’ll impress your family and friends!

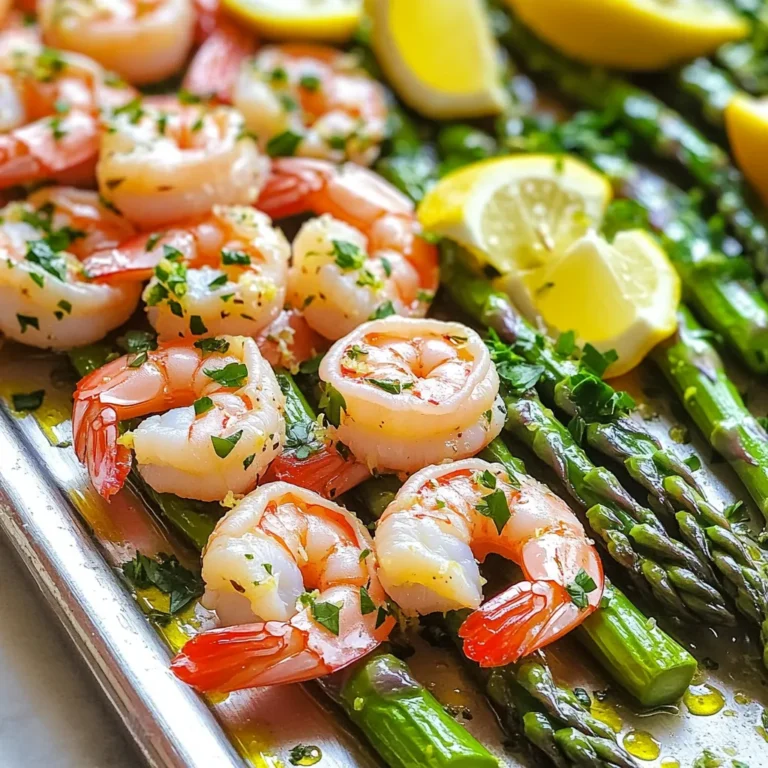
Sheet-Pan Lemon Herb Shrimp and Asparagus Delight

- 1 cup all-purpose flour (heat-treated) - ½ cup brown sugar, packed - ¼ cup granulated sugar - ½ cup unsalted butter, softened - 1 teaspoon vanilla extract - ¼ teaspoon salt - ½ cup mini chocolate chips - 8 oz cream cheese, softened - ½ cup powdered sugar - 1 teaspoon vanilla extract (for frosting) - 1 cup graham cracker crumbs (for coating) Heat-treated flour is safe to eat. Regular flour can harbor germs. Treating it by heating kills harmful bacteria. This step ensures your bites are safe. It also gives a nice texture. I always recommend this for raw dough recipes. For cream cheese, I recommend Philadelphia. It’s creamy and blends well. For chocolate chips, Ghirardelli is a top choice. Their mini chips melt perfectly into the dough. Enjoy the rich flavor they bring! To start, you need a large mixing bowl. First, beat the softened butter, brown sugar, and granulated sugar together. Mix until the mixture is creamy and smooth. Next, add the heat-treated flour, salt, and vanilla extract. Stir until the dough comes together. This dough should feel soft and slightly sticky. Then, fold in the mini chocolate chips. Make sure they are spread out evenly in the dough. With a tablespoon, scoop out portions of the dough. Roll each portion into a ball and place them on a parchment-lined baking sheet. For the cream cheese filling, take another bowl and add the softened cream cheese. Beat it until it is smooth and creamy. Gradually add the powdered sugar. Mix well to avoid lumps. Then, add the vanilla extract for flavor. Your filling should be rich and sweet. Now, it’s time to assemble your bites. Take each cookie dough ball and gently flatten it. Place a small dollop of the cream cheese filling on top—about a teaspoon is perfect. Carefully reshape the dough around the cream cheese to form a ball again. Once they are all shaped, roll each one in graham cracker crumbs. This adds a nice crunch. Finally, place the bites back on the baking sheet. Refrigerate them for at least one hour. This helps them firm up nicely. To make these bites sweet and tasty, use the right sugars. Brown sugar adds moisture and flavor. Granulated sugar gives a nice crunch. You want the mix to feel soft yet firm. If the dough is too dry, add a bit more butter. For the cream cheese layer, make sure it’s very soft. This helps it blend well with the powdered sugar. Test the filling; it should be sweet but not too sweet. Using the right tools makes this recipe fun and easy. I recommend a sturdy mixing bowl for the dough. A hand mixer or stand mixer works best for the cream cheese. Use a cookie scoop to get even bites. This keeps them looking nice and tidy. A parchment-lined baking sheet is great for the bites to cool on. Finally, have a small bowl ready for the graham cracker crumbs. Sometimes things don’t go as planned. If the dough sticks to your hands, try wetting them slightly. This helps shape the bites easily. If your bites are too crumbly, add a bit of milk or butter. If the cream cheese mixture is too runny, chill it briefly. This can help it firm up. Always taste as you go. If something feels off, adjust the sweetness or flavors until it feels right. {{image_2}} You can easily mix up the flavor of your No-Bake Cookie Dough Cheesecake Bites. Instead of vanilla extract, try using almond or hazelnut extract. These choices add a unique taste. Lemon or orange zest offers a fresh twist. You can even add a splash of peppermint extract for a winter treat. Each variation brings its own fun flavor to the bites. If you need a gluten-free version, swap the all-purpose flour with gluten-free flour. Make sure it’s heat-treated for safety. For a vegan version, use dairy-free butter and vegan cream cheese. Coconut cream can also work well. Replace the sugars with coconut sugar or maple syrup for a healthier option. These swaps keep the bites tasty for everyone. Get creative with toppings and mix-ins for your bites. Instead of graham cracker crumbs, use crushed nuts or cereal for a crunch. You can drizzle melted dark chocolate on top for added sweetness. Sprinkles can make them festive for parties. Try adding chopped dried fruits like cranberries or apricots for a fruity touch. These fun ideas let you customize each bite! To keep your No-Bake Cookie Dough Cheesecake Bites fresh, place them in an airtight container. Layer them with parchment paper to prevent sticking. Store the bites in the fridge for up to one week. If you have leftovers, make sure they are cooled completely before storing. This helps maintain their shape and taste. Freezing these bites is a great option for longer storage. To freeze them, first chill the bites in the fridge for one hour. After that, place them in a single layer on a baking sheet. Freeze them for about two hours, then transfer to a freezer-safe bag or container. They can last for up to three months in the freezer. Just remember to label the bag with the date! When you’re ready to enjoy these bites, simply take them out of the fridge or freezer. If they are frozen, let them thaw in the fridge for a few hours. For a quick treat, you can also serve them straight from the fridge. Arrange them nicely on a plate and add some extra chocolate chips around them for a fun touch. Yes, you can! Feel free to swap mini chocolate chips for regular ones. You could also use dark chocolate or white chocolate chips. Each type gives a different taste. Experiment to find your favorite mix. These bites stay fresh for about one week in the fridge. Keep them in an airtight container. This keeps them tasty and prevents them from drying out. Using heat-treated flour makes this cookie dough safe. Heat-treating kills any harmful bacteria. So, you can enjoy the dough without worry. Just make sure to follow the recipe closely. Absolutely! You can make these bites a day ahead. Just store them in the fridge until you are ready to serve. This makes them a great option for parties or special events. You’ve learned how to make delicious No-Bake Cookie Dough Cheesecake Bites. We covered important ingredients, including heat-treated flour for safety. I shared clear steps for mixing and assembling your bites, plus tips for perfect texture and flavor. We also explored fun variations for different diets and creative toppings. These bites are easy to store and freeze for later. With this knowledge, you can enjoy a tasty treat anytime. Dive in and make these bites your own!

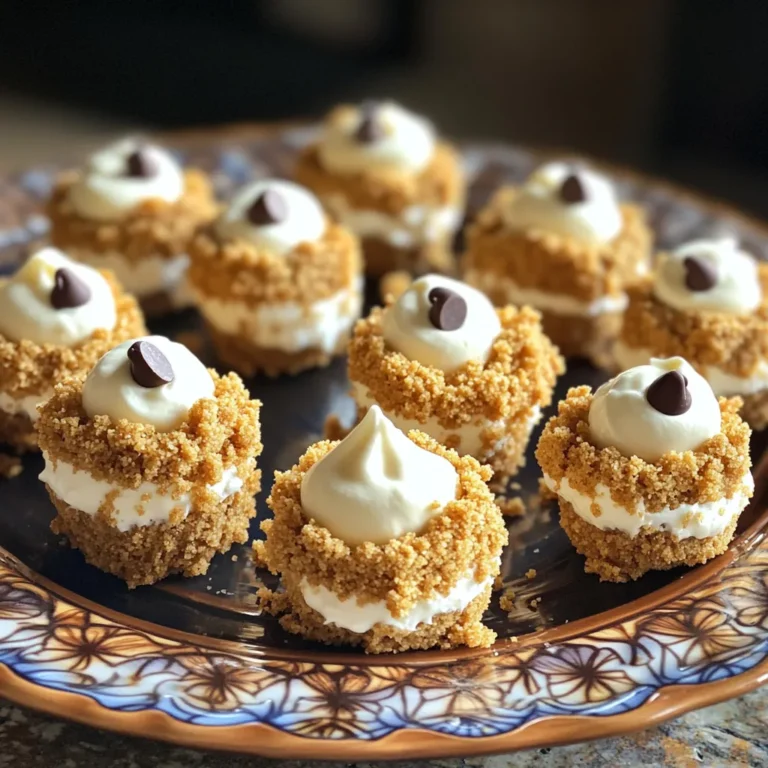
No-Bake Cookie Dough Cheesecake Bites Delightful Treat

- 14 oz firm tofu, drained and pressed - 2 tablespoons sesame oil - 1 tablespoon fresh ginger, grated - 2 cloves garlic, minced - 1 bell pepper, sliced (any color) - 1 cup snap peas, trimmed - 1 carrot, julienned - 3 green onions, chopped - 2 tablespoons soy sauce (or tamari for gluten-free) - 1 tablespoon sesame seeds - Cooked brown rice or quinoa, for serving This dish is packed with nutrients. Each serving has about: - Calories: 250 - Protein: 15g - Carbohydrates: 30g - Fat: 10g - Fiber: 4g It provides a mix of protein from tofu and fiber from veggies. The sesame oil adds healthy fats, too. This recipe makes about four servings. You can serve it over: - 1 cup cooked brown rice - 1 cup cooked quinoa Each serving is colorful and full of flavor. It’s a great dish for a quick meal or to share with friends. Start by draining and pressing 14 oz of firm tofu. This step is key; it removes excess water. Once pressed, cut the tofu into bite-sized cubes. Make sure they are even in size. This helps them cook evenly. Heat 2 tablespoons of sesame oil in a large skillet over medium-high heat. Wait until the oil is hot. Then, add the tofu cubes. Cook them for about 5 minutes. Turn them occasionally so they brown on all sides. Next, add 1 tablespoon of grated fresh ginger and 2 minced garlic cloves. Stir this mixture for 1 minute. You want the aroma to fill your kitchen. Now, toss in 1 sliced bell pepper, 1 cup of snap peas, and 1 julienned carrot. Stir-fry these veggies for about 3-4 minutes. They should stay colorful and tender but not mushy. After that, drizzle 2 tablespoons of soy sauce over the stir-fry. Stir well to combine everything. Let it cook for an additional 2 minutes. This helps the flavors meld together. Remove the skillet from heat. Sprinkle with 3 chopped green onions and 1 tablespoon of sesame seeds. This adds color and crunch. Serve your stir-fry hot over cooked brown rice or quinoa. Enjoy the vibrant colors and flavors on your plate! Tofu can be tricky, but it’s easy to get it right. Start with firm tofu. Drain and press it well to remove excess water. This step helps the tofu absorb flavors. Cut the tofu into small cubes. When cooking, use high heat and sesame oil. This method gives you crispy edges and a soft center. Don’t rush; let it brown for about five minutes. Flip the cubes gently to avoid breaking them. Tofu loves flavor, so don’t hold back! Fresh ginger and garlic are must-haves. Grate the ginger for a bright taste. Mince the garlic finely to mix well. Use soy sauce or tamari for a savory kick. For a hint of sweetness, add a dash of honey or maple syrup. Finally, sprinkle sesame seeds on top. They add a nice crunch and nutty flavor to your dish. Cooking doesn’t have to take long. Prep your veggies while the tofu cooks. Slice the bell pepper and julienne the carrot ahead of time. Use pre-trimmed snap peas to save time. You can also cook brown rice or quinoa in advance. Store it in the fridge for quick meals. This way, you can whip up your stir-fry in just 20 minutes! {{image_2}} You can mix up the veggies in this stir-fry. Try using broccoli, zucchini, or mushrooms. Each adds a new taste and texture. You can even use frozen mixed vegetables for a quick option. Just adjust the cooking time slightly. The goal is to keep the veggies bright and crisp. If you want to swap tofu for another protein, go for tempeh or seitan. Both are great for a meaty bite. You can also use chicken or shrimp if you eat meat. Just make sure to cook them fully before adding the veggies. This keeps everything safe to eat. To make this dish gluten-free, use tamari instead of soy sauce. Tamari has a similar taste but is safe for those who avoid gluten. You can also check your tofu brand to ensure it’s gluten-free. Most brands are, but it’s always good to check. Enjoy your meal without worries! After making Minute Sesame Ginger Tofu Stir-Fry, let it cool. Store your leftovers in an airtight container. Place it in the fridge within two hours. This dish stays fresh for up to three days. When you are ready to eat, check for any off smells or changes in texture. You can freeze this stir-fry if you want to save it for later. First, let it cool completely. Then, transfer it to a freezer-safe bag or container. Remove as much air as possible. This way, it can last for about three months in the freezer. When you're ready to enjoy it, thaw it overnight in the fridge. To reheat, you have a few options. Use the microwave for quick warming. Heat on medium power for about two to three minutes. Stir halfway to heat evenly. Alternatively, use a skillet over medium heat. Add a splash of water or oil and stir until hot. This keeps the tofu from drying out. Enjoy your tasty meal again! This recipe is already vegan! It uses firm tofu and fresh vegetables. All the ingredients, like ginger and soy sauce, are plant-based. You don’t need to change anything. Enjoy this dish as is for a tasty vegan meal. You can serve this stir-fry with cooked brown rice or quinoa. Both add fiber and nutrients. You could also serve it with noodles for a fun twist. A simple green salad would pair well too, adding freshness. Yes, you can! Olive oil or avocado oil works well as substitutes. They both have a mild taste, which won’t overpower the dish. However, sesame oil adds a nice nutty flavor. If you have it, I recommend using it. Tofu stir-fry lasts about 3 to 4 days in the fridge. Store it in an airtight container to keep it fresh. When you’re ready to eat, just reheat in a pan or microwave. Enjoy a quick meal from your leftovers! This blog post covered how to make a tasty tofu stir-fry. I shared a list of ingredients and their nutritional details. You learned step-by-step how to prepare and cook tofu. I offered tips to improve texture and flavor. There are variations for different diets, plus storage tips for leftovers. Enjoy experimenting with your stir-fry. With practice, you will create delicious meals. Stay curious and keep cooking!

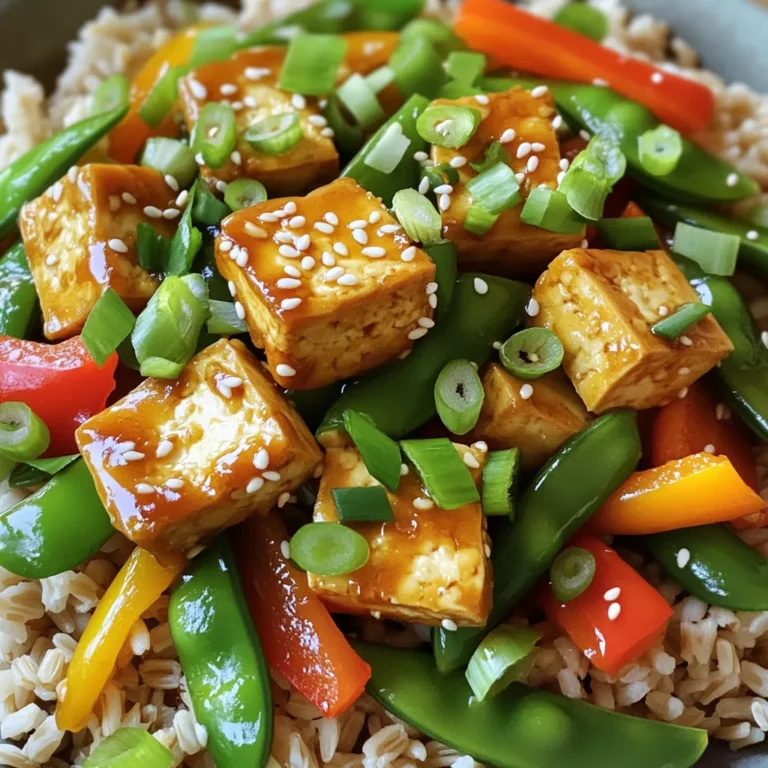
Minute Sesame Ginger Tofu Stir-Fry Quick and Simple

Here are the ingredients you need for a tasty Pumpkin Spice French Toast Casserole: - 1 loaf of challah bread, cut into cubes - 2 cups milk (whole or almond) - 4 large eggs - 1 cup pure pumpkin puree - 1/2 cup brown sugar - 1 tablespoon vanilla extract - 2 teaspoons pumpkin pie spice - 1/2 teaspoon ground cinnamon - 1/4 teaspoon salt - 1/2 cup chopped pecans (optional) - Powdered sugar for dusting (optional) - Maple syrup for serving Each ingredient plays a key role. The challah bread gives the casserole its soft and sweet base. The milk and eggs create a rich custard. Pumpkin puree adds a creamy texture and warm flavor. Brown sugar and spices bring sweetness and warmth. You can also add pecans for some crunch if you like. This recipe is simple and fun to make. You can easily find these ingredients at your local store. Make sure to gather everything before you start. This helps the cooking process go smoothly. Plus, it gets you excited to create this delicious dish! 1. Preheat the oven and prepare the baking dish First, set your oven to 350°F (175°C). While it heats, grease a 9x13-inch baking dish with cooking spray or butter. This helps prevent sticking. 2. Mix the wet and dry ingredients In a large bowl, whisk together two cups of milk, four large eggs, one cup of pumpkin puree, and half a cup of brown sugar. Add in one tablespoon of vanilla extract, two teaspoons of pumpkin pie spice, half a teaspoon of ground cinnamon, and a quarter teaspoon of salt. Mix until smooth and well combined. 3. Combine the ingredients with the challah bread Cut your loaf of challah bread into cubes. Gently fold the cubed bread into the egg mixture. Make sure each piece is well-coated. If you like, add half a cup of chopped pecans for a nice crunch. 1. Initial baking covered Pour the mixture into your greased baking dish. Spread it out evenly. Cover the dish with aluminum foil. Bake it for 25 minutes. This helps the bread soak up the liquid. 2. Final baking uncovered for browning After 25 minutes, remove the foil. Bake for another 15 to 20 minutes. The top should turn golden brown. You can check if it's done by inserting a knife in the center. It should come out clean. 1. Cooling time before serving Once baked, take the casserole out of the oven. Let it cool for 5 to 10 minutes. This makes it easier to cut and serve. 2. Dusting and serving suggestions If you want, dust your casserole with powdered sugar. Serve it warm with maple syrup on the side. Enjoy this tasty treat! To make the best Pumpkin Spice French Toast Casserole, soak the bread long enough. I recommend letting the mixture sit for at least 20 minutes. This gives the bread time to absorb the egg and pumpkin mix. For even better results, you can refrigerate it overnight. This allows the flavors to deepen and the bread to soak more. Make sure every piece of bread is coated evenly. When you add the cubed challah to the mixture, gently fold it in. This way, each piece gets the sweet pumpkin flavor and spice. If you skip this step, some bread might stay dry after baking. You can easily switch up some ingredients. If you want a dairy-free option, use almond milk instead of whole milk. It works well in this dish. You can also replace eggs with flaxseed meal or applesauce for a vegan option. Use 1 tablespoon of flaxseed mixed with 2.5 tablespoons of water for each egg. For a nut-free option, skip the pecans. You can replace them with seeds like sunflower seeds if you want some crunch. When it comes to serving, I love pairing this casserole with maple syrup. The sweet syrup adds a nice touch. You can also dust it with powdered sugar for a pretty finish. As for side dishes, fresh fruit works great. Sliced bananas or berries make it feel fresh and light. You could also serve it with yogurt for added creaminess. Enjoy this cozy dish any time! {{image_2}} You can easily change the taste of your pumpkin spice French toast casserole. Try adding different spices like nutmeg or ginger for a new twist. These spices mix well with the pumpkin and give a warm flavor. You can also add seasonal fruits like apples or cranberries. Chopped apples add a sweet crunch, while cranberries bring a tangy kick. Mix and match to find your favorite blend. If you need a gluten-free option, use gluten-free bread instead of challah. This way, everyone can enjoy the dish. For nut-free needs, leave out the pecans. You can also replace almond milk with regular milk. This keeps the casserole creamy and delicious without any nuts. You can serve this casserole in different ways. For a cozy family meal, make a big dish for everyone to share. If you prefer individual servings, use small ramekins. This makes it easy for guests to grab their own. You can also prepare the casserole ahead of time. Just cover it and let it sit in the fridge overnight. This way, you save time in the morning. After enjoying your Pumpkin Spice French Toast Casserole, store any leftovers right away. Use an airtight container to keep it fresh. Place it in the fridge. This dish stays good for about 3 to 4 days. If you want it to last longer, consider freezing. To reheat your casserole, use an oven or a microwave. If using the oven, preheat it to 350°F (175°C). Cover the casserole with foil to keep it moist. Bake for about 15-20 minutes. For the microwave, place a slice on a plate. Heat in short bursts of 30 seconds until warm. This helps keep the texture and flavor nice. If you want to freeze the casserole before baking, prepare it as usual. Once it’s in the dish, cover it well with plastic wrap and foil. It can stay frozen for up to 2 months. When you’re ready to bake, take it out and thaw in the fridge overnight. Then, bake as directed, adding a little extra time if needed. Enjoy the warm, cozy flavors! Can I use different bread types? Yes, you can! Challah bread is soft and sweet, but you can swap it. Use brioche, sourdough, or even whole wheat bread. Each type gives a new flavor. How can I make it dairy-free? Easily! Just replace the milk with almond milk or oat milk. This keeps the taste rich. Make sure to use dairy-free eggs or a flaxseed mix if you need to. Is it safe to leave it out overnight? No, it’s best not to! Leave it in the fridge if you want to soak it overnight. This keeps it safe and fresh. How to adjust for fewer servings? To make fewer servings, cut the recipe in half. Use a smaller dish, like a 8x8 inch. Adjust baking time to check for doneness. Can it be made in advance? Yes! You can prepare it the night before. Just cover it and place it in the fridge. Bake it in the morning for a warm breakfast. What to do if the casserole is soggy? If it’s soggy, it might have soaked too long. Next time, soak it for less time. Also, ensure the bread is fresh but not too moist. How to prevent over-browning? To stop over-browning, cover the dish with foil for the first part of baking. Remove it later for that golden top. Keep an eye on it to ensure it cooks evenly. In this blog post, we explored a delicious Pumpkin Spice French Toast Casserole. We covered key ingredients, step-by-step instructions, and helpful tips. You can experiment with flavors and dietary options to suit your needs. Whether you enjoy it fresh or want to store it for later, we shared useful advice for leftovers. Embrace this warm dish for special gatherings or cozy mornings at home. It’s simple, tasty, and sure to please everyone at your table. Enjoy every bite!

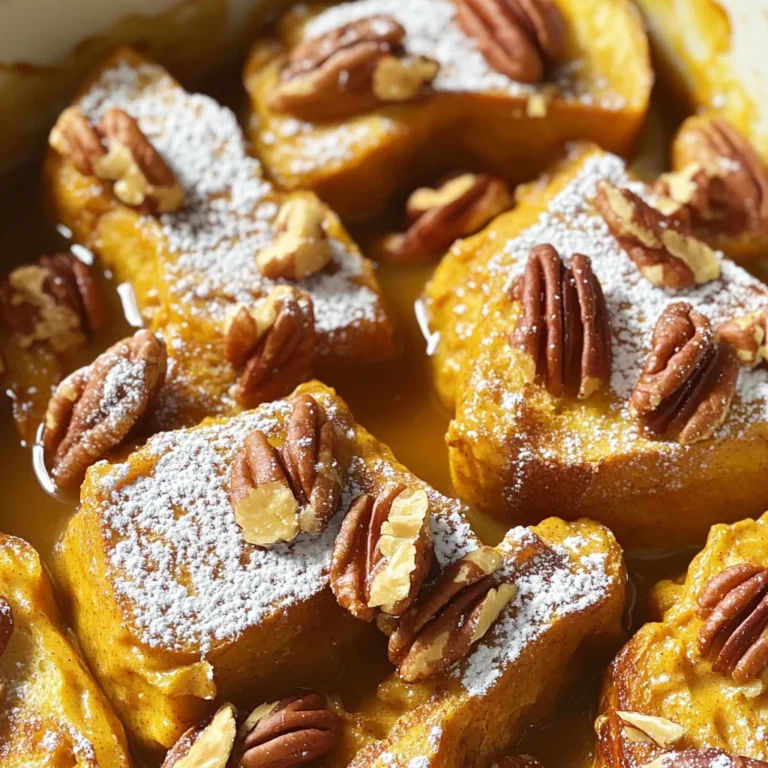
Pumpkin Spice French Toast Casserole Delightful Dish

- 4 chicken thighs, bone-in and skin-on - 4 medium potatoes, cut into wedges - 1 lemon, zested and juiced - 4 garlic cloves, minced - 3 tablespoons olive oil For this dish, I always use bone-in and skin-on chicken thighs. They stay juicy and tender. The potatoes should be medium-sized, as they cook evenly. A fresh lemon adds a zesty touch that brightens the meal. Garlic provides depth and flavor. Olive oil keeps everything moist and helps with browning. - 2 teaspoons dried oregano - 1 teaspoon paprika - Salt and pepper, to taste I love using dried oregano for that classic Greek flavor. Paprika adds a subtle warmth and color to the dish. Salt and pepper are essential for enhancing all the flavors. Adjust these spices according to your taste preferences. - Fresh parsley Chopped fresh parsley adds a pop of color and freshness. It balances the rich flavors of the chicken and potatoes. You can sprinkle it just before serving for the best effect. First, gather your ingredients. In a large bowl, combine the following: - 1 lemon, zested and juiced - 4 garlic cloves, minced - 2 teaspoons dried oregano - 1 teaspoon paprika - 3 tablespoons olive oil Mix these well. The lemon juice and zest give a bright flavor. The garlic adds depth. Oregano and paprika enhance the dish with herbal and smoky notes. This marinade will make your chicken tasty and juicy. Next, season four chicken thighs with salt and pepper. Then, add them to the bowl with the marinade. Make sure each piece is well-coated. Let the chicken marinate for at least 15 minutes. This step is key for flavor. You can marinate longer if you have time. Now, preheat your oven to 400°F (200°C). On a large baking sheet, spread four medium potato wedges in a single layer. Drizzle them with olive oil, and season with salt and pepper. Toss the potatoes to coat them evenly. Nestle the marinated chicken thighs among the potatoes. Pour any leftover marinade over the chicken and potatoes. Place the pan in the oven and roast for 35-40 minutes. Check that the chicken reaches 165°F (75°C) for safety. The potatoes should be golden and tender. For extra crispy skin, broil on high for the last 5 minutes. This adds a nice crunch. Once done, let the dish rest for a few minutes. Garnish with freshly chopped parsley before serving. Enjoy your meal! Marinate your chicken for at least 15 minutes. This short time lets the flavors sink in. For the best taste, marinate it for up to 2 hours. This longer time enhances the lemon and garlic flavors. If you have extra time, go for it! To get that crispy chicken skin, broil it for the last 5 minutes. Make sure your oven is on high. This step gives the skin a nice, golden crunch. Keep an eye on it, so it doesn’t burn. Cooking times may change with the size of the chicken. If using larger thighs, add 5-10 minutes. Always check the thickest part of the chicken. The right internal temp is 165°F (75°C). Adjust your cooking time based on what you use. {{image_2}} You can swap out chicken for hearty vegetables. Use mushrooms, zucchini, or bell peppers. These will soak up the lemony marinade. Cut the veggies into bite-sized pieces. Toss them in the marinade for flavor. Roast them just like the chicken. This way, you still get a tasty one-pan meal. Feel free to change the potatoes. Sweet potatoes add a nice sweetness. They also pair well with the lemon. You can use red or Yukon Gold potatoes too. Each type brings its own flavor and texture. Cut them into wedges, and they will roast just as well. Want to kick up the flavor? Try adding fresh herbs. Rosemary or thyme works great. You can also mix in some red pepper flakes for heat. A pinch of cumin adds warmth and depth. Feel free to experiment with your favorite spices. This dish can easily adapt to your taste. To keep your Greek Lemon Chicken and potatoes fresh, store leftovers in an airtight container. Place the chicken and potatoes together, but separate them if you want. They will last up to three days in the fridge. Make sure your fridge is at 40°F (4°C) or lower to keep everything safe. When you reheat, aim to keep the chicken crispy. Preheat your oven to 350°F (175°C). Place the chicken and potatoes on a baking sheet. Heat for about 15-20 minutes. Check if they are warm throughout. You can also use a microwave. If you do, cover the dish with a damp paper towel to keep moisture in. Yes, you can freeze this dish! Place cooled chicken and potatoes in a freezer-safe container. They can stay in the freezer for up to three months. When ready to eat, thaw overnight in the fridge. Reheat in the oven or microwave as mentioned above. Enjoy your meal anytime! Yes, you can use boneless chicken. Boneless chicken cooks faster. You may need to adjust the cooking time. Keep an eye on it. The chicken should still reach 165°F. This will keep it safe to eat. The flavor from the marinade will still shine through. Greek Lemon Chicken pairs great with many side dishes. Consider serving it with rice, a fresh salad, or roasted veggies. Couscous or quinoa works well too. You can also enjoy it with warm pita bread. These sides add to the meal's flavor and texture. To check if the chicken is done, use a meat thermometer. Insert it into the thickest part of the thigh. It should read 165°F. If you do not have a thermometer, cut into the chicken. The juices should run clear, not pink. Yes, this recipe is gluten-free. The ingredients used do not contain gluten. Be sure to check your spices and any sauces. Some store-bought products may have hidden gluten. Always read labels to be safe. Enjoy this dish with peace of mind. This blog post covers making a tasty Greek Lemon Chicken dish. You need simple ingredients like chicken thighs, potatoes, lemon, garlic, and olive oil. I shared step-by-step instructions to marinate and roast your chicken and potatoes. I also included tips for perfecting flavors, variations for vegetarians, and storage advice. In closing, this recipe offers a great way to enjoy a classic dish. It is easy to make and fits many tastes. I hope you try it and love every bite!

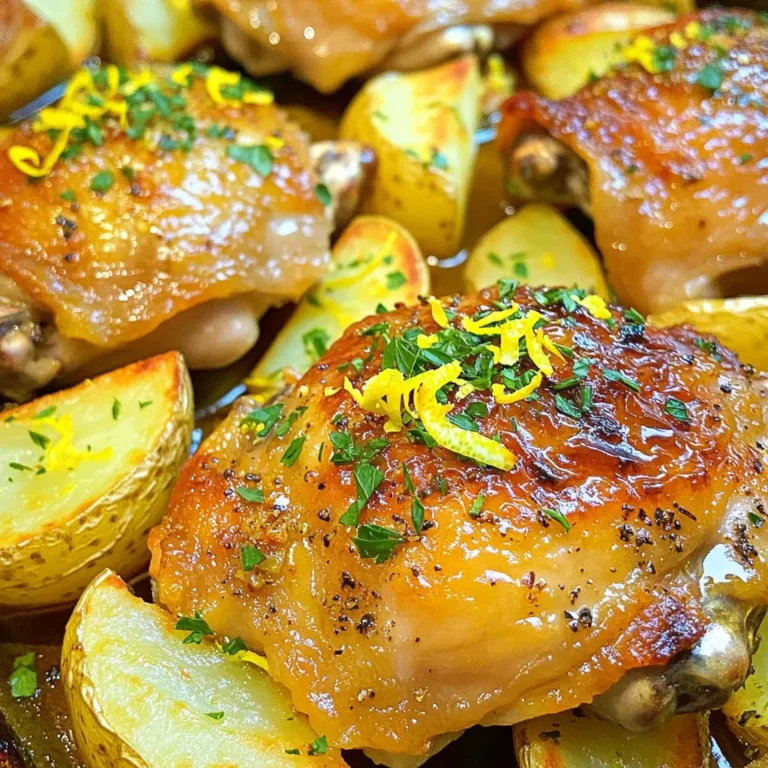
One-Pan Greek Lemon Chicken and Potatoes Delight

To make the perfect Iced Pumpkin Cream Cold Brew, you need some key items. Here are the basics: - 1 cup cold brew coffee - 1/2 cup unsweetened almond milk (or any milk of choice) - 2 tablespoons pumpkin puree - 1 tablespoon vanilla syrup (more to taste) - 1 teaspoon pumpkin pie spice (plus more for garnish) - 1 tablespoon whipped cream (optional) - Ice cubes These ingredients come together to create a rich and creamy drink that tastes like fall. You can make this drink your own by adding a few extras. Consider these options: - Different milk types, like oat or soy - Sweeteners like honey or maple syrup - Flavored syrups such as caramel or hazelnut - Extra spices like cinnamon or nutmeg Feel free to mix and match these ingredients to find your perfect flavor! Choosing good brands can enhance your drink's taste. Here are my top picks: - Cold Brew Coffee: Try Stumptown or Blue Bottle for smoothness. - Almond Milk: Look for Califia Farms for a rich texture. - Pumpkin Puree: Libby’s is a classic choice for quality. - Vanilla Syrup: Monin offers great flavor and sweetness. Using these brands can help you get the best results for this tasty treat! To start, gather your ingredients. You will need pumpkin puree, almond milk, vanilla syrup, and pumpkin pie spice. In a mixing bowl, add: - 2 tablespoons pumpkin puree - 1/2 cup unsweetened almond milk - 1 tablespoon vanilla syrup - 1 teaspoon pumpkin pie spice Whisk these together until smooth. This mix will be your creamy pumpkin layer. Don’t rush this step. A smooth blend makes a big difference in taste. Now, grab a tall glass. Fill it with ice cubes, about halfway. Next, pour in 1 cup of cold brew coffee. Fill it about two-thirds of the way. The cold brew should be nice and strong for the best flavor. Slowly pour your pumpkin cream mixture over the cold brew. Watch how it swirls together. The colors are lovely, and it looks great! If you want a little extra indulgence, add a dollop of whipped cream on top. Then, sprinkle a bit more pumpkin pie spice for a festive look. It adds flavor and flair! Before you drink, stir gently. This mixes all the flavors. You can sip it layered for a pretty drink or mix it all in. Enjoy your tasty treat! To get the best flavor, start with quality cold brew coffee. A smooth brew gives you a nice base. Next, add the pumpkin puree. It adds creaminess and a rich taste. Don't be shy with the pumpkin pie spice! It brings warmth and a seasonal feel. Adjust the vanilla syrup to fit your sweet level. Taste as you go. This way, you find the perfect balance that you love. If you want a dairy-free drink, almond milk works great. You can also try oat milk or coconut milk. Each brings a different taste. For a creamier texture, use full-fat coconut milk. It adds a nice richness. If you’re watching calories, unsweetened options keep your drink light. They still taste amazing with the pumpkin and spice. Sometimes, the pumpkin cream may not mix well. If that happens, whisk it longer until smooth. If your drink is too sweet, add more cold brew. It helps balance the flavors. If it’s too strong, try adding more milk. This softens the taste. For an iced drink that melts too fast, use larger ice cubes. They chill your drink without watering it down. Enjoy your tasty treat! {{image_2}} You can change the spice mix to create new flavors. Try adding cinnamon or nutmeg for warmth. A little ginger can add a nice kick too. For a fun twist, mix in some cocoa powder for a chocolatey taste. Each spice gives you a new drink experience. You have options when it comes to milk and coffee. Almond milk is great, but try oat or coconut milk for a different taste. You can even use soy milk if you prefer. For coffee, cold brew is smooth and rich, but brewed coffee works too. Just let it cool down first. This drink is perfect for fall, but don’t stop there! In winter, add peppermint extract for a festive touch. In spring, use fresh vanilla bean to brighten things up. In summer, try a fruity blend with some strawberry puree. Each season can inspire a new version of this tasty treat. If you have extra pumpkin cream, store it in an airtight container. Place it in the fridge. It stays fresh for up to three days. When ready to use, stir it well. The ingredients may separate while it sits. This mix is perfect for quick drinks later. To store cold brew, keep it in a sealed jar or bottle. Refrigerate it right away. Cold brew lasts for up to two weeks. Make sure to avoid adding ice to the coffee before storing. Ice will dilute the flavor over time. Always serve it cold and fresh for the best taste. - Cold brew coffee: lasts up to two weeks in the fridge. - Almond milk: check the label; it often lasts 7-10 days after opening. - Pumpkin puree: homemade puree keeps about three days; canned lasts longer if sealed. - Vanilla syrup: typically lasts several weeks, but always check for any changes in smell or taste. - Pumpkin pie spice: stores well for years if kept dry and sealed. Understanding how to store each component helps keep your iced pumpkin cream cold brew tasty. Yes, you can use brewed coffee. Cold brew coffee is smoother and less bitter. It has a mild taste that blends well with pumpkin flavors. If you use brewed coffee, let it cool before mixing. This will help keep your drink refreshing. Pumpkin puree adds flavor and creaminess. It gives your drink that rich pumpkin taste. If you don’t have pumpkin puree, you can try using pumpkin pie spice instead. This will change the drink’s texture but still provide a hint of pumpkin flavor. To make your drink less sweet, cut back on the vanilla syrup. You can also use unsweetened almond milk. If you still want some sweetness, try adding a splash of maple syrup. This will keep the flavor while lowering the sweetness. This blog post covered how to make an Iced Pumpkin Cream Cold Brew. We explored essential ingredients, optional customizations, and brand suggestions for quality. I shared step-by-step instructions for preparing and serving your drink. You learned tips for flavor balance and dairy-free options. We discussed fun variations and storage tips for leftovers. Finally, I answered common FAQs about the recipe. Now, you can enjoy this tasty drink any time! With a few simple steps, you can create a delicious treat that fits your taste.

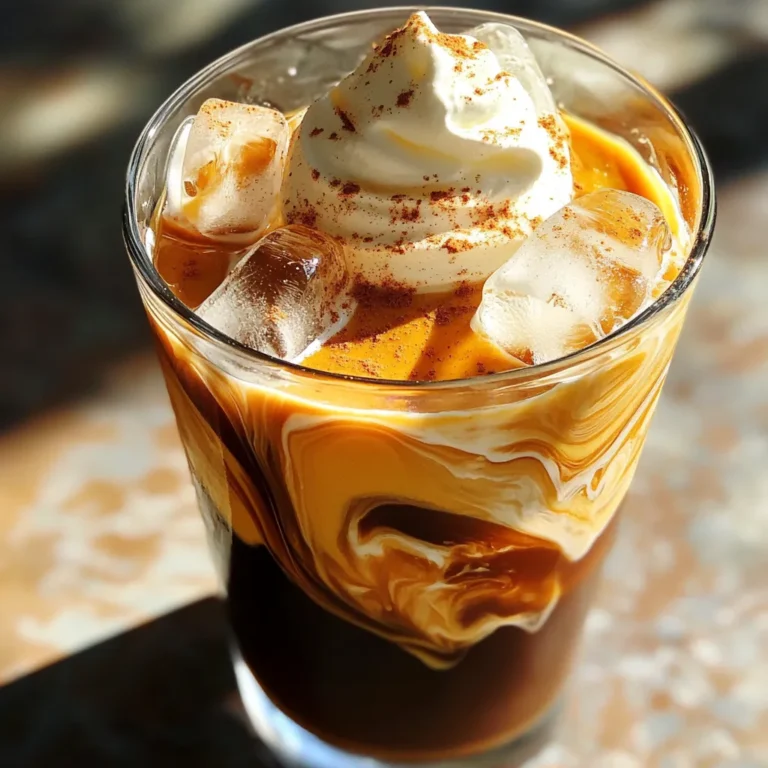
Iced Pumpkin Cream Cold Brew Copycat Tasty Treat

- 1 cup Biscoff cookies, crushed - 1/4 cup unsalted butter, melted - 16 oz cream cheese, softened - 1 cup granulated sugar - 1/2 cup Biscoff cookie butter - 2 large eggs - 1/2 cup heavy whipping cream I love using Biscoff cookies for this recipe. They add a sweet, spiced flavor. The cream cheese makes the bars creamy and rich. Biscoff cookie butter adds a smooth, nutty taste that pairs perfectly. Use granulated sugar to sweeten the filling. I always use fresh eggs to help the bars set right. Unsalted butter gives a nice flavor to the crust. Heavy whipping cream is key for the topping; it adds a lightness that balances the rich cheesecake. - Extra Biscoff cookies for garnish - Chocolate drizzle (if desired) If you want to make the bars even more special, add extra Biscoff cookies on top. They look nice and taste great. A drizzle of chocolate also adds a sweet touch. It makes the bars look fancy and fun. You can choose toppings based on your taste. These small additions can make a big difference. 1. Start by crushing the Biscoff cookies. You can use a food processor or put them in a bag and crush them with a rolling pin. Aim for fine crumbs. 2. In a medium bowl, mix the crushed cookies with melted butter. Stir until it looks like wet sand. 3. Press this mixture firmly into the bottom of an 8x8 inch baking pan. Make sure it’s even. Bake the crust for 10 minutes and take it out of the oven. 1. In a large mixing bowl, beat the softened cream cheese. Use an electric mixer until it’s creamy and smooth. 2. Gradually add the granulated sugar while mixing. This helps it blend well. 3. Mix in the Biscoff cookie butter next. Make sure it’s fully combined. 4. Add the eggs one at a time, mixing well after each addition. Then, add the vanilla extract, flour, and salt. Beat until smooth and well blended. 1. Pour the cheesecake filling over the baked cookie crust. Use a spatula to spread it evenly. 2. Bake the cheesecake bars for 25-30 minutes. The edges should be set, but the center should still jiggle slightly. 3. Turn off the oven and crack the door. Let the bars cool in the oven for about 1 hour. 4. After cooling, refrigerate the cheesecake bars for at least 4 hours. For the best taste, let them sit overnight. To make a creamy cheesecake, mix all ingredients well. Start with soft cream cheese. It blends easier. Add each egg one at a time and mix gently. This keeps the texture smooth and light. Room temperature ingredients are key. Take your cream cheese and eggs out ahead of time. They should be warm to the touch. This helps them mix better and reduces lumps. Slice the cheesecake bars into small squares for easy serving. Use a sharp knife for clean cuts. Wipe the knife between slices for neat edges. Pair these bars with coffee or a sweet tea. The flavors work well together. You might also enjoy a scoop of vanilla ice cream on the side. Avoid overmixing the batter. This adds too much air and can crack the cheesecake. Mix just until smooth and combined. Be careful not to undercook the cheesecake. The edges should be set, but the center can jiggle a bit. If it looks too wobbly, give it more time. It should firm up in the fridge later. {{image_2}} You can change the flavor of these cheesecake bars easily. Adding chocolate chips or peanut butter can create a rich twist. Simply fold in ½ cup of mini chocolate chips or ¼ cup of creamy peanut butter into the cheesecake filling before pouring it over the crust. You can also try different cookie crusts. For a nutty taste, use crushed almond or hazelnut cookies. If you prefer a chocolate flavor, go for Oreo cookies. Just remember to adjust the butter amount based on the cookie type. If you need gluten-free options, use gluten-free Biscoff cookies. They provide the same great taste without the gluten. You can also replace the all-purpose flour with almond flour or coconut flour for a gluten-free cheesecake. For vegan substitutes, use vegan cream cheese and a flaxseed egg instead of regular eggs. Mix 1 tablespoon of ground flaxseed with 2.5 tablespoons of water. Let it sit for a few minutes to thicken. Use coconut cream instead of heavy whipping cream to keep it dairy-free. You can make these bars festive by adding pumpkin spice for the fall. Mix in 1 teaspoon of pumpkin spice to the cheesecake filling. This adds a cozy flavor that fits the season. Decorating for special occasions is fun! Use whipped cream and crushed Biscoff cookies on top. You can also add seasonal fruits like strawberries or raspberries for a bright touch. These small changes make your cheesecake bars unique for any celebration. To keep your Biscoff cookie butter cheesecake bars fresh, store them in the refrigerator. Use an airtight container to prevent moisture loss. You can also cover the bars with plastic wrap. This keeps them safe from other odors in the fridge. If you want to store them longer, freezing is an option. First, cut the bars into squares. Wrap each piece in plastic wrap, then place them in a freezer bag. This method helps prevent freezer burn. When you need a treat, just thaw them in the fridge overnight. These cheesecake bars can last up to one week in the fridge. After that, their taste and texture may change. Look for signs of spoilage, like a sour smell or changes in color. If your bars feel sticky or have mold, it’s best to throw them away. Enjoy your delicious treats while they are fresh! Yes, you can! If you want to switch it up, consider these options: - Graham crackers - Oreos - Digestive biscuits - Shortbread cookies Each of these will give your crust a unique flavor. Just crush them finely and mix with melted butter like you would with Biscoff cookies. This way, you can make a crust that suits your taste! Making this recipe dairy-free is simple. Here are some ideas: - Use dairy-free cream cheese. Brands like Violife or Tofutti work well. - Swap heavy cream for coconut cream or almond milk. - Choose dairy-free butter or margarine for the crust. These swaps maintain the creamy texture and rich taste of the cheesecake bars. Absolutely! Here are some tips to prep ahead: - Make the cheesecake bars a day or two in advance. - Store them in the fridge, covered tightly. - You can also freeze them for up to three months. Just thaw in the fridge before serving. This makes entertaining easy and stress-free! This recipe combines simple ingredients like Biscoff cookies and cream cheese to create a delicious cheesecake. You learned how to make the crust and filling, ensuring perfect texture. There are tips to avoid common mistakes and ways to customize the flavor. Remember to store cheesecake bars properly for the best taste. Enjoy experimenting with variations and toppings. With these steps, you can impress anyone with your cheesecake bars!

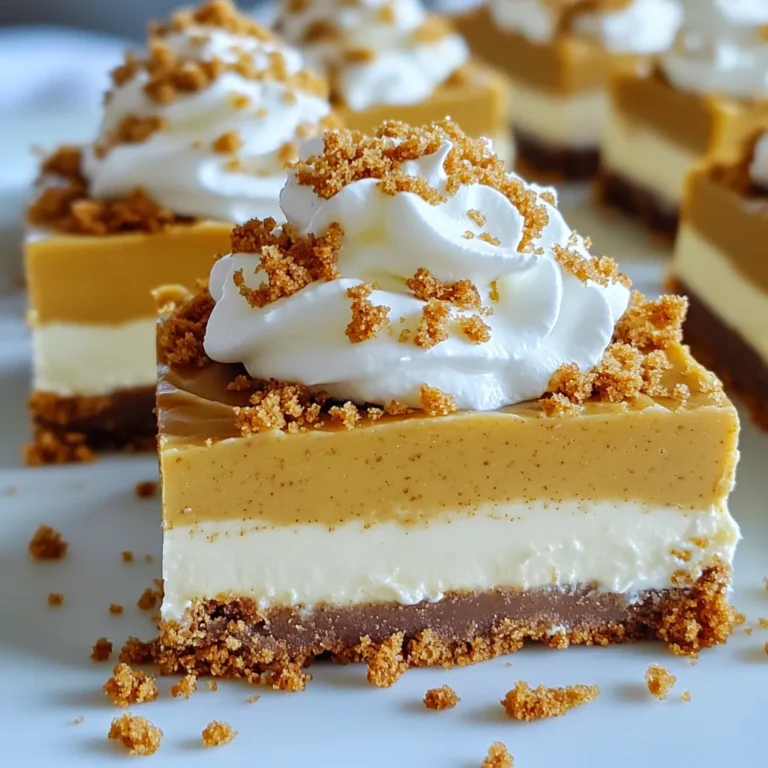
Biscoff Cookie Butter Cheesecake Bars Delightful Treat

- 1 lb sirloin steak, cut into bite-sized cubes - 4 tablespoons unsalted butter - 4 cloves garlic, minced - 1 teaspoon fresh rosemary, chopped - 1 teaspoon fresh thyme, chopped - Salt and pepper to taste - 2 cups broccoli florets - 1 tablespoon olive oil - Lemon wedges for garnish Gathering the right ingredients sets you up for success. Start with a pound of sirloin steak. Cut it into bite-sized cubes for easy cooking and eating. Use unsalted butter for rich flavor. You will need four cloves of minced garlic to give your dish that amazing aroma. For herbs, grab some fresh rosemary and thyme. They add depth to your steak bites. Don't forget the salt and pepper! They enhance all the flavors and make everything pop. Now, let’s not forget the vegetable side. Broccoli florets add color and health to your meal. Sauté them in olive oil for a tasty crunch. Finally, some lemon wedges will brighten your plate and add a zesty kick. With these ingredients, you’re on your way to making a delightful meal that is full of flavor! Start by cutting your sirloin steak into bite-sized cubes. This helps the meat cook evenly. Next, season the steak cubes with salt and pepper. Make sure to coat each piece well. This step ensures every bite bursts with flavor. Now, heat a large skillet over medium-high heat. Add 2 tablespoons of unsalted butter and let it melt. Wait until the butter is hot and bubbling. This is the perfect time to add the seasoned steak bites. Place them in a single layer in the skillet. Be careful not to overcrowd the pan. This helps the steak sear properly. Once your steak bites are in the skillet, let them cook for 2-3 minutes without moving them. This forms a nice crust. After that, flip the bites and cook for another 2-3 minutes. You can adjust the time based on how you like your steak cooked. Now, reduce the heat to medium. Push the steak to one side of the skillet. Add the remaining 2 tablespoons of butter, minced garlic, rosemary, and thyme. Stir these ingredients together and let them cook for 1-2 minutes. You want the garlic to turn golden and fragrant. Finally, mix everything together in the skillet for one more minute. This blends all the rich flavors perfectly. To get your steak just right, start by checking the cooking time. For medium doneness, cook the steak bites for about 4-6 minutes total. If you like it rare, cut down the time to 3-4 minutes. Always let your cooked steak rest for 5 minutes before serving. This helps keep it juicy. For tender-crisp broccoli, sauté it over medium heat. Cook for about 5-7 minutes. Stir it often to avoid burning. A light sprinkle of salt enhances the taste. You can also add a pinch of garlic powder or lemon zest for extra flavor. Switch up the herbs if you want! Fresh basil or parsley works great too. If you prefer a different cut of steak, try ribeye or filet mignon. Both offer rich flavor and tenderness. {{image_2}} You can add more veggies to your skillet! Low-carb options include zucchini, bell peppers, and asparagus. These veggies pair well with steak and cook quickly. - Zucchini: Slice it into half-moons. Sauté it for about 3-4 minutes until tender. - Bell Peppers: Cut them into strips. Cook for about 5 minutes for a nice crunch. - Asparagus: Snap off the ends and sauté for 4-5 minutes until bright green. Feel free to mix and match these veggies for added color and taste! You can cook your steak bites in different ways. Grilling gives a smoky flavor, while baking is easy and hands-off. - Grilling: Preheat your grill to medium-high. Skewer the steak bites and grill for about 2-3 minutes per side. - Oven-Baked: Preheat your oven to 400°F (200°C). Spread the steak bites on a baking sheet and cook for about 10 minutes. Both methods can bring out unique flavors in your steak! Marinades can add a lot of flavor to your steak. Simple ones work best for keto. - Garlic and Herb Marinade: Mix olive oil, minced garlic, and herbs. Let the steak marinate for at least 30 minutes. - Spicy Marinade: Combine olive oil, chili flakes, and lime juice for heat. For butter blends, consider adding herbs like parsley or chives. Mix them with your melted butter for a tasty drizzle over the steak. To store leftovers, let the steak bites cool down. Place them in a container with a tight lid. Use a glass or plastic container to keep them fresh. The steak bites stay good for up to three days in the fridge. For freezing, use freezer-safe containers. Make sure to leave space for expansion. You can freeze the steak bites for up to three months. To thaw, place the container in the fridge overnight. This helps keep the texture nice. Reheat steak bites in a skillet over low heat. Add a little butter or broth to keep them moist. Heat for about five minutes, stirring often. This method helps avoid dryness. You can also use a microwave on medium power. Heat for 30-second intervals, checking often. Yes, you can use chicken. Chicken thighs work best for this dish. They stay moist and tender. Cut them into bite-sized pieces just like the steak. Season them the same way you would the steak. Cook them until they reach 165°F for safety. To make this dish dairy-free, use olive oil instead of butter. You can also try avocado oil for a rich flavor. For a buttery taste, try dairy-free butter. Look for brands that fit your diet needs. This dish is high in protein and low in carbs. The steak provides healthy fats and amino acids. Broccoli adds fiber and vitamins. Overall, it fits well into a keto diet. Each serving has around 25 grams of protein and 5 grams of carbs. To keep the steak tender, choose a good cut like sirloin. Don’t overcook it; aim for medium doneness. Let the steak rest after cooking. This helps juices stay inside the meat. Slice against the grain to ensure each bite is tender. This blog post covered a tasty steak recipe, its key ingredients, and cooking steps. You learned how to season and cook the steak perfectly while pairing it with tender broccoli. Remember, the right herbs and cooking methods can enhance your meal. Explore variations for different flavors and storage tips for leftovers. By following these steps, you can create a delicious dish that suits your taste. Enjoy your cooking journey and keep experimenting with new flavors!

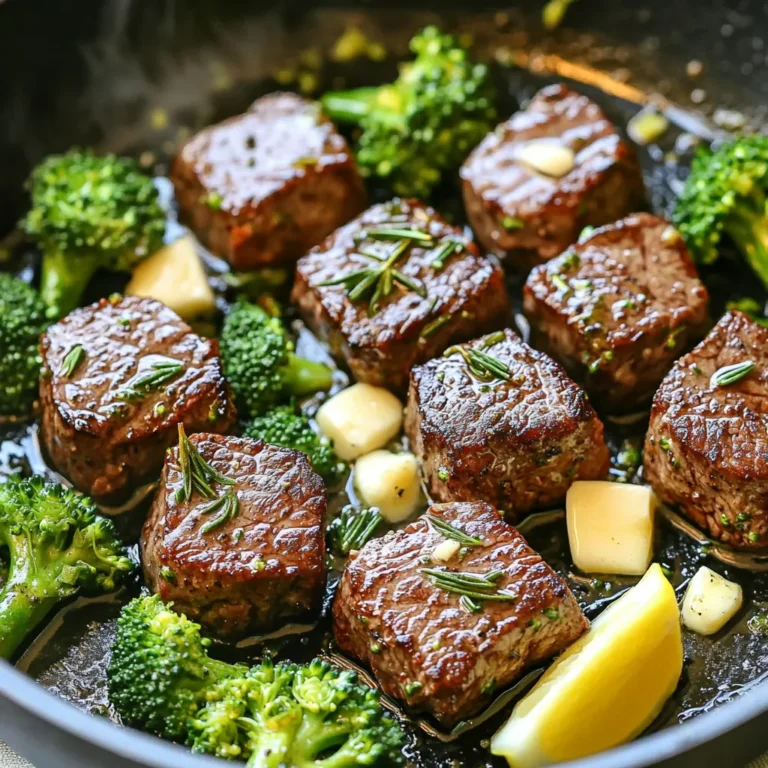
Keto Garlic Butter Steak Bites Skillet Delight

PREV 1 … 11 12 13 … 52 NEXT
cozy citrus kitchen

explore

DessertsDinnerAppetizersDrinks

Our Policies

  • Cookie Policy
  • Copyright Policy
  • Disclaimer
  • GDPR Policy
  • Terms Of Use
Back to Top
  • About
  • Contact Us
  • Privacy Policy
© 2025 cozy citrus kitchen