
Looking for a sweet treat that’s easy to make? You’re in the right place! My No Bake Strawberry Cheesecake Bars are a delightful way to satisfy your dessert cravings without turning on the oven. With simple ingredients and quick steps, you can whip up these creamy bars in no time. Let’s dive into the recipe and learn how to create this delicious dessert that everyone will love!

Ingredients
List of Ingredients
To make no bake strawberry cheesecake bars, gather these simple items:
– 1 ½ cups graham cracker crumbs
– ⅓ cup granulated sugar
– ½ cup unsalted butter, melted
– 16 oz cream cheese, softened
– 1 cup powdered sugar
– 1 teaspoon vanilla extract
– 1 cup heavy whipping cream
– 1 ½ cups fresh strawberries, pureed
– 1 tablespoon lemon juice
– Fresh strawberries for topping
Ingredient Substitutions
You can easily swap some ingredients to fit your needs. Here are a few ideas:
– Use cookie crumbs instead of graham crackers for a different flavor.
– Replace granulated sugar with coconut sugar for a more natural option.
– If you want a lighter option, use low-fat cream cheese.
– You can use whipped topping instead of heavy cream for a quicker recipe.
– Try using lemon zest instead of lemon juice for a zesty twist.
Tips for Selecting Fresh Strawberries
Choosing the best strawberries makes a big difference in flavor. Here are some tips:
– Look for bright red strawberries with no green or white spots.
– Check for firmness; they should not be soft or mushy.
– Smell them! Fresh strawberries have a sweet aroma.
– Choose berries with healthy green tops. Avoid dried or brown leaves.
– Buy organic strawberries when possible to avoid pesticides.
These tips will help you create the perfect strawberry cheesecake bars.
Step-by-Step Instructions
Preparation of the Graham Cracker Crust
To start, gather your graham cracker crumbs, sugar, and melted butter. You need 1 ½ cups of graham cracker crumbs and ⅓ cup of granulated sugar. Mix these in a large bowl. Add ½ cup of melted unsalted butter to the crumbs. Stir until the mixture feels like wet sand.
Next, take a lined 9×9 inch baking dish. Press the crumb mix firmly into the bottom. I use the back of a measuring cup to make it even. This will form a solid crust. Place the dish in the fridge for 10 minutes. This helps the crust set and hold its shape.
Making the Cheesecake Filling
In another bowl, beat 16 oz of softened cream cheese until it is smooth. This step is key for a creamy filling. Gradually add 1 cup of powdered sugar and 1 teaspoon of vanilla extract. Mix these well until combined.
Now, take a separate bowl and whip 1 cup of heavy cream. Beat it until stiff peaks form. This gives the cheesecake a light texture. Gently fold the whipped cream into the cream cheese mix. Be careful not to deflate the whipped cream.
Next, mix 1 ½ cups of pureed fresh strawberries with 1 tablespoon of lemon juice. Fold this into the cheesecake mixture. The strawberries add flavor and color.
Assembling the Bars
Now it’s time to put it all together. Spread the strawberry cheesecake filling over your prepared crust. Use a spatula to smooth the top. Make sure it’s even for a nice finish.
Refrigerate the bars for at least 4 hours. For the best results, let them chill overnight. Once set, lift the bars from the dish using the parchment paper. Cut them into squares.
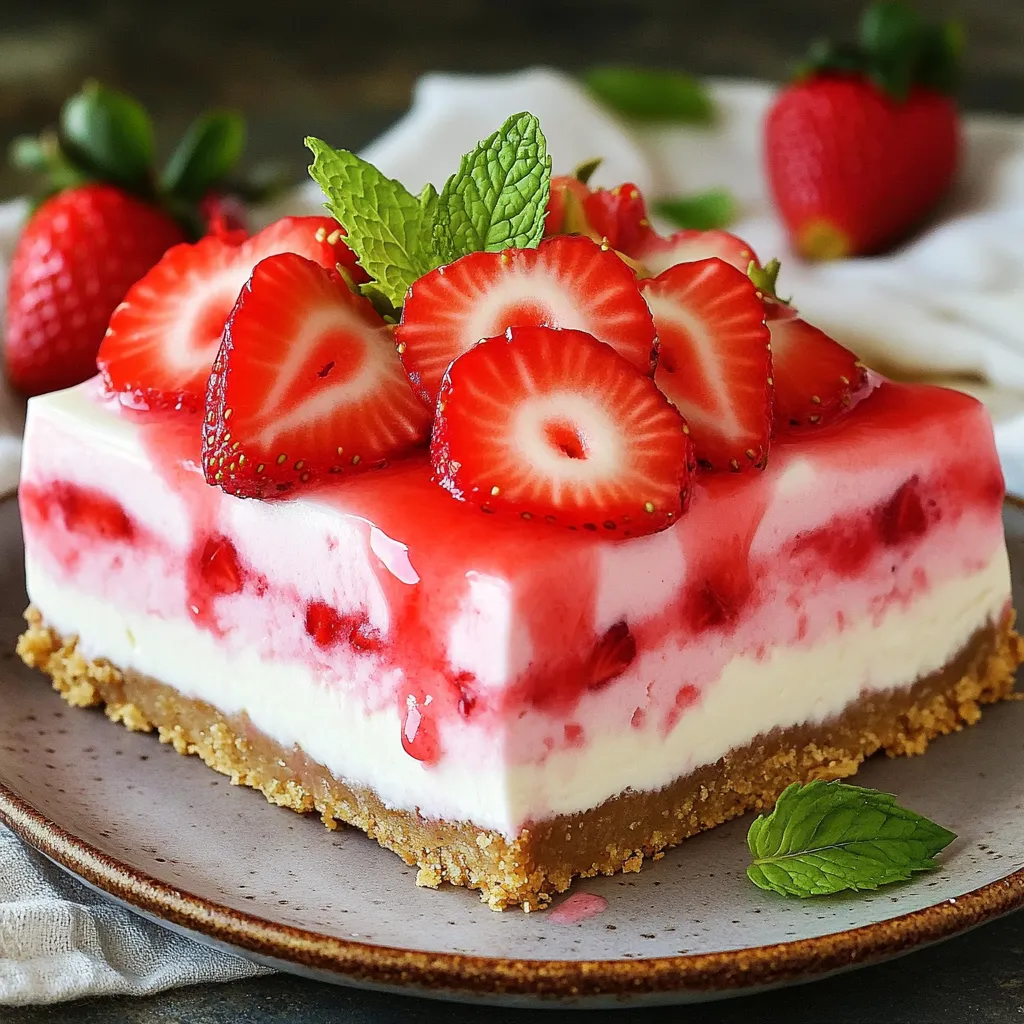
Top each bar with fresh strawberry slices before serving. This adds a lovely pop of color and extra flavor. Enjoy your delightful no-bake strawberry cheesecake bars!
Tips & Tricks
Common Mistakes to Avoid
When making no-bake strawberry cheesecake bars, avoid these common mistakes:
– Overmixing the cheesecake: This can lead to a dense texture. Mix just until smooth.
– Skipping the chilling time: Chilling is key for the bars to set properly. Don’t rush this step.
– Not pressing the crust firmly: A loose crust will fall apart. Make sure it’s well packed.
Best Practices for Whipping Cream
Whipping cream gives your cheesecake its light texture. Here are some tips:
– Use cold equipment: Chill your bowl and beaters in the freezer for about 10 minutes.
– Start slow: Begin mixing on low speed to avoid splatters. Gradually increase to medium-high.
– Watch for stiff peaks: Stop mixing as soon as you see stiff peaks form. Overwhipping can turn it into butter.
Techniques for Fold Efficiency
Folding is crucial to keep the air in the whipped cream. Follow these steps:
– Use a spatula: A rubber spatula works best for folding without deflating the cream.
– Add whipped cream gradually: Start with a small amount of cream cheese mixture. This helps to lighten the heavier mixture.
– Fold gently: Use a scooping motion, and turn the bowl as you fold. This keeps the mixture airy and light.
Variations
Alternative Fruit Options
You can easily mix up the fruit in this recipe. Instead of strawberries, use blueberries, raspberries, or peaches. Each fruit adds a new twist. For blueberries, mash them slightly before mixing. For raspberries, you might want to strain the seeds. Peaches can be pureed. All these fruits will taste great!
Gluten-Free Substitutions
Want to make this treat gluten-free? Swap the graham cracker crumbs for gluten-free crumbs. You can find these at most stores. Just check the label to ensure they are safe. Use a gluten-free butter for the crust too. This way, everyone can enjoy these bars without worry.
Vegan Version of Strawberry Cheesecake Bars
To make a vegan version, replace cream cheese with cashew cream. You make cashew cream by soaking cashews and blending them with a bit of lemon juice and maple syrup. Use coconut cream instead of heavy cream for a rich texture. Check that your graham crackers are vegan-friendly. Now, you have a delicious dessert for all!
Storage Info
Best Ways to Store Leftovers
To store your no bake strawberry cheesecake bars, place them in an airtight container. Use parchment paper to separate layers if needed. This prevents sticking and keeps them fresh. Keep the container in the fridge for best results. This will maintain the creamy texture. If you have extra strawberries, store them separately to avoid sogginess.
Freezing Instructions
You can freeze these cheesecake bars, too! Cut them into squares first. Wrap each piece tightly in plastic wrap. Then, place them in a freezer-safe bag. This helps protect them from freezer burn. They can last in the freezer for up to three months. When ready to eat, let them thaw in the fridge overnight.
How Long They Last in the Fridge
In the fridge, these cheesecake bars last about five days. Make sure they stay covered to keep them fresh. If you notice any changes in texture or smell, it’s best to toss them. Enjoy your delicious treat within this time to savor the flavors at their best!
FAQs
Can I make these bars ahead of time?
Yes, you can make these bars ahead of time. They actually taste better when chilled overnight. Make them a day before your event for the best flavor and texture. Just keep them in the fridge until you’re ready to serve. This lets the flavors blend nicely and makes them easier to cut.
How do I cut the cheesecake bars neatly?
To cut the cheesecake bars neatly, use a sharp knife. First, chill the bars until they are firm. Then, dip the knife in warm water and wipe it dry. This helps the knife glide through the bars. Cut straight down without sawing back and forth. Clean the knife after each cut for clean edges.
What can I serve with no-bake strawberry cheesecake bars?
These bars pair well with many tasty treats. Consider serving them with fresh whipped cream or a scoop of vanilla ice cream. A drizzle of chocolate sauce can add a nice touch, too. You can also serve them with fresh fruit like berries or mint leaves for a pop of color and flavor.
This blog post covered all you need for strawberry cheesecake bars. We explored ingredients, step-by-step instructions, and storage tips. We also shared common mistakes and delicious variations. You can now create your own tasty treats with ease. Remember to pick fresh strawberries and follow the tips for success. Enjoy making your dessert, and don’t forget to store any leftovers properly. Happy baking!
