No-Bake Chocolate Peanut Butter Bars Easy Delight

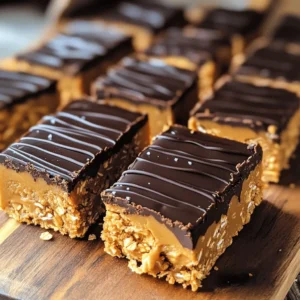
Craving a sweet treat that’s easy to make and hard to resist? You’re in luck! These No-Bake Chocolate Peanut Butter Bars are a quick delight that even kids can help with. With just a handful of simple ingredients, you can whip up a delicious dessert in no time. Let’s dive into how to make these tasty bars that satisfy your sweet tooth without turning on the oven!

- 1 cup natural peanut butter (creamy or crunchy) - 1/2 cup honey or maple syrup - 1 cup rolled oats - 1/2 cup ground flaxseed - 1/2 cup dark chocolate chips - 1 teaspoon vanilla extract - A pinch of salt Each ingredient plays a key role in this no-bake treat. Peanut butter gives a rich taste and smooth texture. Honey or maple syrup adds the right amount of sweetness. Rolled oats bring fiber and help bind the mixture. Ground flaxseed is a great source of omega-3s and adds nutrition. Dark chocolate chips give a sweet, creamy layer on top. Vanilla extract boosts the flavor, while salt balances the sweetness. Together, these ingredients create a delicious and satisfying snack. You can easily adapt this recipe to fit your needs. For a vegan option, use maple syrup instead of honey. If you're nut-free, try sun butter or soy nut butter. You can swap rolled oats for gluten-free oats if needed. If you prefer a different sweetener, agave syrup works well too. Feel free to change the chocolate chips to white or milk chocolate, depending on your taste. Each swap can give you a new twist on this classic treat. Start by grabbing a medium bowl. Add 1 cup of natural peanut butter and 1/2 cup of honey or maple syrup. Mix them well until the blend is smooth. Next, include 1 cup of rolled oats, 1/2 cup of ground flaxseed, 1 teaspoon of vanilla extract, and a pinch of salt. Stir until everything forms a sticky dough. This dough is the base of your bars. For the topping, use a small microwave-safe bowl. Place 1/2 cup of dark chocolate chips in it. Heat the bowl in the microwave in 30-second bursts. Stir after each interval. Keep doing this until the chocolate melts and is smooth. This melted chocolate will give your bars a rich finish. Line an 8x8-inch baking pan with parchment paper. Make sure the paper hangs over the sides. This helps with easy removal later. Now, take your sticky mixture and transfer it into the pan. Press it down evenly using a spatula or your hands. It is key to pack it tightly. A firm base ensures your bars stay together. To get the right texture, combine the peanut butter and honey well. This mix should be smooth with no lumps. Adding rolled oats and flaxseed makes the bars chewy and hearty. Press the mixture tightly into the pan. This step helps the bars hold together. When you pour the melted chocolate on top, spread it evenly. This gives a nice finish. To keep your bars fresh, wrap them in plastic wrap or foil. You can also use an airtight container. Store them in the fridge for the best taste. They will stay good for about a week. For longer storage, freeze them. Just make sure to separate layers with parchment paper. This prevents sticking. These bars shine as a snack or dessert. Cut them into squares for easy serving. You can also drizzle extra chocolate on top for a treat. Try adding some chopped nuts or dried fruit for more flavor. Serve with a glass of milk or coffee for a perfect pairing. Enjoy sharing them with friends or family! {{image_2}} If you want a nut-free treat, swap peanut butter for sun butter. Sun butter tastes great and has a similar texture. You can also use soy nut butter or pumpkin seed butter. These swaps keep the bars safe for nut allergies. You can make these bars even more fun by adding mix-ins. Try adding chopped nuts, like almonds or walnuts, for crunch. Dried fruit, like cranberries or raisins, gives a nice sweet bite. Just fold in your chosen mix-ins after combining the main ingredients. You can change the chocolate type for a new flavor. Use milk chocolate chips for a sweeter taste. White chocolate adds a creamy touch and looks pretty too. Just melt and pour over the mixture as you would with dark chocolate. To keep your no-bake chocolate peanut butter bars fresh, store them in an airtight container. You can use a glass or plastic container with a tight lid. Parchment paper helps to separate the layers if you stack them. This way, they won’t stick together. These bars stay tasty in the fridge for about one week. The cool air helps keep them firm and fresh. If you see any signs of spoilage, like an off smell or change in color, it’s best to toss them out. You can freeze these bars for up to three months. To do this, cut them into squares. Wrap each piece in plastic wrap, then place them in a freezer bag. When you want a snack, just take one out and let it thaw in the fridge. Enjoy the deliciousness later! Yes, you can use other sweeteners. Maple syrup works well too. Honey adds a nice taste. You can also try agave syrup. Each sweetener gives a unique flavor. Just keep the amount the same. I prefer natural peanut butter for its taste. Creamy or crunchy is your choice. Creamy gives a smooth texture. Crunchy adds a fun bite. Look for a brand with no added sugar or oils. The bars will feel firm to the touch. They should not be sticky. After chilling for 1-2 hours, check them. If they hold their shape, they are ready. You can also use a knife to test the edges. Yes, these bars offer good nutrition. They have protein from peanut butter. Oats provide fiber, which is great for digestion. Flaxseed adds omega-3 fatty acids. Just watch your portion sizes, as they are still a treat. In this blog post, we explored key ingredients and their roles in your recipe. I provided step-by-step instructions for easy preparation, from melting chocolate to pressing the mixture. You now have tips for perfect texture and freshness, along with varied options for dietary needs. Remember, taste and texture can change with mix-ins. Finally, proper storage ensures your bars stay fresh. With this guide, you can create delicious bars that suit any preference. Enjoy experimenting with flavors and have fun!

Ingredients

List of All Ingredients

– 1 cup natural peanut butter (creamy or crunchy)

– 1/2 cup honey or maple syrup

– 1 cup rolled oats

– 1/2 cup ground flaxseed

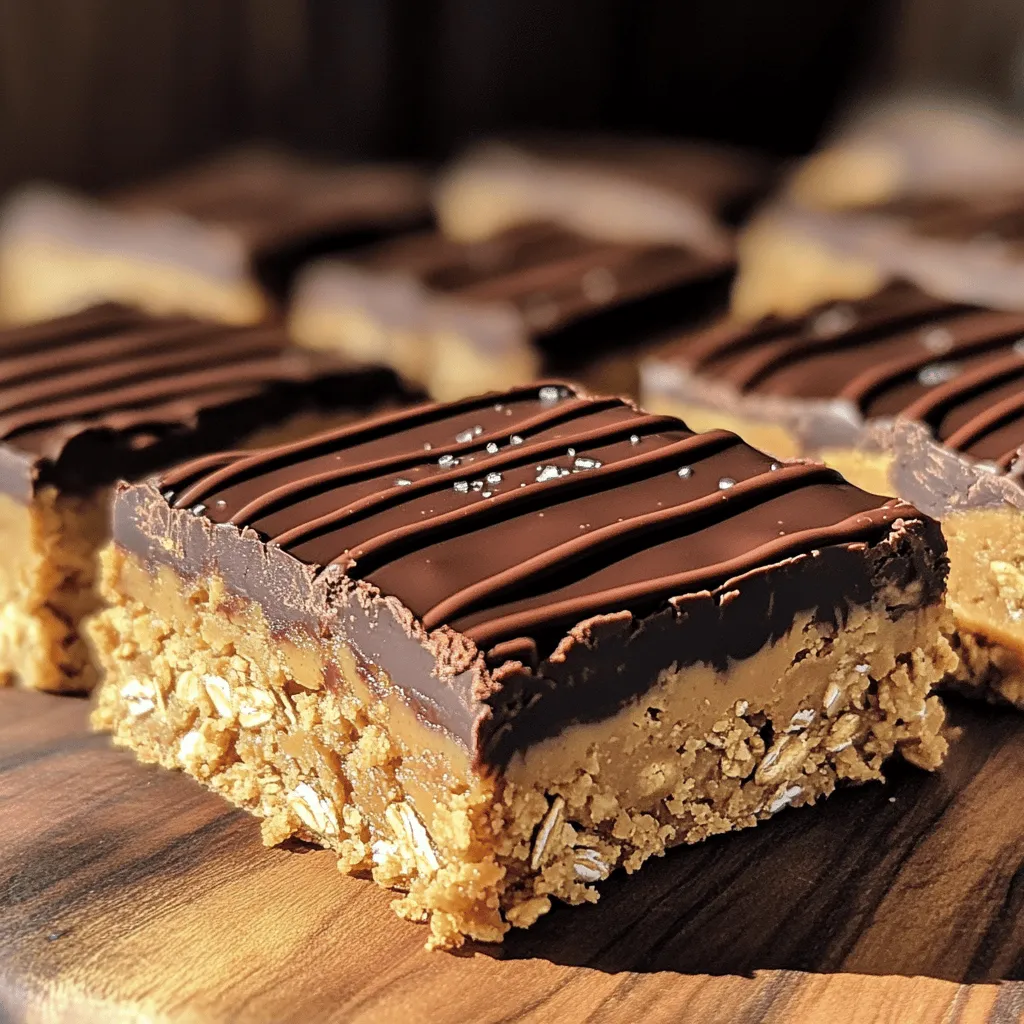
– 1/2 cup dark chocolate chips

– 1 teaspoon vanilla extract

– A pinch of salt

Importance of Each Ingredient

Each ingredient plays a key role in this no-bake treat. Peanut butter gives a rich taste and smooth texture. Honey or maple syrup adds the right amount of sweetness. Rolled oats bring fiber and help bind the mixture. Ground flaxseed is a great source of omega-3s and adds nutrition. Dark chocolate chips give a sweet, creamy layer on top. Vanilla extract boosts the flavor, while salt balances the sweetness. Together, these ingredients create a delicious and satisfying snack.

Substitutions for Dietary Preferences

You can easily adapt this recipe to fit your needs. For a vegan option, use maple syrup instead of honey. If you’re nut-free, try sun butter or soy nut butter. You can swap rolled oats for gluten-free oats if needed. If you prefer a different sweetener, agave syrup works well too. Feel free to change the chocolate chips to white or milk chocolate, depending on your taste. Each swap can give you a new twist on this classic treat.

Step-by-Step Instructions

Preparation Process

Start by grabbing a medium bowl. Add 1 cup of natural peanut butter and 1/2 cup of honey or maple syrup. Mix them well until the blend is smooth. Next, include 1 cup of rolled oats, 1/2 cup of ground flaxseed, 1 teaspoon of vanilla extract, and a pinch of salt. Stir until everything forms a sticky dough. This dough is the base of your bars.

Melting the Chocolate

For the topping, use a small microwave-safe bowl. Place 1/2 cup of dark chocolate chips in it. Heat the bowl in the microwave in 30-second bursts. Stir after each interval. Keep doing this until the chocolate melts and is smooth. This melted chocolate will give your bars a rich finish.

Tips for Pressing the Mixture

Line an 8×8-inch baking pan with parchment paper. Make sure the paper hangs over the sides. This helps with easy removal later. Now, take your sticky mixture and transfer it into the pan. Press it down evenly using a spatula or your hands. It is key to pack it tightly. A firm base ensures your bars stay together.

Tips & Tricks

Achieving the Perfect Texture

To get the right texture, combine the peanut butter and honey well. This mix should be smooth with no lumps. Adding rolled oats and flaxseed makes the bars chewy and hearty. Press the mixture tightly into the pan. This step helps the bars hold together. When you pour the melted chocolate on top, spread it evenly. This gives a nice finish.

How to Store for Freshness

To keep your bars fresh, wrap them in plastic wrap or foil. You can also use an airtight container. Store them in the fridge for the best taste. They will stay good for about a week. For longer storage, freeze them. Just make sure to separate layers with parchment paper. This prevents sticking.

Serving Suggestions

These bars shine as a snack or dessert. Cut them into squares for easy serving. You can also drizzle extra chocolate on top for a treat. Try adding some chopped nuts or dried fruit for more flavor. Serve with a glass of milk or coffee for a perfect pairing. Enjoy sharing them with friends or family!

Variations

Nut-Free Option

If you want a nut-free treat, swap peanut butter for sun butter. Sun butter tastes great and has a similar texture. You can also use soy nut butter or pumpkin seed butter. These swaps keep the bars safe for nut allergies.

Adding Mix-ins

You can make these bars even more fun by adding mix-ins. Try adding chopped nuts, like almonds or walnuts, for crunch. Dried fruit, like cranberries or raisins, gives a nice sweet bite. Just fold in your chosen mix-ins after combining the main ingredients.

Different Chocolate Options

You can change the chocolate type for a new flavor. Use milk chocolate chips for a sweeter taste. White chocolate adds a creamy touch and looks pretty too. Just melt and pour over the mixture as you would with dark chocolate.

Storage Info

Best Storage Practices

To keep your no-bake chocolate peanut butter bars fresh, store them in an airtight container. You can use a glass or plastic container with a tight lid. Parchment paper helps to separate the layers if you stack them. This way, they won’t stick together.

How Long They Last in the Fridge

These bars stay tasty in the fridge for about one week. The cool air helps keep them firm and fresh. If you see any signs of spoilage, like an off smell or change in color, it’s best to toss them out.

Freezing Instructions

You can freeze these bars for up to three months. To do this, cut them into squares. Wrap each piece in plastic wrap, then place them in a freezer bag. When you want a snack, just take one out and let it thaw in the fridge. Enjoy the deliciousness later!

FAQs

Can I use a different sweetener?

Yes, you can use other sweeteners. Maple syrup works well too. Honey adds a nice taste. You can also try agave syrup. Each sweetener gives a unique flavor. Just keep the amount the same.

What type of peanut butter is best?

I prefer natural peanut butter for its taste. Creamy or crunchy is your choice. Creamy gives a smooth texture. Crunchy adds a fun bite. Look for a brand with no added sugar or oils.

How do I know when they are set?

The bars will feel firm to the touch. They should not be sticky. After chilling for 1-2 hours, check them. If they hold their shape, they are ready. You can also use a knife to test the edges.

Are these bars healthy?

Yes, these bars offer good nutrition. They have protein from peanut butter. Oats provide fiber, which is great for digestion. Flaxseed adds omega-3 fatty acids. Just watch your portion sizes, as they are still a treat.

In this blog post, we explored key ingredients and their roles in your recipe. I provided step-by-step instructions for easy preparation, from melting chocolate to pressing the mixture. You now have tips for perfect texture and freshness, along with varied options for dietary needs. Remember, taste and texture can change with mix-ins. Finally, proper storage ensures your bars stay fresh. With this guide, you can create delicious bars that suit any preference. Enjoy experimenting with flavors and have fun!

- 1 cup natural peanut butter (creamy or crunchy) - 1/2 cup honey or maple syrup - 1 cup rolled oats - 1/2 cup ground flaxseed - 1/2 cup dark chocolate chips - 1 teaspoon vanilla extract - A pinch of salt Each ingredient plays a key role in this no-bake treat. Peanut butter gives a rich taste and smooth texture. Honey or maple syrup adds the right amount of sweetness. Rolled oats bring fiber and help bind the mixture. Ground flaxseed is a great source of omega-3s and adds nutrition. Dark chocolate chips give a sweet, creamy layer on top. Vanilla extract boosts the flavor, while salt balances the sweetness. Together, these ingredients create a delicious and satisfying snack. You can easily adapt this recipe to fit your needs. For a vegan option, use maple syrup instead of honey. If you're nut-free, try sun butter or soy nut butter. You can swap rolled oats for gluten-free oats if needed. If you prefer a different sweetener, agave syrup works well too. Feel free to change the chocolate chips to white or milk chocolate, depending on your taste. Each swap can give you a new twist on this classic treat. Start by grabbing a medium bowl. Add 1 cup of natural peanut butter and 1/2 cup of honey or maple syrup. Mix them well until the blend is smooth. Next, include 1 cup of rolled oats, 1/2 cup of ground flaxseed, 1 teaspoon of vanilla extract, and a pinch of salt. Stir until everything forms a sticky dough. This dough is the base of your bars. For the topping, use a small microwave-safe bowl. Place 1/2 cup of dark chocolate chips in it. Heat the bowl in the microwave in 30-second bursts. Stir after each interval. Keep doing this until the chocolate melts and is smooth. This melted chocolate will give your bars a rich finish. Line an 8x8-inch baking pan with parchment paper. Make sure the paper hangs over the sides. This helps with easy removal later. Now, take your sticky mixture and transfer it into the pan. Press it down evenly using a spatula or your hands. It is key to pack it tightly. A firm base ensures your bars stay together. To get the right texture, combine the peanut butter and honey well. This mix should be smooth with no lumps. Adding rolled oats and flaxseed makes the bars chewy and hearty. Press the mixture tightly into the pan. This step helps the bars hold together. When you pour the melted chocolate on top, spread it evenly. This gives a nice finish. To keep your bars fresh, wrap them in plastic wrap or foil. You can also use an airtight container. Store them in the fridge for the best taste. They will stay good for about a week. For longer storage, freeze them. Just make sure to separate layers with parchment paper. This prevents sticking. These bars shine as a snack or dessert. Cut them into squares for easy serving. You can also drizzle extra chocolate on top for a treat. Try adding some chopped nuts or dried fruit for more flavor. Serve with a glass of milk or coffee for a perfect pairing. Enjoy sharing them with friends or family! {{image_2}} If you want a nut-free treat, swap peanut butter for sun butter. Sun butter tastes great and has a similar texture. You can also use soy nut butter or pumpkin seed butter. These swaps keep the bars safe for nut allergies. You can make these bars even more fun by adding mix-ins. Try adding chopped nuts, like almonds or walnuts, for crunch. Dried fruit, like cranberries or raisins, gives a nice sweet bite. Just fold in your chosen mix-ins after combining the main ingredients. You can change the chocolate type for a new flavor. Use milk chocolate chips for a sweeter taste. White chocolate adds a creamy touch and looks pretty too. Just melt and pour over the mixture as you would with dark chocolate. To keep your no-bake chocolate peanut butter bars fresh, store them in an airtight container. You can use a glass or plastic container with a tight lid. Parchment paper helps to separate the layers if you stack them. This way, they won’t stick together. These bars stay tasty in the fridge for about one week. The cool air helps keep them firm and fresh. If you see any signs of spoilage, like an off smell or change in color, it’s best to toss them out. You can freeze these bars for up to three months. To do this, cut them into squares. Wrap each piece in plastic wrap, then place them in a freezer bag. When you want a snack, just take one out and let it thaw in the fridge. Enjoy the deliciousness later! Yes, you can use other sweeteners. Maple syrup works well too. Honey adds a nice taste. You can also try agave syrup. Each sweetener gives a unique flavor. Just keep the amount the same. I prefer natural peanut butter for its taste. Creamy or crunchy is your choice. Creamy gives a smooth texture. Crunchy adds a fun bite. Look for a brand with no added sugar or oils. The bars will feel firm to the touch. They should not be sticky. After chilling for 1-2 hours, check them. If they hold their shape, they are ready. You can also use a knife to test the edges. Yes, these bars offer good nutrition. They have protein from peanut butter. Oats provide fiber, which is great for digestion. Flaxseed adds omega-3 fatty acids. Just watch your portion sizes, as they are still a treat. In this blog post, we explored key ingredients and their roles in your recipe. I provided step-by-step instructions for easy preparation, from melting chocolate to pressing the mixture. You now have tips for perfect texture and freshness, along with varied options for dietary needs. Remember, taste and texture can change with mix-ins. Finally, proper storage ensures your bars stay fresh. With this guide, you can create delicious bars that suit any preference. Enjoy experimenting with flavors and have fun!

No-Bake Chocolate Peanut Butter Bars

Indulge in these decadent no-bake chocolate peanut butter bars that are as easy to make as they are delicious! With just a handful of wholesome ingredients, including creamy peanut butter, rolled oats, and rich dark chocolate, you'll have a guilt-free treat ready in no time. Perfect for a sweet snack or dessert, click through to explore the full recipe and satisfy your cravings today!

Ingredients
  

1 cup natural peanut butter (creamy or crunchy)

1/2 cup honey or maple syrup

1 cup rolled oats

1/2 cup ground flaxseed

1/2 cup dark chocolate chips

1 teaspoon vanilla extract

A pinch of salt

Instructions
 

In a medium bowl, combine the peanut butter and honey (or maple syrup) until well-blended and smooth.

    Add the rolled oats, ground flaxseed, vanilla extract, and a pinch of salt to the peanut butter mixture. Stir until all ingredients are fully combined and form a sticky dough.

      Line an 8x8-inch baking pan with parchment paper, leaving some overhang for easy removal.

        Transfer the mixture into the prepared pan and press it down evenly using a spatula or your hands to ensure it’s tightly packed.

          In a small microwave-safe bowl, melt the dark chocolate chips in 30-second intervals, stirring in between, until smooth.

            Pour the melted chocolate over the pressed mixture, spreading it out evenly with a spatula.

              Place the pan in the refrigerator for about 1-2 hours, or until the bars are set and firm.

                Once set, lift the bars out of the pan using the parchment paper overhang. Cut into squares or rectangles as desired.

                  Prep Time: 15 minutes | Total Time: 2 hours (including chilling time) | Servings: 12 bars